- Home
- Photoshop ecosystem
- Discussions
- Betreff: Spread 600 files on workbench without ove...
- Betreff: Spread 600 files on workbench without ove...
Copy link to clipboard
Copied
Hello everyone,
I need to import 600 images per day (12 kb .png on average, small images, but massive quantity)...
I need to spread them on workbench without overlapping theses elements (edit : and keep power to move images one by one after have all spreading). >> Idealy spread and ajust spacing between images as if they were in a board with column and rows - and keep images files separatly in layers - will be great ! An interactive contact sheet is possible ? <<
Until now, I process like this for have theses files in differents layers :
File > Scripts > Load files into a stack > Browser (Selects files) > Press Ok
Then, I modify workplan size for have a large space but files in differents layers are overlap.
It's ennoying, I need repeat this operation every day with others files like this so it's laborious to make it one by one with hand.

Does anyone have the answer? I have maked a drawing in french for explain and screenshots for be more clearly.
Thanks for your help !
Best regards,
 1 Correct answer
This first script "combine_tiles_into_montage.jsx" will get you part of the way there, presuming each tile is the same canvas size:
https://www.andrewnoske.com/wiki/Adobe_Photoshop_-_Scripts_Related_to_Montaging
However it does not add a gutter/space between the files...
EDIT: It is easy to make a quick-n-dirty hack like follows on lines 46-47 to add say 25pt spacing (PostScript points are equivalent to pixels)
var tileWidth = firstTile.width + 25;
var tileHeight = firstTile.height + 2Explore related tutorials & articles
Copy link to clipboard
Copied
Have you tried-
Menu: File > Automate > Contact Sheet
Select a Folder of images-
Copy link to clipboard
Copied
Contact sheet method interests me because we can adjust the parameters but is it possible to align only theses files (layers) without creating a new image contact sheet image to keep power of moving each image (to the side) one by one with the mouse ?
>> like an interactive contact sheet ? <<
Thank you @WobertC !
Copy link to clipboard
Copied
If your images have different aspect ratios and sizes you can not align all you images. You could tile them using a particular tile size you would resize the images to fill the tile area and mask off any excess the images composition would be like a centered crop like you get when you have a print shop print your images a particular print size.
My paste image roll script can do that. Otherwise use contact sheet II all your images can not be aligned.
Copy link to clipboard
Copied
Maybe this script helps...
http://didoscripts.yolasite.com/resources/Inset%20Arrangment%202-2_D_EN.jsx
Load your layers into stack - run script...
Copy link to clipboard
Copied
I tried the scipt and the files are aligned on a single line with no space between them and files come out of work plan. Is it possible to modify this script and choose the spacing between images like a board with column and rows ?
If not, I can apply a grid that cuts around the images after contact sheet process like a cutting matrix, it will be an another option, but after that I hope that contact sheet is fractionned in differents files/layers to recover possibility to move them separly ?
Many thanks @Tom_Winkelmann
Copy link to clipboard
Copied
Sorry, forget the link to the tutorial...
https://www.youtube.com/watch?v=O4AYCAjZtqA&feature=emb_title
Copy link to clipboard
Copied
This first script "combine_tiles_into_montage.jsx" will get you part of the way there, presuming each tile is the same canvas size:
https://www.andrewnoske.com/wiki/Adobe_Photoshop_-_Scripts_Related_to_Montaging
However it does not add a gutter/space between the files...
EDIT: It is easy to make a quick-n-dirty hack like follows on lines 46-47 to add say 25pt spacing (PostScript points are equivalent to pixels)
var tileWidth = firstTile.width + 25;
var tileHeight = firstTile.height + 25;
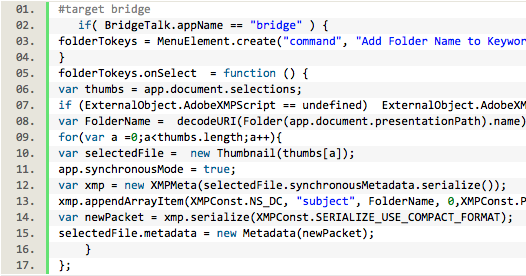
EDIT 2: You can also modify line 75 to remove the %20 characters in layer names to word spaces:
layer.name = files[i].name.replace(/%20/g, " ").slice(0,-4);
EDIT 3: And also line 51...
firstTile.layers[firstLayer].name = files[0].name.replace(/%20/g, " ").slice(0,-4);
Here is the original script in full, just in case the original site disappears sometime in the future:
// Assembles a folder full of ordered image tiles into a single montage image
// with each tile in a separate layer. Before processing and tile translation
// occurs, you will be prompted to enter the number of columns and whether
// tiles are ordered by x or y first. If possible, I recommend you name tiles
// like so: "my_tile_x=0&y=0.jpg". Tiles *should* work as any image type, but
// I have had trouble before with .png, so you may need to convert to .jpg.
// All tiles are added to the first tile, and then saved as a PSD (with one
// tile per layer) at the end.
//
// TIPS:
// > This has been tested up to 80x80 (256x256 pixel tiles), but over 30,000
//   in any dimension is not supported by all photoshop versions.
// > The final PSD won't save if > 2 GB (easily fixed by saving as a TIF)
// > Images can be different types, but certain image "modes", including
//   "Indexed" color, fail (fixed by Image > Mode > RGB Color).
#target photoshop

// Open folder selection dialog (for user to chose folder):
alert("You will be prompted for the folder containing your tiles.\n" +
      "Tiles should be named like 'x=10&y=4.jpg' so they sort well, " +
      "all of the identical dimension and the folder should contain " +
      "no other image files.");

var folder = Folder.selectDialog();
if (!folder) {alert("Cancelled"); exit;}

// Set units and guess the number of columns using square root:
var origUnits = app.preferences.rulerUnits;  // Can delete.
app.preferences.rulerUnits = Units.POINTS;
var files = folder.getFiles(/\.(jpg|jpeg|tif|tiff|bmp|png|eps)$/i);
files.sort();
var numColGuess = Math.ceil(Math.sqrt(files.length));

// Prompt the user to enter the number of columns and if x appears first:
var numCol = prompt("Found " + files.length + " images.\n" +
                    "How many columns are there?", numColGuess);
var numRows = Math.ceil(files.length / numCol);

var answer = prompt("Grid will be " + numCol + "x" + numRows + " tiles.\n" +
                    "Does x or y appear first in the filenames?", "x");
var orderedWithYFirst = (answer == "y" || answer == "Y");
if (!answer || numCol == 0 || numRows == 0) {alert("Bad values"); exit;}

// Open first file to determine dimensions:
var firstTile = app.open(File(files[0]));
var tileWidth = firstTile.width;
var tileHeight = firstTile.height;

// Resize first file to a size that will fit all tiles:
var firstLayer = firstTile.layers.length - 1;  // Most likely 0.
firstTile.layers[firstLayer].name = files[0].name.slice(0,-4);
firstTile.resizeCanvas(firstTile.width * numCol,
                        firstTile.height * numRows,
                        AnchorPosition.TOPLEFT);

// Zoom to fit whole image on screen:
doMenuItemNoInteraction = function(item) {
   var ref = new ActionReference();
   ref.putEnumerated(app.charIDToTypeID("Mn  "), app.charIDToTypeID("MnIt"), item);
   var desc = new ActionDescriptor();
   desc.putReference(app.charIDToTypeID("null"), ref);
   executeAction(app.stringIDToTypeID("select"), desc, DialogModes.NO);
}
doMenuItemNoInteraction(app.charIDToTypeID('FtOn')); // Fit all on screen.

// For each tile: open, transfer into a new layer, and re-position:
for (var i = 1; i < files.length; i++) {
  var tile = app.open(File(files[i]));
  if (tile.layers.length > 1) {
    tile.flatten();
  };
  tile.layers[0].duplicate(firstTile, ElementPlacement.PLACEATBEGINNING);
  tile.close(SaveOptions.DONOTSAVECHANGES);
  var layer = firstTile.layers[0];
  layer.name = files[i].name.slice(0,-4);  // Omit the file extension.
  // Determine current column and row:
  var col = Math.floor(i / numRows);
  var row = i - (col * numRows);
  if (orderedWithYFirst) {
    row = Math.floor(i / numCol);
    col = i - (row * numCol);
  }
  // Calculate the x/y offsets and translate image:
  var xOffset = (tileWidth * col) - layer.bounds[0];
  var yOffset = (tileHeight * row) - layer.bounds[1];
  layer.translate(xOffset, yOffset);
};

// Save as new file;
var basename = firstTile.name.match(/(.*)\.[^\.]+$/)[1];
var docPath = firstTile.path;
psdOpts = new PhotoshopSaveOptions();
psdOpts.embedColorProfile = true;
psdOpts.alphaChannels = false;
psdOpts.layers = true;
psdOpts.spotColors = true;
firstTile.saveAs((new File(docPath+'/'+basename.slice(0,-4)+"_comb.psd")),psdOpts,false);
app.preferences.rulerUnits = origUnits;
Comment out or remove the code block at the bottom if you don't wish to auto save.
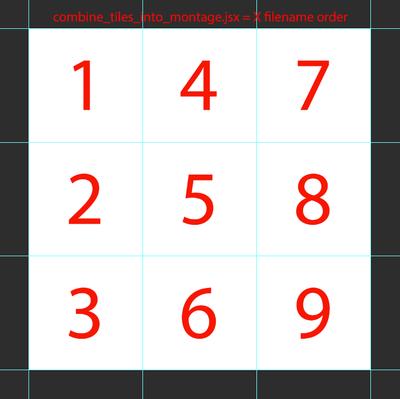
EDIT 4: Presuming nine separate input files named 1-9, here is the result of the input order when X is selected (vertical, left to right):
And here is the layout order when Y is selected (horizontal, left to right):
Copy link to clipboard
Copied
Many thanks @Stephen_A_Marsh I will to experimente what you've said in your post !
I'm a starter so I will take time for understand all theses informations.
I hope come back for click on correct answer !
See you
Copy link to clipboard
Copied
I'm pretty sure that it is exactly what you are looking for (if all your files are consistent sizes), however if you need the images to appear in a certain order then you will need to read the comments at the head of the script regarding file naming (Adobe Bridge's Batch Rename Tool may be a good choice).
As you are new to scripting, this may help when it comes to saving the raw code:
https://prepression.blogspot.com/2017/11/downloading-and-installing-adobe-scripts.html
Copy link to clipboard
Copied
This script do the job for increase my productivity many thanks ! I just modify lines 46-47 with theses values (+105 ;+20) to adapt big width images classification compared to their height with differents size between them, but in similar proportions :
line 46 : var tileWidth = firstTile.width + 105;
line 47 : var tileHeight = firstTile.height + 20;
I will try your EDIT 2 and 3 for see difference with but I feel already better
Bless you 😉
Copy link to clipboard
Copied
Hello, the script is really helpful.
I named my images to background_01.png up to background_300.png but somehow the script just jumps to 100 after 10. ignoring the 11-99 images
Find more inspiration, events, and resources on the new Adobe Community
Explore Now


