• Global community
    • Language:
      • Deutsch
      • English
      • Español
      • Français
      • Português
  • 日本語コミュニティ
    Dedicated community for Japanese speakers
  • 한국 커뮤니티
    Dedicated community for Korean speakers
Exit
4

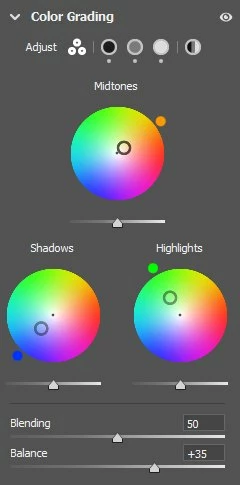
Color grading panel from ACR as an Adjustment layer
Enthusiast ,
Nov 29, 2022 Nov 29, 2022

Copy link to clipboard

Copied

IvanZayats_0-1669725519260.jpeg

Can we have the Color grading panel from ACR as an Adjustment layer in PS?


Now if we want to use it not for the raw processing at the beginning, but for the final image after retouching, we have to merge the layers, make a Smart object (to adjust the settings later if needed), open it in ACR... an Adjustment layer would be handy & time-saving 🙂


Idea No status
TOPICS
macOS , Windows

Views

742

Translate

Translate

Report

Report
Community guidelines
Be kind and respectful, give credit to the original source of content, and search for duplicates before posting. Learn more
community guidelines
12 Comments
Community Expert ,
Nov 29, 2022 Nov 29, 2022

Copy link to clipboard

Copied

That would be the Camera Raw Filter, not Adobe Camera Raw?

Votes

Translate

Translate

Report

Report
Community Expert ,
Nov 29, 2022 Nov 29, 2022

Copy link to clipboard

Copied

As Stephen implies, you can already do this as a smart Camera Raw filter. You don't need to reopen the file in the ACR processor.


I fully agree that, as re-editable adjustments go, adjustment layers are simpler and more convenient than smart filters. But considering that the functionality in question is already available in a slightly different form, it's hard to see this getting high priority. Unless a lot of people vote for it.

Votes

Translate

Translate

Report

Report
Enthusiast ,
Nov 30, 2022 Nov 30, 2022

Copy link to clipboard

Copied

@Stephen Marsh, @D Fosse, what's the difference? it's a pity, you don't vote...


Votes

Translate

Translate

Report

Report
Community Expert ,
Nov 30, 2022 Nov 30, 2022

Copy link to clipboard

Copied

The difference is that the Camera Raw filter is accessed from the Photoshop Filter menu and used on RGB files in Photoshop. It uses only a small subset of the ACR code. It can't process raw files.


The Camera Raw filter works just like any other filter, and like other filters it can be used as a re-editable Smart Filter.


acr_filter.png

The ACR processor is the full plugin, primarily used on raw files from a camera, and you open the file into ACR directly from the browser.

Votes

Translate

Translate

Report

Report
Enthusiast ,
Nov 30, 2022 Nov 30, 2022

Copy link to clipboard

Copied

I open raws by dragging them into PS, so I see NO difference

Votes

Translate

Translate

Report

Report
Community Expert ,
Nov 30, 2022 Nov 30, 2022

Copy link to clipboard

Copied

I didn't vote as I don't believe that this is technically possible in an adjustment layer, at least the same way as it works in the raw plug-in or in the filter. But hey, here's a vote! I'm not a programmer so I could be wrong. I haven't performed tests to see what benefits this would bring as an adjustment layer vs. existing adjustment options.

Votes

Translate

Translate

Report

Report
Community Expert ,
Nov 30, 2022 Nov 30, 2022

Copy link to clipboard

Copied

The filter works on rendered gamma-encoded RGB data.


The plugin works on unrendered, linear raw sensor data.

Votes

Translate

Translate

Report

Report
Enthusiast ,
Nov 30, 2022 Nov 30, 2022

Copy link to clipboard

Copied

what's impossible here? to color grade the shadows & highlights? hope, it's a joke

we can do this with the Curves, but color circles are more intuitive and easier, especially for beginners & amateurs. thanks for voting 🙂 

Votes

Translate

Translate

Report

Report
Community Expert ,
Nov 30, 2022 Nov 30, 2022

Copy link to clipboard

Copied

Edited... That can be done with say Color Balance, however, I agree that HSL may be more intuitive and that the GUI is more modern.


What I was saying is that the code base of ACR or the CR Filter may not work directly in an adjustment layer. I am not saying that the concept doesn't work or that a totally different code base couldn't work, with or without the exact same results.


One can't always transplant a feature from ACR and expect it to work the same elsewhere, exposure being a perfect example.


So, yes, even if not the same code or if it isn't "pixel perfect" an adjustment layer using such HSL controls would likely be welcomed by many.

Votes

Translate

Translate

Report

Report
Community Expert ,
Nov 30, 2022 Nov 30, 2022

Copy link to clipboard

Copied

I open raws by dragging them into PS, so I see NO difference

By @Ivan Zajats


Not a particularly good habit, for the simple reason that you don't know exactly what you're opening: it could be a thumbnail, a preview, a "proxy"/cache image kept by the application for fast access. Or it could be the full original file - but you don't know.


You just have to take our word for it: The ACR filter and the ACR processor are not the same thing.


And in any case Stephen hits the nail on the head: you can't just transfer a function from one codebase into another. They may not mean the same thing. It would have to be rewritten, so it's not necessarily a trivial task.


Don't get me wrong - I wouldn't mind the adjustment wheels in an adjustment layer. That would be nice. All I'm saying is to be realistic. It's not necessarily as simple as it sounds, and since the functionality is already available in another form, I'm not sure it will get high priority.

Votes

Translate

Translate

Report

Report
Enthusiast ,
Nov 30, 2022 Nov 30, 2022

Copy link to clipboard

Copied

always know what I'm drinking opening! I go to the raw folder, select the files and drag them to PS

I have no other files there and there's always clearly visible file extension in the filenames (.cr2)


it's offtop, let's discuss the color grading 🙂

Votes

Translate

Translate

Report

Report
Community Beginner ,
Feb 07, 2023 Feb 07, 2023

Copy link to clipboard

Copied

LATEST

I would find a color grading adjustment layer to be super convenient. I spend a lot of time retouching renderings and there are often a lot of layers and adjustments stacked up. It's very cumbersome to have to bounce back and forth between your file and the camera raw filter interface or plugin. Sometimes it's useful to do the color grading after making a lot of other adjustments, and to do this non-destructively we're having to put all of our layers into a single smart object and apply the filter to that which is even more cumbersome, especially since our files are often very large. I often end up using curves instead, but that interface is not very easy to use and takes a lot of practice to be able to visualize results without tons of tweaking.

Votes

Translate

Translate

Report

Report