Community Manager
April 5, 2023
Question

[Released] Now in beta: New ‘Settings’ tab in the Lumetri Color panel

  • April 5, 2023
  • 15 replies
  • 15788 views

Edit: This feature is now shipping in Premiere Pro v24. Thanks to everyone who provided feedback while it was in beta!


Note: since the message below was posed, we have updated the color settings user experience. Please refer to the post here for more information. 


With the latest update to Premiere Pro in Beta, we have made finding and using color settings easier. Color settings in the application are now in one place in the new ‘Settings’ tab in the Lumetri Color panel. So, if you want to quickly select the Media Color Space or add an Input LUT while editing and doing color correction, you can do so within the Lumetri Color panel without hunting for settings in different dialogs.

As an advanced user, you can find all color settings from ‘Auto Tone Map Media’ to ‘HDR Graphics White (Nits)’ across the application in one place to quickly update while color correcting and grading.


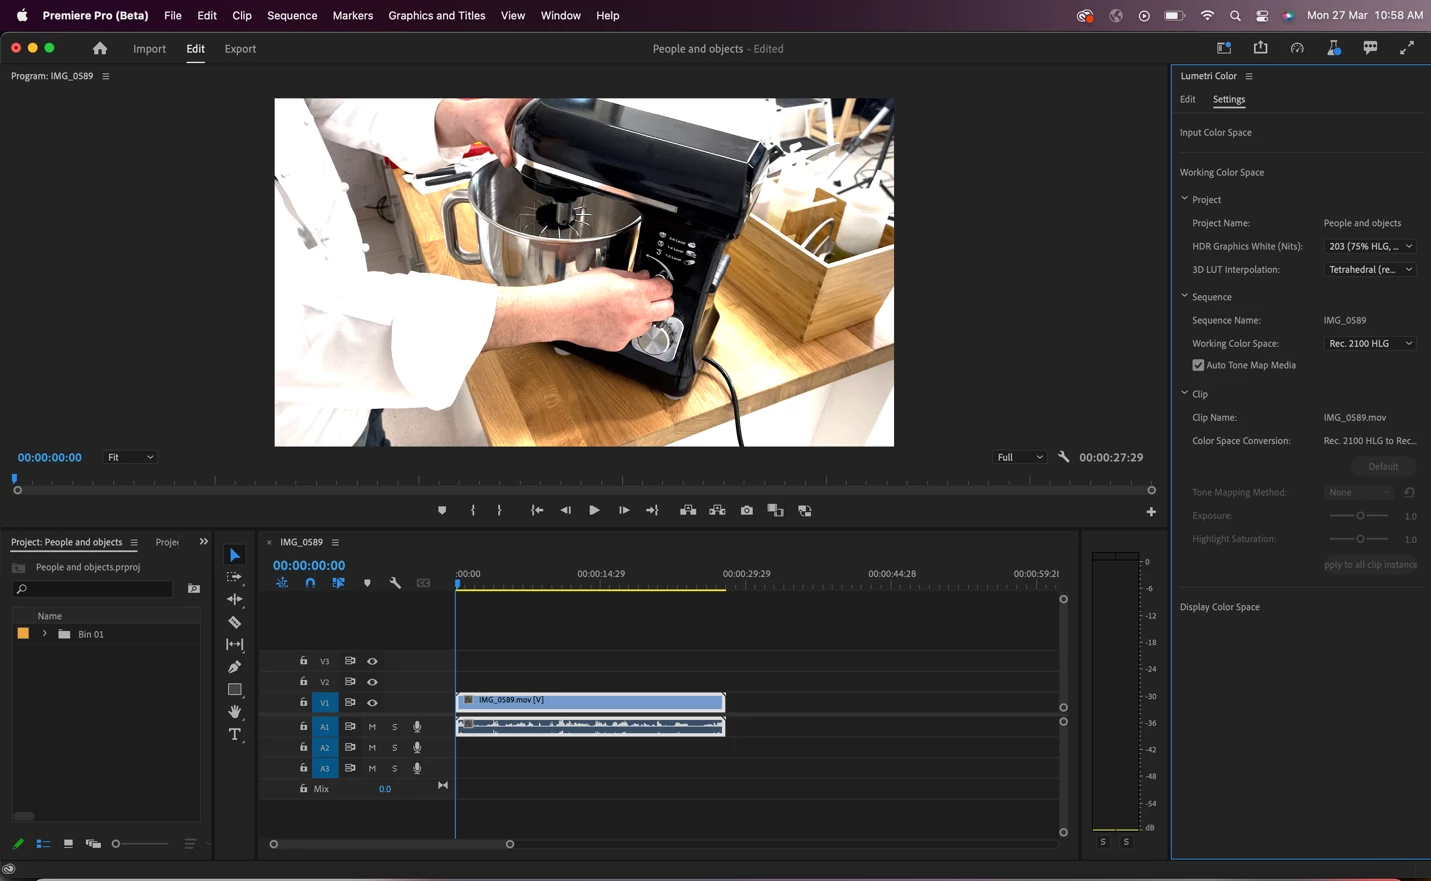
Screen above shows the Lumetri Color panel with the new ‘Settings’ tab.


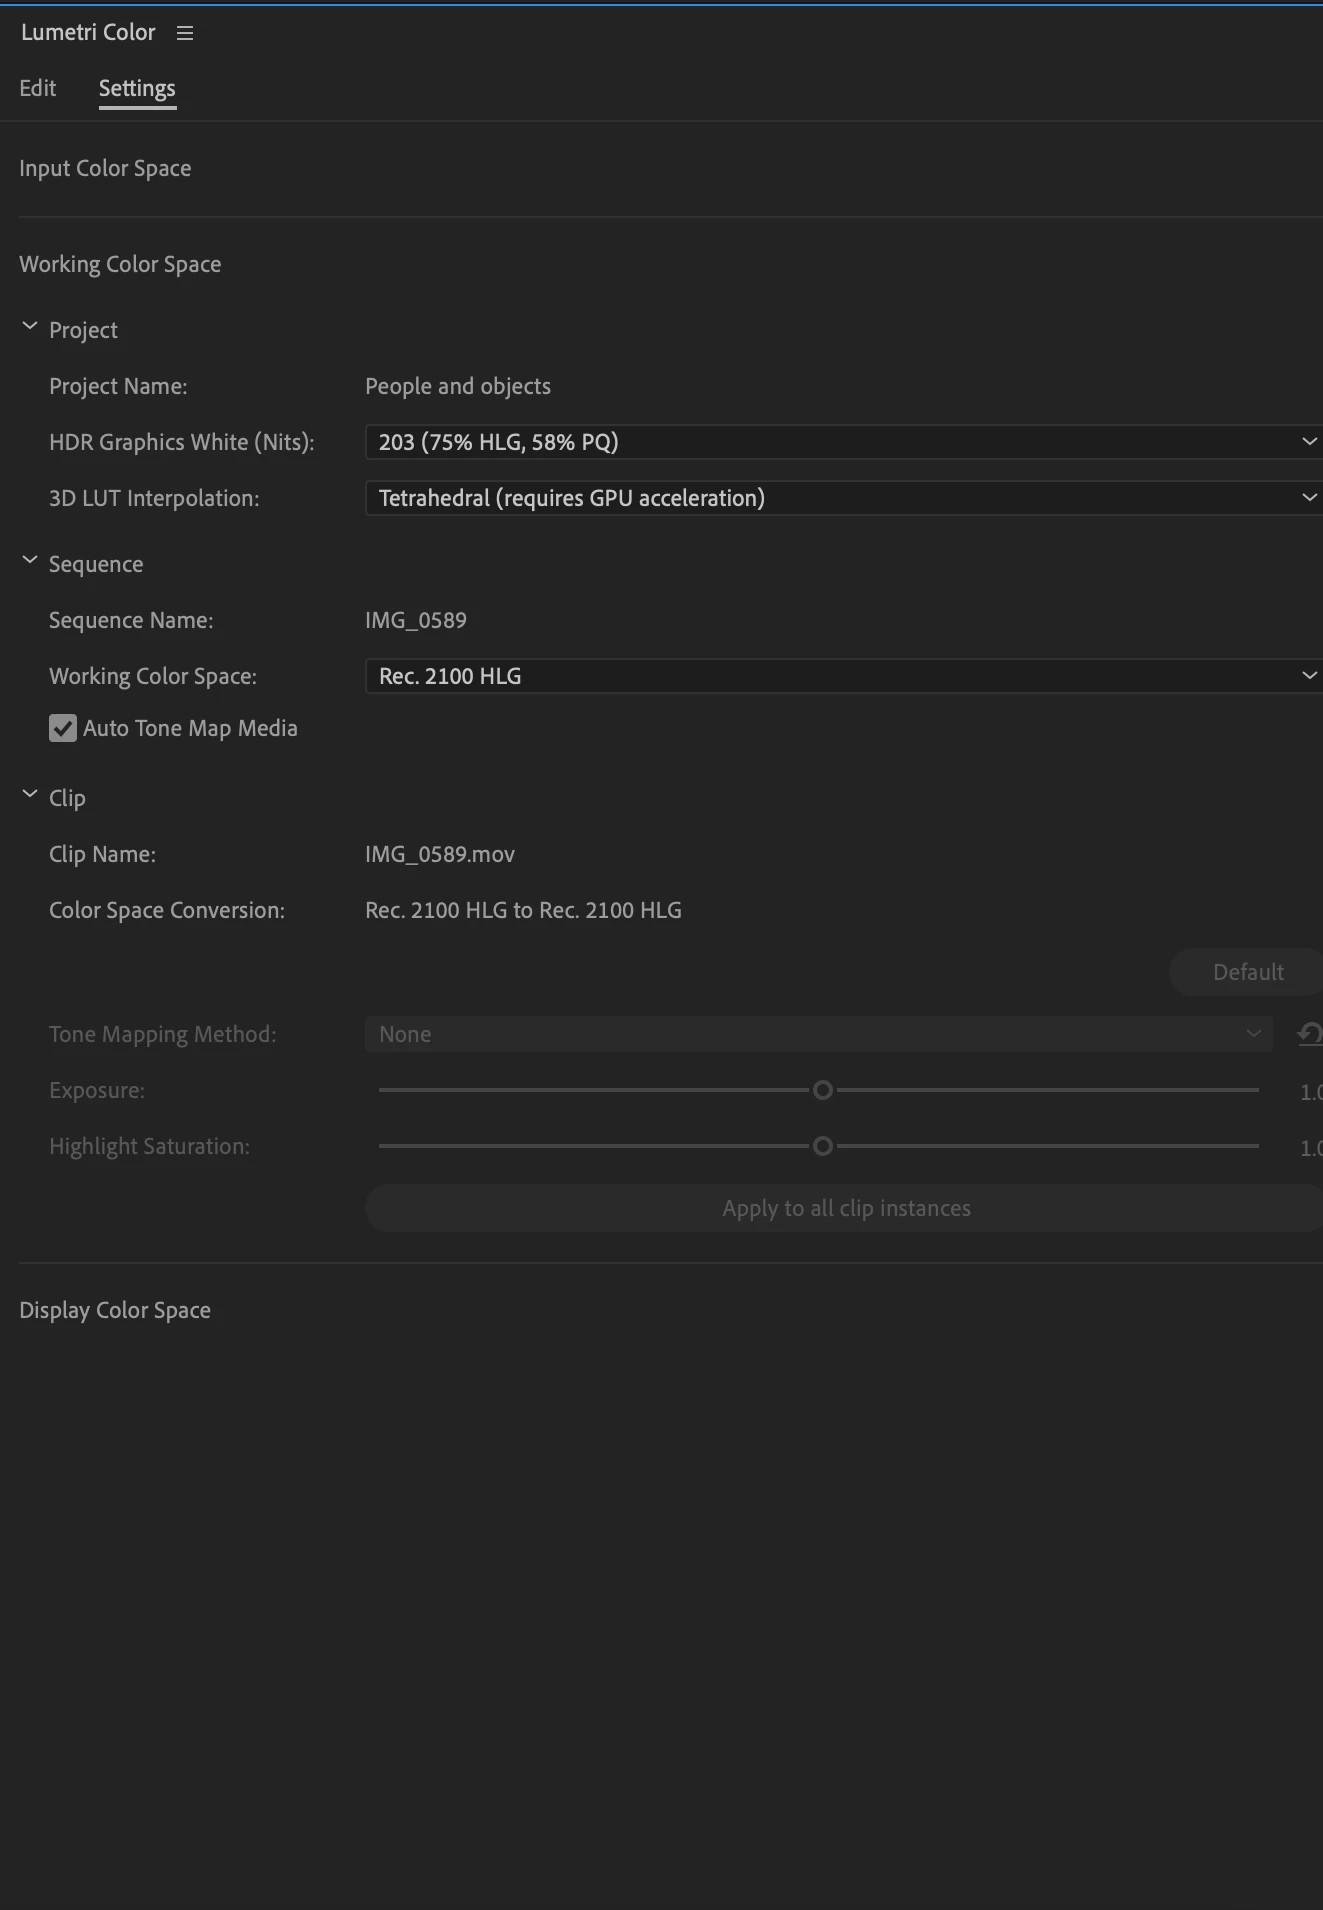
The screen above shows the zoomed-out view of the new ‘Settings’ tab.


The color settings are organized under three sections ‘Input Color Space’, ‘Working Color Space’ and ‘Display Color Space’ for you to easily find the setting based on where they are in the color workflow, such as specifying metadata for source (input) media or editing the color space or specifying the display settings.

If you just want to use basic color settings, you will find some settings such as specifying input (source) Color Space, Working Color Space, and input LUT useful.


As an advanced user, you can interact with the below settings:  

1.  Input Color Space – This section allows you to choose the color settings at the source media level like specifying the color space of the source (input) media if you want to override the color space that Premiere Pro has selected. If you work with log videos, you can also select if you would like all log videos to be auto-detected as log and color converted to the selected Working Color Space or have the application recognize them as Rec. 709.

2. Working Color Space – This section allows you to select the color settings that apply to the Working Color Space of your video. For example, which color space should be chosen and be visible in the Program Monitor or used for color conversion.  You can also select the Tone Mapping Method  or HDR Graphics White (Nits) to be used when working with HDR videos.

3. Display Color Space – In this section, you can find some settings applicable to Display Color Management, if you have a different monitor/device than your Working Color Space. For example, turn Display Color Management on to see your HDR videos on a non-HDR monitor while editing to know how your final output will appear on HDR display devices.

The settings under various sections are further organized under ‘Clip’, ‘Sequence’ and ‘Project’ and will be enabled only when the corresponding clip or sequence has been selected. Project or application-level settings will apply to the whole Project or application respectively.


The settings are in sync with settings spread across dialogs today like Modify Clip, Sequence Settings, Project Settings, source settings  and Preferences.We have, additionally, consolidated all settings in these dialogs in a new Color tab to make them more discoverable. So, if you have created a new sequence and want to modify color settings while editing video and audio settings in one go, you can do so easily as well within the same dialog. The same applies for other dialogs like Project Settings and Modify Clip as well. We have also incorporated color settings like HDR Grpahics White Nits and 3D LUT interpolation in Team projects.


Please try out the new Lumetri Color panel ‘Settings’ experience in Beta and let us know what you think!


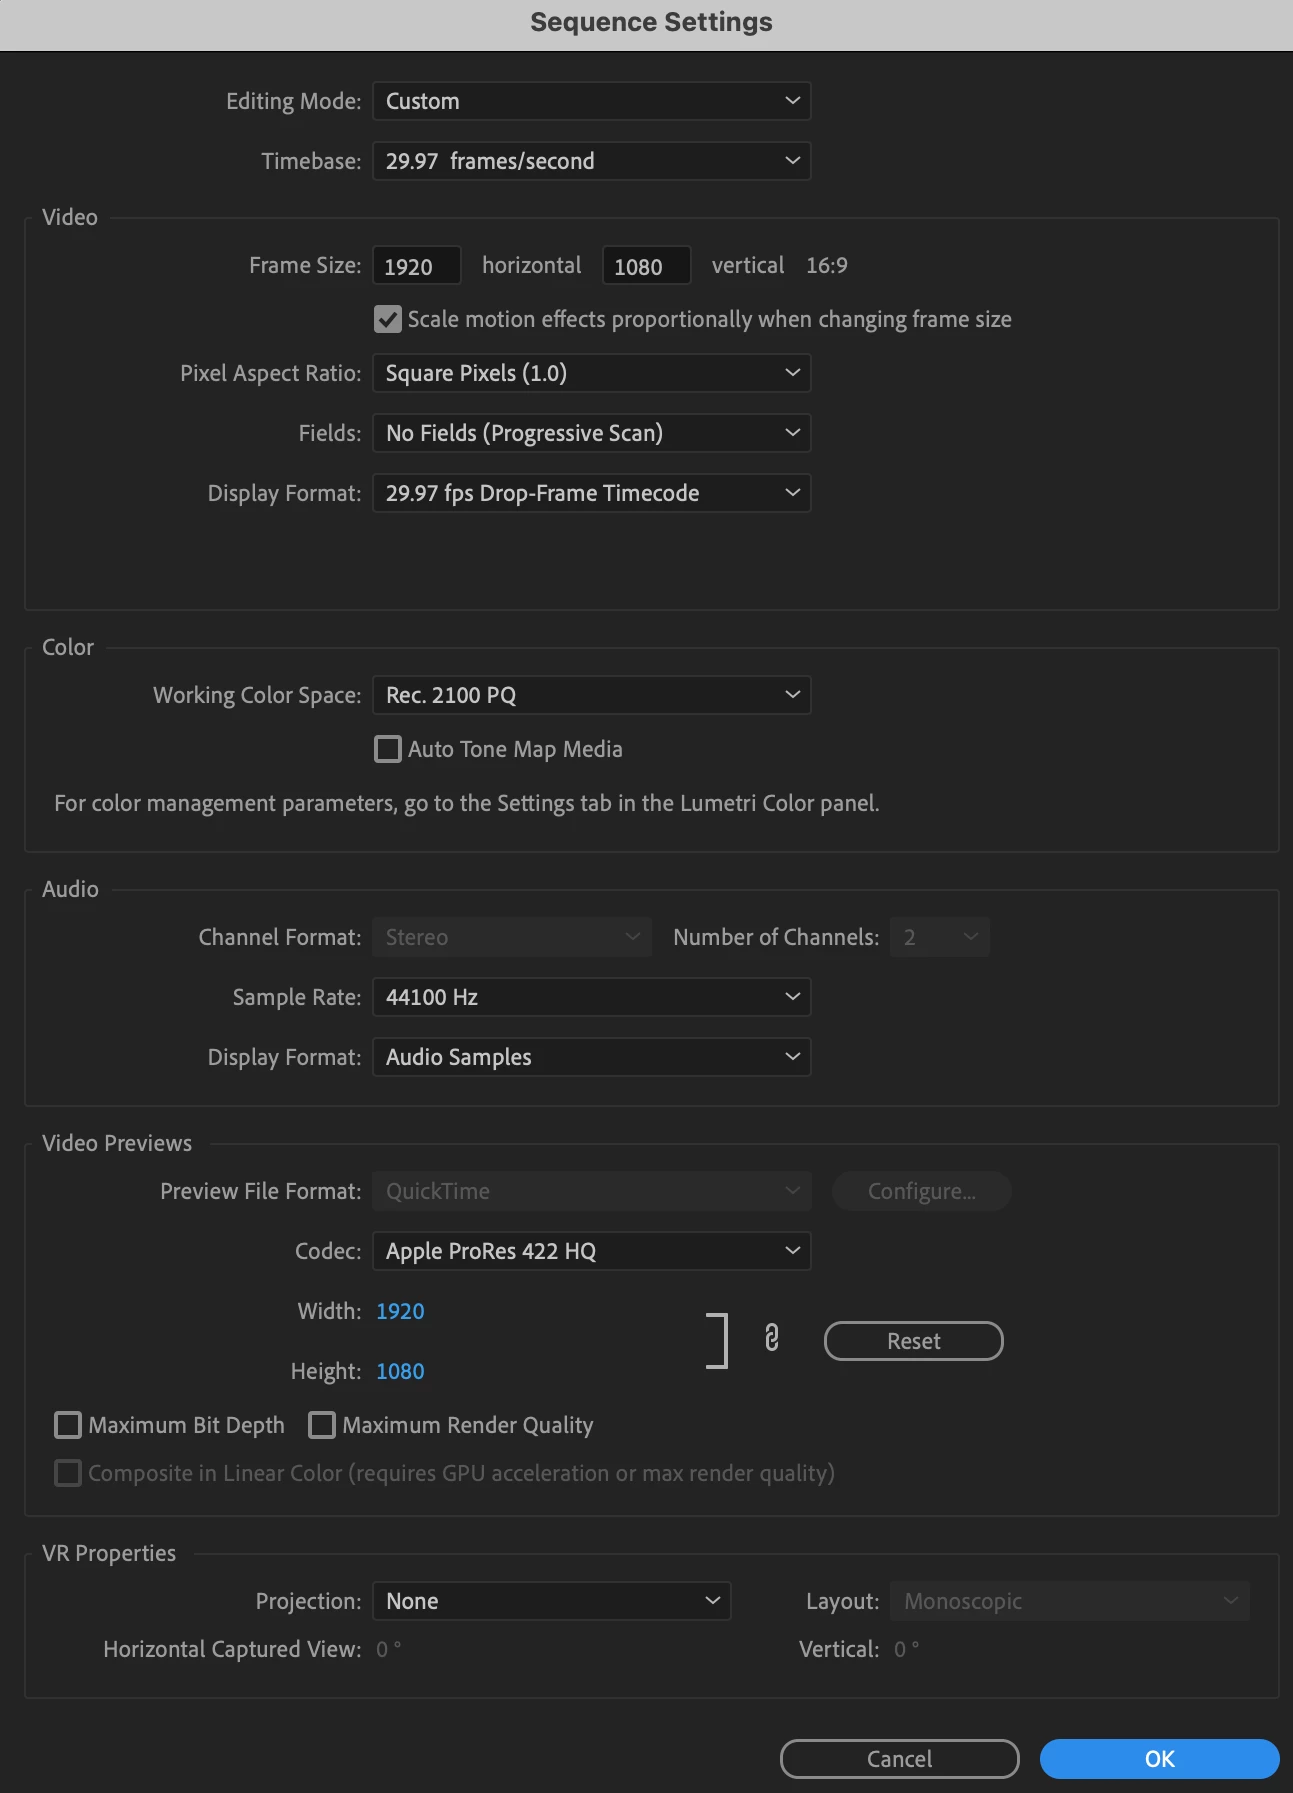
The dialog above shows the Sequence Settings dialog with a new consolidated color section.

This topic has been closed for replies.

15 replies

Community Manager
August 16, 2023

Hi All,


Based on your feedback, we have updated the settings user experience. You can find the details here. Thanks a lot for your valuable comments and feedback. 


Thanks,

Neerja

Known Participant
August 16, 2023

Is there a way to add a batch remove for lumetri color effect, or even just all effects from master clips please? There is still now way to view .r3d in rec 709 without adding a LUT and when you do that at the master level there's no way to remove it all at once. When you have 100s of clips that is not possible. When editing the client does not want to see log material in the source viewer while pulling selects. 

Community Manager
August 18, 2023

Hi,


We don't have auto-detect support for .r3d footage at this point. Have you tried using an adjustment layer to add or remove the LUT?  Please let us know if you have faced any issues.


Thanks,

Neerja

GundamVanguard
Known Participant
August 16, 2023

Could we have these options expanded to secondary monitor full screen previews as well? Whenever I turn on color management it tones it to 2.4, would love to have it match the new 2.2 preview option.

R Neil Haugen
Legend
August 16, 2023

Is that just full screening the Program monitor, or the Transmit out function?

Everyone's mileage always varies ...
GundamVanguard
Known Participant
August 16, 2023

"Adobe Monitor 2" in my transmit device section, it's my secondary monitor.

R Neil Haugen
Legend
August 14, 2023

We now have an expanded color management panel in Lumetri ... take a look:


Although what the bottom Sequence tab is about, I don't know ... I couldn't get that 'triggered' whether highlighting a clip in the Sequence, Project panel bin, or Source monitor. It was always grayed out.


Neil

Everyone's mileage always varies ...
Edzel Yago
Participant
August 14, 2023

Love revisions to the colour settings page. Definitely fewer questions about what does what/is activated where.

The bottom of the sequence clip with the tone mapping method seems to be enabled when your footage is PQ/HLG/?? and your sequence is 709(?), to tone-map from HDR to SDR.


R Neil Haugen
Legend
August 14, 2023

Thanks for the comment ... I keep hoping for tool-tips or something, ya know?   lol

Everyone's mileage always varies ...
R Neil Haugen
Legend
August 9, 2023

Thanks for the information, Fergus.


It would be nice, of course, 

if there was say notification here ... or at least on the beaker icon "changes stuff" in the beta app menu bar.

Everyone's mileage always varies ...
R Neil Haugen
Legend
August 9, 2023

And apparently, until they change it again ... clip CM is back in the Project panel Modify/Interpret Footage dialog.

Everyone's mileage always varies ...
Legend
August 9, 2023

This panel seems to be gone in the newest beta versions (I'm on 24.0.0 beta build 23). What are we getting instead?

R Neil Haugen
Legend
August 9, 2023

Woa, that's ... interesting, @Jarle Leirpoll  ...!


Not at a computer right now, I'll have to check that out a bit later today ...


Neil

Everyone's mileage always varies ...
Participant
July 26, 2023

I'm a little curious where others are with this. I've just tried it and I can't see that it's doing anything -- it's not applying any corrections and not letting me change the input color space. I'm using DJI d-log and Lumix v-log footage as testing. Davinci makes this quite easy and Apple appears to be working on it as well, so I want to see how it works in Premiere.

R Neil Haugen
Legend
July 26, 2023

The Beta Lumetri settings tab is a bit intriguing at first.


For instance, to affect Input settings, you have to select the clip in the Project panel, with the Lumetri panel settings tab also visible.


Then you can change Input things. That confused me at first.


And of course whether the preference for auto-detect log and the sequence settings for tonemapping affect this also.


Neil

Everyone's mileage always varies ...
Participant
July 26, 2023

Interesting, ok. I'm sure that will get cleaned up once it's reached alpha. I appreciate the heads up and will try that next time I'm working on it. 

R Neil Haugen
Legend
June 9, 2023

I was told by a senior staffer at NAB that the Sequence display color space is the control that tells Premiere how to display the sequence. That in total, Premiere takes the original clip color space with any modifications made by the user, applies Lumetri changes based on 'scales' from the math relating to that color space, then uses the Sequence color space to perform the correct transform of that data to the color space of the sequence and deliver this to the monitor.


Clip color space/Lumetri math/Sequence color space, essentially in that processing order.


And the above need to be correctly aligned with the chosen export color space.


So the separate Display Color Space tab seems ... odd. Could you explain this entire process clearly? Color space processes/transforms from Clip, Lumetri math, sequence, display, export?


Neil


Neil

Everyone's mileage always varies ...
Evangelist ittsui
Community Expert
Community Expert
May 27, 2023

Until now, the Lumetri Color Panel has been a panel for making changes to "clips.
However, the new settings screen also includes changes to "projects" and "sequences.
If the user thinks he/she is making a change to a clip, it will affect other parts of the project as well.
It may seem convenient not to have to open the Preferences dialog,
However, I think it may cause confusion and increase risk to the user.


これまでLumetriカラーパネルは"クリップ"に対しての変更を行うパネルだった。
しかし、今回の新しい設定画面は"プロジェクト"や"シーケンス"に対する変更も含んでいる。
ユーザーがクリップに対する変更のつもりで操作してしまうと、他のパートにも影響してしまう。
環境設定ダイアログを開かなくて良いのは便利に感じるかもしれないが、、
ユーザーに戸惑いとリスクが増える可能性もあると思う。
R Neil Haugen
Legend
April 15, 2023

Good comments here.


I'm a bit concerned about the way the Clip section works in the Lumetri Color Setttings panel. It's grayed out most of the time it seems. Even for most clips selected in a bin and in the timeline. Some ProRes, Red, BRAW and other log clips.


But occasionally it's 'active'.


So what are the rules on that? When can we actually use that control? Why is it grayed out for so many clips?


And it is frustrating that we can't over-ride the inactive status when we want to change color space.


This is one of numerous things I'll be talking with staffers about at NAB next week. Got any questions y'all want asked? Post them ... I'll ask in person.


Neil

Everyone's mileage always varies ...
Eugene Mogrts
Known Participant
May 10, 2023

It would make a profound sense if there would be ACES settings in the color management settings. 

Otherwise, that panel looks more convenient than going to the sequence settings or edit settings dialogues -- that's for sure... but adding those ACES color spaces that we have in After Effects now is crucial for the streamlined pipeline.

Edzel Yago
Participant
April 15, 2023

There are a couple of things things that can get a bit confusing - the auto tone map media checkbox under 'Sequence' can be checked off even with the working color space set to PQ/HLG though it doesn't seem to enable the tone mapping method (which I'm assuming is just for HDR to SDR mapping)


It wasn't immediately obvious that the Input Color Space section behaves differently between selecting a clip on a timeline (settings aren't adjustable) vs selecting a clip in the Project window (settings are adjustable).


It took me a few clicks to understand how things worked but this is actually very usable!


Now, is there going to be a way to extract/export the final tone mapping process in a LUT? The way I'm envisioning this working for my team is working in HDR, exporting the HDR copy, using the tone mapping feature to create the SDR version for other platforms (either with just the final HDR copy or by using tone mapping in the timeline and a new SDR sequence), and then having some way to create an HDR-to-SDR conversion LUT based on the tone mapping tools.


Otherwise, I'm ending up with bringing the HDR version into Resolve and then using the Universal conversion with a pre-conversion adjustment for exposure.


Somewhat related, the SLOG3 interpretation is looking much improved since the last time I tried it/spoke to Francis. Love it!