Copy link to clipboard
Copied
Hey guys! I'm a Premiere Pro newbie. I just noticed that the colouring/brightness changes a lot after exporting to H.264. In Premiere it looks the way I wanted it to (I haven't done any colour grading at all though), but the resulting MP4 looks too bright. What's even more annoying, I'm editing a VLOG where I use cut&zoom a lot, to cover up any bloopers. Now the brightness is actually very different depending on the zoom level. This is not the case when looking at it in Premiere itself.
Can someone explain what might cause this, and any ideas how I could improve it?
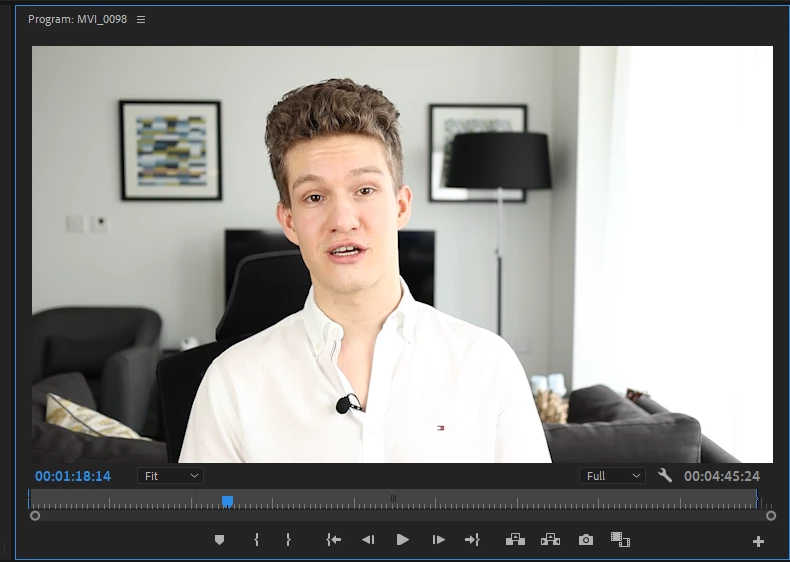
In Premiere Pro (same brightness regardless of zoom level):
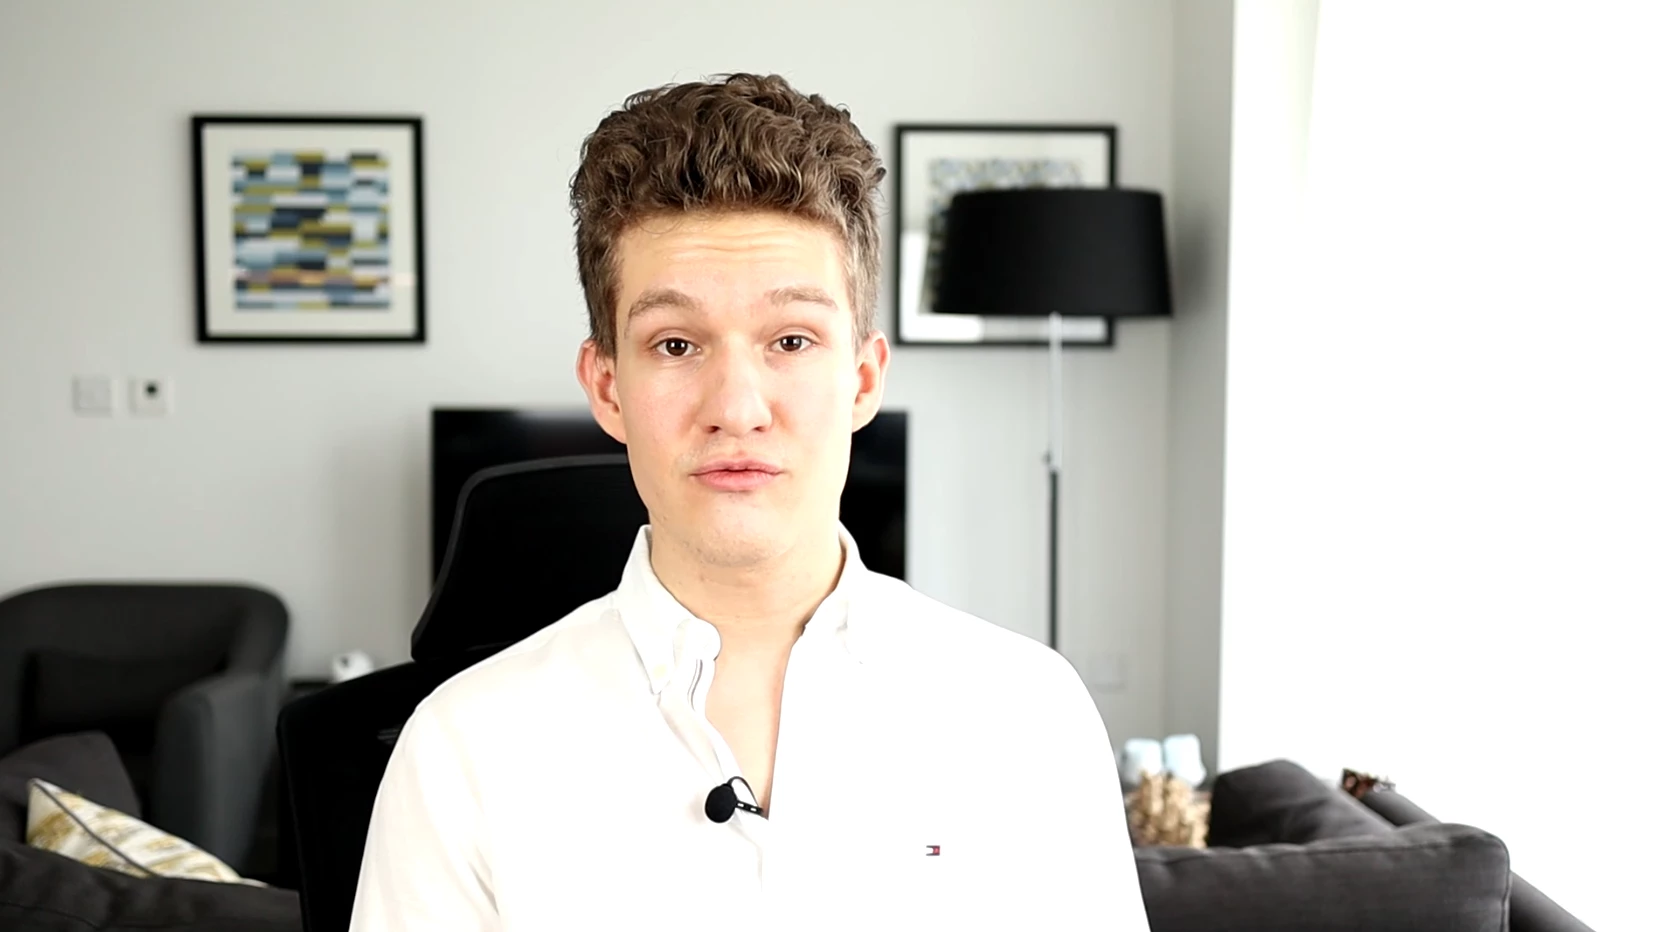
In VLC, zoomed-in fragment:
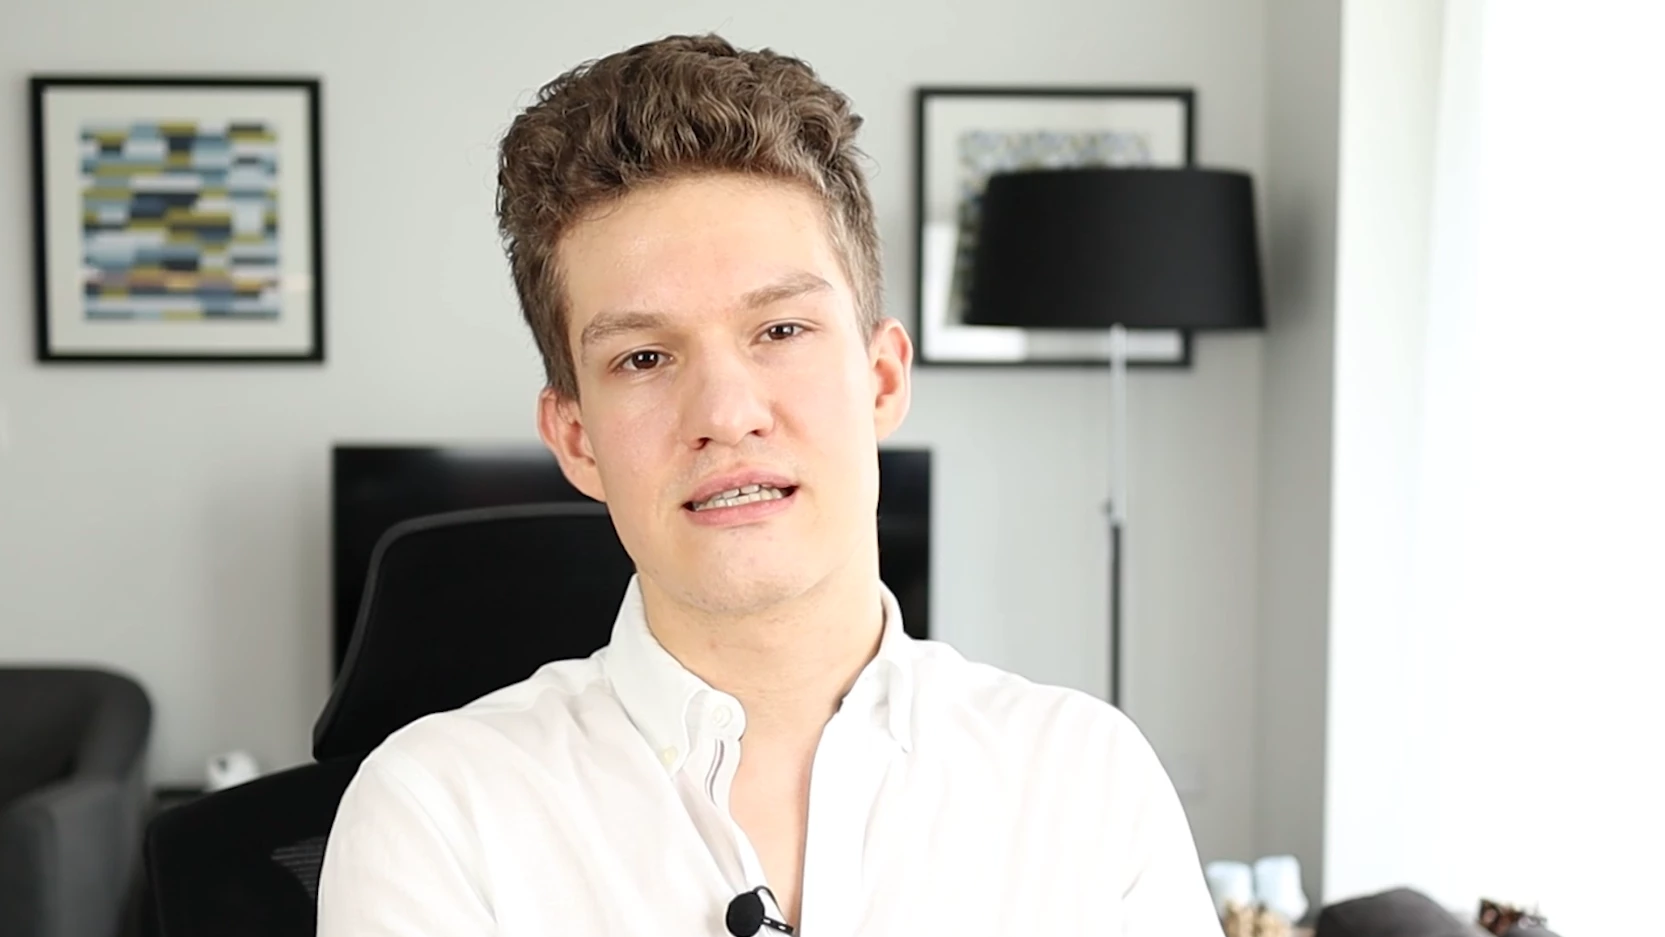
In VLC, zoomed-out fragment:
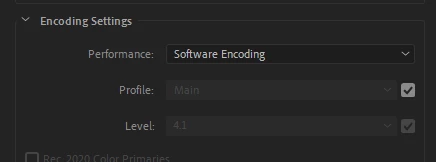
PS: I'm using Premiere Pro v14.3 (build 38) on a PC. The source files are MP4 in Full HD 30 FPS from an EOS M50.
Sooooo I just tried something else which worked! In the encoding settings, I simply changed it from Hardware to Software:
Because clearly this export problem was only happening on my PC so I figured it might be a hardware problem. And indeed, there is no change in exposure when exporting via software encoding!
Looking at the Premiere documentation, this Hardware encoding uses Intel Quick Sync. I'm wondering if there are any Intel settings that I could amend to fix this problem and still use Harwa
...Copy link to clipboard
Copied
Hey,
A few days, a bit more reading and a few testcases later, I have to get back on my previous answer. Though it did some improvement to the brightness of the export, it was still not the same as the original.
As I am quite a newbie to 4K video editing, I could not make sense of your reply, as I am not yet that familiarized with all the setting that goes with that, but I think you are saying basically the same as stated on this page.
So I changed the export setting to HDR Graphics White (Nits) setting to 203, set the profile to Main10 and the Export Color Space to Rec.2100HLG. And now the export seems excactly like the source clip from my iPhone 13 Pro Max (HVC1 3840x2160 60fps 53921kbps [V: Core Media Video (hevc main 10 L5.1, yuv420p10le, 3840x2160, 53921 kb/s)]).
Anyway thanks, your post made me look further as I wasn't too happy with the end result after all. A lot better than before though, but still.
Ron
Copy link to clipboard
Copied
For anyone reading this thread, PLEASE! ... use the proper export presets to save a lot of headache.
Use the 'standard' presets for SDR/Rec.709 work only.
For any HDR sequences, use the appropriate HDR export presets. ALL HDR presets have either HLG or PQ in the preset name. And they have all those things set correctly as it is SO easy to miss some silly little setting and get a hash export.
I say this of course from personal experience getting a hash export.
Lastly, at this time, the vast majority of pro colorists have yet to deliver their first paid HDR job. HDR among colorists is of course "the coming Thing" but is still considered the Wild Wild West for a good reason.
There are SO many ways to have it screwed up, some difficult to tell until it fails QC, and ... the monitor setups are incredibly demanding. ALL consumer (under $10,000 at this time) monitors & TVs do things both to 'enhance the viewing experience" and to protect the screen from burn-in pixels.
Which makes it impossible to know exactly what you're doing ... is doing exactly what ... on screen.
I figure if a pro colorist doesn't have confidence in what is coming out, with their always having more money in calibration gear than we have in our entire computing system ... well, there's a reason they don't have full confidence.
Neil
Copy link to clipboard
Copied
I now see I pasted the wrong link. It should have been this one: https://community.adobe.com/t5/premiere-pro-discussions/faq-how-to-fix-saturated-over-exposed-hlg-hd...
Copy link to clipboard
Copied
IMO Adobe does not handle the various colourspaces at all well. I often get mixed mobile clips to put inthe same sequence. There is no way to interpret a REC2100HLG clip in Premiere to make it look right in a 709 colourspace. The best I've been able to do is to interpret the clips as REC2020 - interpreting them as REC709 gets very average results. Any tips on a better workflow when working with sime REC709 and some REC2100HLG in the same sequence. End target is normally always Vimeo 1080P.
Copy link to clipboard
Copied
Those transforms aren't expected to make things 'right' if meaning nearly finished. They are designed only to simply, safely, move the data from one space to another. Not to be "pretty".
Which means the user will still need to do the 'finishing' of the clips on a sequence.
Which is wnat I need to do in Resolve also. CSTs are simply a rather gross application transform function.
As to whether or not they've made a great user-friendly system ... no, they haven't, because
When those things appear, it will work better.
Neil
Copy link to clipboard
Copied
Just seems like a big swing and a miss to me. Why does REC2020 work better as a preset than REC709 which is the actual space the sequence is sitting in? I'm not looking for art here. These are outside sourced mobile phone clips which just need to be "as shot". They look great when played back through VLC on an old monitor with Apple doing the interpretation in the background. That monitor can't display HLG. Of course they look even better on the laptop screen which covers a wider colourspace, but they never look wrong which is the only way I can describe Adobe's attempt. If you don't use the interpret footage setting, no amount of tweaking in Lumetri will bring these clips back. If you use interpret footage to REC709 the clips look wrong and once again no amount of tweaking in Lumetri will fix them. So is there a solution within Premiere itself? Or do I have to resort to Resolve? Or stick with my compromise 2020 solution? I'm happy to do whatever works.
Copy link to clipboard
Copied
Can you send me a clip via dropbox type transfer? I'd be glad to test on my rig.
Neil
Copy link to clipboard
Copied
Very kind offer - I'll see what I can do. Just have to find something that is not corporately sensitive.
Copy link to clipboard
Copied
Sent you a pm ...
Neil
Copy link to clipboard
Copied
For me, I had to just add an adjustment layer and use trail and error with the exposure until i found what i liked.
Copy link to clipboard
Copied
For everyone coming to this issue in 2022, I tried every response in this thread before realizing that after I upgraded to Windows 11 my VLC had changed its settings. I should've checked that first, so learn from my mistakes. VLC was brightening the video using settings, and that just had to be turned off. Doh!
Copy link to clipboard
Copied
Do you know how to turn off VLC? Im stuggling to find it, Thanks!
Copy link to clipboard
Copied
If on Windows, hit ctrl+E, or go to Tools>Effects and Filters. Go to Video Effects tab and either uncheck Image Adjust, or adjust them to your desired settings, I personally just unchecked the box and hit save.
Copy link to clipboard
Copied
Copy link to clipboard
Copied
That looks like the clip is either HLG color space, or it's a log-encoded Rec.709 clip that Premiere is mis-interpreting as HLG. So we need the information on the original clip.
And ... btw ... there's no reason you've got the Effects tab Lumetri checked, as you don't have a LUT chosen, which is all that's there for. Any 'normal' sequence work of Lumetri will be included in the export without consideration of the Effects tab.
The Export dialog's Effects tab is only to add something for the export that isn't applied to the sequence.
Neil
Copy link to clipboard
Copied
Is there a way to turn this off on a MAC? It's really bothering me!
Copy link to clipboard
Copied
Turn ... what? ... off?
Color management is something that we've needed to have both more options and user control of. They're finally modding the app to make that happen, and no, it's not a perfect rollout.
But again, all users will need to work with color management even in Premiere. Resolve has had this of course all along, as that app started as a colorist's grading tool. And with so much media producing gear capable of HDR, even though there's not much use for it as a deliverable yet, well ... Premiere's got to be able to work in different color spaces.
I'm including links to two FAQs on this forum ... the first details the changes in Pr2022, how to work within the new system, and what's currently broken. the second is how to monitor HDR in Pr2022, which has also completely changed.
Neil
FAQ:PremierePro 2022 Color Management for Log/RAW Media
Copy link to clipboard
Copied
i can't believe it guys, always problems with premiere always. now with the new fuji h2s, at export i find everything clearer. but how is that possible? i already tried all the possible combinations and even the ones written here that i already knew, there is no way!!!
here is the frame of what I see in premiere with the monitor calibrated to rec 709 yesterday and what I find in the export:
i really can't believe already use ths software, only problems
Mod note: This post has been edited for content. Please do not use profanity on our forums. It is against community guidelines.
Copy link to clipboard
Copied
What did you view the clip in after export, and on what OS? As that can easily provide an answer.
Outside of Premiere on a Mac is of course a difficult situation as Mac's ColorSync color management ... or as one colorist I heard called it "color manglement" utility ... applies a 1.96 gamma to Rec.709 video.
And of course, if you display at 2.4 (normal standard) versus 1.96 (Mac), you get different 'views' of the same data. Premiere tries to use the 2.4.
So that's one possible issue.
Neil
Copy link to clipboard
Copied
Hi Neil, you are a tank I knew you would come to help. I have mac os (the latest), latest premiere version and I view the video with quiktime, vlc and on vimeo they were all 3 versions much clearer and smushed. I must say though that with davinci I had a little bit better results but not perfect. How can I solve this? Simply what I see on the premiere monitor at the time of export must be the same. Lastly, the monitor is a benw sw321c and I have premiere calibrated yesterday in rec 709
Copy link to clipboard
Copied
Sadly, Apple created a mess by setting ColorSync to show the 'scene referred' capture gamma of 1.96 as the display gamma. Being as all other systems, and all pro reference color systems, use 2.4. And have for over a decade, since the first non-CRT monitors came into use.
The 2.4 gamma for display use was chosen as that matched the 'natural' CRT display action, so no change was needed to the camera image recording process. Old history, but ... that's why "it is what it is".
And there isn't a way around this. ColorSync will set anything it can control to use 1.96 for Rec.709/SDR video. Everything else will show the same file using 2.4.
So ... QuickTime player (on a Mac), Chrome & Safari browsers will all display Rec.709 video with gamma 1.96. Firefox and VLC will probably not allow ColorSync control, so they might show the same Rec.709 video file on the same computer with gamma 2.4.
And my system, set up for bog-standard pro-level Rec.709, will of course use 2.4.
I teach over at MixingLight's colorist subscription website. And most colorists (yea, big surprise ... ) are based on Macs ... and are FURIOUS with Apple over this. Because there isn't any "solution" to mod a file to show at two different gammas.
But they understand something you may not ... which is that every screen out there shows a different image anyway. Even the same screen, say an iPhone ... on a park bench at noon in sun, and at night in a dark bedroom, will show the same program with a rather different image due to changes in the surrounding lighting/brightness. And the way your eyes react to the screen at the same time as they are affected by the ambient light level.
And bluntly ... no one ever sees exactly what that colorist saw when they were grading a professional show for broadcast, streaming, or theatrical release. So they use incredibly expensive monitors, calibrators and calibration procedures to get nailed down on Standards.
And then let it go out Into The Wild.
Where every screen will do something different, and no one will understand they aren't seeing what the colorist saw. Because they are used to what they see on their screen as "normal".
Neil
Copy link to clipboard
Copied
The issue isn't Premiere at all. It's the iPhone.
In your iPhone, go to Settings > Camera > Formats and then make sure you mark the check next to Most Compatible. This fixed the issue for me when exporting onto my iMac. See below.
Find more inspiration, events, and resources on the new Adobe Community
Explore Now