

- Home
- Premiere Pro
- Discussions
- Re: Export sequence as individual clips
- Re: Export sequence as individual clips
Export sequence as individual clips

Copy link to clipboard
Copied
I'm hoping to find a quick and easy way to export a sequence as individual clips.
I color in DaVinci Resolve and by exporting XML all my time remaps are messed up so I guess the only way around this is to render and bake in my time remaps.
A lot of the projects I work on are comprised of 200+ of individual clips, so I'd really like to avoid manually nesting each clip and exporting that way. It's just far too tedious.
Is there an easy way around this?
Thank you!


 10
Replies
10
10
Replies
10

Copy link to clipboard
Copied
There's no shortcut for this one. You will need to manually set up every export one at a time.
You don't need to use nesting, though. Put the playhead over the clip, hit x to select it, hit CTL+M for the Export settings dialog and set up your desired settings. Hit Queue. Use the down arrow to move to the next clip, and repeat...
Copy link to clipboard
Copied
Thanks!
Still tedious but a little less so. Anything that can save me time is super!

Copy link to clipboard
Copied
A little less tedious and maybe worth a test is...
Create subclips from each clip in the sequence. One at a time unfortunately but...
A quick way is set Sequence to Select Clip under Playhead,> rip along using Ctrl-U for the Subclips.
Select all the subclips in the Project Bin and > right click> Export Media. > Set DPX or similar .. Queue. etc..

Copy link to clipboard
Copied
One advantage of using Render and Replace to generate the individual clips from the timeline is that you just select all the clips, then control-click on anyone of the selected clips, set the destination, etc, and click OK and it will output all the selected clips individually on its own.
MtD
Copy link to clipboard
Copied
jaes63625099 wrote:
I color in DaVinci Resolve and by exporting XML all my time remaps are messed up
I don't use DaVinci, but the Blackmagic website says:
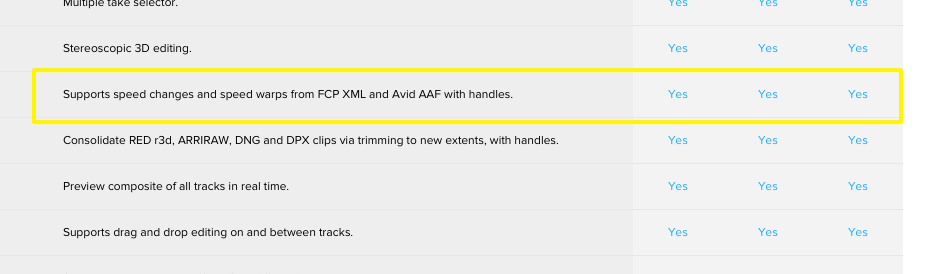
Is this not correct? If it does support the speed changes and speed warps, I might have a potential work around for you.
MtD
Copy link to clipboard
Copied
Interesting...
The Resolve page states that it supports speed changes and speed warps, wouldn't that be the same as a time remap?
Regardless, I've never been able to make it work. My clips make it over to Resolve just fine, but all my time remaps are gone, only the IN/OUT points make it over.
What's the potential work around you had in mind?
Copy link to clipboard
Copied
speed changes and speed warps, wouldn't that be the same as a time remap?
Those are three different effects.
Copy link to clipboard
Copied
Sorry, was in a session. No guarantees on this, but I've been experimenting using the Render and Replace menu command to get around the inability of PPRo to automatically export individual clips from the timeline.
The Render and Replace command lets you create clips with handles from the timeline. Once those clips are created, the sequence relinks the clips in the timeline to those rendered files.
Since the render files can be sent to any directory you choose, you can have the files created on an external drive, and once the file creation process is complete, you can export an xml of the sequence which will call for that media which is on the external drive.
You can then move the external and xml to another workstation, open the xml and (if necessary) re-link the sequence to the files on the external.
Once the VFX work is done on the clips, save the clips with the same name to a new directory on the external, move the external back to the PPRo workstation and relink the sequence to the VFX'ed files.
Obviously, you'll want to verify if this works for you, so work on copies of your project/sequence in case something goes wrong.
Your milage may vary.
MtD

Copy link to clipboard
Copied
I may have a solution.
I go under File > Project Manager
in the project manager panel I select "consolidate and transcode"
I usually leave the default handles (24frames) and run the export.
Then all your raw clips (but only the ones used in the sequence) will be exported in whatever davinci-friendly format you prefer in a seperate folder. Better than that, they have the correct in and out points plus the handles which saves considerable space. And the transcoded premiere project will look identical to your current project but it's made up of only the transcoded clips.
If you color all the individual raw clips in the transcode folder, you can just replace the existing ones (or replace footage from within premiere) and bam! all your effects and time warps are still applied but they aren't baked in. You can even make changes after the grade is finished in your normal, familiar premiere interface.
Definitely a time saver and you don't habve to be picture-locked at all. I use it all the time.

Copy link to clipboard
Copied
This is the solution. Works perfectly!

Find more inspiration, events, and resources on the new Adobe Community
Explore Now
 AdChoices