
FAQ: Why is my GPU not available for Mercury Playback Engine GPU acceleration?
Are you missing GPU acceleration for the Mercury Playback Engine? We see this issue in support quite a bit. If you are using Premiere Pro CC, and later, and as long as your GPU has a minimum of 2GB VRAM, please refer to the following steps to restore GPU acceleration.
Adobe Help Documentation: GPU Accelerated Rendering & Hardware Encoding.
Adobe Community article: FAQ: Everything you need to know about GPU use in Premiere Pro.
Solution 1: Ensure that GPU acceleration is enabled in both Premiere Pro and Media Encoder
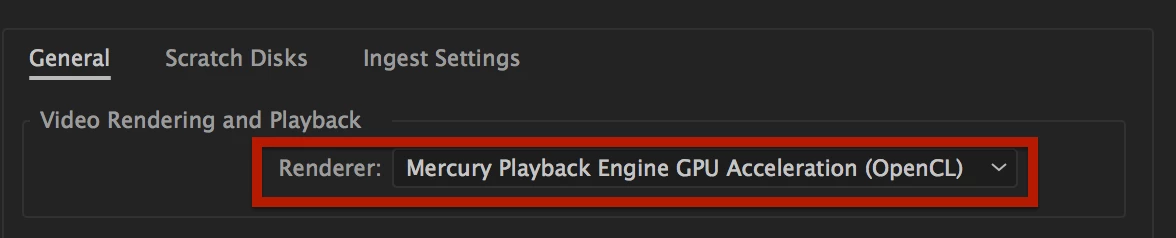
- In Premiere Pro, choose File > Project Settings > General and check in the Video Rendering and Playback options.
- Under Renderer, choose the GPU acceleration method appropriate to your GPU, usually CUDA, or Metal. OpenCL is an alternative, but is becoming less desirable as an option in current versions.
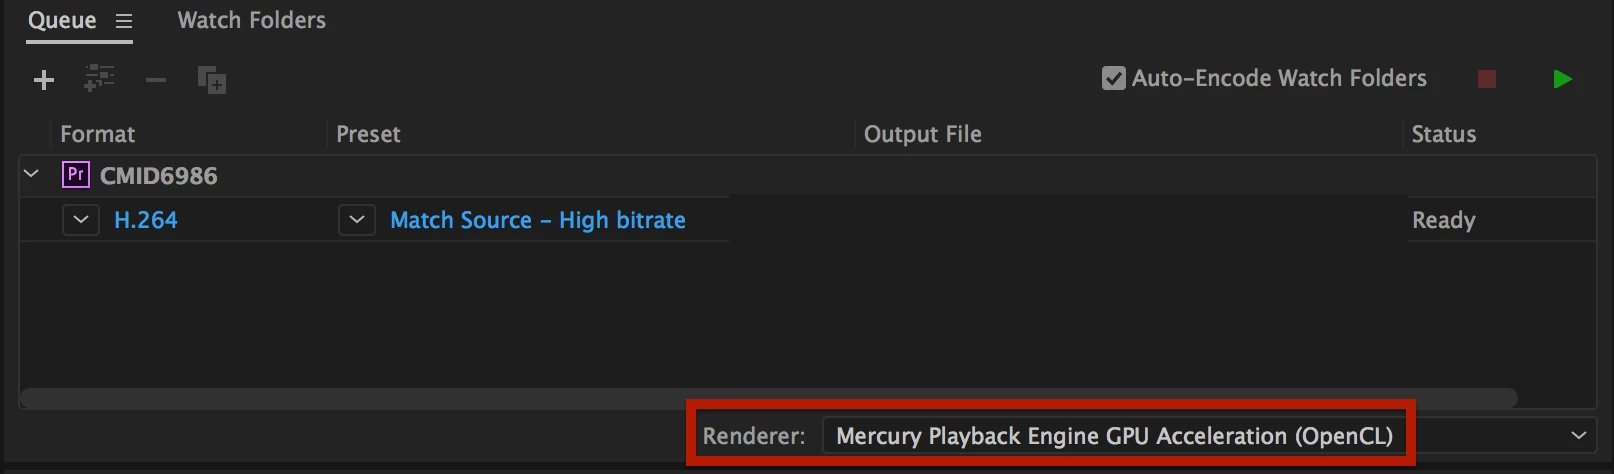
In Media Encoder, you can enable the GPU in a menu in the bottom of the "Queue" panel.
- Choose "Software Only" if your GPU is simply too underpowered, or if you are troubleshooting problems related to the GPU.
- If your GPU is powerful enough, you need to revisit Solutions 2 and 3.
Adobe Documentation: Settings for GPU Accelerated Rendering & Hardware Encoding
- Solution 2: Perform a clean installation GPU drivers.
- NVIDIA driver installation tips:
- Download NVIDIA drivers here.
- General clean installation method
- AMD driver installation tips:
- Download current AMD drivers here.
- General clean installation method
- Download current AMD drivers here.
- Reboot the computer
- NVIDIA driver installation tips:
GPU acceleration should now be restored
- Solution 3: Troubleshoot GPU settings on your computer.
- Review the troubleshooting steps in the following document. Though authored for Photoshop, many of the troubleshooting steps are identical.
GPU acceleration should now be restored.
- If you have 2 GPUs, yet the iGPU is favored when monitoring for export processing. You may be wondering why.
- Quick Sync technology and your iGPU can likely make quicker work of your footage than your AMD or NVIDIA GPU can when working with H.264 or HEVC footage.
- If you would like to understand more about that, as well as, setting up your AMD or NVIDIA GPU, here's a video which explains how this all works with an Intel Quick Sync based workflow and H.264 or HEVC footage:
Tips:
- The proper video drivers must be installed for the GPU to be detected by Premiere Pro. See Solution 2.
- Adding GPUs to any "white list" that you create or copy from an older version of Premiere Pro will not enable a GPU in Premiere Pro CC 2017.
- Premiere Pro engineering, "There is no GPU whitelist and GPU detection by Premiere Pro relies only on capabilities."
- A whitelist for GPUs has not existed since early versions of Premiere Pro CC.
- The general rule of thumb is a GPU should have 2GB VRAM for GPU detection and for HD work, 4 GB and up for 4K work.
- If you are working with footage greater than HD frame size, a lot of GPU-accelerated effects, scaling 4K to HD in encoding, and other GPU-intensive operations, you'll need even more VRAM for acceptable playback performance and GPU intensive processes. You can never have enough VRAM with these larger frame sizes and using effects.
- If you do not have a powerful GPU but are working with 4K footage, and a lot of GPU-accelerated effects, etc., consider either transcoding at ingest to HD or working with proxies.
- A GPU does not necessarily speed up all exporting processes. Encoding is a CPU-centric process. However, if GPU-accelerated effects are applied and certain export processes affected by the Mercury Playback Engine (scaling, frame rate changes, etc.) are enabled, then the GPU does play a role in exporting.
- If you do not have a proper GPU assisting these processes, it is much more difficult to have a smooth workflow, in general.
- A powerful enough CPU to balance the GPU power is also required, so make sure to purchase one that is appropriate in respect to making sure you have a "balanced" computer for the workflow you are trying to achieve.
