

- Home
- Premiere Pro
- Discussions
- Re: HDR iPhone 14 footage washed out, exhausted al...
- Re: HDR iPhone 14 footage washed out, exhausted al...
HDR iPhone 14 footage washed out, exhausted all solutions

Copy link to clipboard
Copied
Hi, I've recently been grappling with the fact that HDR footage is not very compatible with Premiere, but it is too late for me to change my original footage.
I am running the latest version of Premiere and the latest Nvidia graphics drivers. I've tried every color space override, downloading HDR fix LUTs, and manually correcting with lumetri color in every available color space. The best I could get from my efforts was a less washed out, slightly magenta tinted sequence that still looked off (see below).

Below I've attached a comparison of what the raw HDR clip is supposed looks like (top) vs. what it looks like in Premiere with no corrections (bottom). I really don't want to settle for the shoddy color corrections I did in the above example, so any help is greatly appreciated.


 20
Replies
20
20
Replies
20

Copy link to clipboard
Copied
Copy link to clipboard
Copied
Just read through it, seems like a dead end? Correct me if I'm wrong, but my takeaway was that HDR footage is essenitally not yet compatible with Premiere, and you cannot get it to look like the original clip no matter what you do.

Copy link to clipboard
Copied
Copy link to clipboard
Copied
Unfortunately, I've already seen that video and tried the tips he suggested, no luck.

Copy link to clipboard
Copied
Premiere actually does work with HDR footage in HLG and PQ rather decently, IF you know how to setup all the controls and the monitor.
I work with/for/teach pro colorists. Most of whom have yet to deliver a single paid HDR gig for b-cast or streaming. It's very much the Wild Wild West out there at this time. Most screens still cannot handle it at all, and those that do are all over the place with capabilities and dumb things the manufacturer's set it up to do to "enhance the viewing experience". So understand that first.
Next ... do you want to work in HDR, in that HLG space? Or go to SDR/Rec.709, where you've got a lot better idea what others will see?
Neil
Copy link to clipboard
Copied
Ideally HDR so the footage can look like it did originally. I've tried converting to SDR/Rec.709 but it only darkens the footage and makes it appear even flatter. If there is another method you know of to make the footage appear as it does with HDR on, please let me know.
Copy link to clipboard
Copied
Properly converted media, from HDR to SDR, is normally quite usable ... it's broadcast and streamed every day. And you would never know it unless you saw the two side by side.
All HDR broadcast and streamed shows are also encoded in an SDR version, as most screens still do not show HDR at all. For example, a friend was a lead editor for a European TV team covering the World Cup. All of their footage was captured in HDR, was cut as HDR in Premiere, and then was exported both in HDR and SDR versions. The broadcast use "back home" was apparently nearly all the SDR version.
So yes, it looks a bit different. But unless you see them side-by-side, you will probably not know you are seeing something different, if both are handled well. I'll give the HDR workflow for you.
HDR Worfklow in Premiere Pro 3 March 2023
I'm giving the date there as their CM system is still in transition. We'll get more and different controls or behaviors over time. So this is the most current setup and operating behavior.
- Check the clip Properties in the Project panel. Use only HDR clips, either HLG or PQ, although some log-encoded clips are also usable. Look at the color space of the clip. A log-encoded clip with Rec.709 color space may or may not work well in an HDR/HLG workflow.
- For log-encoded clips, you should normally select the log format in the Project panel's Modify/Interpret Footage dialog, Override-To option, and if the "Use Color Space from file:", shows Rec.709, uncheck it.
- Your sequence setting must be set to the appropriate HDR format, as of this date limited to HLG or PQ. PQ is more used in a pass-through process to another editor or grading situation. HLG is more typically a delivery format.
- Your OS and monitor must be set to the appropriate HDR color space. Again, either HLG or PQ. And the monitor should be capable of a high percentage of the P3 color space at the least. And as much Rec.2100/HLG/PQ as possible by specs.
- Premiere's Preferences settings should include Display Color Management in the Preferences, and perhaps "Auto Detect Log Color Space" and perhaps also "Extended Dynamic Range monitoring when available" ... test those two on and off.
- Scopes should be showing the correct color space in the lower left corner, if not, right-click in the Scopes panel, set color space to the appropriate option.
- When exporting, ONLY use presets that have the appropriate color space in the preset name, such as HLG or PQ.
If you follow those, you should be able to work in HDR without problems in Premiere.
Neil
Copy link to clipboard
Copied
Now the SDR Workflow as of 3 March 2023
- Check clip Properties in the Project panel, for color space. All HLG or PQ clips must be set to Rec.709, though how to do that depends on whether they are log-encoded or not.
For log-encoded media, you have several options. You can use an Input LUT in the Interpret Footage dialog to normalize the media to Rec.709, or you can do so with other options later. Giving more options to your chosen process.
- If the clip is log-encoded, such as S.log3-cine, use the Project panel's Modify/Interpret Footage dialog. For your first choice, you can supply an "Input LUT" to normalize the clip, and also set the "Override-To" option to Rec.709. This handles the entire process here.
- Or you can set the "Override-To" option to the specific option for the log footage of the media involved. If the "Use color space from file" shows HLG or PQ, uncheck that option.
- And choose whether to use the Sequence setting for Auto-Tonemapping to normalize the clip to Rec.709/sRGB, or use a LUT or manual normalization process in the Color Workspace Lumetri panel.
- Make sure the scopes show the correct color space, Rec.709, in the lower right corner. If not, right-click in the scope's panel and select Rec.709 from the color space options.
- In the Preferences, make sure that "Display color management" is checked on all Macs and most PCs.
- For exports, do NOT use any preset with HLG or PQ in the preset name.
Their auto-tonemapping operation is an application of specific mathematical algorithms to remap both dynamic range and color volume to within Rec.709 specs. NOT a simple LUT! Much more detailed, specific formula.
Although if you have a normalization LUT you would prefer, you can use that either in the Interpret Footage Input LUT slot, or by selecting the log type in the Interpret Footage dialog, but deselecting auto-tonemapping, you can apply the normalization LUT in the Color Workspace Lumetri panel.
Is the result of their algorithms identical to how you might see the image via some other process? No, of course not. But then, there isn't any "perfect" process to get the "exact real image". All transforms, including manufacturer provided ones, do things a little differently than any other, and all can still be proved to be "mathematically correct".
I would note, that there is not a single camera made that has a totally accurate monitor on the camera. Not even the $70,000 Red and Arri or Sony rigs. If they need an accurate monitor, they bring a highly calibrated and expensive monitor on-set for checking the image.
This whole thing that there isn't any "perfect" representation of a camera file, is why pro colorists have a number of transforms for different media. One might work perfectly for a group of clips, but ... not ideal with this other clip of the same format. So they use a different transform for that clip.
Adobe's auto-tonemapping algorithms will bring dynamic range into SDR/Rec.709 without either clipping whites or crushing blacks, not losing a single pixel. Something that is hard at times to accomplish with the simple lookup table or LUT.
And they also do a pretty decent job of bringing color volume to within the sRGB color space.
But again, that is expected to be a starting point ... a high quality start point ... for you to mod the image to your heart's content. You have all the data possible available to you.
I would note that Mac users do have a special problem outside of Premiere with SDR/Rec.709 media. If your Mac is set to Rec.709, it will not show the clips correctly, as they use only the camera transform function of gamma 1.96 but not the display transform function of gamma 2.4, required for professional use. And used internally by Premiere Pro.
I have heard there is an option for Macs in the system or for the monitor, of "HDTV/Bt709-Bt1886" ... which when used while you also deslect the option for 'system gamma boost' ... gives a pretty close match to an actual reference monitor for Rec.709.
Neil
Copy link to clipboard
Copied
I appreciate the in-depth responses. However, upon trying the detailed steps for both HDR and SDR workflows, I have still not been able to bring the footage close to/back to it's original quality. The only other thing I can think of is the fact that the clips are .HEVC files. Are they not very compatible with Premiere?
Copy link to clipboard
Copied
Define "original" ... as seen where, on what? What's the difference between Pr and whatever else you view this through? And what is that ... else?
And I'm quite serious in asking the questions.
As someone who works for/with/teaches pro colorists, I'm around a lot of discussions about how something "should" look. And while the following is understood as a practical matter by colorists, for many others, it's dangnably frustrating.
First, no camera made has an accurate, calibrated (and calibratable) screen. Not even the $70,000 Red, Arri, & Sony rigs.
For any need for accurate viewing during shooting, they bring special and calibrated/profiled external monitors on-set. They don't 'trust' the camera image.
Second ... there is no perfect "view" of any image data wherein all other views are "wrong", as color volume capabilities, metamerism, slight gamma shifts, how bright the viewing environment is, there are tons of things can and will be involved.
So the thing pro colorists do is have those spendy Grade 1 Reference monitors (and yes, that's a specified thing) ... with a breakout device feeding that monitor from the computer, so neither their computer OS nor the GPU can touch the signal; and then, the not only run a calibration software with expensive spectrometers to create a LUT for that device, they run a profile check after applying the LUT to make sure that they are technically 'accurate' to a very high degree ... low deltaE numbers.
And even then, two identical monitors, side by side, both calibrated/profiled with the same system, showing the same signal ... will look slightly different to the eye.
So when someone says "make it look like it did on my camera" to them, colorists have to work to not roll their eyes.
Nor is there a perfect transform or normalization for all files from X camera. There are some that you may prefer overall, but ... on specific clips, you would probably prefer a different one. Which is why colorists will have a go-to transform process for X camera, and a number of alternates they'll jump to, for those inevitable clips where their normal default isn't looking great with that specific clip.
So the view from the camera itself, say, is one way of tranforming a file from image data (numerical values) to visual data. But not necessarily the "correct" and definitely not the "only" way.
Creating digital image data, then returning the digital data to visual response via a viewing device, just isn't that precise a system, never will be.
Frustrating? Yea.
But never expect two different screens to show the exact same image. Let alone different entire systems.
Neil
Copy link to clipboard
Copied
I'm no pro-colorist, as you can probably tell, but thanks for the insights.
Anyway, this is what it looks like in Google Drive on my Asus VG238 monitor. It does not have HDR display capabilities, but still displays a better image:

This is what it looks like in Premiere:

As mentioned in my reply to Kevin below, my project file has unfortunately been lost due to external drive corruption out of nowhere (too add to the frustration...). I'll be sure to revisit this thread once I'm back up to speed.

Copy link to clipboard
Copied
Hi wpmac,
Looks frustrating. I can relate and have switched off HDR on my iPhone and work in 709 until a future date. To fix existing issues sounds tricky when it really should not be. I am really sorry about that. Now that tone mapping is here in 23.2, can you show us a screen shot of your sequence settings? That may help us assist you.
Thanks,
Kevin
Copy link to clipboard
Copied
Hi Kevin, thanks for the reply. Unfortunately, the external drive that I was storing the project file on has become corrupted and unreadable. Once I get back up to speed from my cloud backups, I'll be sure to post the sequence settings here.
Copy link to clipboard
Copied
Back up to speed, here are my sequence settings:

Copy link to clipboard
Copied
Have you tried with the Auto-tonemapping off, does that make a difference?
It looks to me like primarily a saturation problem. Which is certainly an easy and quick thing to set in Lumetri.
Neil

Copy link to clipboard
Copied
I came across this thread looking for solutions within Premiere for HDR iPhone footage but I've tried all the same suggestions with no luck. The best solutions I've found are not in Premiere. The absolute best is going into *gulp* iMovie and turning off HDR as explained here:
https://www.youtube.com/watch?v=DGaU9CZE7_Q&ab_channel=Technolobe
I also found if I export out of iMovie on my desktop to ProRes it looks as intended as well. In both instances the footage looks exactly the same to me as it does on the iPhone. However, I don't see a way to batch clips with this method so it is very tedious. There is also a Resolve workflow, but that still requires some manual color adjustments and does not look exactly the same.
https://www.youtube.com/watch?v=mv5sF7hR2Bk&ab_channel=JohnW.
Hopefully Adobe fixes this issue soon because I've been getting more and more jobs that involve working with HDR iPhone footage.


Copy link to clipboard
Copied
UPDATE: I ended up trying Apple Compressor ($50) and this is by far the best solution I've found. I can convert to ProRes and set the color space to rec. 709 and batch all my clips. Then when I bring the footage into Premiere the color is nearly identical to the original HDR footage and ready to edit. These are the settings I used, it did give me a warning message when I went to export but worked fine regardless. I kept my file names the same and saved to a "converted" folder so I was able to relink my media directly to these new converted ProRes files and not need to re-edit anything.

Copy link to clipboard
Copied
unfortunately, compressor is Mac only but does have a full feature set that allows batch processing and customizable presets. ... If anyone has a comparable windows solution, please post it...

Copy link to clipboard
Copied
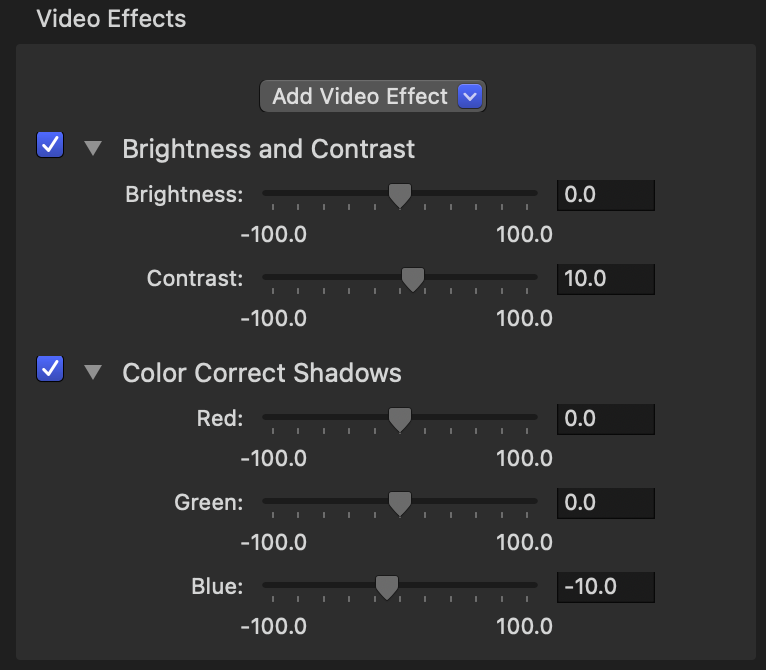
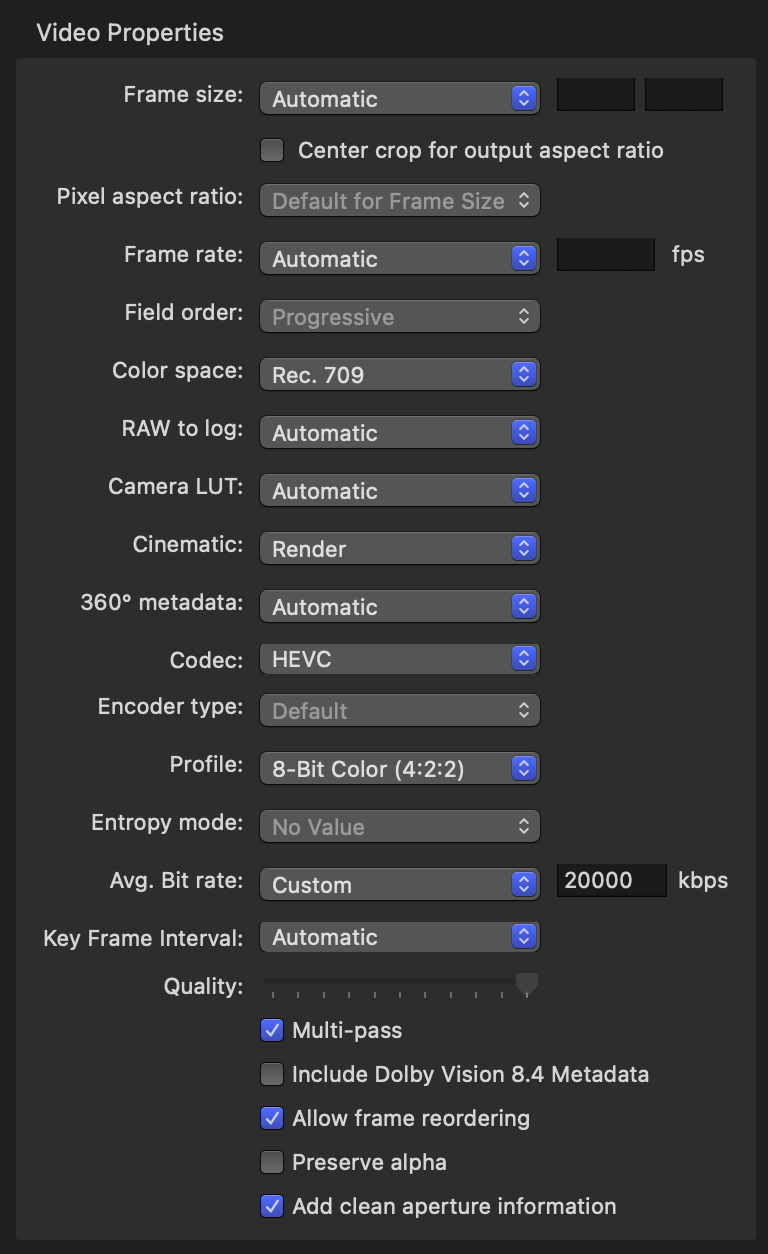
Chiming in here, after much internet research and first-hand experimentation, I also found Apple Compressor uniquely useful (for Mac users, of course). My end-product is for social media, so I didn't want to work in ProRes (it's just too big). I created a preset that takes my iPhone 14 Pro HDR video footage (cinematic or otherwise) and converts it to an SDR result which looks almost identical to the way Apple Photos or QuickTime displays the original HDR footage on my SDR monitor. Everything looks about as good as it can look, files are roughly the same size but have no additional visible compression artifacts (I tried many different bitrates—using 4K test footage), and now I'm free to edit in SDR. See screenshots for settings. One note: I'm not 100% sure if I'll keep the color correction I added to the shadows long-term—shadows were looking a little too blue in my test footage but it may be specific to the footage. All the other settings, as far as I can tell, do a great job converting HDR to SDR. You can even drag source footage straight from Apple Photos, and Compressor will dump the new files wherever you want.
For the record, I'm not a professional video editor or colorist. Just a content creator for my own music. Hope this helps!
Copy link to clipboard
Copied
Thanks for a great post there. Specific, detailed information that's very useful. Even though I'm total PC, that's nice info to have "here".

Find more inspiration, events, and resources on the new Adobe Community
Explore Now
 AdChoices