Exit
  • Global community
    • Language:
      • Deutsch
      • English
      • Español
      • Français
      • Português
  • 日本語コミュニティ
  • 한국 커뮤니티
0

How to speed up encoding in Adobe Premiere Pro CS6?

New Here ,
Jan 28, 2020 Jan 28, 2020

Hello, I'm having issures reducing export time in premiere pro (hence the title). Can you please help me out? Thank You.


Problem: 

I export videos that are generally about 4-5 minutes long. They currently take about 40 minutes to export. I expect that they should take about 10-15 minutes.


What I've done so far:

I've spent hours trying to figure out why my exports take so long. I've looked at the FAQ, I've watched tons of YouTube videos, and looked up a bunch of articles. I'm still having trouble.

- I've experimented with codecs, and export settings with no luck.

- I've set process priority to high

-Allocated 26/32 GB of ram to Premiere. It only ends up using 3 for whatever reason.


My system:

-Adobe Premiere Pro CS6

-32 gigs ram

-9th gen i7-9750H, 12 logical processors

-with an Nvidia Gtx 1660 Ti (6 Gb DDR6)

-I have a 500 gb ssd, and a 1tb HDD (Both with hundreds of  Gb offree space)


I run premiere on the SSD, and I export to the SSD as well. 


Current settings:

Premiere Pro usage.PNG

- note, process priority has been set to high.

- I also can't seem to get preiere pro to use my GPU like other people suggest doing. Such as the FAQ suggests: (https://community.adobe.com/t5/premiere-pro/faq-how-do-i-speed-up-rendering-exporting-or-encoding/td...)

CS6 project settings.PNG

I can't get the Renderer to not be Gray. I can't figure out how to change that.

- Note: if I render the project before exporting, Rendering takes about 20 minutes, and then exporting takes about 20 minutes. No time decrease overall.


sc6 workspace.PNG

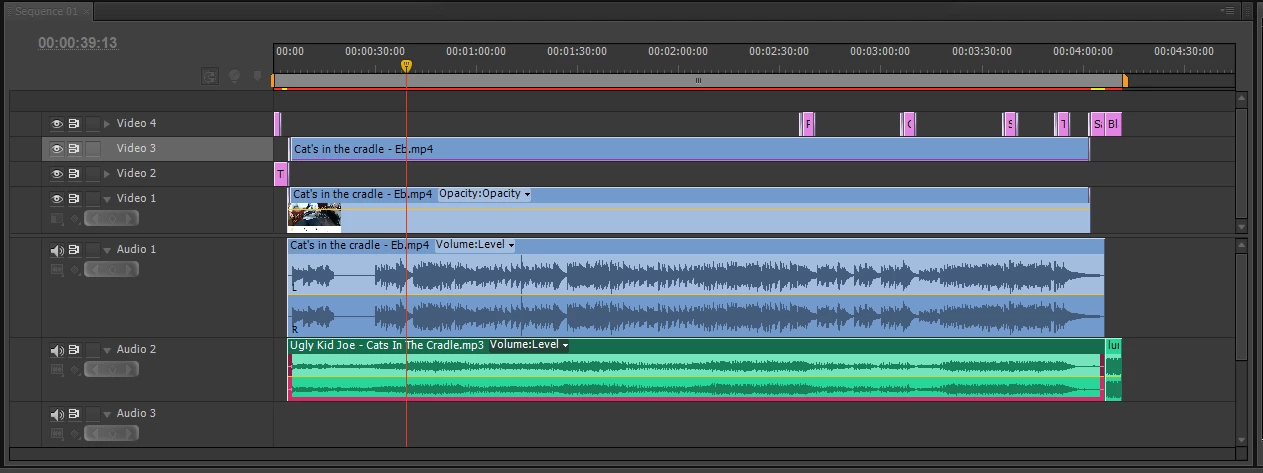
This is my entire sequence or project. I have a couple cross fades, and one trim for my effects. No color correction or anything like that. Sequence is 1080p, all clips are 1080p, and there are titles made inside premiere that are only text.

Sequence Settings.PNG

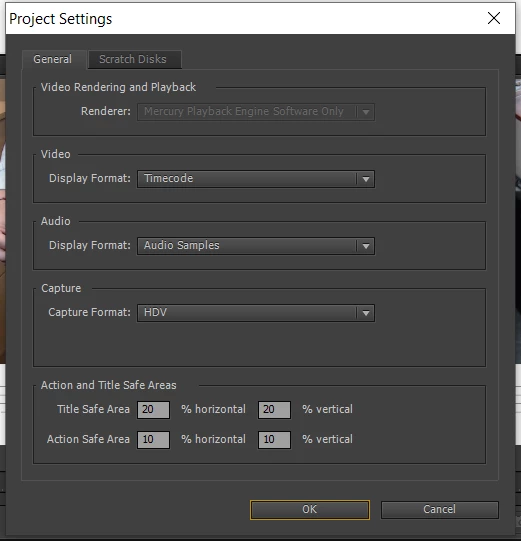
Sequence settings - I can't get the gray boxes to become not gray. I've found the max bit depth and max render quality don't really affect my time. Also, my system should be able to run it with them checked


Export settings.PNG

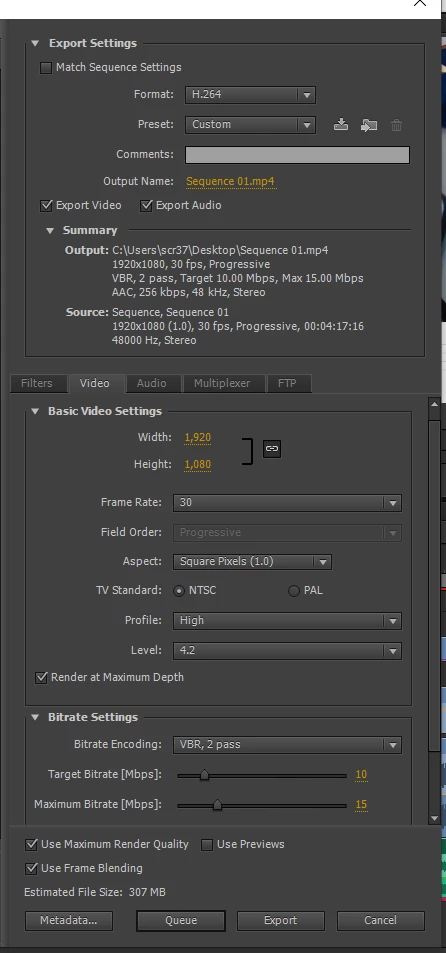
These are my export settings. 

I'm using H.264. A lot of the encoders don't like going 1080p with 30 fps for some reason. They like 24,25, and 29.97, but not the 30. As you can see, source and output settings have no scaling, source video is 30fps

- video profile at high or main doesn't seem to affect my export times, nor does render at max depth or max quality.

- VBR 2 pass seems to take slightly longer than 1 pass. I will switch it. I had previously used 5 for the target and the maximum, but have since increased it with no noticable change in export time.


Conclusion:

I hope it is clear that I have tried my best to reduce the export time and can't figure out what to do. 

My system is clearly capable of better performance, but I don't know how to tell premiere pro to use more resources than it currently uses.

I export as an .mp4 because I upload my videos to YouTube, and YouTube says .mp4 is the best upload format for them (last I checked).

I have also tried exporting the same sequence on a 2010 laptop with an old i5 and 4 gigs of ram with no GPU, and it exports in a similar timeframe as my new computer. This also leads me to think it is a settings issue and not a hardware issue.


I hope I've made it very clear all the setting you might need to know to understand my problem and what all I've done so far. 


Thank you for your time. 

TOPICS
Error or problem , Export , Performance
5.9K
Translate
Report
Community guidelines
Be kind and respectful, give credit to the original source of content, and search for duplicates before posting. Learn more
community guidelines

correct answers 1 Correct answer

Community Expert , Jan 28, 2020 Jan 28, 2020

Check this tutorial on how to add the graphics card. CS6 is old and your GPU is much newer, so incompability issues may occur, or not. [Tutorial] Enable CUDA on After Effects/Premiere CS6


Next, un-check Render at Maximum Bit Depth, Use Maximum Render Quality and Use Previews in the Export Settings dialog. In the Sequence Settings, un-check Maximum Bit Depth and Maximum Render Quality as well since the preview codec is just MPEG2. Use those settings only if you know for sure what they actually

...
Translate
Community Expert ,
Jan 28, 2020 Jan 28, 2020

Check this tutorial on how to add the graphics card. CS6 is old and your GPU is much newer, so incompability issues may occur, or not. [Tutorial] Enable CUDA on After Effects/Premiere CS6


Next, un-check Render at Maximum Bit Depth, Use Maximum Render Quality and Use Previews in the Export Settings dialog. In the Sequence Settings, un-check Maximum Bit Depth and Maximum Render Quality as well since the preview codec is just MPEG2. Use those settings only if you know for sure what they actually do and that you need them. Most of them are render hogs and most of them are of no use when exporting 1080 to H.264 @ 1080.


The source footage matters as well, SD footage renders out faster than 8K.

Translate
Report
Community guidelines
Be kind and respectful, give credit to the original source of content, and search for duplicates before posting. Learn more
community guidelines
New Here ,
Feb 05, 2020 Feb 05, 2020

Thank you for your reply.


I followed the video, and it showed what to do for After Effects, but I found the name of what I was looking for was CUDA, so I was able to use that to find a video that gave me results. Thank you for the link.


For my video settings, I found the following gave me my desired results and cut the export time down to about 2-3 minutes:

Keyframe distance: unchecked

Video Profile: Main

Bit rate - 1 pass, target 10, allowable 15 mbps

max depth: unchecked

Max quality: unchecked

Frame Blend: unchecked


Playing around, I could turn a couple of those on or off and it didn't affect anything, but having all of them checked slowed it down. 


I also tried a 2 pass VBR, but it was pretty grainy and I had better quality for the 1 pass. I don't really understand why, but as long as it works I'm happy. Once I got the time down to about 2-3 minutes, 1 or 2 pass didn't change my speed, but I see how 2 pass would theoretically take longer, and for most people would. 

Translate
Report
Community guidelines
Be kind and respectful, give credit to the original source of content, and search for duplicates before posting. Learn more
community guidelines
Community Expert ,
Feb 05, 2020 Feb 05, 2020
LATEST

Grainy video is probably because you are using Preview file; I would not use them if I were you (wrong/lesser codec).


Translate
Report
Community guidelines
Be kind and respectful, give credit to the original source of content, and search for duplicates before posting. Learn more
community guidelines