Exit
  • Global community
    • Language:
      • Deutsch
      • English
      • Español
      • Français
      • Português
  • 日本語コミュニティ
  • 한국 커뮤니티
0

Keyframe zoom without pan

Contributor ,
Dec 16, 2024 Dec 16, 2024

I want to zoom in slightly without panning - but am having problems.  In the 1st screen shot, my playhead is on the keyframe where i want the zoom to start.  The 2d screenshot shows the next set of keyframes with a scale of 70 increased from the previous scale of 65.  However, the image has drifted to the left, so that the man's head is no longer centered.  I thought if I clicked on Motion while on the position of the 2d set of keyframes and centered the man's head, this would achieve what I want, but instead, there is further drift between the 2 sets of keyframes, with the frame drifting first to the right and then to the left before landing on the 2d set of keyframes.  What am I doing wrong and how do I get a dead on zoom from the 1st set of keyframes to the 2d?  Thanks.  


Barton5C39_0-1734405457406.png


Barton5C39_1-1734405584971.png


TOPICS
Effects and Titles , How to
1.1K
Translate
Report
Community guidelines
Be kind and respectful, give credit to the original source of content, and search for duplicates before posting. Learn more
community guidelines

correct answers 1 Correct answer

Contributor , Dec 24, 2024 Dec 24, 2024

Thanks to Larry Jordan, I now know that I can't achieve the desired effect using a single clip.  Rather, if you want to zoom into the middle of a section of a larger clip, you need an acnhor point set to the middle of that clip, which is not where it will be for the larger clip.  So I created a new clip, aligned the master clip to it at the point where i want to start zommin in, using the detail clip to zoom in on.  It was a lot easier than it sounded and the results were quite good, but did tak

...
Translate
Community Expert ,
Dec 16, 2024 Dec 16, 2024

You should only have beginning and ending keyframes. So, put your playback head where you want to start the zoom, and click the stopwatch for position and scale. Go to the end, and set the position and scale where you want it to end. 

Translate
Report
Community guidelines
Be kind and respectful, give credit to the original source of content, and search for duplicates before posting. Learn more
community guidelines
Community Expert ,
Dec 16, 2024 Dec 16, 2024

Scaling in Premiere Pro is always centered around the clip's anchor point (the blue circle with crosshairs), and in your case, it looks like the anchor point might be off-screen.

To change this and ensure the zoom is centered, you’ll need to adjust the Position values to align the anchor point back to the center of the frame.

Translate
Report
Community guidelines
Be kind and respectful, give credit to the original source of content, and search for duplicates before posting. Learn more
community guidelines
Contributor ,
Dec 17, 2024 Dec 17, 2024

Thank you for your reply.  I am trying to understand more about how the anchor point works.  It looks like it is present at the point where you upload media into your project - the 1st screen shot below shows it in the center of my image when opened.  When I use Motion to zoom and pan to the image's left side, it moves off the screen to the right (2d screenshot).  So it seems to "travel" with position and (possibly?) zoom change.  By the point where I want to create a zoom in (not pan) between 2 sets of keyframes (screenshoits 3 & 4), the anchor has moved off the screen, as you note.  Do I need to "reset" the anchor at the 1st set of these keyframes to be at the center of the image?  Is there an "automatic" way to do that or do I eyeball it?  (Presumably, resetting it does not affect its prior positioning.)  Bottom line I need to know how to adjust the Position to realign the achor point back to the center of the image - but I don't know enough to do this.  Thanks for any help you can provide.  


Barton5C39_0-1734456089226.png


Barton5C39_1-1734456356110.png


Barton5C39_2-1734456877563.png

Barton5C39_3-1734456927398.png


Translate
Report
Community guidelines
Be kind and respectful, give credit to the original source of content, and search for duplicates before posting. Learn more
community guidelines
Community Expert ,
Dec 17, 2024 Dec 17, 2024

I notice your anchor point is the same in all 4 screenshots. Try using rotation, you'll see the clip moves around the anchor point.

Sometimes a short screen movie would be a better choice.

If you want to avoid confusion, please use the Adobe given names of things. <<When I use Motion to zoom and pan>>. I can't find the "zoom" and "pan" controls on the screen, are you referring to Scale and Position?


Translate
Report
Community guidelines
Be kind and respectful, give credit to the original source of content, and search for duplicates before posting. Learn more
community guidelines
Contributor ,
Dec 17, 2024 Dec 17, 2024

Thank for your reply.  Re zoom and pan - I am animating a still image.  Zoom and pan are the animation effects I am trying to achieve - by using different Scale and Position values.  I hope that clears up any confusion.


Re rotation - I don't know enough to know how to use this to achieve the desired goal, which is to recenter the anchor point for the keyframe(s) where I want to zoom in slightly.  These are the last 2 sets of keyframes in my screenshot(s).  I don't know how to "move" or reset the anchor, nor how to determine the value I want to reflect its desired position.  Perhaps this is too complex to explain step by step and I need a tutorial, online if available.  

Translate
Report
Community guidelines
Be kind and respectful, give credit to the original source of content, and search for duplicates before posting. Learn more
community guidelines
Adobe Employee ,
Dec 17, 2024 Dec 17, 2024

Hey there @Barton5C39,

@Barton5C39

When I get into a situation like yours, I often start over and begin with a fresh workflow so you don't end up having to work harder.

My step order in achieving a good slide show workflow involves.

  1. Import the images.
  2. Lay them out in order in the timeline.
  3. On the first image, locate the Anchor Point.
  4. Drag the Anchor Point to the focal point where you want the animation to end. For example, for a human face, I often place the anchor point between a person's eyes. If I'm zooming or panning to a front door of a house, I place the anchor point there.
  5. I continue to each image and do the same thing until the anchor point is set for all the images.
  6. Only then to I animate position and scale. Sometimes you don't heed to animate position because the anchor point is set in an optimal place. If you do, it may only be a slight reposition.
  7. I may choose to right click on each keyframe and choose ease out for the outgoing keyframe and ease in for the incoming keyframe. That looks nice.
  8. If you have a dissolve between images, you might need to go to the panel menu (on the tab - with three lines) and deselect "Pin to Clip" so you can drag the keyframes either before or after the transition takes place - but that's a bit of an advanced technique.
  9. Render the animation to see the true speed and velocity of the animation.
  10. These steps are likely on YouTube, except the anchor point tip. That comes from my After Effects training and days as an animator on feature films.

All this may take a little practice. I hope the steps help you create a great slideshow!


Cheers,
Kevin


Kevin Monahan - Sr. Community & Engagement Strategist – Pro Video and Audio
Translate
Report
Community guidelines
Be kind and respectful, give credit to the original source of content, and search for duplicates before posting. Learn more
community guidelines
Contributor ,
Dec 17, 2024 Dec 17, 2024

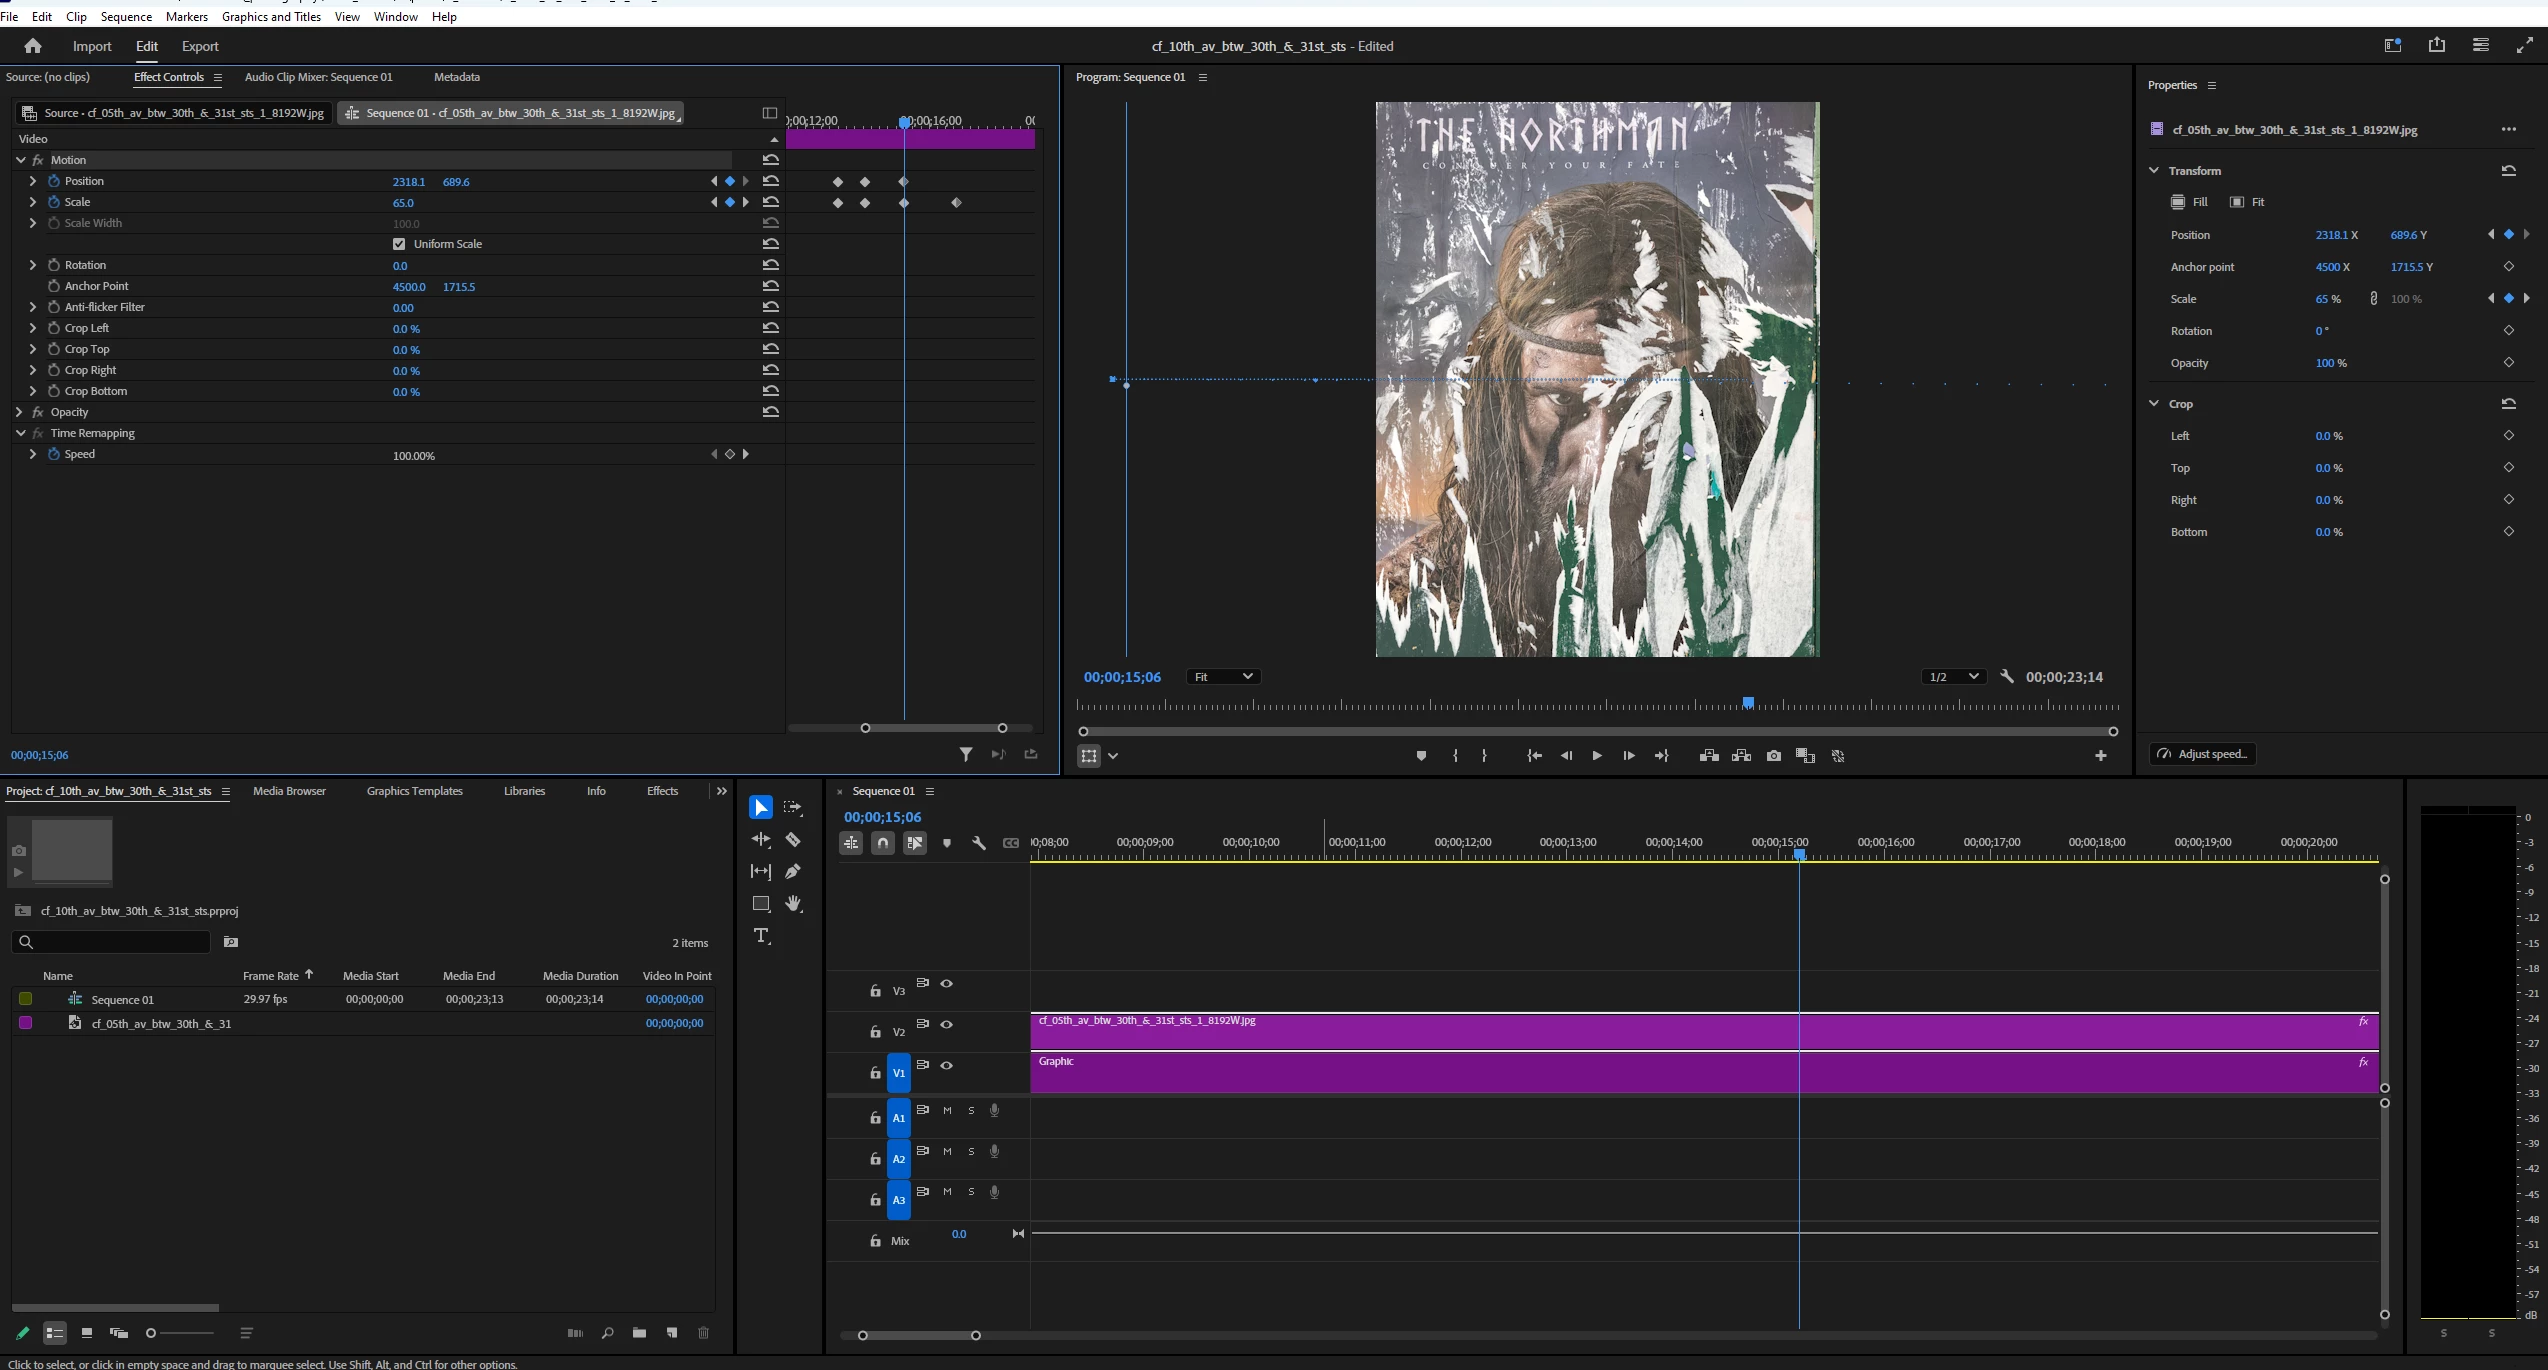
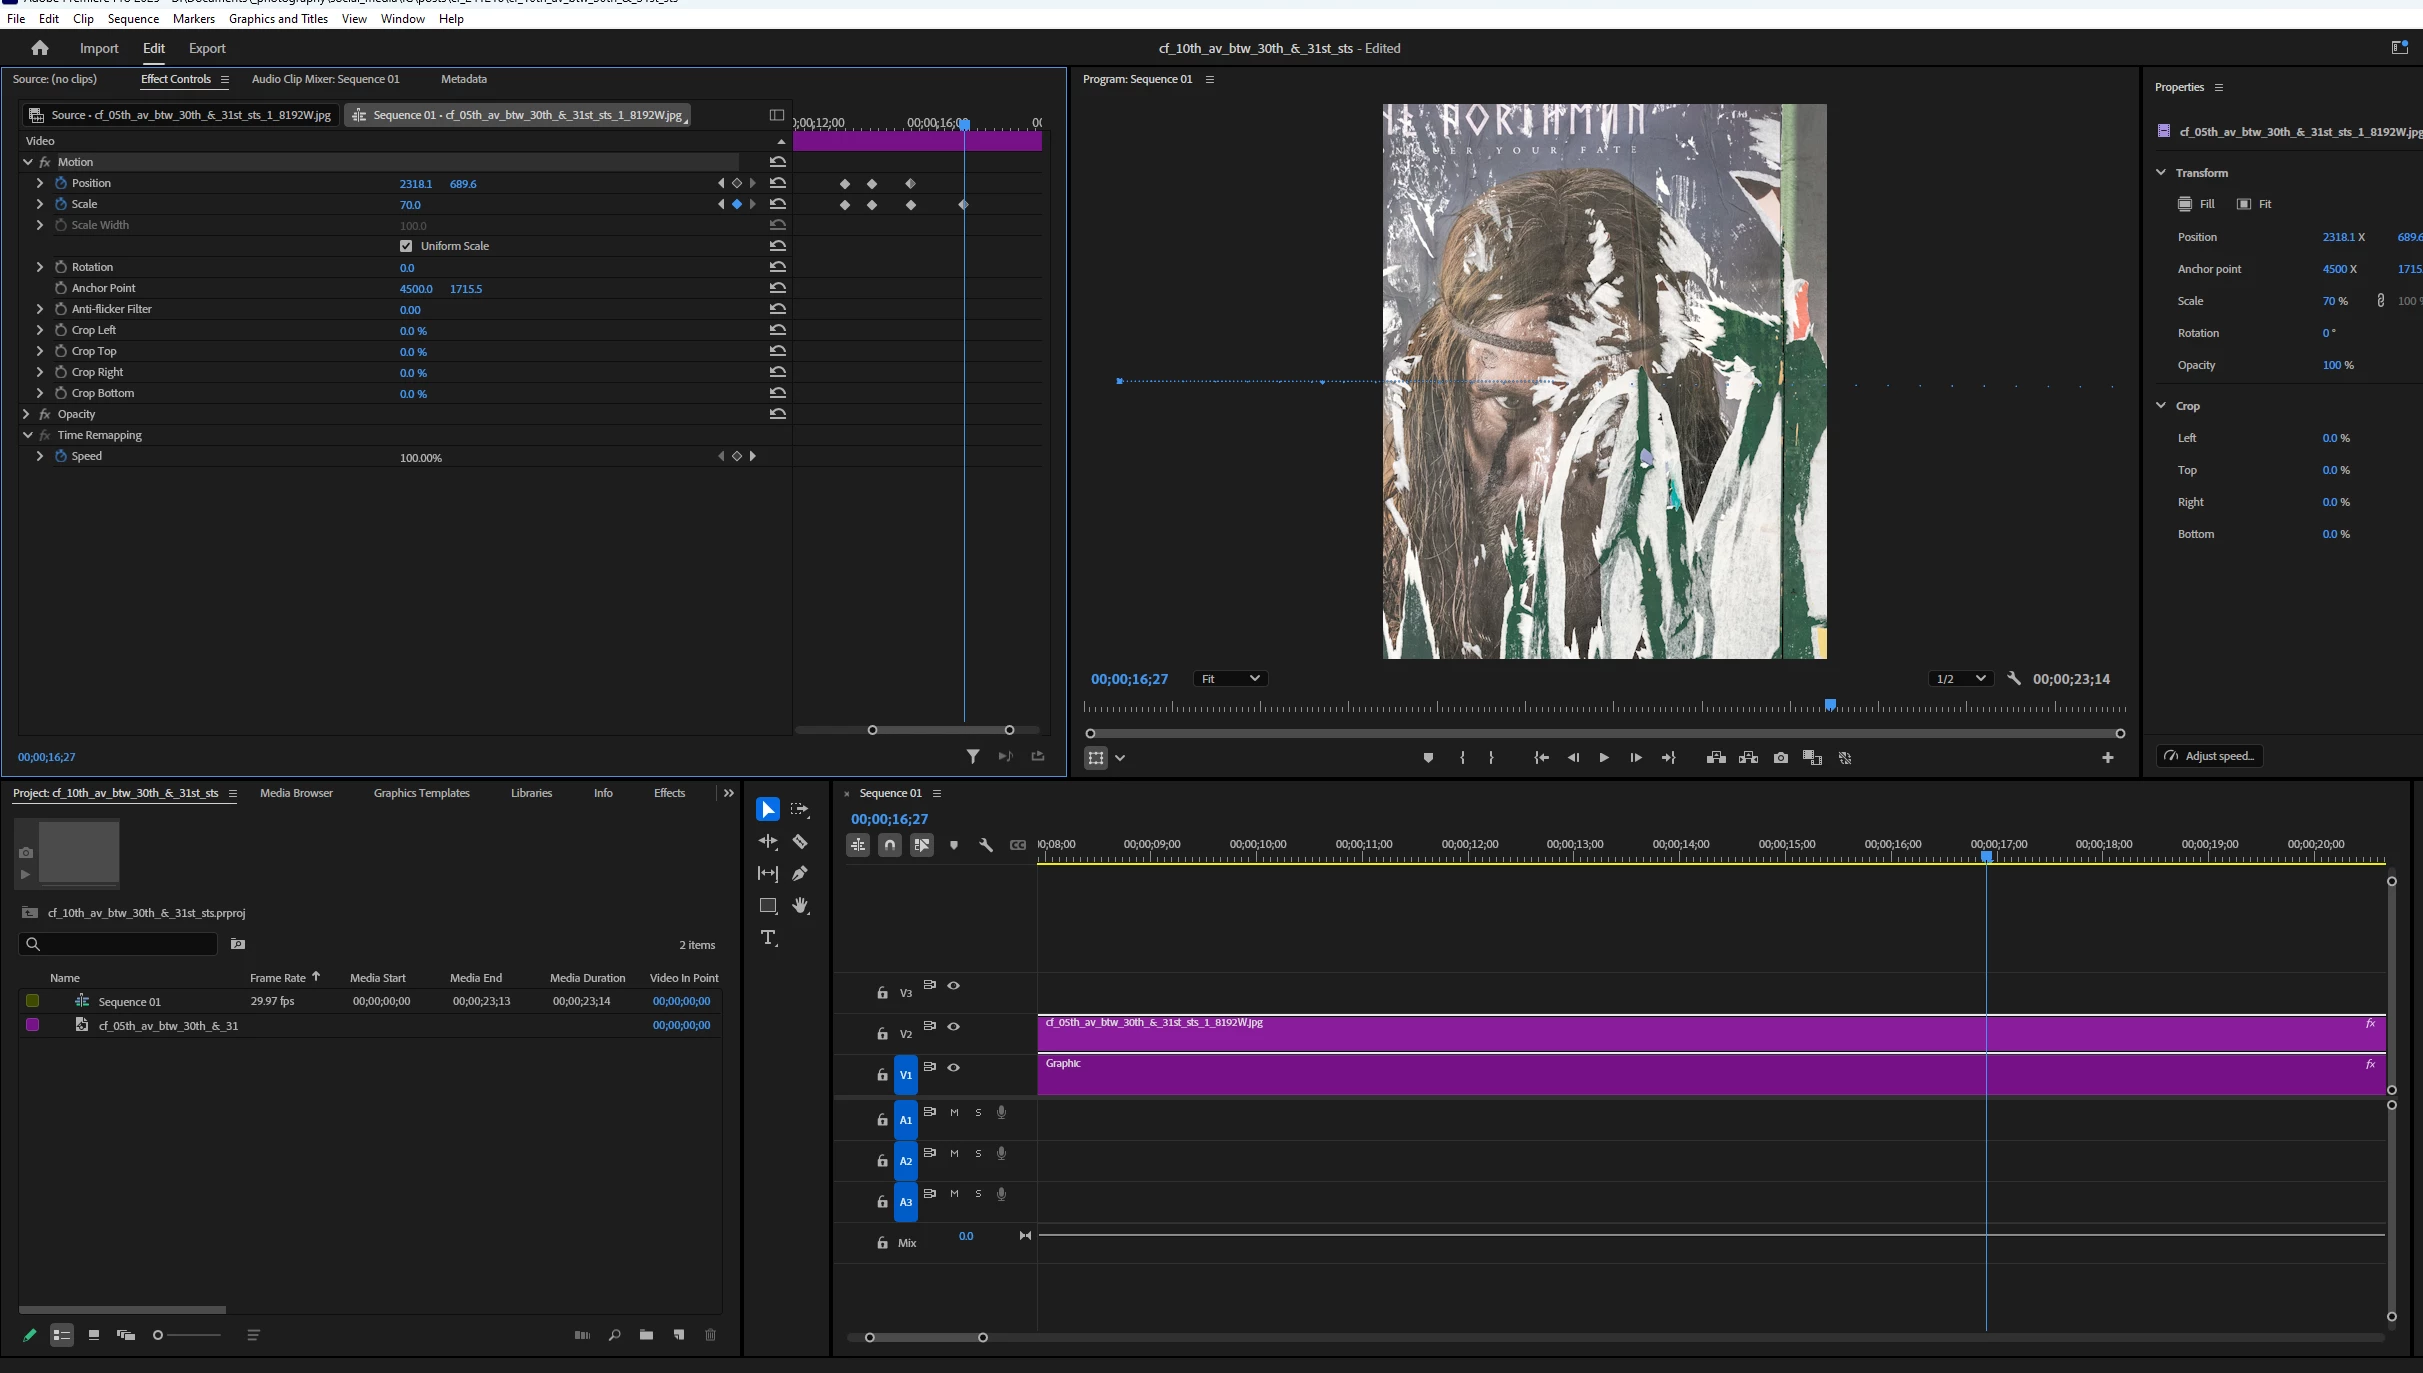
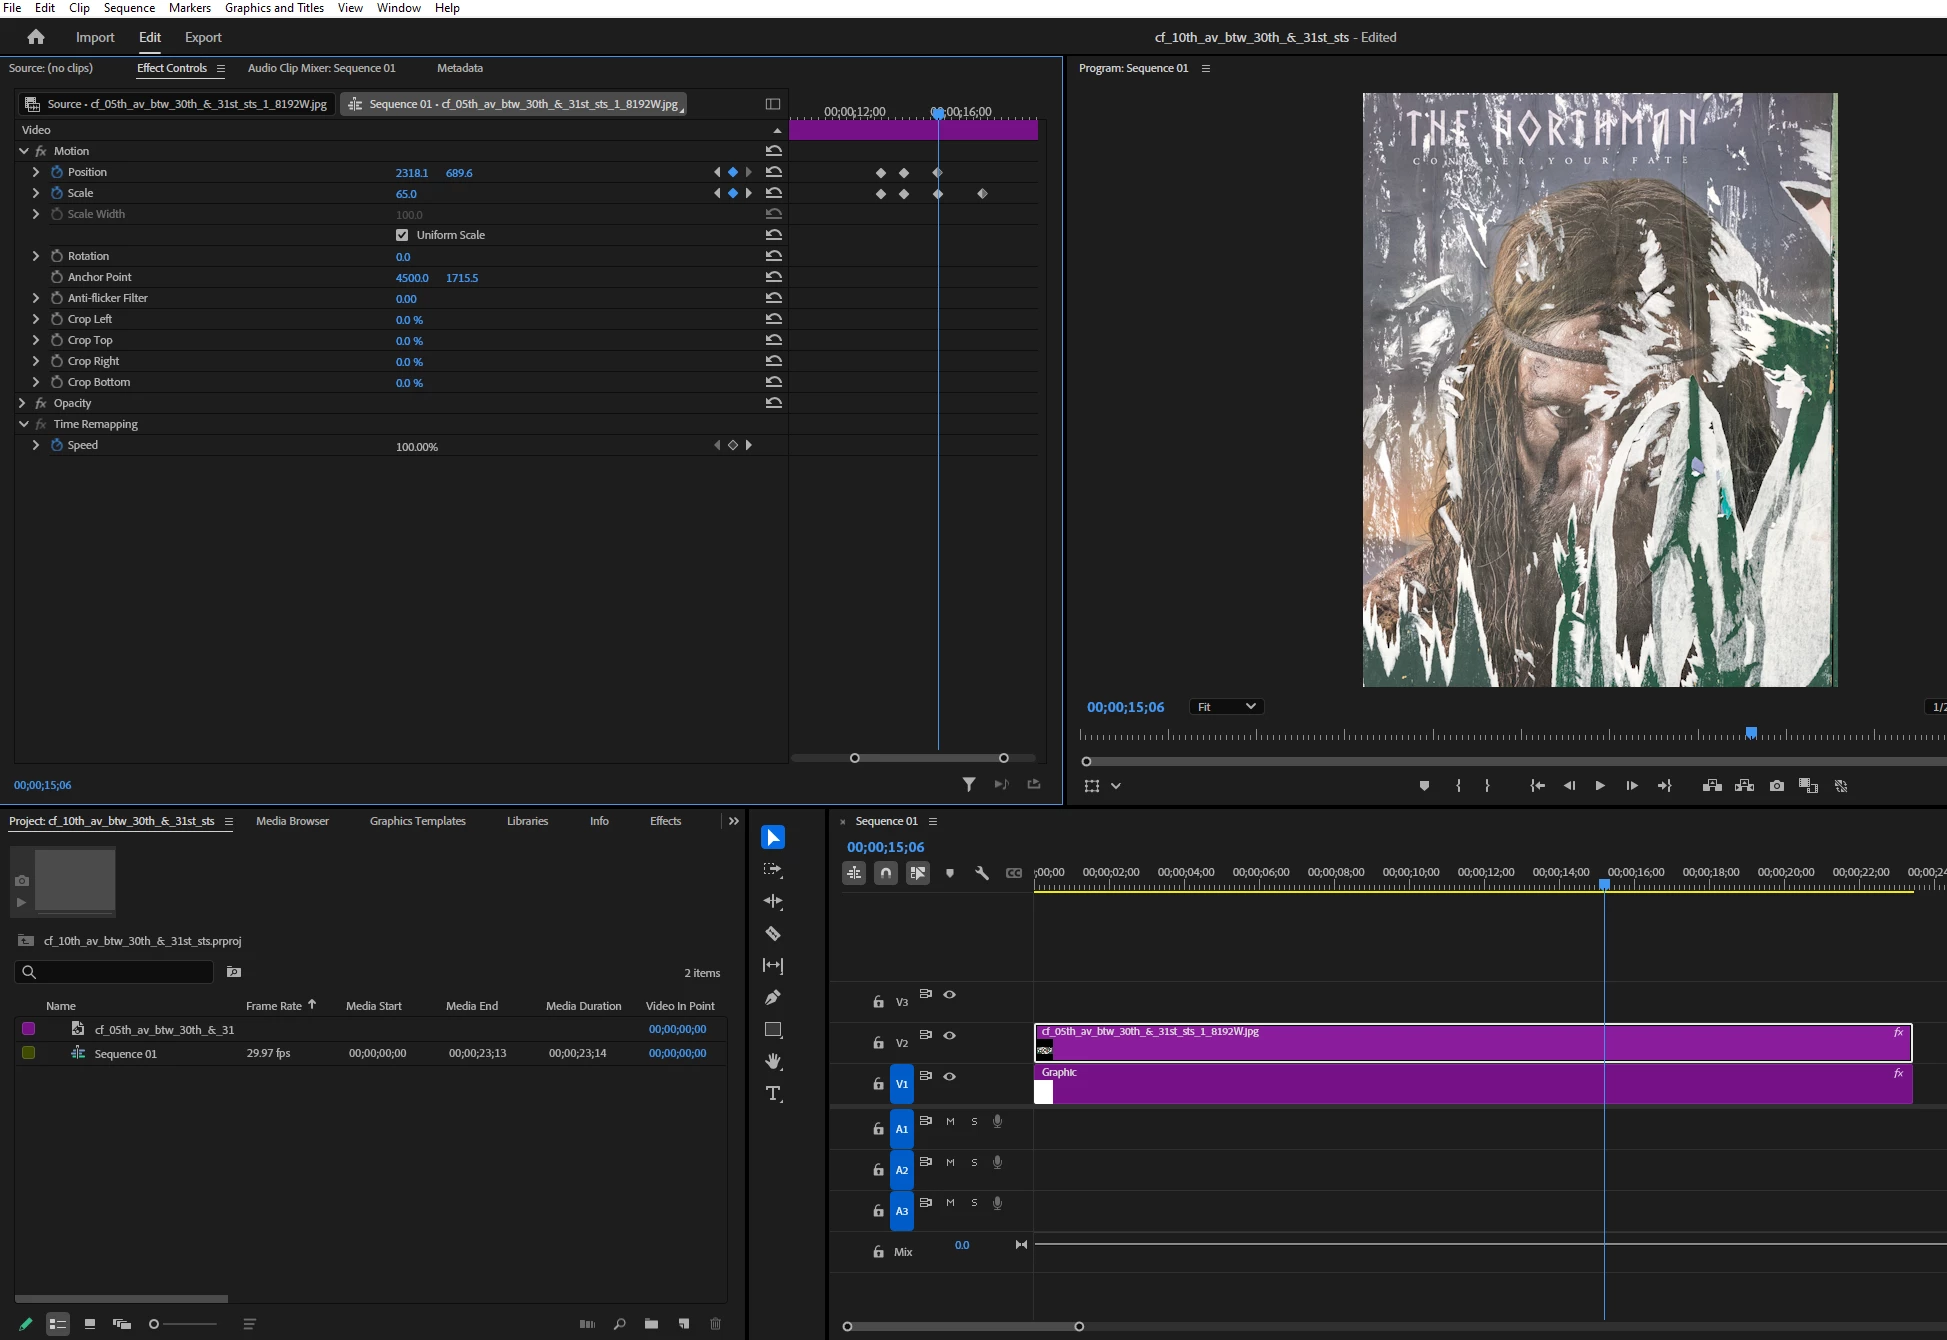
Thank you for your information.  I wonder if my workflow would be different given that I am animating a single image.  I am making an Instagram reel and using a very large image with an aspect ratio of approx. 3:1.  I start out showing the entire image so it fills the frame from side to side, at 12% scale, then zoom in so that it fills the frame from top to bottom, at 38% scale.  I then pan from left to right across the image and can see the anchor point moving, eventually it leaves the screen entirely.  I want to pan to sections of the image, then zoom briefly in, then repeat that in other areas.  I want the zoom to be dead on.  What I am experiencing instead is "drift," with the image both panning and zooming.  I thought if I left off a position keyframe for the 2nd set of keyframes and only increased the scale, the image would only zoom but that's not happening.  See screenshots below showing the image at the 1st set of keyframes and at the 2d - the man's face is no longer centered, but towards the left side of the frame.  What's happening here?  Without putting in a position value, is the zoom using the acnhor point as a reference?  If so, how do I change it, and how do I know what to change it to?  Many thanks.  


Barton5C39_0-1734486901743.pngBarton5C39_1-1734486933544.png


Translate
Report
Community guidelines
Be kind and respectful, give credit to the original source of content, and search for duplicates before posting. Learn more
community guidelines
Contributor ,
Dec 24, 2024 Dec 24, 2024

Thanks to Larry Jordan, I now know that I can't achieve the desired effect using a single clip.  Rather, if you want to zoom into the middle of a section of a larger clip, you need an acnhor point set to the middle of that clip, which is not where it will be for the larger clip.  So I created a new clip, aligned the master clip to it at the point where i want to start zommin in, using the detail clip to zoom in on.  It was a lot easier than it sounded and the results were quite good, but did take some work.  

Translate
Report
Community guidelines
Be kind and respectful, give credit to the original source of content, and search for duplicates before posting. Learn more
community guidelines
LEGEND ,
Dec 24, 2024 Dec 24, 2024

That your anchor point moves shows that you had things done out of order ... and admittedly, it isn't obvious.


You need to move the anchor point before doing anything else ... so if you have, you need to start over.


So ... with your original clip on a newly created sequence, first center the anchor point.


Then your scaling will work as you expect.


But if you've done anything else, your anchor move is "down the line" from the first scaling operation. Exactly as Premiere thinks you want it to be.

Translate
Report
Community guidelines
Be kind and respectful, give credit to the original source of content, and search for duplicates before posting. Learn more
community guidelines
Community Expert ,
Dec 24, 2024 Dec 24, 2024
LATEST

There's 22 mentions of 'anchor' in this thread. Both Paul and Kevin replied a week ago on using that to help you. I'm glad Larry was able to break thru. 🙂

Translate
Report
Community guidelines
Be kind and respectful, give credit to the original source of content, and search for duplicates before posting. Learn more
community guidelines