

- Home
- Premiere Pro
- Discussions
- Re: Lumetri Scopes: sharpen over 100 and below 0
- Re: Lumetri Scopes: sharpen over 100 and below 0
Lumetri Scopes: sharpen over 100 and below 0

Copy link to clipboard
Copied
Hello,
I am learning how to read Lumetri Scopes by just watching others' work via internet.
And I came to face this problem.
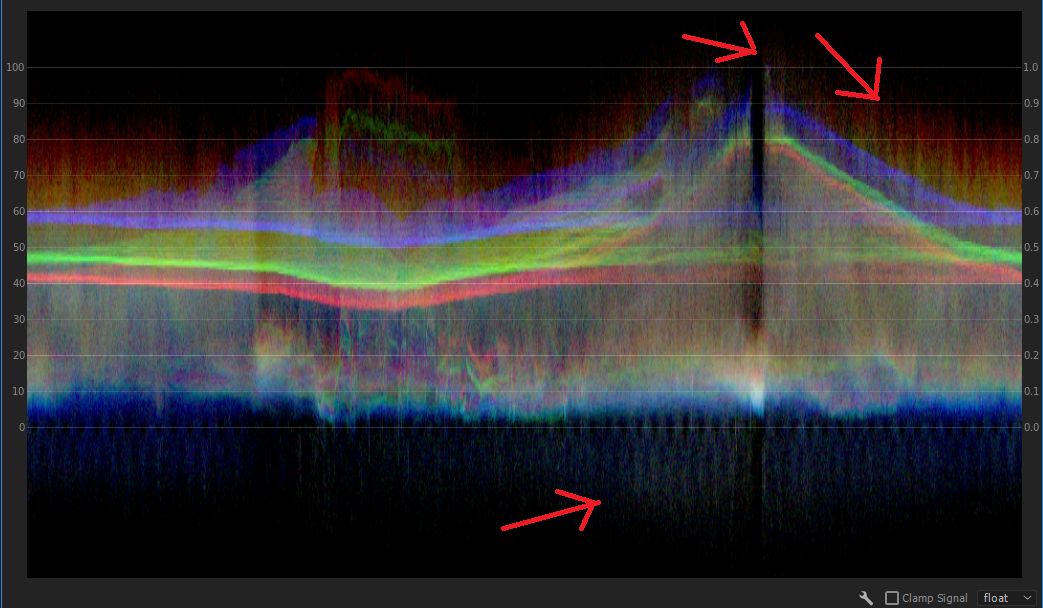
this is the lumetri scopes of my video, and unlike other, I've spotted this spike like chart going over 100 and below 0.
Well... I have just figured out that giving sharpen causes this outcome. Is it okay to just ignore this wavelength?
or should I just never use sharpen tool? or, I just wondered if there is a way to give sharpen option and limit this chart with in 100 to 0.
Thank you for hearing,


 25
Replies
25
25
Replies
25

Copy link to clipboard
Copied
What amount do you have set in Sharpen? I can only get something approaching this when I set it to 50 or above ... which is seems rather over-sharpened on any of my media.
Sharpening works by increasing local contrast, essentially. Hence, if you've got it set way high, you get a sort of contrast "flare" I suppose you could call it.
Neil
Copy link to clipboard
Copied
Hi Neil,
Well, that was sharpen 20. the video is meant to be played on VR device. Since VR device blurs out video, (that is how I felt about it), I kinda gave sharpen option to all videos. On top of it, the video was taken in flat, so I got more confused in contrast and color, etc.
Thank you for your reply
Copy link to clipboard
Copied
I'd suggest doing a contrast correction to take care of "flatness", and use sharpen as sparingly as possible.
The two main 'forms' of contrast are Luma (brightness) and Chroma (color). Sometimes pulling down the Saturation can allow for a bit higher Contrast setting without seeming too contrasty, which does help with the "feel" of sharp. And if the video then seems a bit low-color, add some Vibrance back (low-saturated colors) into the clip with the Vibrance setting in the Creative tab.
Unless you've got a pretty high "K" of material, 4k or above, video typically has a bit of softness to the moving parts of an image. If you're new to the medium, it can be confusing ... all of us when new tend to try and make our videos CRISP ... and then realize, that other work often isn't as crunched looking as ours is ... I know I had this issue at first. So I'm wondering if the expectation might be a bit high.
How about showing us a screen-grab of the program monitor, so we can see what the project looks like? Might get some suggestions about contrast, saturation, sharpness, all that.
Neil
Copy link to clipboard
Copied


Well, this is one of many video, but I felt this one could be a good example. The video is taken flat so I had to give least 140 of saturation to bring greenish color and curve out red in cloud area. (4096x2048 btw)
Copy link to clipboard
Copied
I'm about headed to the sack now. In the morning, I'll take a look at these on my editing rig. Might have some suggestions. would be nice if you could "drop" me a few frames of this clip to work with myself.
Neil
Copy link to clipboard
Copied
Well, I literally have no idea what this "drop" you meant, is there a way I can upload this specific clip to you? I would like to share, but don't know how.
Daniel
Copy link to clipboard
Copied
Sent a "private message" (pm in JIve-speak) to you about sharing the file.
As to what I can see ... I think I'd like to get a quick try at this, I think there's some other things I might do instead. It looks like you've got a Three Way Color Corrector effect being applied after Lumetri to give some cyan to the the highlights. And of course, I can't see if you've got any other tabs of the Lumetri panel working ... I certainly would with this or really, any other piece.
Basic tab is good for neutralization of clips ... as it sounds, to get a visually neutral look so most clips seem similar. It certainly is not set to really "finish" a clip. Then you give a proper feel for the day, time, scene & such working your way down through the other tabs. And while the Luma (RGB) is a very useful scope, I'll typically use the Vectorscope YUV, RGB Parade, and Waveform (Luma). To each their own.
Neil
Copy link to clipboard
Copied
Ok ... this doesn't look like a log image, the contrast is pretty full only the saturation is near nothing. Looks more like someone tried to make a log-type image by changing camera settings, and the saturation is set too low. Trying to recover much can get it looking bizarre, as it does when simply too little color data was recorded to begin with.
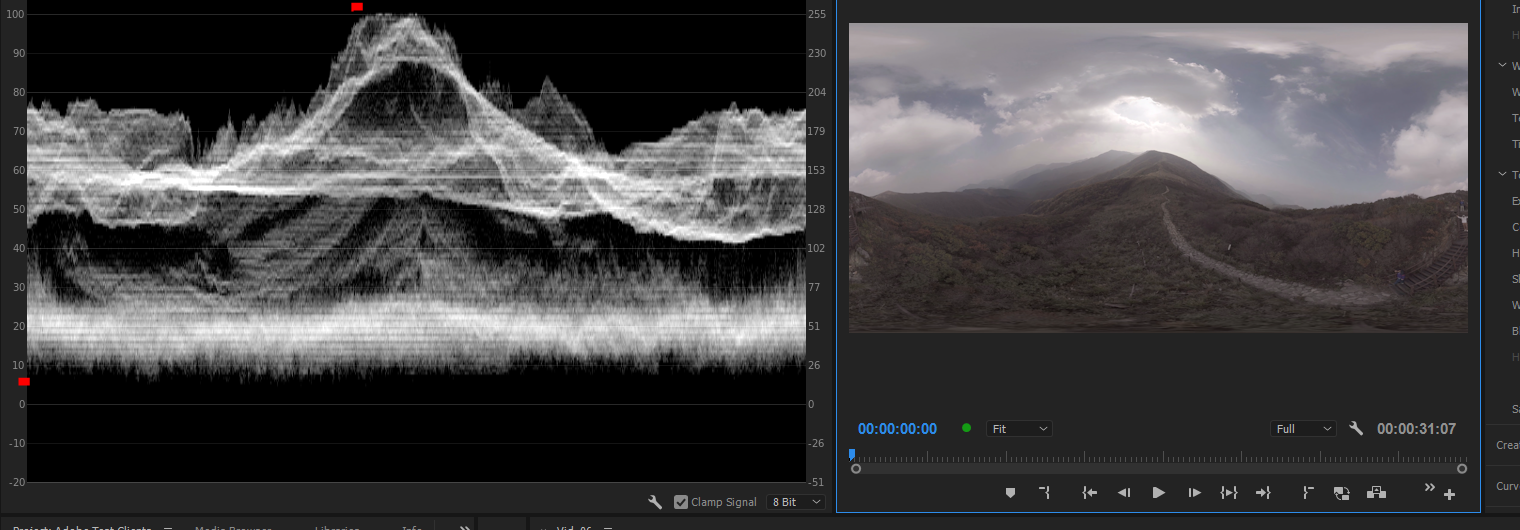
Waveform (Luma) shows a pretty full-range image, slightly over-exposed ... whites near clipping, no blacks or anything below ten.

Yowza that's low.
Neil
Copy link to clipboard
Copied
So starting here ...

In about ten minutes I got here ....
With the following corrections ...
Copy link to clipboard
Copied


Not perfect, with a bit more time I could do more, but ... that's a good start.
Neil
Copy link to clipboard
Copied
Oh, so this is not how log footage looks a like?
Also, I gave same setting, but it seems bit darker than your.

Daneil
Copy link to clipboard
Copied

Copy link to clipboard
Copied
Depending on the screen calibration we're both running, yes, one would normally be a bit different than the other. And I don't know of course what your monitor setup is ...
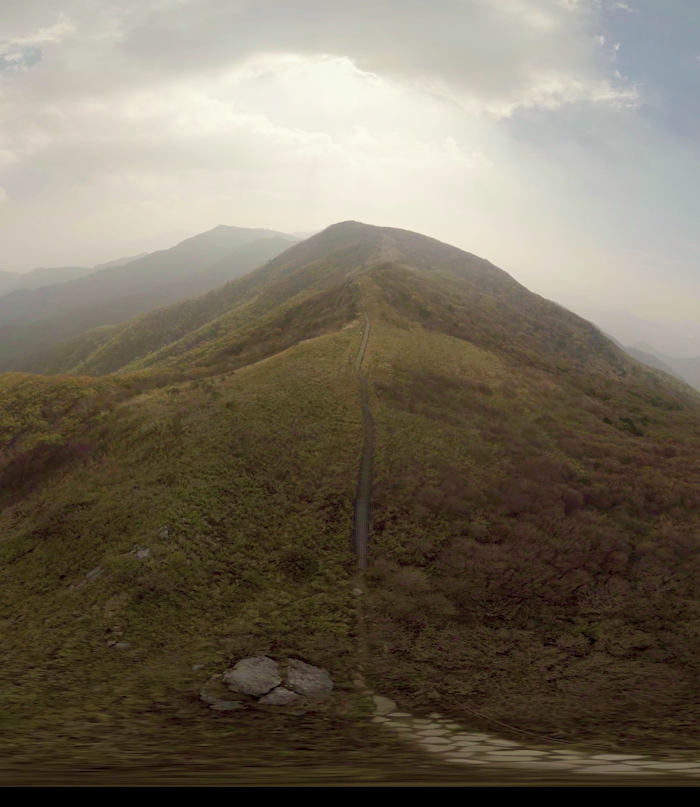
Has this helped you some? That's ... intriguing ... media to work with. The "green" foliage mostly has a lot of various red hues in it ... more so in much of it than yellows. And it goes very quickly to macro-blocking with much change in either chroma or luma contrast values.
It's a fantastically beautiful scene, with an incredible sky. I played a bit more with it on Saturday, just ... because it's so fascinating.
Neil
Copy link to clipboard
Copied
Of course it did! From 'finding that these footage are not log image' to 'seeing how you color correct these footage' have been great help to me. I mean, I watched some instruction videos from various web, but they weren't really that helpful since the video settings are different. Again, thank you so much. I Just wondered, you did not show me any work on the Curve, I assume you did not touch the panel, is there are a reason behind that?
Plus it is 'very' possible that the foliage may contain a lot of reds in them. I wasn't there when they took this video, but I heard they had to shoot them during Autumn, and had to make them look a like summer. It is quite.... "stubborn" request from the National Park Association to begin with.
Daniel
Copy link to clipboard
Copied
Ahh ... shot in Autumn trying to make it look like summer ... that explains some!
Most of the log media I've seen is narrower of 'scale' on first looking at it than this ... say the bottom is something like 20-40, the top somewhere around 70. Maybe as much as 80 So it isn't just compressed in saturation, but in values as well. Being as this is pretty full-range for luma, it doesn't appear as a log style that I am familiar with. Which is not to say that it isn't a log format of some kind.
In my working with it on Saturday, the only curves adjustment that I found really useful was a slight drop in the lower mid reds. This made the "I think it's green" foliage a lot more actual green. One of my biggest frustrations with the Curves panel in Lumetri is the small size ... it makes it hard to do numerous subtle adjustments ... also, the Hues circle, which at first I thought was cool ... getting numerous subtle shifts has proven harder. It is so easy to make a bigger adjustment than one intends. This is an image where subtle RGB and Hues curves adjustments could indeed help.
Something I'm really interested in is what drone shot this? I'm assuming it's a drone ... and what settings were used? Is there any way you could find out?
From checking it with MediaInfo, it looks to be an 8-bit long-GOP with standard Rec709 encoding. And as fast as it goes into macro-blocking when one tries to push or pull it for dynamic range/contrast/saturation, I'm wondering if with a simpler sensor and high compression.
The super-low saturation though doth puzzle me. What it reminds me of is of the tests I made when I first got my GH3, and numerous people online were testing for best quality of image from camera settings through post. So as they did, I shot from the lowest contrast and saturation settings on up through the camera's scale of settings. I got a very similar thing to this shot of yours when I shot with the next-to-lowest contrast setting and lowest saturation setting. Looked sort of log-ish, BUT ... it couldn't be recovered in grading like real log media is designed to do ... there just wasn't enough chroma data in the file.
Like this, I could get a full dynamic range, but ... trying to separate the blacks from the shadows stretched the shadow data so far that it "broke" and went into macro-blocking. Trying to get full saturation back meant some colors weren't really there ... or looked thin ... and other colors were comparatively way too "hot", though the overall saturation in the scope was still low.
The real log media I've worked was actually pretty easy to slap a curve or contrast adjustment onto, and then only needed a bit of increased saturation, and then looked very "normal". If this is a log format, I'd want to see what the camera maker's corrective LUT does with the media.
Neil
Copy link to clipboard
Copied
Oh.... so that's what we call them.... "macro-blocking", I was so frustrated with this but had no idea what to call them.
I can tell you what camera and drone they used, but I do not know what camera setting the director set.
They used GoPro Hero 4 Black.
The drone, I am not 100% sure but, it had 6 propeller and fold-able leg, so I assume it is "Spread wing s900".
Daniel
Copy link to clipboard
Copied
Okay, so I did some research and there is this Gopro's protune mode called flat.
(Video link below shows its' option)
Hero4 Black: How To Set Up Protune - GoPro Tip #507 - YouTube
What I am not sure is, do definition of Log differs depend on the brand of Camera?
I mean, I thought Log, Flat, and RAW all means same.
Copy link to clipboard
Copied
No ... flat, log, and RAW are very different things.
Starting with the least of the three ... "flat" ... that means setting the camera's user controls for typically lower than "standard" amounts of contrast and saturation so that you can be sure that all the data the camera's processor can record to disc is recorded. It prevents losing a few bits especially in the highlights and heavily saturated areas, but ... it will get maybe at most a half a stop of wider dynamic range (total difference between black & white points) than at "standard" settings. Given most "economy" cameras need all the dynamic range they can get, it's often worth doing, but still ... just gets a wee bit more. And needs to be done carefully or you lose data from doing it.
What you are doing to a certain extent is recording less data per pixel (relatively) to get a slightly wider range of pixels light-to-dark recorded. This is especially why dropping saturation past a certain point ... just means you no longer have the chroma data to work with. Some cameras (like my GH5) can easily go over-legal on Red saturation. Setting the overall saturation down to a point that doesn't happen helps my post-processing. BUT ... the next step down in the user-settings for saturation control just loses color data that can of course never be re-created in post, because ... the data isn't recorded.
Log ... the cameras that work in full Log mode record in specialized processing-to-chip. And to make a log format really work, it needs to be shot in 10-bit color mode, not the 8-bit that is all the bit-depth nearly all drones and DSLRs can create. The log-capable cameras also typically record a greater dynamic range than 'standard' while in Log mode, maybe 2-4 full stops worth of data off the sensor, and pass the entire range to card but in a special way. Although it appears on-screen in a very narrow or "flat" image from medium grey to light grey and with very low saturation, the actual full data for all the contrast range & saturation is still encoded to disc. Not the same as "flat" 8-bit at all.
The starting point in the difference between flat & log is that Log has often several times the data actually recorded to file!
RAW ... here, the full unprocessed input data to the sensor is recorded to disc without processing in the camera. A lot more data to work in post-processing even than log media.
As to different log forms ... yes, the various camera makers tweak the log format for their camera's sensor/processor capabilities and needs. They then create LUTs (Look Up Tables) that are designed very specifically to apply major curves work to alter the luma & chroma data to essentially reverse-engineer the log encoding into a "normal" looking say Rec709 color space. Many camera makers for those rigs make several LUTs per camera, to use for different color spaces in post.
Realistically, for most of the log media I've worked with, I can create a LUT to "normalize" the media that I may well prefer to the camera maker's LUT in fairly short time. So ... I've just made my own from scratch. I learn about that particular media along the way, which is useful.
A typical log workflow is to apply a corrective or "normalization" LUT to a clip, then do the neutralizing of that media in front of the LUT. In other words, put the normalization LUT in place, then do the neutralizing of color & tonality through the LUT.
In PrPro, that would mean using the Lumetri panel's Creative tab "Look" slot to apply the normalization LUT, and ... because the order of processing through Lumetri is strictly top to bottom, go back to the top of the Basic tab and use the temp, tint, and tonal controls to get them most natural/neutral looking image possible.
Then you go to the controls in the Creative tab, Curves, Color Wheels, and HSL to "complete" the grading work.
...............
The media you were given from that GoPro is highly compressed H.264 8-bit, and ... is what I think of as "thin" media, in that it's not got enough data to take much of a change of values without macro-blocking.
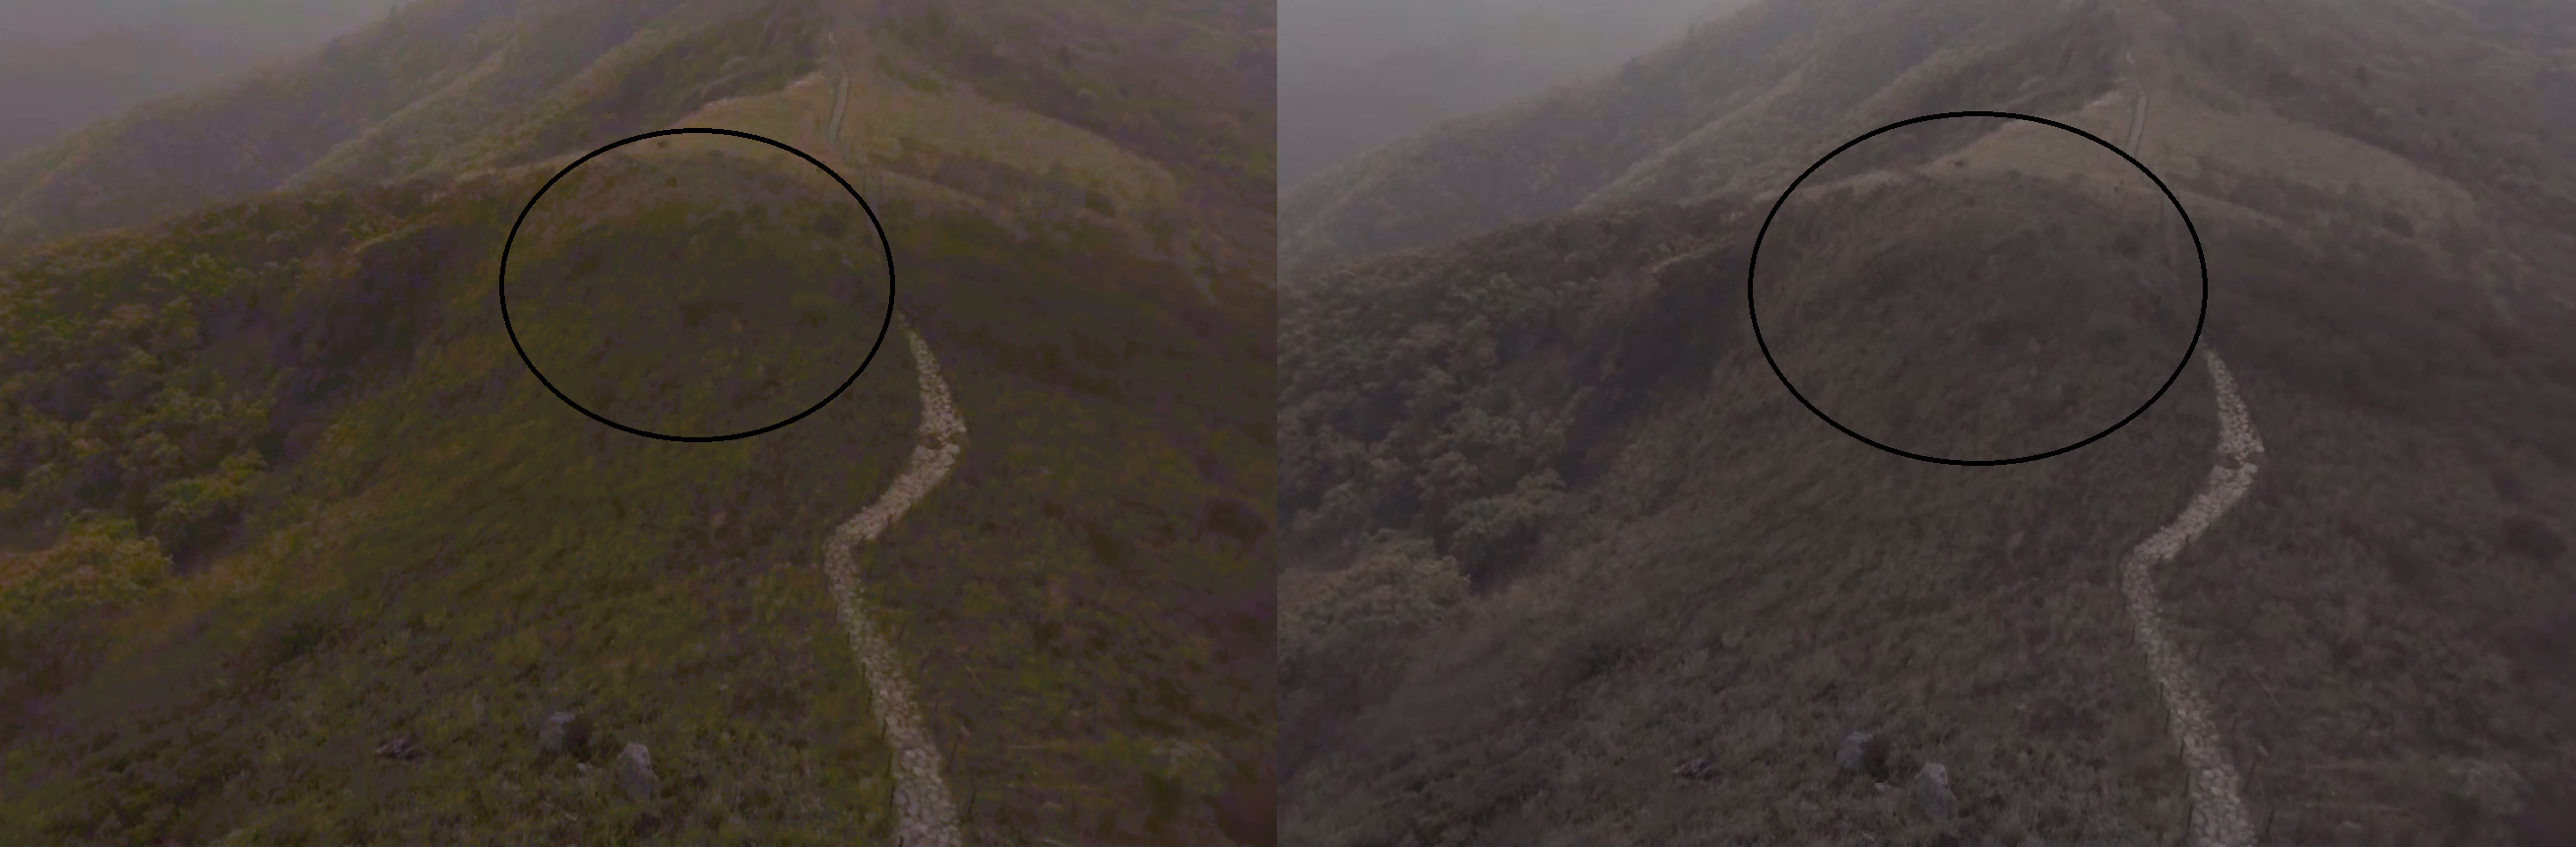
Notice in the hills to the left-center background, if you do much to push tones up or down, and start playback, you start seeing big blocky chunks with no data ... just flat groups of squares? That's macro-blocking. It was the biggest problem to try & do something with this ... if I did much of anything, I'd get m-b.
Think of your tones light to dark as being a rubber stretchable band. If you grab in the middle, and pull towards one end, that 'near' end band gets a bit thicker as you're pushing material towards that end. But look at the end you're pulling away from ... it gets thinner ... there's less material there. If you start with a very thin and hard-stretched rubber band, only a little pull from the middle to one end can cause the band to break.
That's your media. A very thin rubber band, essentially.
And as far as curves versus the other tools of the User Interface ... most of the "tools" in color correction actually work the same with the media as a curves tool would ... it's just the interface control uses a different "look", and feels a bit different while using it.
Neil
Copy link to clipboard
Copied
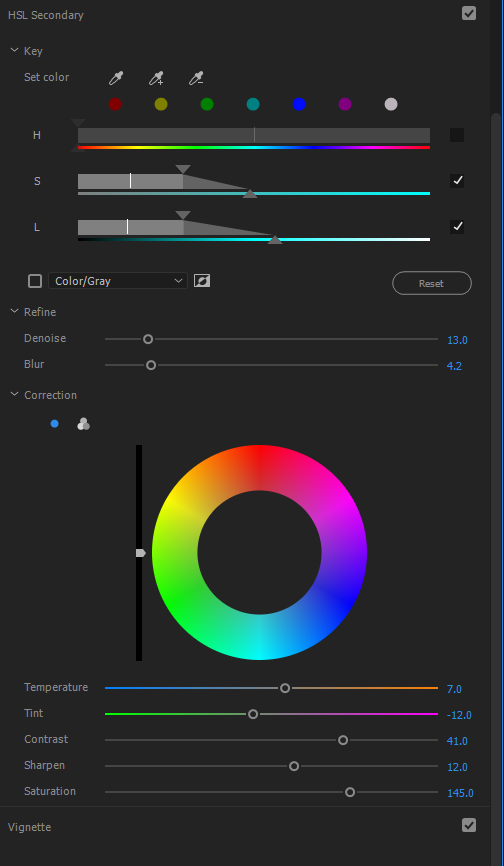
I just shared a new Look file with you via the shared files. With an accompanying LUT file, Client3.cube, to see what you think of these settings.
The LUT I created with a bit of a Curves setup in Lumetri, lowering the highlights end-point and moving the blacks end-point to the right just a bit, then bringing shadows up a bit to give a curve up to rolling off the highlights some. I think I did lift saturation also. Then with a touch of color wheels to balance the shadows & lift mids, and a bit of Sharpening in the Creative tab. All subtle adjustments.
Reset Lumetri.
Applied the LUT in the Input slot, then the other settings as you'll see when you apply the preset.
This is quite a test piece to grade ... so "thin" a media file that much of a touch anywhere gets noise & blocking and macro-blocking. This last bit got more done, there's not much noise to clean up, and I avoided any macro-blocking entirely as far as I can tell.
Interesting to see what you think.
Neil
Copy link to clipboard
Copied
Colorwise, it looks very natural, but I also found out that it takes out some small details in the shot. It is just slightest bit but it does not even have enough details to start with. Except that I would like to figure out about this LUT. I mean its kinda foggy (since I gave no extra setting) but that details in the sky, and the top of the mountain where sunshine looks amazing.
Also, when I look in a far distance, the shade of mountain looks bit odd due to actual fog.
Daniel
Copy link to clipboard
Copied
Are you talking about a LUT you used, or the one I made?
And yea, the fine detail is pretty ... thin ... through much of the shot.
Neil
Copy link to clipboard
Copied

I meant the one you sent me. I tried to balance brightness between light and shadow area on the mountain, but it is kind of tricky. It is bit weird to have bluish color on top of the mountain and not for the half bottom of the mountain. I lowered blue curve little bit, but the blue from the shadow also decreased.
Daniel
Copy link to clipboard
Copied
I realized just after I dumped that Lumetri afer exporting the LUT that I should have made screen grabs. Also, the brightest same seemed about 80% of the way through the clip, so that's where I worked.
The main activity is in the Luma curve. The white point I brought down a bit, enough to be sure all white points would be below 10.
The black point was slid to the right to steepen the slope, then i wanted to lighten the lower mids so I grabbed a point about the 40 level and lifted straight up. Not too much as the clip can't take much movement.
Then I did a slight tweak to the mid/upper areas on the red an blue curves to match them a bit. Very subtle. That I think was about it.
It's the two combined ... the LUT and the stuff I then did in the preset.
Neil
Copy link to clipboard
Copied
Oh, I see
Thank you for all your help, sir
Daniel
-
- 1
- 2

Get ready! An upgraded Adobe Community experience is coming in January.
Learn more
 AdChoices