- Home
- Premiere Pro
- Discussions
- Premiere Pro 2023 overexposing my video in the tim...
- Premiere Pro 2023 overexposing my video in the tim...
Premiere Pro 2023 overexposing my video in the timeline and export
Copy link to clipboard
Copied
I am a professional videographer and have been using Premiere Pro for years and have never run into a problem like this...
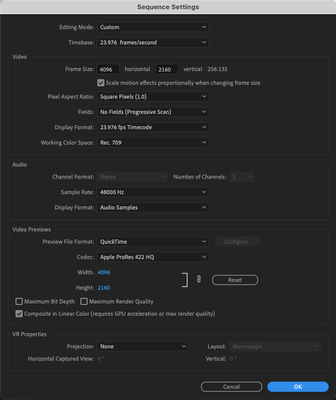
I am currently editing a video for my job using both a 4k camera and my iPhone 14 Pro (I've combined footage from my phone and this 4k camera before in a project and never had an issue) the footage looks fine when I import the footage into Premiere but once I move the footage onto my timeline to watch it, the color and exposure is incredibly blown out. Normally when I have footage that needs color correcting I will use Lumetri Color and adjust it till it looks good and I would use the same default settings I always use with no issue, however, after exporting my current project the footage is completely different (usually worse) Which I then have to go in and tediously color correct the footage to account for Premiere changing it in export. I've done some research and have tried a variety of different LUTs that many claims to fix this issue however nothing changes. I've attached screenshots of my export setting is, and my sequence settings, as well as a comparison of the same shot (the first one on the left is the original footage and the one on the right is the same shot but what it looks like on my timeline).
If someone could please take a look at these and let me know what silly thing I am doing wrong and what I need to fix, Thanks
Copy link to clipboard
Copied
I am a professional videographer and have been using Premiere Pro for years and have never run into a problem like this...
By @cas_118
Then you must watch this video by Karl Soule at Adobe that explains everything: Premiere Pro V22 - Understanding Color Spaces, HDR, and what that might mean to you - YouTube
Another great link: Solved: FAQ: How to fix saturated/over-exposed HLG/HDR cli... - Adobe Support Community - 12489252
Copy link to clipboard
Copied
Premiere 2022 came out a year ago with a completely rebuilt color management system and color handling pipelines, as mostly explained in the links Averdahl posted. I wrote the following forum FAQ ...
FAQ:PremierePro 2022 Color Management for Log/RAW Media
And another on HDR workflows in Premiere 2022 and forward. I'll give a quick summary below.
Basic Color Management 101 in Premiere Pro
Color space of clips AND sequence AND export preset/settings MUST be identical for a successful export. Therefore in practical terms, you have two choices:
- Work in the standard SDR/Rec.709 color space
- Work in the HDR/HLG color space
Of the two, SDR/Rec.709 is the 'standard' process, vastly easier to accomplish. HDR is still the Wild Wild West. I workf for/with/teach pro colorists, some of whom were the earliest adopters of streaming/network HDR capabilities. And were in fact hired by Dolby Labs to do the in-house training material for colorists on how to successfully work DolbyVision HDR in Resolve for network/streaming/theatrical release.
But most pro colorists have yet to deliver a single paid HDR job. Most screens don't handle it yet, and of those that do, many do not handle it well. And the image is all over the place. But ... you're welcome to go for it, just understand ... it's very different and you will at times get unexpected results.
Working in SDR/Rec.709
All clips must be seen by Premiere as in the sRGB/SDR/Rec.709 color space and range. To do that, check in the Project panel, right-click/Properties, look for the color space item.
For any clips that are HLG ...
- select one or more, right-click, Modify/Interpret Footage
- go to the bottom, and set the Override-To option to Rec.709
- go to your Timeline panel, check the Sequence settings ... make sure the working color space is Rec.709
- do your color/tonal correction now
- use ONLY presets that do not have HLG or PQ in the preset names.
In this case, for the OP, that would mean changing the working space of the iPhone clips as listed above.
Neil
Find more inspiration, events, and resources on the new Adobe Community
Explore Now


