

- Home
- Premiere Pro
- Discussions
- premiere pro won't export in original aspect ratio...
- premiere pro won't export in original aspect ratio...

Copy link to clipboard
Copied
There is probably a really obvious answer too this, but...
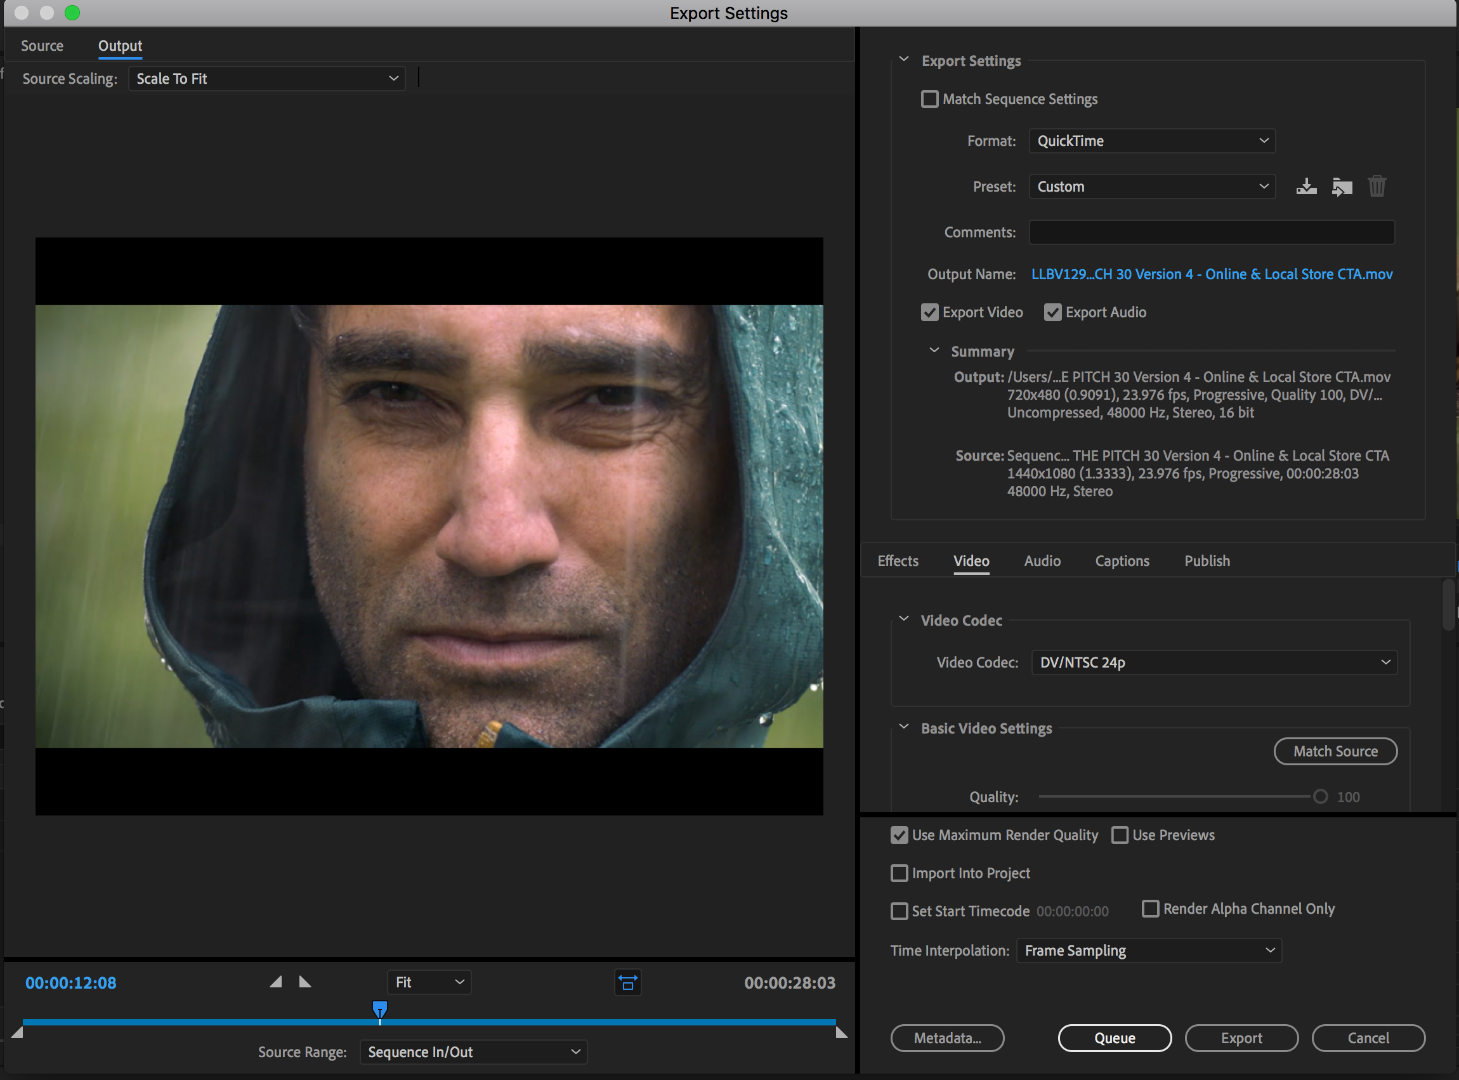
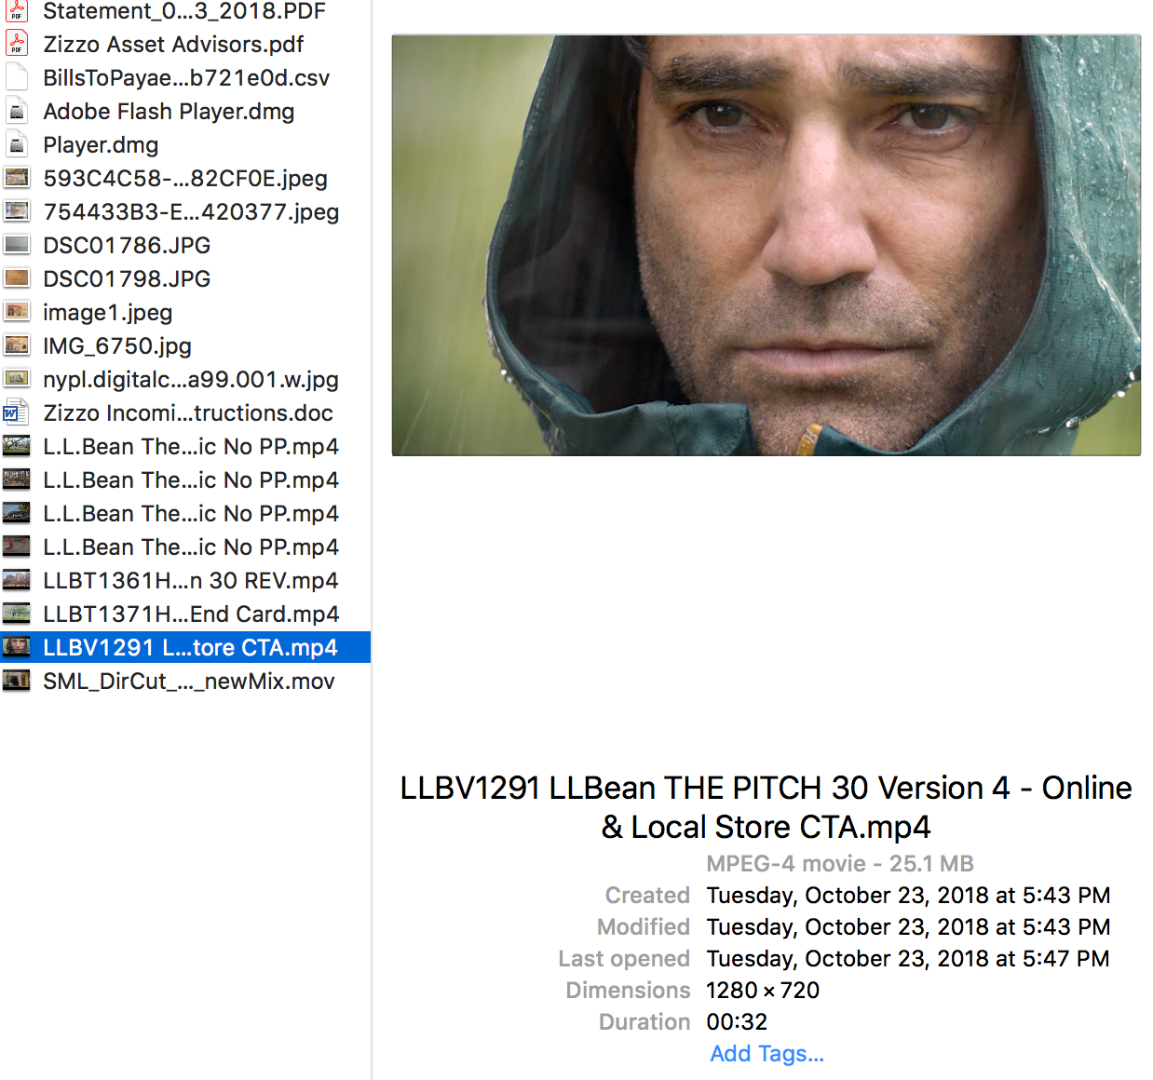
I am trying to export a project for which I imported a single 30-second MP4, 1280x720, for the purpose of color correction. To do this, I made cuts at every edit, so as to be able to individually color each segment. No problem with any of that, but when i go to export it gives me a finished piece in 720x480 4:3 - letterboxed - when the original was 1280x720 16:9... and the Export Settings dialogue box says that the source video was 1440x1080, when in fact it is 1280x720. (see screenshots - the first is the settings premiere pro wants to export at - the second shows my source material at 1280x720)
how can i get a 1280x720 finished piece!?
thank you!
-Joe


 1 Correct answer

You would normally create a new, empty timeline (menu File > New > Sequence) and drag one of your source clips into the empty timeline. You will be prompted by Premiere to Match the Sequence settings to the Source, click Change Sequence Settings. Now the sequence should match your source material - if the source is 1280 x 720, the sequence will be set that way to.
When you export the selected clips for color correction (menu File > Export > Media) check the box in the export settings to Match Seq
... 8
Replies
8
8
Replies
8
Copy link to clipboard
Copied
There are a number of strange choices made in your export settings, but first check your sequence settings (click anywhere in the sequence, go to the menu Sequence > Sequence Settings). From the screen shot you posted, it looks like you had your timeline set to 1440x1080 with a Pixel Aspect Ratio set to HD Anamorphic 1080 (1.3333). Is this your intention, to edit your source material on timeline set that way?
Secondly, you are exporting to NTSC DV which is 720 x480 pixels, which forces the letter boxing, is that your intended output format?
MtD
Copy link to clipboard
Copied
Thanks Meg!
No none of that was my intention, its just the way it came up.
When I go to Sequence Settings, there are so many choices, I have no idea how to set it up. What should i choose in order to be able to export as a quicktime in 1280x720 16:9?
thanks again...
Joe

Copy link to clipboard
Copied
No none of that was my intention
There's the underlying cause, you don't know what you're doing.
Solve that, and this problem goes away.
Copy link to clipboard
Copied
Thanks Jim - that's so helpful! You're a genius - not to mention a wonderful human being. I can't even imagine what yore work must be like. If only we could all be like you...

Copy link to clipboard
Copied
JIm's direct, but then ... when I first started in video post a few years back, there were a couple others around here who made Jim look positively sweet and lengthy of posting. They were rather short, critical, and ... extremely accurate in their analysis and responses.
You'd get answers like "Stupid noob mistake. Autosave is for fools. Learn a proper save routine."
Which may not feel soft & fuzzy, but ... was absolutely correct. And you might guess what that was in answer to from me ... and yes, it was a correct answer. Because whether or not autosave functions properly, if the user does a long-standing Computing 101 save/save-as routine, it never matters if autosave malfunctions.
One of many lessons I learned from their short, pithy comments. I'm missing them "here", as they haven't posted in some years. They were incredible resources for this forum, their experience in editing and knowledge of the app were stunning. And ... once you showed you were learning! ... then their comments became a bit deeper and more informative.
For some things, you want JIm's help here. He's ... good. Really, good.
Neil
Copy link to clipboard
Copied
You would normally create a new, empty timeline (menu File > New > Sequence) and drag one of your source clips into the empty timeline. You will be prompted by Premiere to Match the Sequence settings to the Source, click Change Sequence Settings. Now the sequence should match your source material - if the source is 1280 x 720, the sequence will be set that way to.
When you export the selected clips for color correction (menu File > Export > Media) check the box in the export settings to Match Sequence Settings. Now the exported clips will match as well.
MtD
Copy link to clipboard
Copied
Ah - got it. For some reason i had not encountered that dialogue box asking to match the sequence settings. Thanks so much Meg!
Copy link to clipboard
Copied
Ok heres a demo I did to explain what you need to do to follow a very simple workflow.
If theres anything you don't understand please ask
If your browser isn't giving you HD options in this window here Is the Youtube link. I recorded it on 2K but have downsized to HD on Youtube

Get ready! An upgraded Adobe Community experience is coming in January.
Learn more
 AdChoices