- Home
- Premiere Pro
- Discussions
- Re: Rendering Is Leaving out Basic Lumetri Color A...
- Re: Rendering Is Leaving out Basic Lumetri Color A...
Copy link to clipboard
Copied
When I render in the latest version of Premire Pro, my basic lumetri color adjustments are not inclucded.
This happens if I use media encoder or not.
Note: I'm not using a LUT. I'm just doing basic lumetri adjustments.
In the export settings, I'm not specifying a LUT(none) because I'm not using one.
What could the issue be?
 1 Correct answer
They didn't make this easy, and yes, I've complained about it. I also put in a UserVoice request for a single Essential Color Management Panel, like unto Essential Sound and Essential Graphics.
Where all CM things from defaults to clip handling are kept in one easy to access panel for perusal and settings.
Ok ... here's the data on their current setup.
Clip color management
Clip color management is found in the Project panel, by right-clicking your clips. You can select one or several at a
...Copy link to clipboard
Copied
It actually looks like you have a color space mismanagement issue. As in, you may have an HLG clip, used on an SDR/Rec.709 sequence, and exported with an SDR/Rec.709 preset.
So go to the clip in the bin, Properties ... is the color space HLG, or perhaps is it log-encoded? As Premiere can sometimes see log clips as if they are meant to be HLG ... which is hybrid log gamma.
If it is either HLG or a log clip, select one or more similar clips, right-click/Modify/Interpret Footage.
In the bottom color management controls, set the Override-to option to Rec.709.
Then make sure your Sequence CM is set to Rec.709, and use the standard Rec.709 export presets.
Neil
Copy link to clipboard
Copied
Thank you Neil, I think you're on to something...
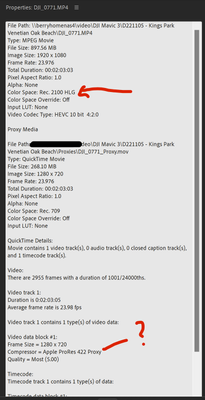
The drone (DJI Mavic 3 pro) that this was shot with used Rec 2100 HLG. I plan on using this in the future, but haven't been able to get anything to color grade properly.
I've checked and both clips were set this way as well as the sequence.
Is there a preset I should use going forard that would work with this? I don't see one titled Rec 2100 HLG.
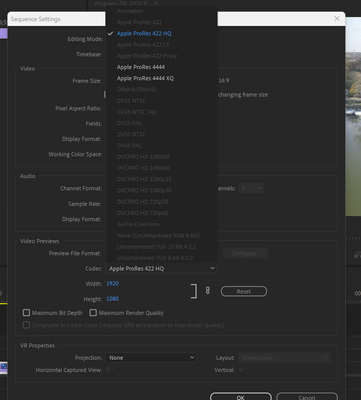
However, it looks like Premire decided to use Apple Pro Res 422 when it built the Proxies.
Is that a good choice or could that be part of my problem? (I'm color grading perhaps with the wrong color space?)
Details on one of my clips (which was used to create the matching sequence)
Thanks for your expertise.
Copy link to clipboard
Copied
Also, I changed the clips to rec 709 but Rec 709 is not an option for me in the sequence properties.
even if i create a new sequence from one of the interpreted clips it doesn't select rec 709
This is a bit over my head. I don't really understand the nuiances of the color spaces and what's compatible with what.
Copy link to clipboard
Copied
The option you've got 'up' there is preview files, not working color space. Which is an option near the top of the Sequence settings, the options are (from memory, hope it's correct) Rec.709, Rec.2100/HLG, and Rec.2100/PQ.
Neil
Copy link to clipboard
Copied
This is pretty confusing to me. I don't see where I'm specifying this.
You woudln't happen to know a good source (youtube perhaps) to go over this? I've been trying to watch some but haven't come across a good overview yet.
I'm trying to take the drone files, color grade them (got that part down fine) then export them in a manner that is faithful to what I color graded and not humungous.
Copy link to clipboard
Copied
They didn't make this easy, and yes, I've complained about it. I also put in a UserVoice request for a single Essential Color Management Panel, like unto Essential Sound and Essential Graphics.
Where all CM things from defaults to clip handling are kept in one easy to access panel for perusal and settings.
Ok ... here's the data on their current setup.
Clip color management
Clip color management is found in the Project panel, by right-clicking your clips. You can select one or several at a time.
Right-click/Modify/Intepret Footage is the path to the dialog for clip CM controls. They are at the bottom of the panel. The two controls you would mostly need to know about are the first and last.
Input LUT is for applying a normalization or transform LUT that you have for your media ... if you have one. Typically only for log-encoded clips.
Override-To is the option for setting the clip's color space. If you have an HLG clip from a phone or camera, and want to work that in SDR, the 'normal' Rec.709 working space and process, you would need to set this to the Rec.709 option.
Sequence color management working space
This is at the top of the Sequence settings. To get there, click in the Timeline panel so you have the blue bar around it, then go up to the main menu system, Sequence/Sequence Settings.The CM controls are at the bottom of the top Video section. The three options are Rec.709, Rec.2100/HLG, and Rec.2100/PQ. The last two are HDR, high dynamic range. More complex and difficult to work in at this time compared to Rec.709 or SDR.
Export color management
When exporting your sequence, you MUST choose an export preset that matches your clip and sequence CM settings. So for SDR/Rec.709 sequences, use presets that DO NOT include HLG or PQ in the preset name.
Conversely, when exporting from a sequence with clip and sequence settings for either HLG or PQ, you MUST use a preset that includes the correct option there also.
Neil
Copy link to clipboard
Copied
Ok thank you so much!
You're right I was all messed up...
I ditched my sequence, and created a new one -- but this time I didn't "create sequence from clip." Instead I created a new one and Chose Rec 709.
Then I noticed that the two clips were different formats and sizes. So I "Interpreted" them like you said.
I color graded them to taste...
Finally, When I exported, I just chose H264 (yeah i was cool with a 1920x1080 output) and poof! It worked! The clip was small, and the color grading matched what I had done in the Lumetri panel.
I wish that Premire had a "non-pro" mode that detected when things were askew and offered to put them in order.
But it was a good learning experience. I have you to thank for that!!
Cheers!
Copy link to clipboard
Copied
Just glad you got it working ...
Neil
Find more inspiration, events, and resources on the new Adobe Community
Explore Now


