

- Home
- Premiere Pro
- Discussions
- Re: Sequence settings in PP for scanned 8mm film?
- Re: Sequence settings in PP for scanned 8mm film?

Copy link to clipboard
Copied
I have a lot of (for me) valuable "dubble-8" films. Just got myself a simple filmscanner (Reflecta). The original film was captured in 16 f/s but the scanner outputs it in 30 f/s (Mp4). After editing I still want it to be played in 16f/s. I am also unsure about the correct frame aspect ratio. So what would be the best settings for these sequences?
Does anyone know?
Peter


 1 Correct answer

I agree with Averdahl on these points:
"Interpret Footage to change the fps from 30 to 16 and did change the Pixel Aspect Ratio from 1.333 to 1.0. "
I don't know why, whether part of the .mp4 file or if Premiere is just assuming the 1.333 PAR since 1440x1080 is usually HDV, but yes change the PAR to 1.0 for correct aspect.
If you don't need HD delivery and simply want to get this material onto a DVD, then you can create a PAL DV sequence, and manually change Fields to NONE - Progressive. Then add t
... 35
Replies
35
35
Replies
35

Copy link to clipboard
Copied
Jeff,
Thanks for the posted images were you used Neat Video. I needed a head up! I haven´t used that plug-in for more than ten years mostly since i have had little need for it and that i remebered it as a true render hog. I downloaded the trial version yesterday and noticed that it has been easier to use than it was before and that it takes advantage of the CPU+GPU when rendering making it not-so-much a render hog anymore. Bought the license three hours later. 
I am going to re-scan Super-8 to HD soon, so it came handy!
Copy link to clipboard
Copied
Hi Peter and Averdahl,
That's what I really enjoy about this community, is that we can all learn from one another and help out. There's not a day goes by I don't learn something new here, and I also get to share what I've learned to help others. It's all good!
Thanks
Jeff Pulera
Safe Harbor Computers
Copy link to clipboard
Copied
Hi Jeff,
Bet you didn't think I'd come back so soon, and as matter of fact, neither did I!
I have finished my first project and I've just started on a new one from another 8mm scanned film. I am puzzled because what seemed like a piece of cake recently doesn't work at the moment! Here's what it's all about:
I've followed the steps provided by your "correct answer" mail . So the first thing I do in my new project is to go to the main menu and click on File>New>Sequence where I choose DV-PAL under sequence preset and progressive scan under settings. This new sequence then shows up in the project window as expected - so far so good.
Then into the project window I import my new scanned filmclip. In the main menu I choose Clip>modify>interpret footage and change framerate to 16 f/s and pixel aspect ratio to square pixels 1,0. The icon of this modified clip lies still in the project window adjacent to the DV-PAL icon and now comes the problem: I can't drop the clip to the DV.PAL sequence!? As I recall from my first project I simply dragged it over to the DV-PAL icon and dropped it there - but this doesn't work. I've also tried to copy the modified clip and paste it to the DV-PAL sequence but that doesn't work either. If I go to the DV-PAL project and import a clip I'll only get the original clip, that is the clip that hasn't been modified. I suppose I could call up the clip from there and do the framerate and PAR changes now, but that is not the way I learned (?) from you. There must be something wrong that I do here but I can't figure out what it is.
There is one little thing that I have noticed, but I don't know if it is important or not, and that is the fact that the icon that represents the new DV-PAL project is simply named "sequence" and not "DV-PAL" as in my first project. I've thought that it might be the fact that there are no clips in it and it may change name after clips have been added?
All the best
Peter

Copy link to clipboard
Copied
Hi Peter,
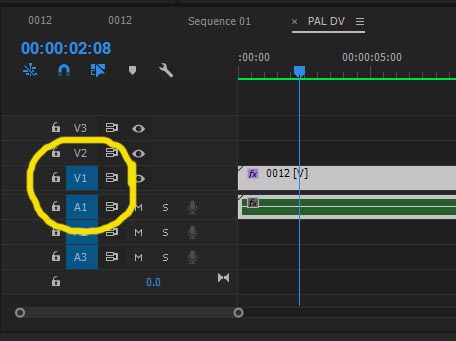
Make sure the V1 to left of timeline track is BLUE - if that is not selected, then you cannot add anything to that track, just click with mouse to select if it is not.
Thanks
Jeff
Copy link to clipboard
Copied
Hi Jeff,
What I did was to try and move the modified clip to the icon with the DV-PAL project within the project window. I also tried to move the DV-PAL project to the timeline, which didn't work because there were no clips in it. And finally I tried to move the modified clip to the timeline but then I got an error note saying that the clip doesn't match the settings of the Project, and: do you want to change the project settings? Well as I didn't want to do that I found myself in a dead end. But this time, after I'd red your reply, I went for the nevermind-the-mismatch-button and, sure enough, the flaming clip instantly showed up within the project icon in the project window. The V1 button has been blue all the time but your reply somehow made me look at the timeline and the problem differently.
They say the telephone-line is a lifeline. Well this support is too!
All the best ('til next time)
Peter

Copy link to clipboard
Copied
updated auto white balance and flicker removal for ae cc 2017 and minor bug fix division by zero. 1440x1080 1.0 framerate 16 fps comp.
auto white and flicker AE cc2017 template - Creative COW
updated:
Convert 16 fps to 24fps using smart frame blend. it only blends every 3rd frame using 50% not adobe's 25%/75% for higher quality frame conversion in AE. as optical flow doesn't work well. also, has built in scene detection for using whole frames on cuts.
here's a fun test I did with my autograde program.
It will automatically grade all your video for you!
It will set black point, white point, gamma, saturation, white balance, all frame by tedious frame.
->You'll never need to grade again!
Copy link to clipboard
Copied
Hi Peter,
I downloaded the sample clips and will play with them as time allows. I did notice the extreme macroblocking compression on the red body of the VW bus. Is this clip direct from scanner and not recompressed at all? If so, that compression artifacting is disappointing.
I had read online that one of the scanners, can't remember if Perfecta or Wolverine, was going to increase the .mp4 bitrate (reduce compression) via a firmware update.
I do have a small bottle of Kodak film cleaning fluid that I'd purchased a LONG time ago, so that's something I could try if needed.
Chris, thanks for posting your tools!
Thanks
Jeff
Copy link to clipboard
Copied
Hi Jeff,
By now there are som many parameters to think about that I get all exhausted! Still it's great to get all this help.
About the red VW microbus; yes it is the scanned film without any changes done to it.
Thanks also to Averdal for your views and Chris for all that stuff to download!
I'll sit down and try different things out.
Love to hear from you again Jeff.
Copy link to clipboard
Copied
I agree with Averdahl on these points:
"Interpret Footage to change the fps from 30 to 16 and did change the Pixel Aspect Ratio from 1.333 to 1.0. "
I don't know why, whether part of the .mp4 file or if Premiere is just assuming the 1.333 PAR since 1440x1080 is usually HDV, but yes change the PAR to 1.0 for correct aspect.
If you don't need HD delivery and simply want to get this material onto a DVD, then you can create a PAL DV sequence, and manually change Fields to NONE - Progressive. Then add the clip to sequence (after changing PAR and frame rate). In the PAL sequence, select clip then use Scale in Adobe Motion to scale the HD clip down to fit the SD frame size. You could use Set to Frame in right-click menu, however that leaves narrow black bars on the sides. So manually scale down until it just fits on sides, and then also perhaps adjust the Y Position to move image down a bit so that none of the top is cut off (assuming top of subject is more important than bottom).
Next, Export as MPEG-2 DVD, using the PAL DV Progressive preset. I see no reason to go with 24p, since your TV system is 25fps then just go to 25p, which Encore supports in the PAL system.
Viewing clip in a PAL DV sequence (after modifying frame rate), the motion and speed looked fine as Averdahl said. I then tried advancing through the clip one frame at a time (right arrow) and it's interesting to see the cadence of how certain frames get repeated, yet the repeats are not apparent when playing the clip in real time.
It seems that perhaps the original film might be pretty grainy? I'm just trying to get an idea of the actual .mp4 compression quality and perhaps your film stock is not providing the best finished example? In any case, I always do enjoy seeing old cars and fashion and such in these old 8mm films!
As I said the other day, you got me interested now in reviving my old films. Haven't ordered a film scanner yet, but got out some VHS tapes from the 80s and 90s and captured a few of those and shared, using Canopus ADVC-300 as the analog to digital converter.
EDIT: For NTSC editors, then 24p may be a great export option as Averdahl mentioned. This is much closer to the 16fps of 8mm film than the 29.97fps of NTSC video. When exporting MPEG-2 DVD, there is a preset for NTSC 23.976p widescreen, and just change to 4:3 before exporting. I've not tried any of this out to DVD yet, but theoretically should be a good workflow for the 8mm scans.
Thanks
Jeff

Copy link to clipboard
Copied
I have 8mm film footage that I had scanned by ScanCafe in California. The video came back both as DVD and mp4 files. I have downloaded the Neat Video denoiser as well. The comments above talk about PAL & NTSC and am a little confused. All I want to do is a full HD (1920x1080) transfer to video on Blu-ray.
Should I just follow the steps outlined in this chat and interpret footage at 16fps with a 1.00 aspect ratio? I am using Premiere 2020 for the edits......Once I get them edited I will apply the denoiser.

Copy link to clipboard
Copied
Now three years old, and with many comments given, I still don't believe any answer in this thread assists me in having scanned 8 mm and Super 8mm film, and outputting the media effectively in a PAL 25 FPS format.
I can see the value in having small gauge film digitally scanned at its native FPS speed: 16 and 18 FPS. However, with some experimentation recently done in Adobe's After Effects, I can say interpreting footage that has been scanned at 25 FPS to 18 FPS isn't too helpful, because adding or dropping frames produces ghosting or "phasing". Ideally, some sort of interpolation, or frame creation would be better, it's just that I haven't found any such software designed for Mac to do this.
As for reducing film grain, stabilisation, de-flickering and colour re-grading, there are filters bundled with AE to do this, and very good third party filters also available. Moreover, Topaz Labs' Video Enhance AI can produce very good upscaled video, providing you do the passes initially to improve the overal clarity of the scanned film. My concern is the speed on a Mac. That is, how to correct the unwanted "Keystone Cops" effect a small gauge film that should be seen at 18 FPS creates when scanned and played back at 25 FPS. Readers, any ideas?
-
- 1
- 2

Get ready! An upgraded Adobe Community experience is coming in January.
Learn more
 AdChoices