- Home
- Premiere Pro
- Discussions
- Re: .srt caption file imports as 720x480 and I nee...
- Re: .srt caption file imports as 720x480 and I nee...
Copy link to clipboard
Copied
Hi all,
I've been experimenting with YouTube's closed caption creation tools and using 3rd party downloaders to extract the .srt file from the video.
Even if I download the 1080P version of the video, the caption file gets interpreted by Premiere as a 720x480 and when I export the video, the captions get cut off...
Any suggestions?
Thanks!
*steve
 1 Correct answer
I have come to bring the solution to this, not even the Adobe guys knows this I'm sure.
You know the commands set to frame size and scale to frame size? There's actually a different behavior to them. I'm sure we all use set to frame size so we can have a better control of the scale of our clips, but try using these two with your captions on the timeline.
Set to frame size, scales the letters horribly, but Scale to frame size... chan! that does it! it actually changes the text sixe of the captions
...Copy link to clipboard
Copied
Okay, today things have improved. I imported a SRT file into a new project, just to see. And finally I have managed to complete a project with open captions! I modify them to 1920x1080, 1.0 aspect ratio and 30 fps.
I apply them to my main sequence. Adjust timing on the text that was imported. Could modify.
Could export to Media with burn-in.
I am cautiously optimistic. For my next project I will attemt this again. Using Premiere pro CC 2018 v 12.0.1
Copy link to clipboard
Copied
Hi Birch!
That is great news. I have found some solutions as well. I need to export an SRT file into MCC for closed caption (srt file created on Subtitle Edit, not Adobe, because I can't do it on Premiere, and won't! LOL). But the problem was that Premiere Pro can't export an SRT file into MCC, only SRT. So... I imported the Srt file on Premiere, edited it regarding italics, alignments, color, because Premiere can't read these codes form other softwares, and had to ask someone with another software to change the ready srt into mcc, because mine can't (the only thing it won't do!) and then I imported the MCC file into Premiere, BUT, srt file worked fine, with black background for subtitles, and the MCC file won't show the black background and it cut some subtitles, which I had to add later.
Well,,, some solution, but not ideal as it should, at least for what I need.
Copy link to clipboard
Copied
I am having the issue of when importing an SRT file that is longer than about 1.5 to 2 minutes, it only shows the captions for the first 1.5 or so minutes. For example, if I have an SRT file with 5 minutes of open captions, and I import than into Premiere Pro 2017.1.2 on the Mac, the length displayed next to the file name in the Project window will be something like 1:36:04. And sure enough, when I edit the captions, it is missing all of the captions after 1:36:04. The rest of the file is just lost. There is NO ERROR MESSAGE. Just captions are missing. Like it is truncating the file on import somehow.
For me the Scale menu option works sort-of. Sometimes the text is cut off at the beginning, end or both of a line. Shrinking the font can help with that.
I am more upset about losing over 3 minutes of captions!
Has anyone else seen this?
John
Copy link to clipboard
Copied
No, but I am not surprised. The subtitling in General and SRT handling specifically is a terrible mess in premiere pro. This travesty is running on the 2nd year now.
Coincidentially, what is the byte size of your SRT file?
Copy link to clipboard
Copied
I figured it out. This method currently works using CC2017.1.2.
Import your .srt file into your bin. Right click on the file / Modify / Captions. Under video settings you can change the video size to 1920x1080. Then double click on the captions file, make all the text larger or any edits and there you go.
There's still some bugs around this method. Sometimes I have to repeat the method above to restore the preview of captions. No need to change settings, seems just opening up the modify window fixes the preview. Output of burning captions into the video seem to only work by using export, not queue.
I'm not yet using CC2018 as it was way too buggy on release when I tried it to be able to trust for professional work. I'm continually disappointed year after year with the price increases and adobe still can't release a working piece of software. Lets get one version working properly please before trying to add features no one will use.
Hope this method works for someone else also.
Copy link to clipboard
Copied
I just tried this in CC18 (12.0.0) because I'm at someone else's shop. It worked pretty well other than placing my text in the center bottom vs left justified like I'd initially created. I was able to select all of my captions at once and adjust their size and placement as a group. But this is a serious PITA!
I definitely miss the days where I dropped a chunk of change on a stack of disks that had software that worked on them because you're going to test the crap out of your software before you go through the trouble of printing disks, packaging them, and shipping them all over vs paying a subscription to be a beta tester. Oh the halcyon days of 2012...
Copy link to clipboard
Copied
This solution applies to the latest version of Premiere Pro:
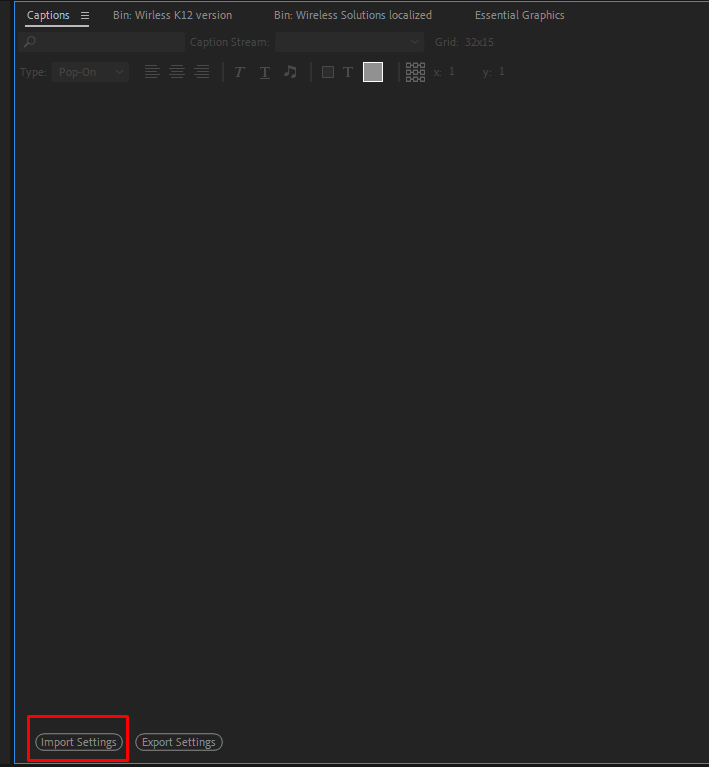
- Go to "Window", and open the "Captions" window
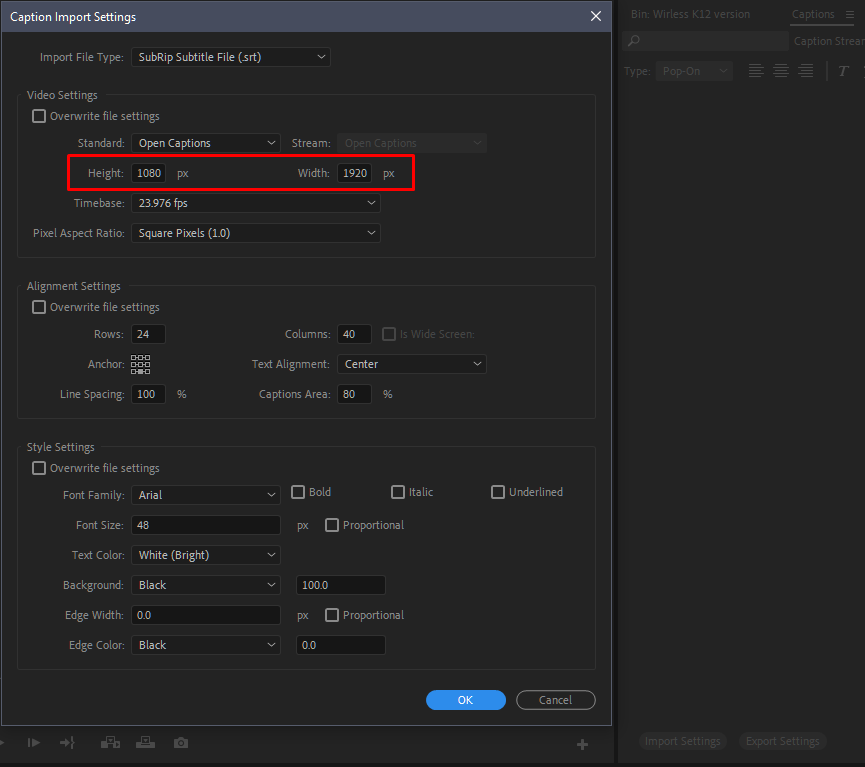
- Click the "Import Settings" button

- Under "Video Settings", enter 1080 into the "Height" value and 1920 into the "Width" value
- CAUTION, the values are shown as height/width instead of width/height, which is the norm in all other frame size settings. This tripped me up for a few hours, because I didn't read the labels properly and was transposing my width and height values.

- BONUS, Under "Alignment Settings" and change the "Line Spacing" value from 50% to 100%. This will move your text up against the background color instead of bottom-justifying the text to the background color. This is an acknowledged bug in Premiere Pro, which can be up-voted here - Vertically align Open captions text against background box. – Adobe video & audio apps

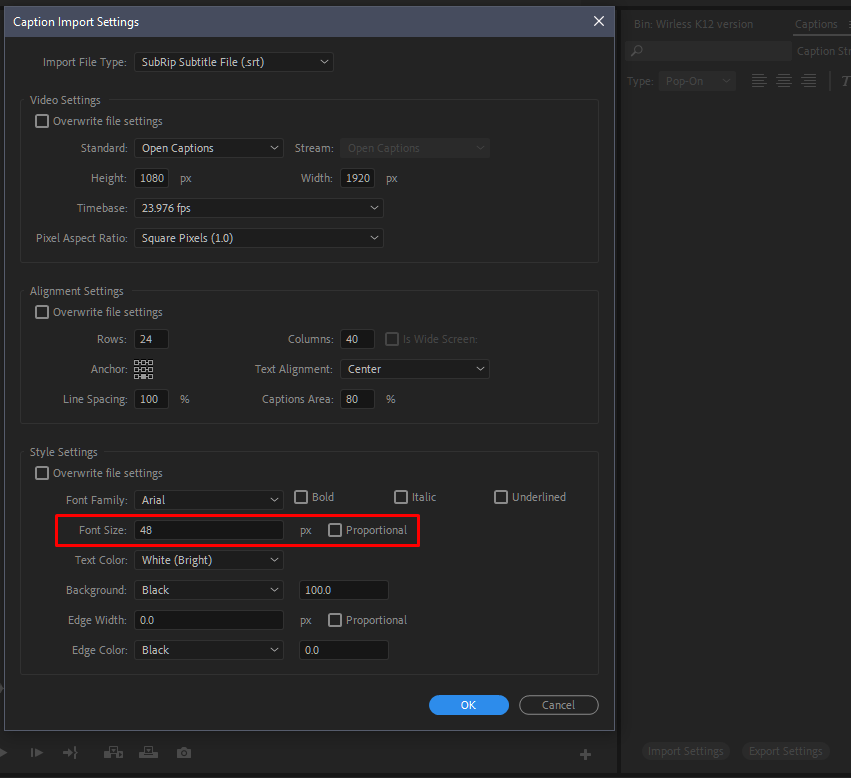
- BONUS 2 - Under "Style Settings", uncheck the "Proportional" box to the right of "Font Size", and enter your desired font size instead. A font size of 48 to 52 usually works well for a 1920 x 1080 frame size.

Copy link to clipboard
Copied
More observations from working with captions in Premiere.
If you import a .srt file, then change your import settings, then delete the .srt file and re-import it, Premiere will apply the settings that were in effect when you originally imported the .srt. It doesn't seem to matter how many times you delete and import, Premiere stores the original settings someplace, ignores your current settings and applies the original settings instead.
I found that I had to change the .srt filename - EG adding a "2" to the filename - before Premiere would finally "forget" the original import settings and apply my current import settings. This behavior is the reason I thought changing my import settings had no effect at all on importing .srt files - because it doesn't if you try re-importing a file that Premiere has already imported - even if that file is no longer in your project.
I also just experienced the "no-changes-take-effect" issue - wherein changes I make in the "Captions" window - EG font size, background opacity, etc. - aren't reflected on the timeline until after I quit Premiere and restart.
So if you're pulling your hair out with frustration, please know that you it isn't you, it is in fact the application. Maybe some of these tips and workarounds will help alleviate your frustration.
Copy link to clipboard
Copied
Drag the srt file from the finder/windows explorer directly to the timeline you wish to conform the caption.
Copy link to clipboard
Copied
1- right click on your .srt file> modify > caption:
in opened dialog(make sure caption tab was selected) go to video setting and change width and height to 1920 and 1080.
Copy link to clipboard
Copied
I put the srt in my timeline, same issue. None of the below work arounds worked. Created a new subtitle track, copied and pasted from the srt track below and boom - done. Worked like a charm 🙂
Find more inspiration, events, and resources on the new Adobe Community
Explore Now


