

- Home
- Premiere Pro
- Discussions
- Re: warp stabilizer requires clip dimensions to ma...
- Re: warp stabilizer requires clip dimensions to ma...

Copy link to clipboard
Copied
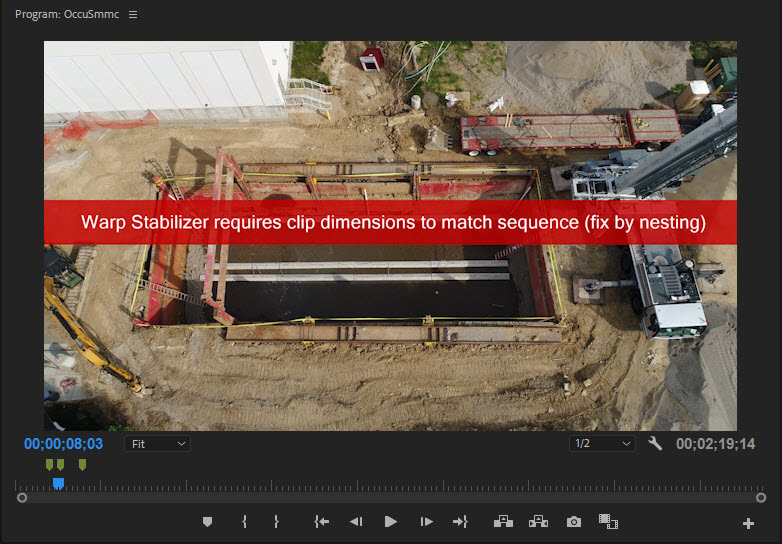
I have a sequence with HDV files and MOV flles. when using warp stabilizer it comes up with ( clip dimensions to match sequence ) ( fix by nesting) HOW


 1 Correct answer

Right click on clip in timeline and Nest then add the the WS-effect.
By nesting the clip first it gets the appropriated dimension of the sequence setting.
Moderator note: in version 13.1.4 and later, nesting is no longer required to add this effect to a clip in a sequence that does not match sequence settings.
 16
Replies
16
16
Replies
16

Copy link to clipboard
Copied
After nesting the clip. Set the dimensions and frame rate of the nested clip to match the clip dimensions and frame rate. The nesting command can probably be found the sequence or clip menu.
Copy link to clipboard
Copied
Right click on clip in timeline and Nest then add the the WS-effect.
By nesting the clip first it gets the appropriated dimension of the sequence setting.
Moderator note: in version 13.1.4 and later, nesting is no longer required to add this effect to a clip in a sequence that does not match sequence settings.
Copy link to clipboard
Copied
Ann's method requires you to apply the warp stabilizer to the nested sequence. My method requires the warp stabilizer to the clip within the nested sequence.

Copy link to clipboard
Copied
NickelplateSpiro's method seems to work, but I find it incredibly frustrating that Adobe can't get it together and this happens every single time they release an update. UPDATE today?...oh great, I'm going to spend the rest of my day fixing my messed up files...
Copy link to clipboard
Copied
Warp needs the clip to be the same dimension as the sequence otherwise it cannot calculate the warp.
My method works also less clicks.
Moderator note: in version 13.1.4 and later, nesting is no longer required to add this effect to a clip in a sequence that does not match sequence settings.

Copy link to clipboard
Copied
Are there any other workarounds for this? Is there any way to warp stabilize a clip of different dimensions without a nest? If you have lots of clips to stabilize, this method is a disaster. A nest is essentially a sequence, and by saving each clip as a nest you increase your project file size so much that it causes ridiculous load times and your project file size can easily balloon into the gigabytes.

Copy link to clipboard
Copied
How do you do this?
Copy link to clipboard
Copied
Right click on clip
nest,
add warp.

Copy link to clipboard
Copied
I can't get this to work. Even when the clip *is* nested and the sequence settings *do* match, it still tells me the dimensions need to match and can't calc the warp. What am I missing?
Copy link to clipboard
Copied
Post screenshot of sequence settings, clip properties (media info)

Copy link to clipboard
Copied
You have to go back to your oryginal clip. Then "nest" and then "warp".

Copy link to clipboard
Copied
That's all fine, but what the heck is "nesting"?
Copy link to clipboard
Copied
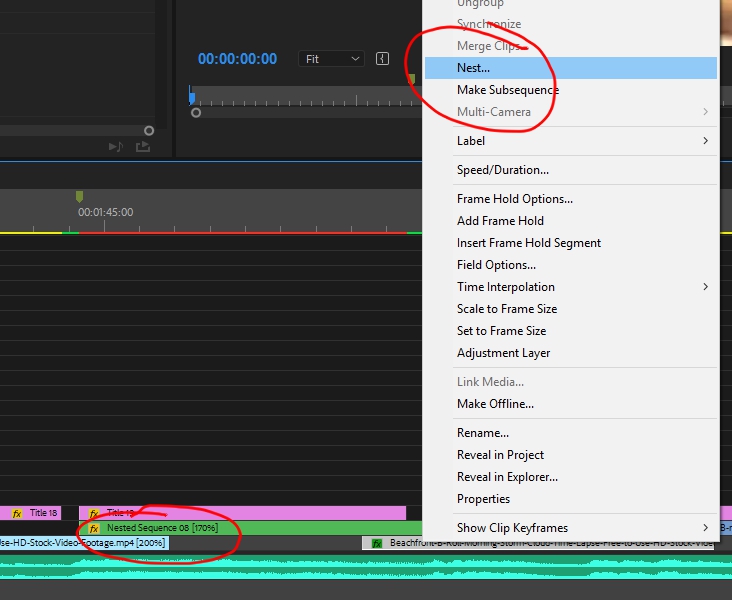
Click right button of mouse on a video sequence and there will be option Nest... See the picture.
After nesting the color of sequence will be green. Enjoy! 

Copy link to clipboard
Copied
I nest then add the Warp and it seems to stabilize but then when I play my video over that clip, there is a red box over the video saying "Warp stabilizer requires clip dimensions to match sequence (fix by nesting)". What a cluster.. I've already nested it and added the warp stabilizer and it still says this.
Copy link to clipboard
Copied
Warp might be still applied to the original clip (before nesting). If so: delete effect.

Copy link to clipboard
Copied
This took me ages to figure out. What I was doing wrong is this -
1. apply warp stabiliser.
2. receive error message that WS requires clip dimensions blah blah fix by nesting.
3. Nest.
4. Apply Warp stabiliser.
5. It's now stable! BUT the red bar is still there, wtf.
So the problem was that I didn't remove the WS BEFORE nesting, so it's essentially applies twice and the error message is still there from the first time. It can be fixed by double clicking on the nest in the timeline, clicking the original clip and deleting WS from the Effect Controls panel. Phew.

Find more inspiration, events, and resources on the new Adobe Community
Explore Now
 AdChoices