

- Home
- Premiere Pro
- Discussions
- Double frame every 4 or 5 frames in an animation p...
- Double frame every 4 or 5 frames in an animation p...

Copy link to clipboard
Copied
Good day, everyone.
I have a problem about frames adding to an 3D animation I made.
Before I go ahead, I should tell you, my english is far from perfect.
Please, when you feel confident I meant something else, read it that way. Also, when it comes to exporting videos, my technical knoledge is poor. I keep on the settings I was told were good for what I need.
For these two reasons, it's very difficult to search for threads where my question could be answered before so in advance please forgive me if It was allready answered somewhere and please link these answers for me to read them.
Now what brings me here:
I work on an animation peoject of mine on a 3D software called Autodesk Maya. There, I exported each frames of each in jpeg still images, with each shot in their own folder and I import them in a Adobe Premiere file to mount them together.
I made sure in the animation preferences of Maya that the frame rate 24 frames by seconds .
In Adobe Premiere, there is also preferences to set to 24 frames per seconds. I checked by right click ingon the sequences made of the frames to see if they are at 24 fps.
In the export setings also they are set to 24 fps. When it comes out, there is a double of a frame around each 4, 5 or 6 frames. It makes the animation unclean. I tried everything I can and even showed it to friends in the business. No matter what I try, these extra frames show up.
They show on each viewer I use. QuickTime, VLC, windows's media viewer.
When I click frame by frame in QuickTime and VLC, the extra frames are clearly visible.
In VLC, I can capture frames with the camera button. This way confirms this problem.
Only one Premiere work file makes it work. It has no other elements than a single shot of these still frames with nothing else. No sounds, no titles, no other sequences. It might be weird but I think there is a beginning of clue there. Not sure how it can be fixed.
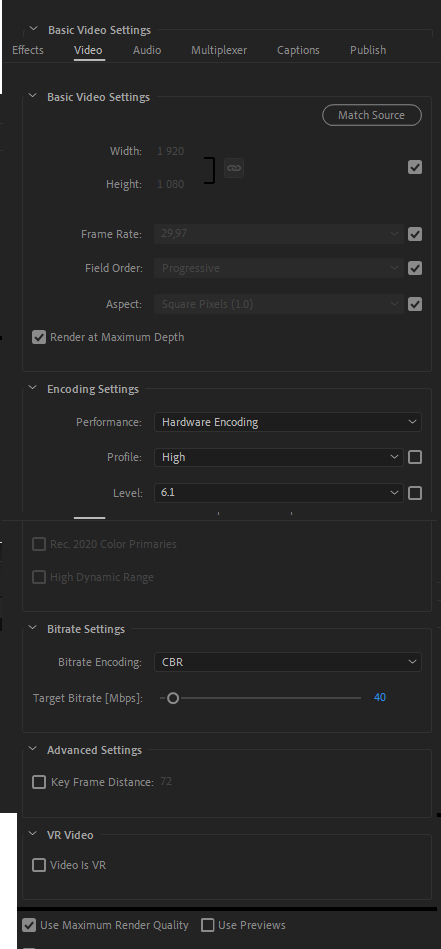
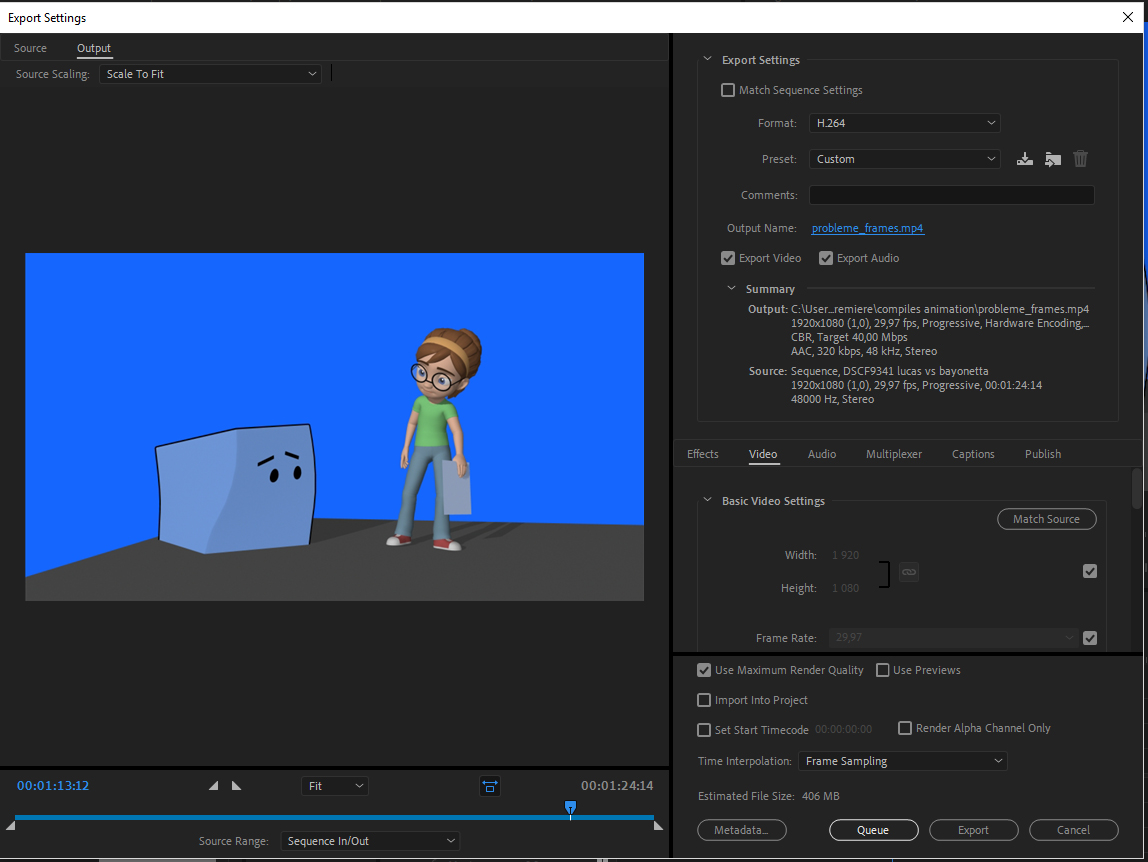
Here , in the linked pictures, are the various places in Adobe Premiere where I checked the frame rate is right. And in Autodesk Maya also although it's not an Adobe software. The video section of the export menu is all glued together in photoshop so I don't crowd the message even more with big pictures.
Can anyone help me with that? Has anyone faced something like that before?
Thank you very much for taking the time to read
.


 1 Correct answer

Your sequence is set to the incorrect frame rate, it is set to 29.97 fps:
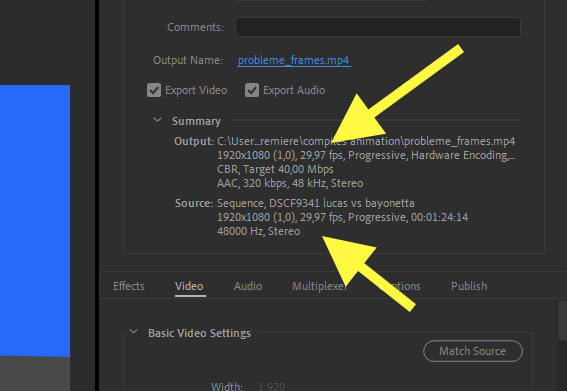
This is why Premiere Pro is creating duplicate frames - to make up the difference in needed frames from 24 fps to 29.97.
Try this:
Duplicate your sequence, and then, working on the copy:
With the copy of the sequence the active timeline, go to the menu Sequence > Sequence Settings and set the sequence timebase to 24fps:
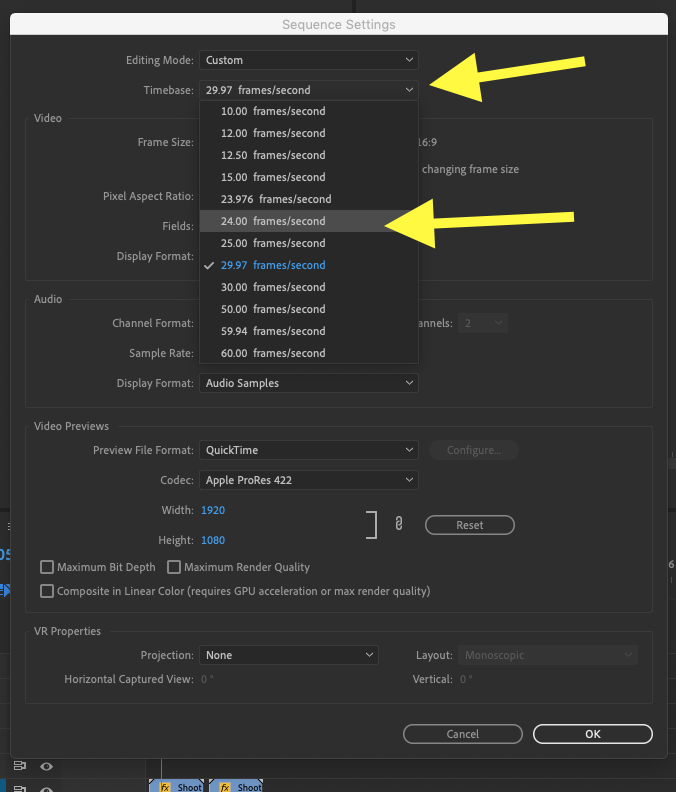
Then click OK.
Now export that timeline at 24fps.
MtD
 5
Replies
5
5
Replies
5
Copy link to clipboard
Copied
Your sequence is set to the incorrect frame rate, it is set to 29.97 fps:
This is why Premiere Pro is creating duplicate frames - to make up the difference in needed frames from 24 fps to 29.97.
Try this:
Duplicate your sequence, and then, working on the copy:
With the copy of the sequence the active timeline, go to the menu Sequence > Sequence Settings and set the sequence timebase to 24fps:
Then click OK.
Now export that timeline at 24fps.
MtD

Copy link to clipboard
Copied
looks like only your intermediate media setting is on 24fps at 960x540 ??
I used maya a long time ago but I am so dumb I couldn't really get even half way good at it on my own. Is very complex program. You are really cool to be using it. I know that you can set up a lot of different cameras to help line things up and view the workspace and objects etc... and you can choose which camera to use to 'export' the work. You can even animate the camera ( track etc. ). It's a really nice program.
When I did this sample test of some spinning text I think I exported as apple animation codec or something like that... So it was one finished 1920x1080p 24 fps 'movie file' … (with an alpha channel ). I put that into Premiere Pro ( I think it was version CS3 back then ) and added the sound, space telescope pictures, and planet earth picture ...and exported that to upload to youtube ( now I use vimeo). Probably an H264 codec for final export from CS3.
So, anyway, maya can export REALLY good quality stuff and you have tons of choices. I would consider doing that at 24fps 1080p and put that into your premiere pro to add all your other stuff. It may be nicer than using jpg images as your maya export.
that's about 60 seconds.
Copy link to clipboard
Copied
in the future, there's something called the new item icon to create a new sequence automatically using your media... I don't have your version of Premiere pro, but someone here can show you where it is...
by dragging your media to the icon it automatically sets it up to match what your source material is ( dimensions, fps, )
Copy link to clipboard
Copied
24 fps.... divided into segments … to make it 30 fps.
4,8,12,16,20,24
that equals 6... so adding one extra frame in all six of those divisions gives you 30 fps. That's why you got the extra frames.

Copy link to clipboard
Copied
Yes, it works. Thank you for taking time to read and answer!
How embarrasing. It has the name of an old element that I started to edit in an old copy of this file from a match of the video game smash bros (hence "lucas vs bayonetta" as title). Really unprofessional that I kept this basic Adobe Premiere file. But I wanted it as a base for the export settings and I removed everything but the basic export name stayed the same. My animation project has of course nothing to do with smash bros. Anyway, you really helped me a lot with this. Thank you very much, Meg the Dog. Good luck and good anything I can wish you, compère, you rule

Find more inspiration, events, and resources on the new Adobe Community
Explore Now
 AdChoices