







Design the future of fashion, win Firefly Pro 👗✨
Premiere (Beta)
Recently active
Now in beta are sequence presets for XAVC-Intra. The XAVC-Intra options are available in a variety of locations, including in the New Sequence dialog, in Sequence Presets > Legacy > XAVC-Intra. By adding XAVC-Intra as a Sequence Preset, we’ve enabled XAVC-Intra as a Preview File Format in the Sequence Settings dialog. In turn, this enables smart rendering. Smart rendering avoids recompression during export by copying matching source data directly to the output file. This preserves maximum quality and dramatically reduces export time. Smart rendering works only when the source codec, frame size, frame rate, and bit rate match export settings exactly. If you’re using XAVC-Intra and want to use smart rendering, you should:Choose an XAVC-Intra sequence preset when creating a new sequence or modify an existing sequence so that its editing mode is one of the XAVC-Intra options. Render your sequence, using one of the options from the Sequence menu When exporting, ensure that you’ve se
Editors have long expressed that automatic track creation can disrupt their editorial flow because it can upset intentional track setups, in particular when the source has more audio channels than the editing sequence. This new preference allows you to stay in control of your timeline and keep your tracks organized. Now you can go into Settings/Preferences → Timeline → Turn off “Add tracks automatically when editing source clips into the Timeline.” This update directly addresses the feature request here: Thanks to everyone who took the time to share feedback and use cases -- your input helped shape this improvement. Please try it out and let us know if you see any issues. Settings: Uncheck “Add tracks automatically when editing source clips into the Timeline”Preference onThis screenshot shows what happens when the preference is on. When you drag a track with ten audio channels into a sequence with four audio channels, it automatically creates them. Preference On Preference off (new)Thi
Hey everyone! We're excited to share a refinement to Ducking that just landed in Premiere Beta 26.5 (Build 12): Auto-update keyframes.This new option is enabled by default and is designed to keep your ducking in sync as your timeline evolves. No more manually regenerating keyframes every time you tweak a clip.What's New?With Auto-update keyframes turned on, Ducking now follows your clip changes automatically. As you trim, move, or swap out the audio you're ducking toward, the music ducking keyframes update on their own to match. Your mix stays in step with your latest edit decisions, without you having to think about it.Where to find itYou'll see the new toggle in the Ducking section of the Essential Sound panel, right above the Generate Keyframes button. It's on by default, but you can switch it off any time if you'd rather drive keyframe generation manually.Auto-update keyframes Why this mattersEditing is iterative. You move a clip, swap a VO take, re-time a section, and suddenly you
In 2025, we updated Premiere’s timeline to make edit operations dynamic. Previously, editing showed a static blue box, and the timeline only updated after you released the mouse. With the dynamic update, everything refreshes in real time as you edit. Since that release, a small but passionate group of editors has let us know they strongly prefer the original, static behavior, especially when trimming. We want to extend a huge thank you to everyone who shared their feedback, and especially to those who hopped on video calls with us to deep-dive into their workflows. We heard you loud and clear! In the latest Premiere beta, we’ve added a new preference to give you control over this behavior. You can now toggle this feature via Preferences > Trim > Update timeline dynamically during ripple edits. Here is a quick look at the setting in action. Please try it out and let us know your thoughts in the replies below. We look forward to hearing your feedback!
Beta versions of Premiere, After Effects, and Media Encoder now natively support Canon Cinema RAW Light files from the following Canon cameras: EOS C50 EOS R6 Mark III EOS R6 V EOS C400, with 3:2 / Open Gate firmware installedThis update allows you to import and edit raw files - up to 7K Open Gate - from these cameras. In addition, Premiere, After Effects, and Media Encoder continue to support raw video files from other Canon cameras. Raw settings - including Color Temperature, Tint, Exposure, Color Space, and Gamma - can be viewed and modified via Effects Controls > Source. If you have any questions or comments about this update, please let us know below. If you experience any performance issues or bugs, please share your OS, hardware specs, and specific camera recording settings.
Beta versions of Premiere, After Effects, and Media Encoder now natively support ARRICORE files from the ARRI ALEXA 35 Xtreme camera. ARRICORE files are approximately half the size of ARRIRAW and are similar in size to ProRes 4444. Unlike ProRes, exposure, white balance, and color tint settings can be changed non-destructively after capture, via the Source tab in the Effect Controls panel. More information about ARRICORE is available on ARRI’s website:ARRICORE overview Sample footageIf you have any questions or comments, please let us know!
Hey everyone! We’re excited to share a small but impactful quality-of-life update that just landed in Premiere Beta 26.2 (Build 14). You can now hide clip audio channel labels directly in the timeline.This update is all about giving you more control over how dense or minimal you want your timeline to feel, especially when working with multichannel audio or complex sequences.What’s New?You can now toggle the visibility of audio channel labels on clips in the timeline. When hidden, the timeline becomes cleaner and easier to scan, helping you focus on the waveform itself rather than extra overlays.This is particularly useful when:Working with multichannel clips Editing dense timelines Reading waveforms at a glance without obstructionWhere to find itThe new option lives in the Timeline wrench menu.You can toggle Show/Hide Audio Channel Labels on or off at any time, depending on your workflow and the level of detail you need in the moment.Bonus: This action can also be assigned to a custom
Beta versions of Premiere, After Effects, and Media Encoder now support X-OCN files from the Sony BURANO using firmware version 3.0. Firmware version 3.0 adds several important features to the BURANO, including:A full-frame 5.8K 6:5 recoding format for anamorphic shooting A Super 35 crop 3.8K 16:9 recording mode at up to 120 fps X-OCN recording support when the imager scan mode is set to S35 1.9K 16:9 up to 240 fpsMore information is available on Sony’s website: https://pro.sony/ue_US/products/professional-cameras/cinematography-burano-firmware-roadmapIf you have any questions or comments about this change, please let us know!
Beta versions of Premiere, After Effects, and Media Encoder now provide better support for ProRes RAW. Via Effects Control > Source, it is now possible to modify the attributes of a ProRes RAW file, including:Processing method ISO Exposure bias Color temperature Raw to log optionsProRes RAW support is available for all ProRes RAW files, including those recorded in-camera (e.g., iPhone 17 Pro, Nikon ZR), and those recorded by external recording devices from Atomos (e.g., Ninja, Shogun).ProRes RAW plugins are supported. These plug-ins enable camera manufacturers to provide their own custom processing pipeline, bypassing the default ProRes RAW pipeline. Two ProRes RAW plug-ins are currently available: iPhone 17 Pro - Pro Video Formats 3.1 (macOS only) Canon (ProRes RAW recorded using Atomos recorders) - Canon Plugin 1.2.0 for ProRes RAW (macOS only)Note: ProRes RAW support in our current, shipping Windows products relies upon installation of Apple’s Apple ProRes RAW for Windows 1.3 pa
In Premiere, our Speech to Text transcription model supports 18 languages. I am pleased to announce a new drop of our Speech to Text model in Premiere Beta, targeted for version 26.2. When you run transcription in Premiere, you should notice improved accuracy in languages, dialects, and overlapping dialogue.AccuracyExpanded language accuracy improvements: All of Premiere’s languages are showing higher accuracy. Some languages are seeing up to 36% reduction in errors.Better handling of overlapping dialogue: You should notice more words being attributed to the correct speaker as well improvements in the change points between speakers.English dialogue improvements: Premiere should be better at recognizing dialects for English speakers. When tested on both African American and Singaporean English data sets, Premiere has a 28% relative improvement in word error rate (tested in CORAAL and National Singapore Corpus).PerformanceTranscription wait time should be reduced, as long as you are on r
We’re excited to release a new Smooth mode in Object mask to Beta which will let you create masks which handle fine edges better. When creating an Object Mask, you can now choose between Sharp and Smooth modes to achieve the best results for your specific masking needs. What's new The new Smooth mode creates masks with softer edges that are better suited for fine edges and detailed objects. This enhancement allows you to handle complex masking scenarios more effectively without compromising quality. Sharp mode Smooth modeMask quality modes Sharp mode Sharp mode continues to create masks as they are currently created, with crisp, well-defined edges. This mode is ideal for: Objects with clear, distinct boundaries Standard masking workflows Smooth mode Smooth mode creates masks with softer edges that provide superior handling of fine details. This mode is particularly useful for: Objects with intricate or delicate edges Hair, fur, or fabric textures Subjects with semi-transparent or
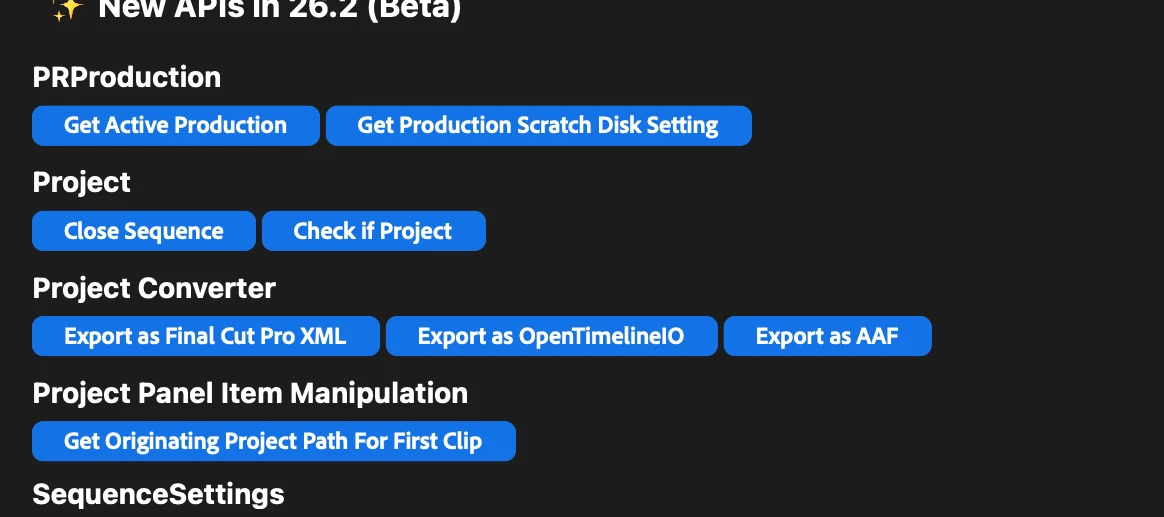
Hello, Premiere integration partners! We’ve added lots of new APIs to the premiere-api sample plugin; updated documentation to follow. These APIs are available in current beta builds, and in our next official release. Please direct any technical questions to the Premiere UXP Developer Forum. We hope you find them useful; more API expansion, coming soon! Thanks for developing your integrations, with Adobe products. -bbb Bruce BullisSenior Engineering ManagerPremiere Pro Integrationbbb@adobe.com
Edit: these effects are now available in Premiere v26.2. If you have question or comments, please post them in the Premiere forum: https://community.adobe.com/p/premiere We are adding some exiting new effects and transitions to Premiere, and they are ready to test out in beta right now. Effects (Gradient, Channel blur, Noise); Transitions (3D spinback, Push). Keep reading for descriptions of each. Gradient effectFind it in: Effects panel > Video effects > GenerateGradient is a new generator effect designed as a modern replacement for Ramp. It’s a great tool for creating background textures with support for a wide range of visual styles. It supports both linear and radial gradients and adds expanded color and texture controls for more creative flexibility. Gradient gives you precise control over position, scale, orientation, repetition, mirroring, interpolation, feathering, and grain, with master opacity and alpha preservation for predictable compositing. Color controls let you
Available in Build 18 or higher (26.2.0.18)It was almost a year ago that we launched the new Search Panel in Premiere. At that time, you could search your clips using Media Intelligence, including visuals, transcript, and metadata. Finding things with AI is cool and useful! However, we also know that every video editor has your own way of tagging and organizing takes and clips. As a result, we have added Marker Search to the Search Panel, making it much faster to find and compile clips that you or your collaborators have already tagged with markers, across your entire project. How It WorksOpen the Search panel Use the Markers dropdown Choose one of two ways to search: Search by marker text – find words from the marker Name or Comment Filter by marker color – click the Filter button to add a Marker Color filter and see only markers of a certain color Using text to search for markers What You Can SearchMarker Search looks across your entire project. As with before, you can narrow searc
Now you can start editing on your iPhone with the Premiere iPhone app and then continue in Premiere Pro on desktop. This new workflow connects mobile and desktop editing, giving you flexibility to shoot and edit on the go while still having access to all the professional tools in Premiere Pro. How can you try it? You can apply to test the new Premiere on iPhone by filling out this survey. You can also pre-order Premiere on iPhone on the App Store. Adobe Premiere on iPhoneNext-level editing. Now in the palm of your hand. Quickly turn any idea into attention-grabbing content with amazing creative control, unique audio tools, and generative AI — and take your creativity on the go with Premiere on iPhone. How does the workflow between Premiere on iOS and Premiere Pro work? 1. In Premiere on iPhone, go to Export: 2. Select the Premiere desktop (Beta) Tab and tap Send. 3. Open Premiere Pro Beta (or if you al
Remix with Firefly Community Gallery
Thousands of free creations to fall in love with and remix in Firefly.
Already have an account? Login
Enter your E-mail address. We'll send you an e-mail with instructions to reset your password.