New Participant
December 29, 2016
Question

Bullet alignment when using wrap text

  • December 29, 2016
  • 3 replies
  • 10992 views

I'm running into a bullet alignment issue when using wrap text around an object. The bullets that is impacted by the picture do not align correctly. They no longer line up along the left hand side and they tab in much more than usual. I've attached a screenshot:

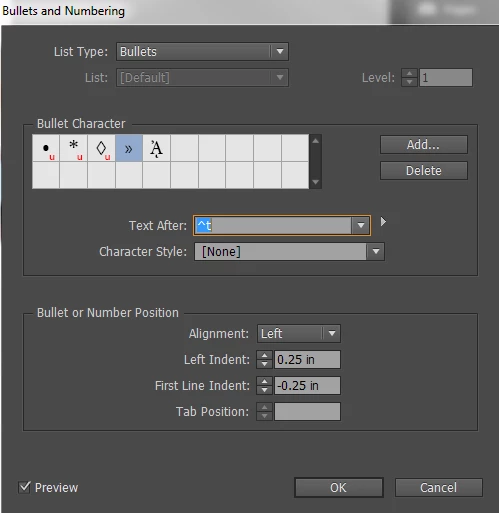
The bullet settings are as follows:

I have a feeling that this issue could be solved with a new character style or paragraph style, but I'm not sure how to go about it. (I have been using InDesign for 5 years, but have not ever had to create character or paragraph styles.)

Any help would be much appreciated. Thank you!

3 replies

Inspiring
March 14, 2018

In case it's still helpful to someone. I used to have the same issue in the "Before" screenshot below. Notice the unsightly gap and how the second line is not aligning in the bullet item.

Then I applied a combination of suggestions in this thread and the results are in the "After" screenshot below.

To get this result, I inserted an Em Space at the beginning of the first line of the bullet (as suggested). Then, in the second line, I inserted an "Indent to Here" character (using the tabs rulers window (Cmd/Ctrl + Shift + T), I had to manually adjust the alignment of the second line to match the first line indent). Finally, I created a paragraph style to use whenever a bullet falls around a wrap-around object. Try it and see if it works for you.

OsakaWebbie
Inspiring
March 22, 2018

r5dsign: You're lucky that you didn't have a third line on your bullet curving around that water image. Your workaround would have failed then. Plus, apparently you don't mind your bullets being flush left. Today I'm trying to lay out a magazine article with LOTS of bullets and a design that uses photos canted at angles. No matter where I choose to put the photos, I can't seem to avoid having some to the left of bullets, resulting in this kind of thing (normal behavior on left, wrapped situation on right):

Two things are lacking: (1) the indent before the bullet (3mm in my case), and (2) the additional indent of non-first lines (3mm plus the size of an en-space, however much that is). "Indent to Here" would only solve #2, and only if the photo edge was straight vertical. It seems crazy to have to add a network of invisible rectangles (three rectangles just for these two bullets alone), but I guess that's what I have to do.

Why isn't there simply a checkbox in either the Text Wrap dialog or Bullets/Numbers dialog to tell InDesign to treat the edge of the wrap area as if it was the left edge of the text frame?

OsakaWebbie
Inspiring
March 23, 2018

OsakaWebbie  wrote

… Why isn't there simply a checkbox in either the Text Wrap dialog or Bullets/Numbers dialog to tell InDesign to treat the edge of the wrap area as if it was the left edge of the text frame?

Hi OsakaWebbie ,

very good suggestion!

Prepare your use case and make a feature request here:

Adobe InDesign: Feature Requests: Hot (944 ideas) – Adobe InDesign Feedback

I'll definitely vote for it!
( Don't forget to post a link to your feature request here. )

Regards,
Uwe


Okay, I wrote a feature request for it: Option to have list indents work near text-wrap objects – Adobe InDesign Feedback

Yes, please vote for it so that it gets the attention of the powers-that-be.

I realized while writing it that numbered lists are even more of a problem than bullets - using an en-space or em-space for Text After won't work, because numbers vary in width. So far I haven't had to put a numbered list next to an non-straight text wrap, but I'm sure the day will come!

New Participant
December 31, 2016

The easiest way is to use INDENT TO HERE in Special Characters.

Replace your TAB by 2 spaces and the special characters «Indent To Here.»

Obi-wan Kenobi
Brainiac
December 31, 2016

Hi Luc,

Not so simplistic! … Read my code! 

(^/)

jane-e
Brainiac
December 31, 2016

I can read English very well

Je peux lire un peu de français

Je ne peux pas lire le code très bien

hammer0909
Inspiring
December 29, 2016

You've encountered a limitation of bulleted lists in InDesign when using a text wrap. I just ran into the exact same issue this past week on a project. The problem I believe is that in a standard bulleted list, it relies on a tab (as shown in the Text After field in your screen shot. When text wraps around an objects, those tabs are not updating to reflect the new position of the text.

To fix it, replace the ^t in the Text After field to an Em or En space by clicking on the arrow to the right of the Text After field and choosing Em or En space. This will replace the contents of the field with either ^m or ^>. You could even just type a single or double space to customize the spacing value if desired. Either way, this should produce a much more desirable result than what you currently have. You may want to create an additional paragraph style to use when you need to wrap bulleted items around an object.

New Participant
December 29, 2016

Yes, that was very helpful! Using the En Space got me much closer to what I needed. Just as a follow up, do you know if there is a way to force the second and third lines to line up with the text first line text?

I have a feeling from your above answer there is not, but just wanted to double check.

Brainiac
December 29, 2016

Hi Andrea,

forcing text to move is doable by using objects with text wrap applied.

If you still like to use a tab between the bullet and the text, go to the tabulator section of the paragraph style, set a tab at position 0.25 and repeat the tab.

Repeated tabs in the paragraph style.

The tab at position 2.5 inch is selected (German "Zoll" is "Inch")

Regards,
Uwe