Francis-Crossman17221443
Community Manager
Community Manager
September 1, 2025
Answered

[Now Released] New Masking Tools

  • September 1, 2025
  • 47 replies
  • 56234 views

We’re excited to push an early development preview of new masking workflows to Premiere Pro (beta).  Whether you are color grading, applying effects, or cutting objects out from the background, these new masking tools are built to help editors work faster, smarter, and more creatively without needing to go to After Effects for simple tasks.


Note: This beta is an early look at upcoming Premiere Pro workflows and is not intended to reflect general availability performance or polish. Please contact us with bugs, feedback, and feature requests to improve these features.


  • Object Mask – Automatically identify objects and people in your footage using AI and isolate them with a single click. Plus mask refinement tools and fast tracking throughout clips.
  • Redesigned Shape Masks – the traditional shape mask tools (ellipse, rectangle, pen) have been rebuilt from the ground up with many performance and UI improvements.
  • Faster Shape Mask Tracking – the tracking algorithm has been completely rebuilt too.  It’s significantly faster than before, more accurate, and offers more precise control for correction.
  • Compositing tools – blend any combination of Object and Shape Masks to create complex masks with new blend modes: add, subtract, intersect


Quick Start guide

Follow these steps to get started with New Masking.

  1. Make sure you have enabled New Masking (see above).
  2. Select a clip on the timeline.
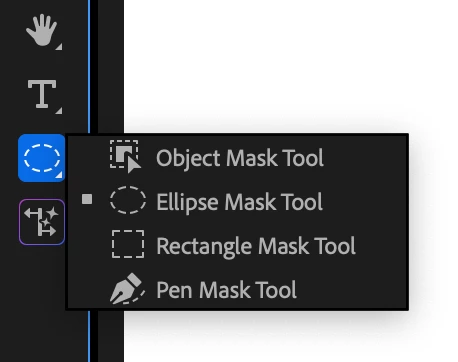
  3. Find the new Mask Tool group in the toolbar. Long-press to see all the masking options. Choose the Object Mask tool.


  4. Hover the mouse over the program monitor, watch as objects are identified, and click. This will draw a static mask around the object or person.
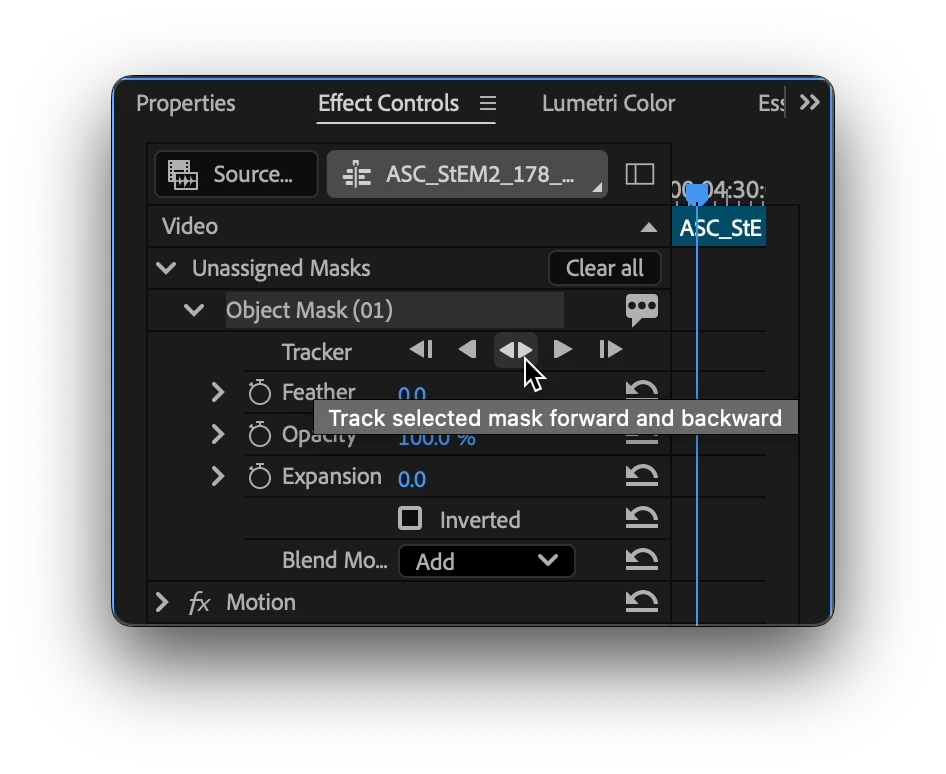
  5. Track the motion. Find the new “Object Mask” in the “Unassigned Masks” section of the Effect Controls Panel. Click on the forward and back button.

    Tip: the Effects panel is a different panel from the Effect Controls Panel. Find it in the Window menu.

  1. Add an effect. Find the Gaussian blur effect in the Effect Panel. Drop it on the clip in the timeline. The mask will automatically be applied to the effect.

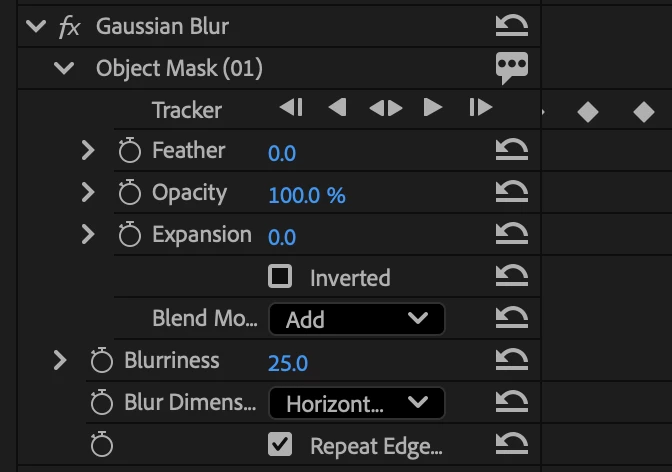
  1. Congratulations, you just used Object Mask to blur an object!
  2. Now, try to use the other tools in the group in a similar manner.


Visit here for the complete documentation. https://helpx.adobe.com/premiere-pro/using/object-masking.html


We want to know what you think.  Join the conversation below.

This topic has been closed for replies.
Correct answer kes_akalaonu

Make sure to right click on the tracked mask in the Effect Controls and select Change to Opacity Mask. Duplicate your video and remove the tracked opacity mask and placed that on V1 and your masked layer on V3 or above. Place your graphics on V2 and it should show up.

47 replies

_nicdean
Community Expert
Community Expert
September 2, 2025

Day 1,557 of requesting "Shift" to lock mask points moving horizontally/vertically.


https://community.adobe.com/t5/premiere-pro-discussions/hold-shift-to-move-mask-points-vertically-horizontally-broken/m-p/14611213

FlyingFourFun
Inspiring
September 3, 2025

@_nicdean fingers crossed for you and all of us!  This is a legit request...  BTW I tried to upvote, but upvotes are really hit and miss - if Adobe is looking for upvotes to prioritize these sorts of things, I think the inconsistent action of the voting button will make it hard to get a real sense of the interest in anything.


@Francis-Crossman17221443 Thank you for taking it up, and getting an project manager assigned to get this coded 🙂  I am looking forward to testing it.

Ron Rigler
Community Manager
Community Manager
October 2, 2025

With 25.6 beta 88, we have added support for SHIFT to constrain movement. This implementation is different than currently shipping masking, so we would appreciate feedback. 
With the SHIFT modifier, you can now constrict movement of either selected mask control points or the entire shape. The movement is constrained either horizontally or vertically. For selected control points, the movement references the axis of the point you are dragging. When moving the entire shape, the center point of the shapes axis is used as a reference point.

Inspiring
September 2, 2025

Go and try it for yourself. It is unusable for anything except solid color shapes with no drop shadow or even slightly fuzzy occlusion. It tracks well but the result is garbage. Hair? Forget it. No amount of feathering or expansion helps. I was all set to do a tutorial on this but it's too embarrassing. It would have ended up as an Adobe hit piece. Stick with AE on this one, folks. Once again, Adobe, your competitors are years ahead of you. It's hard to believe you put this out there.

Ishan Y
Community Manager
Community Manager
September 2, 2025

Hey Stanley,

Sorry for the trouble. I've moved this post to the Premiere Pro Beta community. Could you share any screenshots or screen recordings? That will help the engineering team better understand the problem. Thank you for taking the time to give your feedback.


Thanks,

Ishan

Please tag me (@) in your replies so that it notifies me and helps me respond promptly.
Inspiring
September 2, 2025

Thanks, but no. I don't have the time. My advice is to scrap it and start over. Runway did this better three years ago. Even Resolve Magic Mask is better.

MyerPj
Community Expert
Community Expert
September 1, 2025

Very cool feature. I like this idea, AE type features that split the difference between having them locally and switching to AE.

I cut a clip to 2 seconds to try it, and the tracking was done in an instant. Real cool, great new feature.

FlyingFourFun
Inspiring
September 1, 2025

Found something else;  trying to remove something that is selected in error; and while holding Alt to remove to it the following error comes up:


The part I am trying to remove from the mask is the little bit of grass in the top right corner of this picture.


Trying to add a missing section of this lamp post also generated the same error, and there was no way for me to add it to the mask to be included:


Trying to select this missing bit of the other lamp post always selects the windows and never the missing bit of lamp post:


These would all be a good use case for a brush tool I suspect where I can manually select the area.  It would link to the other detected masks, and use those to stay in sync if it was having a hard time tracking it (use relative planar data to stay locked on)


Another thing that is a workflow issue, is there needs to be markers for where the mask is drawn, and what part of the clip is tracked and not, and you should be able to use those to find your way back to the correct frame where the mask was created, and to skip to untracked portions of the clip.   Just found out the hard way by hitting the spacebar in error and it started playing the video, how hard it was to come back to where i was building the mask.


BrianLevin
Known Participant
September 1, 2025

Will test the masks but in the meantime can I please reiterate that the shortcut key for Toggle Direct Manipulation needs work no matter what panel you have active. Right now you must have the Program panel active, and so it makes it so that playback stops if you previously had it active, but can't disable it without clicking into the Program Monitor to do so. This used to work amazing prior to the new Toggle Direct Manipulation settings from 25.0. Since you are already messing with that part of the program would you please please restore this function.

Inspiring
September 3, 2025

it does, you're just encountering an issue with premiere's keyboard shortcut system where if they change the scope of a hotkey in an update, you lose the ability to change that hotkey within the GUI, which causes the issue you're describing.
You can manually go into the hotkey xml and remove the problem hotkey yourself, otherwise you need to create a fresh hotkey file. Early 25.x versions of premiere changed a whole bunch of hotkeys that results in similar issues

BrianLevin
Known Participant
September 3, 2025

Oh wow, well that solves like half the bug reports I posted today. Basically I just need to make a fresh new keyboard shortcut file to solve some of my issues because I just tested with cleared keyboard preferences and sure enough the things that are really bugging me aren't problems after starting from scratch. Guess that's an hour I get to waste tomorrow morning fixing this.


By chance what else do you know of that got changed that is having these types of issues because so far it's Toggle Direct Manipulation that I've been complaining about and on 25.4 the hotkey for Zoom Program Monitor to Fit not working in the Program Monitor (it does if I follow your advice and start with fresh keyboard shortcuts).

FlyingFourFun
Inspiring
September 1, 2025

I had a chance to try this, and it is impressive, but the selection tool and its refinement needs some seriose work.  I was tryign to track a horse, and it would select everythign fine, and when tracking started, it would pickup other parts of the video no where near even the horse.  


When you removed a section, and retracked,  it would make things worse.  When you added a section that was prev workign fine, it would remove other perfectly tracked sections.


The tool needs a brush tool, and maybe a way fro multiple objects to have there own track (maybe multi object tracks are already there, but I have not found it yet).


Over all, its a really solid start, but the unexpected object selctions, lost tracking and the random like changes when adding in something later removes something that was workign fine before.  I assume the AI training used can/will be improved,  so this is still very exciting.


But please add a resizable brush to it, and muti object tracks that can be locked down when they are good.


I assume at some point you will also be able to select obects that are not auto detected?  so far it seems to be focused on forground objects it detects, and not background objects.


Compliments to the team working on this, it shows significant promise.

FlyingFourFun
Inspiring
September 1, 2025

it seems like you can create multiple objects and rename them if after tracking them, you convert it to opacity mask for example, and then they show up as different tracks:

and then each object you tracked shows up as a seperate tracked item:


I dont belive these are doing oclusion based tracking (meaning that a object already tracked can be cut out of the object/ignored for the new item beign tracked liek you can with Mocha for example).


Again, impressive - and I'm sure the more time you have with this feature and its tweaking it will get much better too....


A full how to video may reveal some things about how to use it that I have not discovered yet, hopefully someone is working on that for us 🙂


As an aside,   if you would like I an willing to provide a short clip of some horses and wagons with people etc if this helps the testing process, just tell mw where to upload it to.


As an aside,  I tried this with a less complex clip, where I had someone talking in front of a barn door, and the track was really good.  There is still considerable jittery edges, and a setting to reduce the edge jitters would be ideal, but actualy very impressive and fast.  It was doign 12 frames per second on the person,  and about 6 frames with tracking a horse with a person on it.

Adobe Employee
September 1, 2025

@FlyingFourFun Thanks for your detailed feedback.

I will reach out to you over direct message regarding how to share the videos you were referring to. 

We have a helpx page that might help with some of the questions you have raised. 
https://helpx.adobe.com/premiere-pro/using/object-masking.html

Blend mode of mask can be used to combine the masks together. You can use "Add", "Subtract" or "Intersect" to combine masks. Any number of Object Masks and Vector Masks can be combined to create complex masks. The Blend Mode of a mask operates on the full result of all the masks that came above it in the stack.  


For Object mask we have different modalities to select an object  - Hover & Click or Draw a rectange or lasso around an object to select an object. If an object you want isn't automatically highlighted, you can use the Rectangle or Lasso tool to roughly draw around it. The model will then detect the object within the drawn area and select it for you. 

FlyingFourFun
Inspiring
September 1, 2025

This is legit exciting....  if you end up with a how too video, please post it - I would love to watch one to get into the object mask properly exercised.   I opened a project to work on, and this will now have me side tracked and my project will be delayed, but I am legit excited for object masking in prem pro....