- Home
- Premiere Pro
- Discussions
- Re: Can't move keyframes in small increments
- Re: Can't move keyframes in small increments
Copy link to clipboard
Copied
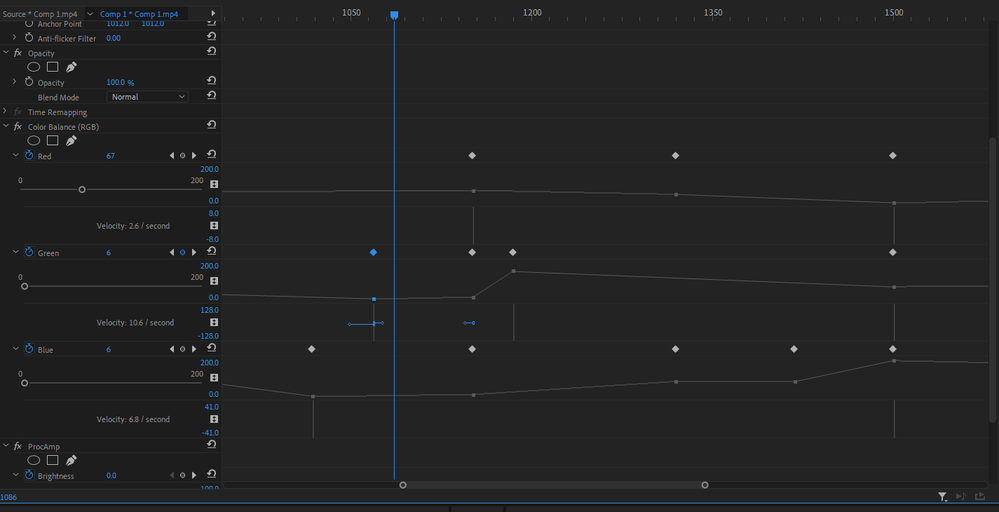
I can only move keyframes in 20-frames increments.
Snap is turned off, both in the Timeline and in the Effect Controls' dropdown menu.
I've tried changing those snap settings to any available option, but they don't have effect at all, which is peculiar in itself, I think.

Am I missing some kind of lock or other snap option?
 2 Correct answers
Make new project and import old one.
Try using Lumetri, Color Balance is now obselete.
Now I know what the problem is:
As mentioned earlier, one track is an imported morph sequence from After Effects.
That sequence consists of two png's on each side of the actual morph, which is titled comp1.mp4.
At some point, both images were automatically renamed comp1 (some percentage; i.e. 0.09%).mp4. When I delete these two comps and replace them with the two original png's, everything works again (including the morph sequence between the two png's)!
So there's that...
Copy link to clipboard
Copied
Several people mention that Alt+Left Arrow are supposed to nudge video keyframes to the left.
However, my version doesn't have any shortcuts for that, so I added one, as shown below, but that doesn't work either...
Copy link to clipboard
Copied
I don't know if this problem is somehow related to the fact that any keyframe appears to be selected (blue) even when I move the playhead far away from it, as opposed to animation apps where a keyframe is selected, and shows its data, only when the playhead is right on top of it.
So, since a keyframe's values -- according to its on-off selection status -- don't change change for around 20 frames in either direction, I suppose it makes sense that it's not possible to actually move that keyframe in smaller increments.
But it's beyond me how it's possible to edit effects if that's the case...
Copy link to clipboard
Copied
Okay, this is definitely the problem:
It's only possible to add new keyframes if there's a minimum distance of 20 frames to the previous and next keyframe.
I hope it's because I have screwed up some unknown setting somewhere as it's not possible to edit anything under those circumstances.
Copy link to clipboard
Copied
This issue is project-specific -- I just tried another project, and keyframes behaved as expected; their select-status don't extend beyond their actual position, they can be moved freely, and my newly created keyboard shortcut to move keyframes frame by frame also works.
So, that's obviously very good. But keyframes still don't work in the original project. The only difference I can see is that it includes a morphed sequence imported from After Effects, but I don't know why that would collide with normal keyframe behaviour.
Copy link to clipboard
Copied
Make new project and import old one.
Try using Lumetri, Color Balance is now obselete.
Copy link to clipboard
Copied
Thank you very much for your help -- I just made a new project and imported the original, and I'm sure it's the right way to proceed. But I'm afraid I can't figure out how to make it work, and unfortunately I'm on a deadline so I can't test the various import options now. The one I did try merged all the tracks so I didn't know how to actually edit anything. But again, I'm sure it's the right approach as the original file must be corrupted in some way.
As for Lumetri, I did use that to begin with, but I felt the RGB version was more intuitive, or more like Illustrator, and faster. I did see that it was labeled obselete, but it doesn't seem to cause problems in my other projects.
Copy link to clipboard
Copied
Now I know what the problem is:
As mentioned earlier, one track is an imported morph sequence from After Effects.
That sequence consists of two png's on each side of the actual morph, which is titled comp1.mp4.
At some point, both images were automatically renamed comp1 (some percentage; i.e. 0.09%).mp4. When I delete these two comps and replace them with the two original png's, everything works again (including the morph sequence between the two png's)!
So there's that...
Find more inspiration, events, and resources on the new Adobe Community
Explore Now