 Adobe Community
- Home
- Premiere Pro
- Discussions
- FAQ: How to fix saturated/over-exposed HLG/HDR cli...
- FAQ: How to fix saturated/over-exposed HLG/HDR cli...
Copy link to clipboard
Copied
With Premiere Pro v 22, new features around color management for H.264 and HEVC have been introduced. This FAQ will show you how to fix clips that appear overexposed or oversaturated due to these new features. Caution: iPhone shoots HDR by default.
- In case you don't want or need the HLG/HDR workflow and want to return to the standard workflow, please follow these steps to avoid oversaturated and overexposed previews.
- Right-click on your media in the Project panel.
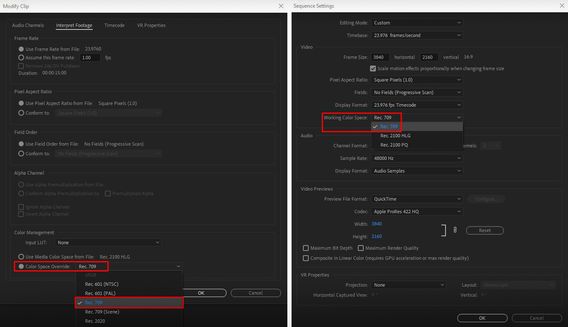
- Select Modify > Interpret Footage > Color Management.
- Set Color Space Override to Rec.709.
- Sequence > Sequence settings, set Working Color Space to Rec. 709.
- In case you do want to edit & deliver in HLG/HDR, please follow the steps mentioned below. Also, see R. Neil Haugen's in-depth article for the full pro workflow: Premiere Pro 2022 Color Management for Log/RAW Media
- Turn off HDR shooting on your iPhone by following the directions here. This allows you to return to a standard iPhone workflow.
So why do HLG files look saturated/over-exposed in Pr v 22?
In the previous version of Premiere Pro (v 15.x), HLG media was treated as Rec.709 & the sequence created from that media also used Rec.709 color space.
In Premiere Pro v22, H264 and HEVC are color managed, and the HLG media is treated as Rec.2100. So a timeline created from HLG media in v 22 will automatically be assigned HLG color space.
However, in v 22 opening a project created in the previous version (which had HLG media on Rec.709 timeline) results in HLG to Rec.709 conversion. This causes the clips to look saturated/over-exposed in the newer version of Premiere Pro.
Note: This only happens with projects (HLG media + Rec.709 timeline) created in the previous version. Newer project files will have the appropriate color space assigned and will show the correct preview.
How to solve this issue in v 22?
You may manage the color space of the entire timeline made from HLG clips.
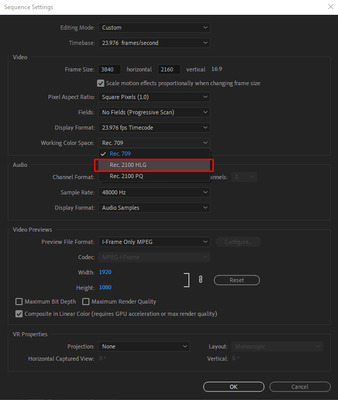
- Highlight the sequence & navigate to Sequence > Sequence settings.
- Under the Video tab, set Working Color Space to Rec.2100 HLG.
You may also color manage individual media files.
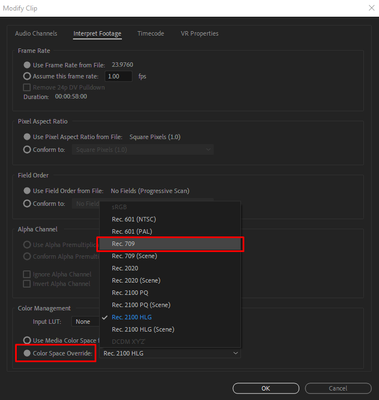
- To do so, right-click on the HLG file in project panel & navigate to Modify > Interpret Footage.
- Under Color Management, set Color Space Override to Rec.709. This will create a preview that matches the color of Premiere Pro v15.x.
How to correct saturated/over-exposed previews during H.264/HEVC export?
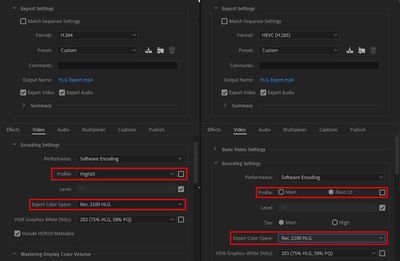
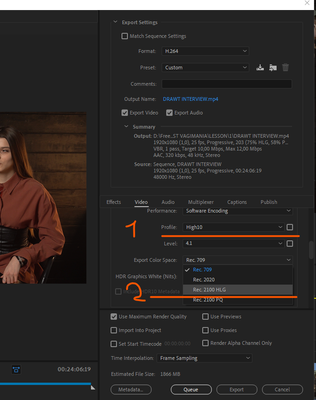
If you have edited in an HLG timeline & would like to export in HLG, please ensure that you use the following export settings.
- Select your Format as H.264/HEVC.
- Navigate to Video tab > Encoding Settings.
- Set Profile to High10 (for H.264) or Main10 (for HEVC).
- Set Export Color Space to Rec.2100 HLG.
Please note that the Match Source presets use Rec. 709 color space & might result in an incorrect preview if used to export a sequence based on Rec. 2100 HLG color space.
For the full HDR broadcasters workflow, see this page in the Premiere Pro User Guide.
Hope this helps.
- Sumeet
 2 Correct answers
Karl's video may help you understand how the HDR workflow all works.
For users recording their footage on a Sony Venice camera, using the Modify>Interpret Footage workflow will not work for those clips!
Venice uses the older unmanaged workflow, with a Source Clip Effect that has a toggle switch, and LUTs to adjust from there. You can batch-adjust these clips with an effect preset.
To see what I mean, load a clip in the Source monitor, and then open the Effect Controls panel. You should see something like this!
You can remove the source effect from there.
...Copy link to clipboard
Copied
Why?
Why make me have to color correct my footage or have it blown out and oversaturated?
Why?
All my footage and even color mattes and titles are completely different on export from what I created in Premiere.
Why?
This should be something people toggle on, not something that is blanketed across the program.
Why?
Copy link to clipboard
Copied
Thank you so much! Just go me an A on my assignment lol
Copy link to clipboard
Copied
I'm still having some issues with this - I changed my sequence working color space to Rec 2100 HLG as instructed.
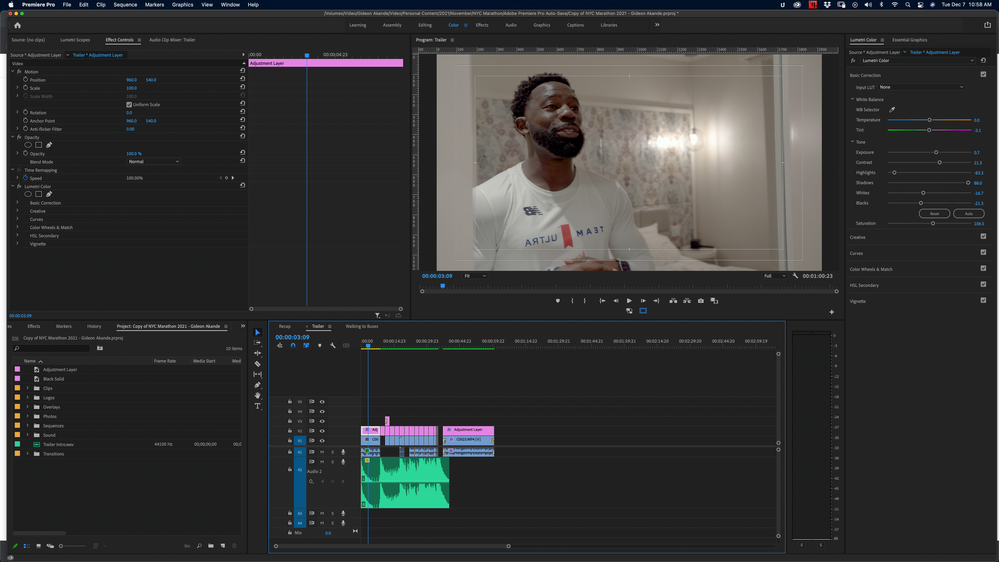
I've included screenshots to show you what I'm seeing. My clip looks normal on the timeline with my color adjustments.
Notice that the light in the background is not blown out in this first image.
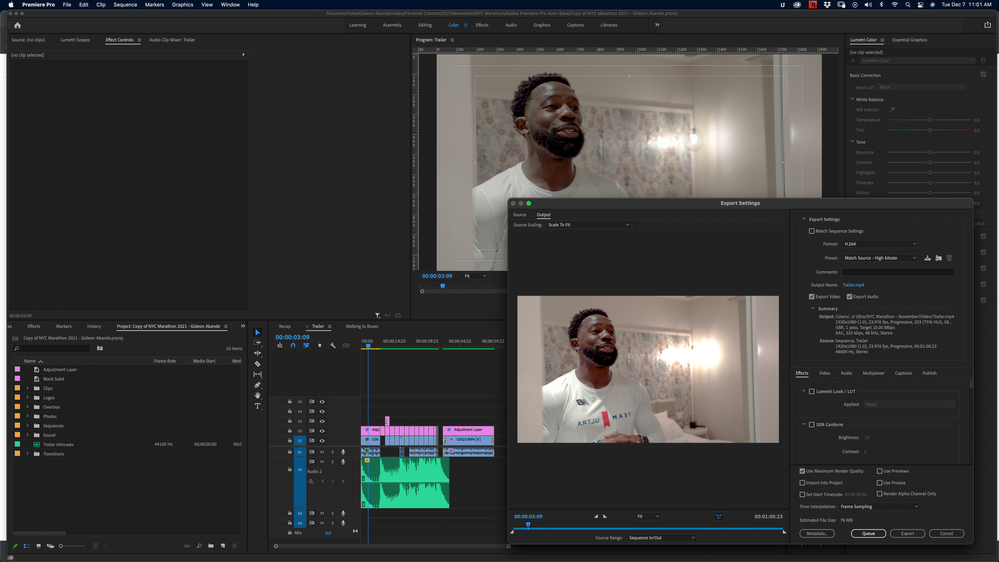
Now when I go to export, this is what the preview shows me:
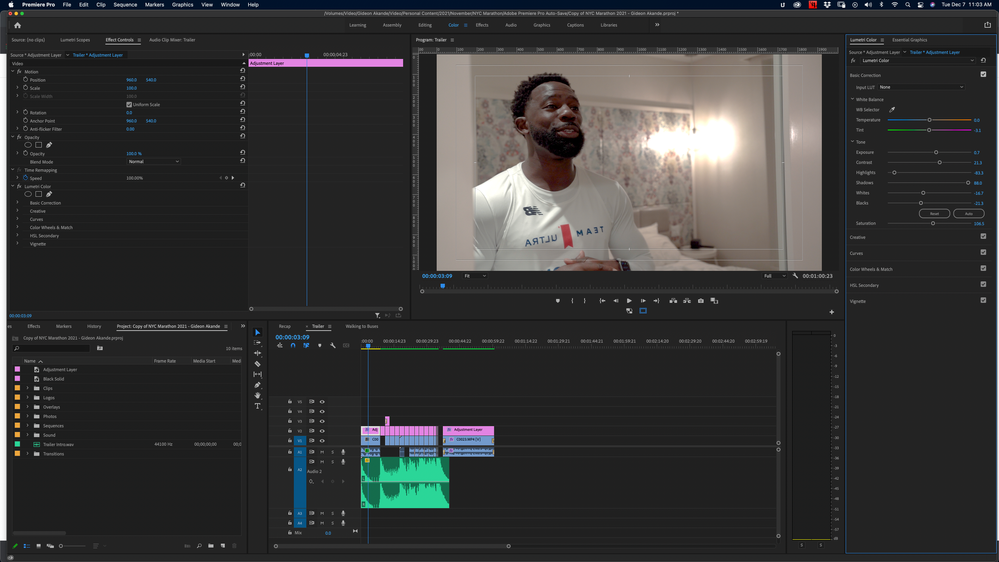
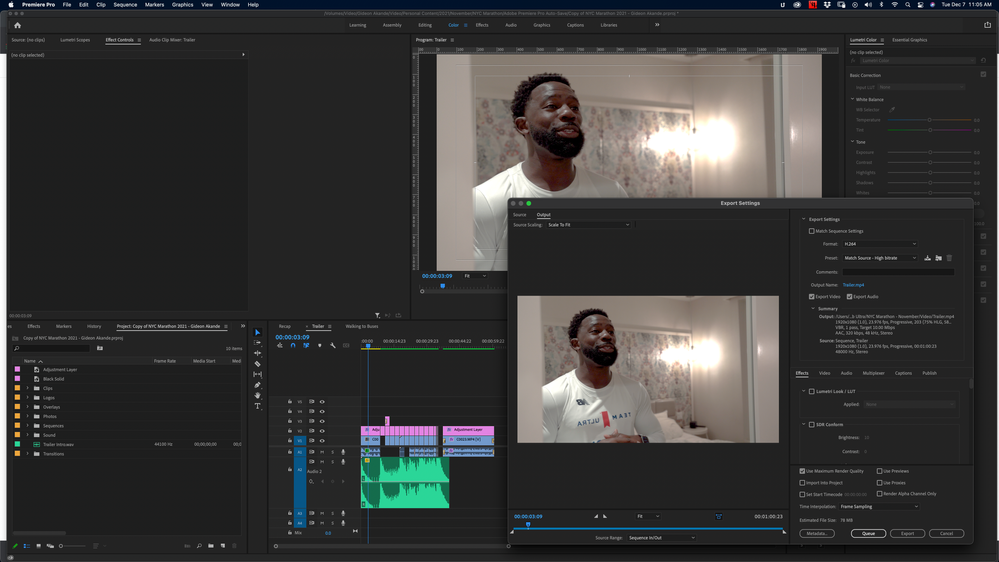
I currently do not have "Display Color Management" turned on. When I do that here is how everything looks:
Timeline image:
Export Preview:
What am I doing wrong here for that back light to be blown out? That's not how the original clip was shot.
Copy link to clipboard
Copied
Most users, unless you have a really tightly calibrated setup, should have the Display Color Management option checked.
Next, what is the clip's CM seen as by Premiere?
Go to the clip in the bin, right-click, Modify/Interpret Footage and check the CM section at the bottom. The clip should either be seen as HLG/PQ or you should use the override option to set it to HLG.
And for exports, make sure you are using an HLG preset. It doesn't look like you selected an HLG preset ... ?
And ... you're not showing the scopes, so I can't get a feel or even any estimation of what the clip has for dynamic range whatever.
Neil
Copy link to clipboard
Copied
Copy link to clipboard
Copied
FREAKING THANK YOU I HAV BEEN STRUGGLING thank you this fixed it
Copy link to clipboard
Copied
✌️
Copy link to clipboard
Copied
For exports, if your sequence CM is say HLG, which it might be for a lot of phone and log-encoded media, make sure you use the HLG export presets they've added.
Select the format, like H.264, then scroll down until you see the HLG preset.
Neil
Copy link to clipboard
Copied
Thanks! Now this problem is solved while working with Pr only. But...
I have a new challenge: Now when I replace with After Effects Composition Pr interprets the footage as rec709 and the footage looks gray and dark. When I click at interpret footage I'm not able to change the color space to Rec2100 HLG. Does anyone know how I can fix this problem?
Copy link to clipboard
Copied
You have to match the CM settings in Ae and Pr ... which is not necesarily as easy as it could be. So check and work with the CM for the AE comp in Ae.
Neil
Copy link to clipboard
Copied
I'm also having this problem, despite matching settings in PR and AE. All footage is forced to Rec709 2.4 in AE and PR, AE project and PR sequence settings all CM Rec709 2.4, but the colour coming out of After Effects is more saturated than that on my PR timeline. I've tried everything I can think of, turning off hardware acceleration, chaning the bit depth in AE, changing everything back to 2100HLG... The only thing I can really do now is try and match the grade which is such a fudge...
Any ideas?
Copy link to clipboard
Copied
When will Adobe stop this mess with color? Fix the color management, it is impossible to work. We created a problem with color, not taking into account dynamic connections with compositions. Nonsense
Copy link to clipboard
Copied
There are other things that might help ... I know that unchecking work in linear color helps at times for mis-matches between Pr and Ae.
I hope with the changes they're making to the underlying color that we get the same setup in both Pr and Ae. This has been a mess for way too many users over the years trying to work between the two.
I've found it takes talking with some of the top Ae users to get the proper color information for working with Ae/Pr comp workflows. David Arbor, some of the others "over there" on the Ae forum.
Neil
Copy link to clipboard
Copied
In general, I don't have a very good opinion of the Lumetri panel. Right now I'm working with commercial material and in order to reset all Curves settings for me, I have to click on each color channel and reset the default color. Answer me the question: in what century do we live that we cannot add one RESET button to each control on the Lumetri panel??? Is this super difficult for Adobe engineers??? What a kindergarten, damn it.
Copy link to clipboard
Copied
For that kind of thing, everyone works differently ... one person's obvious NEED is someone else's never ever EVER item. I've followed and participated in discussions on this type of thing from Premiere, Resolve, AfterEffects, and Audition.
I agree with you, a total reset option for the RGB curves would be useful. The other curves panels of course, simply double-clicking does a reset. I've had other people insist an overall reset for the RGB curves would allow people to do damage too quickly. To each their own, I suppose.
I know some people that were upset the Hue/Sat 'donut' tool got dropped ... !
Neil
Copy link to clipboard
Copied
Nail, a hundred taps per day for this kind of thing, like resetting the color to the factory. What are you talking about. Ask anyone who appreciates productivity now, he will confirm my words. One more time... I click twice on the R channel, twice on the G channel, twice on the B channel and twice on the Y channel. Who is comfortable with this??? Who paints once a year??? What nonsense
Copy link to clipboard
Copied
OK, I started with 2022 and its already set to 2100 HLG and it exports to a way over saturated video. The original video is from an iPhone. I'm not up on the complexities of color management and what all these various settings mean. I've tried different configurations (going back to rec.709, etc.) nothing seems to make it export like the original video. How can I get it to export correctly? I've already edited 8 videos in 2022 that I'd have to redo in the older version.
Help!?
Kathy
Copy link to clipboard
Copied
I don't have near enough information on what you're doing to do other than guess. So I'll just restate the most common fix.
For most users, you really do want to work in Rec.709 still. So the best thing is check your clips in the bin. If they're other than Rec.709, you want to "override" to Rec.709 via the Modify/Interpret Footage color management settings. Then make sure your sequence is using the Rec.709 color space in the Sequence settings.
At that point, you can export easily with the "standard" export presets and the results will play as expected everywhere.
IF you really do want to work in HDR ... then make sure the clips are HLG or PQ in the bin. Override to which of the two HDR options you want for any clip NOT of that color space. You also need to make sure that your monitor ... and the OS ... are set for viewing in HDR.
Then make sure your sequence CM is set to that color space, whether HLG or PQ. And also make sure your export preset lists the same color space in the name! You cannot use a 'normal' preset for the HDR sequence.
Neil
Copy link to clipboard
Copied
many people like me who are not expert professional video editors and this
additional task of having to manage the color format is new and unexpected.
IMHO, the default should be that it doesn't alter the color unless the user
changes the settings like it's done for all the past versions.
Kathy Evans
Copy link to clipboard
Copied
"... doesn't alter colors ..."
There are actually several ways to view that. A couple quick examples. Do you mean you always want Rec.709/SDR no matter the clip's color space? Or do you mean that no matter the sequence, the clip should be in it's 'native' color space whatever that is?
One could easily argue that both those fit your statement.
The complicating factor is our media is more complicated now. Some Rec.709/SDR, some where the camera shoots HLG/PQ whether you want it or not, and might prefer to work in SDR. And some who want to work in HDR.
Now, the Adobe video apps are still limited because we can't work with DolbyVision's HDR yet, nor work within an ACES color managment system. Both of which we'll get at some point I would expect.
So there are going to be more CM options than we have now. Which is why I've been pushing for a single CM Panel ... one panel to rule all default behaviors and user overrides.
Neil
Copy link to clipboard
Copied
Neil I hope they give it an easy way to manage it. The current way is confusing. I still get even get the color space meta data to show in the project window!! despite there being two tags for 'color space' in the metadata list. This color space change is awfully hard to follow and incomplete execution - I should be able to see the meta data next to the clip name, even a flag or conditional formatting for clips that don't conform to the sequence color space would be nice.
I votted for your suggestion already BTW...
Copy link to clipboard
Copied
@katevaThe new way premier works is in fact as you described, it doesn't alter the color profile, it actually respects the color profile embedded into the video. The prev versions flagged ALL the video as rec709 and created rec709 timelines and all exports were rec709 (basically).
The latest version imports the HLG clips with their color space information. if you create a seq from that clip it also creates it in the matching color space. The trick is on export to select the correct color space also (if you working seq is HLG for example your export must be in the same color space, if you use a rec709 preset for export the whole video will be blown out.
I am no color space expert, but I have run into tons of confusion, and the only way I made sense of it was to design my project backwards. If I needed a REC709 output file, I would import everything, modify the footage to REC709 and then create the seq and place the video. Because all three (clip, sequence and exported seq) matched, it was good. As a matter of fact if you do all three with REC709 manually like this its what premier was doing before they added color management.
I was running into issue where I had HLG + rec709 footage, they don't mix well, I found that using REC709 when there was any HLG footage in the sequence wasn't easy for me.
As a side note, I have also discovered that using the NVIDIA encoder presets doesn't work on HLG footage as they are all setup for REC709. There seems to be no hardware acceleration on the HLG footage so it takes a very long time to export. for my needs staying in REC709 for everything works and gives me the ability to leverage the hardware acceleration of the NVENC encoders.
At the end of the day, the change is confusing, and without tinkering with the clips based on the advice you get here it takes a bit to understand whats going on. I struggled for a few days and finally picked up on what it was doing once I understand there was three places (clip, timeline sequence and export setting) that I had to manage to get an expected result.
Copy link to clipboard
Copied
Yea ... that's a very good explanation of the new Rec.709 workflow.
And yea, it's also rather confusing until you get a bit of a handle on it. Now of course, it has been very necessary to get the controls, and I'm glad of it. That said, I would prefer they were "housed" differently. More clearly so for the users.
But from the explanations they've given, it is supposed to recognize if you put an HLG clip on a Rec.709 timeline, and apply the correct transform to Rec.709 automagically. Which, for most clips, it ... doesn't. It drops the HLG clip on the timeline with the same math as it would on an HLG timeline. Without the transform.
So yes, then you run to the bin to use the override to Rec.709 option. And it works for Rec.709.
But there's a huge problem here: you can't use the clip as both Rec.709 and HLG in the same project. So if you need to deliver both versions, well ... that's a painful thing. You have two options.
First ... try duplicating the clip in the bin, set one to Rec.709 override, the other to HLG. It might work ... but on the other hand, this sort of thing can also seem to confuse Pr at times, and you might not always get the "right" interpretation.
The second is to make a completely new project. I haven't tried yet, but will soon ... to see how well it can handle in Productions mode having the clip imported to two different projects, one being HLG, the other Rec.709.
And see how stable that works.
Neil
Copy link to clipboard
Copied
Neil; I think if there was a way in which premier would transform the clip to the color space of the timeline, and another transform was optioned when exporting it would solve many issues.
For a professional that needs locked down color space, they should be able to do what's needed and have complete control. For what I think is a large portion of the users, the ability to drop clips into a special "conforming" timeline (maybe call it a conformed REC709 for example) that anything from any color space would auto conform to the color space of the 'conforming' sequence. The Export feature, I am not sure why we even have a choice for color space if it's not going to conform it to the request (for an HLG seq exported as a REC709 should be transformed properly for export - respecting the technical limitations).
My working mental model of exporting is that it takes anything and everything (that it can read/support) and exports all of that to a the desired (conformed) target. As an example, put prores, H265 and H264 in the same timeline along with a PNG image SEQ and export as a H264 @ 50mbps - they all transform to the export target. Color space should work the same way.
I believe that anyone who needs the color space control will have control with with this approach, and you don't have to make multiple projects to get a REC709 + HLG.
I have done a couple of 'for fun' projects where I built a project with HLG footage to export as HLG, it works great. I then tried to get the same HLG project out as REC 709 and it was blown out. Easy answer was to 'interpret' the footage to REC709, change the seq to rec 709 and export with a Rec 709 setting.
Complications arose when I had a mix of the two in the same project. Once can with great ease add HLG footage interpreted as REC709 on a REC709 Seq, exported as REC 709. But when you try to to export as HLG with REC709 on the timeline it gets wonky (I'm still not ever sure I understand exactly what happens).
All of this to say, if the export at the very least conformed your project to the desired color space on export that would be welcome. It would basically save you all the manual steps to interpret footage etc etc... A smarter way would be add a special seq setting that can be universal for all footage and self conform and maps nice to the export target color space selection (so you can make one project and Media Encoder can be told to build various color space versions).
I understand that for the purists among us in color science this workflow/feature may be a bad idea. However, The purist/expert would still be able to film, edit and export in the color space they want, they would be wise to stay away from the 'self conforming' workflow for mixed color space clips to exact control on the whole project and use the locked down color space version of the timeline.
I also run into problems now when I use Topaz, it seems to affect the color space of HLG clips in some strange way there Premier doesn't see the colorspace at all. and I have been fussing with a work around for that now also. At the end of the day, I'm still stuck in a REC709 workflow.... and premier is adding steps and room for errors in the process - which is what I believe is driving the complaints about color space management.
Copy link to clipboard
Copied
I too will be much happier when this is more settled ... finalized. Currently, part of the problem is the whole thing is in flux. Think about it ... they went from a total SDR/Rec.709 CM with the ability to manually set "over-range" options to sort of do HDR work ... to a program that doesn't have a "base" CM anymore.
That's really a massive change underneath everything.
In Davinci Resolve, for instance ... you can set a default and/or override the media in the Media Pool. Set a CM for a timeline with a default behavior that applies a transform to all clips of a different color space. Apply a monitor CM setting to view that timeline. And on export, set what thou wist.
My colorist acquaintances are now in the habit of setting the sequence default to P3/D65, the widest practical color space currently available. And will be for some time. All media is transformed into that space, no matter what they are using for monitoring and export. This way the math used for all color controls is identical for all clips.
Then for a Rec.709 project, you set the monitor to Rec.709, and export to Rec.709. For HLG, you would set the monitor then export for HLG. Monitoring and exports are totally separate from the timeline CM.
That's ... got great advantages.
Neil
