- Home
- Premiere Pro
- Discussions
- FAQ: How to fix saturated/over-exposed HLG/HDR cli...
- FAQ: How to fix saturated/over-exposed HLG/HDR cli...
Copy link to clipboard
Copied
With Premiere Pro v 22, new features around color management for H.264 and HEVC have been introduced. This FAQ will show you how to fix clips that appear overexposed or oversaturated due to these new features. Caution: iPhone shoots HDR by default.
- In case you don't want or need the HLG/HDR workflow and want to return to the standard workflow, please follow these steps to avoid oversaturated and overexposed previews.
- Right-click on your media in the Project panel.
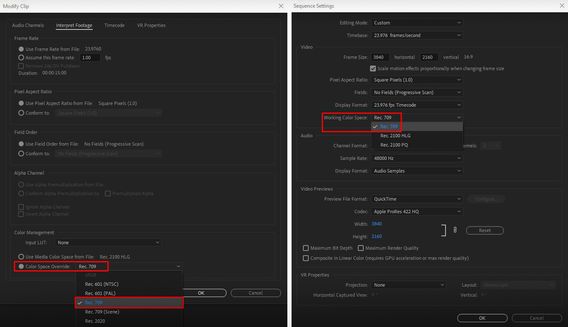
- Select Modify > Interpret Footage > Color Management.
- Set Color Space Override to Rec.709.
- Sequence > Sequence settings, set Working Color Space to Rec. 709.
- In case you do want to edit & deliver in HLG/HDR, please follow the steps mentioned below. Also, see R. Neil Haugen's in-depth article for the full pro workflow: Premiere Pro 2022 Color Management for Log/RAW Media
- Turn off HDR shooting on your iPhone by following the directions here. This allows you to return to a standard iPhone workflow.
So why do HLG files look saturated/over-exposed in Pr v 22?
In the previous version of Premiere Pro (v 15.x), HLG media was treated as Rec.709 & the sequence created from that media also used Rec.709 color space.
In Premiere Pro v22, H264 and HEVC are color managed, and the HLG media is treated as Rec.2100. So a timeline created from HLG media in v 22 will automatically be assigned HLG color space.
However, in v 22 opening a project created in the previous version (which had HLG media on Rec.709 timeline) results in HLG to Rec.709 conversion. This causes the clips to look saturated/over-exposed in the newer version of Premiere Pro.
Note: This only happens with projects (HLG media + Rec.709 timeline) created in the previous version. Newer project files will have the appropriate color space assigned and will show the correct preview.
How to solve this issue in v 22?
You may manage the color space of the entire timeline made from HLG clips.
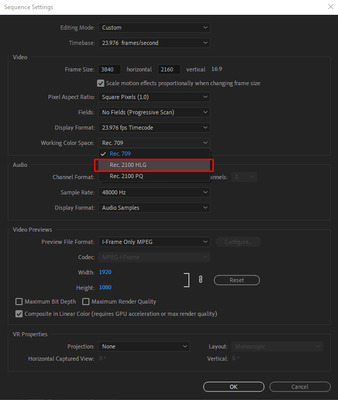
- Highlight the sequence & navigate to Sequence > Sequence settings.
- Under the Video tab, set Working Color Space to Rec.2100 HLG.
You may also color manage individual media files.
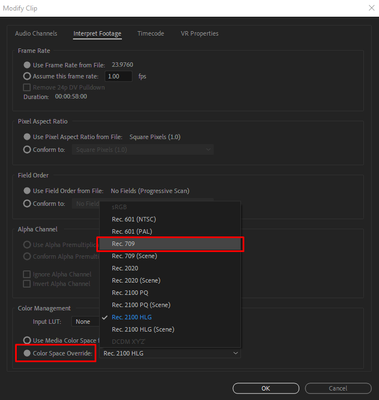
- To do so, right-click on the HLG file in project panel & navigate to Modify > Interpret Footage.
- Under Color Management, set Color Space Override to Rec.709. This will create a preview that matches the color of Premiere Pro v15.x.
How to correct saturated/over-exposed previews during H.264/HEVC export?
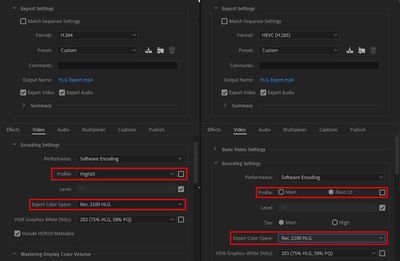
If you have edited in an HLG timeline & would like to export in HLG, please ensure that you use the following export settings.
- Select your Format as H.264/HEVC.
- Navigate to Video tab > Encoding Settings.
- Set Profile to High10 (for H.264) or Main10 (for HEVC).
- Set Export Color Space to Rec.2100 HLG.
Please note that the Match Source presets use Rec. 709 color space & might result in an incorrect preview if used to export a sequence based on Rec. 2100 HLG color space.
For the full HDR broadcasters workflow, see this page in the Premiere Pro User Guide.
Hope this helps.
- Sumeet
 2 Correct answers
Karl's video may help you understand how the HDR workflow all works.
For users recording their footage on a Sony Venice camera, using the Modify>Interpret Footage workflow will not work for those clips!
Venice uses the older unmanaged workflow, with a Source Clip Effect that has a toggle switch, and LUTs to adjust from there. You can batch-adjust these clips with an effect preset.
To see what I mean, load a clip in the Source monitor, and then open the Effect Controls panel. You should see something like this!
You can remove the source effect from there.
...Copy link to clipboard
Copied
Good job on making importing clips take 1000x as long now for the majority of your uses. This update is terrible. Nobody wants this.
Copy link to clipboard
Copied
I couldn't disagree more. More fine-tune control over color profiles and color management is a pretty key feature that I'd argue is necessary for a professional NLE.
@Sumeet Kumar Choubey
I am curious how overriding HLG/PQ footage with a Rec 709 color space handles compared to say, applying the SDR Conform effect. At first glance, I'd assume SDR Conform would give you more image control considering that's the intended use of the effect, to bring HDR footage to an SDR timeline.
When you override HLG footage with a Rec 709 color space, is essentialy the same thing as SDR Conform happening in the background? Is Premiere just remapping HLG bit values to Gamma 2.4 bit values? Perhaps with a different correction curve? Is there any "best practice" between assigning the Rec 709 profile vs. keeping the Rec 2100 HLG profile and adding SDR Conform.
Thanks!
Copy link to clipboard
Copied
Just an update from what I've seen from others, as I think I've answered my own question now:
The more and more I read, it sounds like using color space override as a way to "trick" HLG footage into being SDR has some consequences. Typically in the realm of proxies, because I assume you cannot independently control color space for proxies (I have no clue if proxies are either ALWAYS 709, or just assume the color space set for the original footage)
For anyone reading this: I think this is an argument for using an SDR Conform adjustment layer for footage, as opposed to color space override. This way, the adjustment layer track can easily be toggled as necessary based on your proxy status. I suppose folks could also integrate SDR Conform into their proxy presets if they prefer, but that might have its own disadvantages.
Still though, personally I feel like on a fundamental level: footage that has color space information tagged should retain that assigned color space. In my mind, an override is useful strictly if the footage was NOT tagged, or INCORRECTLY tagged. If it's simply a matter of conforming HDR footage to an SDR sequence, well, this is what SDR conform is for. Just my 2 cents and random musings. Thanks for letting me ramble.
Copy link to clipboard
Copied
ah.,
Please provide this feedback to devs here: Premiere Pro User Voice
Sumeet and myself are not on the dev team and cannot add your requests. We can advocate and upvote any bug reports, however. Hope we can get your issue some more attention and get more and better features for a smoother workflow.
Thanks,
Kevin
Copy link to clipboard
Copied
Kevin, no worries.
To be clear, I actually don't see it as an issue. I think everything is working as intended. I was merely postulating (perhaps just working it out for myself!) the difference in approaches of overriding color spaces vs. SDR conform, and PERSONALLY I think SDR conform might be a better approach, but it's still just me digressing.
I know this change is taking some folks by surprise, but having Premiere read and acknowledge color space information is, in my opinion, a good thing. Maybe not as big of a deal now when SDR is still the norm, but if HDR editing becomes more widespread, I think this level of manual control is essential for a pro NLE.
Copy link to clipboard
Copied
How do you compensate for the sequence being different from what shows up in the export window before exporting and the export itself? So far for me they all having different color from the original footage?
Ever step requires adapting or changing to fit this and it's not working for client work that needs multiple edits daily. Even when exporting the same sequence and using the exact same settings I'm getting different results. No export seems to be exporting with the same color.
Nevermind using footage from multiple camera sources or phones in the same sequence.
I guess in general it's very strange ot have a program that manipulates color so poorly on everything without allowing you to work with the original footage and color you shot. It's kind of a nightmare for anyone who wants a consitent fast workflow.
Copy link to clipboard
Copied
Actually, what's changed is they are doing less default changing of media now, not more. Odd as that sounds. There are completely different default Color Management behaviors, and correspondingly more user-settable CM options. And we do need the greater options that are now possible. Though I disagrree with the rollout of them.
The old behavior was to assume most everything needed a transform to Rec.709. Now, most HLG and some Log media are left untransformed unless the user chooses to do so. No matter the color space of the seqeunce.
Which is a reversal of the program default.
That phone media is quite likely HLG, and before that was 'assumed' to be transformed to Rec.709 when used on a timeline. Now, it's left as HLG unless the user decides to change it.
And if you drop some recognized Sony, Canon, and Panasonic Log media on a sequence first or make a sequence for them ... it will make an HLG or PQ sequence. Unless of course, you set the Override option for those clips to Rec.709.
Before, it would have defaulted to a Rec.709 sequence. And transformed the clips to that space.
The log media that is currently "recognized as log" from the several manufacturers I mentioned above, is brought to a timeline without interpretation into Rec.709 unless the user chooses to set it to Rec.709 as an override. So plopped onto a Rec.709 timeline, it will show as horribly blown out. Because you are seeing the uncorrected dynamic range of the clip.
In either case, setting the appropriate color space for HLG or affected log media, is done via the bins in the Project panel. Select the clips that need an override to Rec.709, then right-click/Modify/Interpret Footage. Then in the new color management controls at the bottom, use the Override option and select Rec.709.
Then make sure the sequence CM is also set for Rec.709.
Again, if you need an HLG or PQ project, make sure the clips are set in the Project panel to the desired color space. Make sure your sequence and scopes are set to the same color space. And select the correct options for export from the HDR presets.
Interesting thing to learn ... log media dropped without a transform on an HLG sequence will not look at all 'log' ... nor has it been transformed. It's simply displaying full dynamic range of the clip as the L of HLG is ... log. Hybrid Log/Gamma.
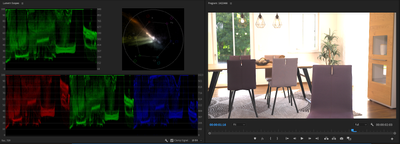
Here's a Sony S-log-3 clip, dropped on a Rec.709 timeline without interpretation.
Blown out whites and look at that vectorscope ... way blown out.
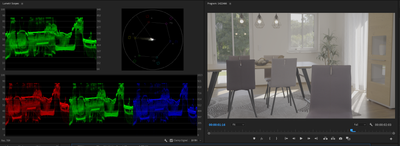
But with an override setting to Rec.709, you get the 'log' look you expect most of the time.
The total dynamic range is what, 18-85, and saturation is a bit low, needing "normalization" to fill out the Rec.709 space.
But here's that same Sony S-log-3 clip without any override, simply dropped on an HLG timeline, and it shows a left-side scale in the scopes of around 0 to 4,000 nits brightness. And the color is well within legal boundaries, as the color space of the sequence is appropriate for the clip.
We've not as users needed to do much in the way of CM settings before. We do now. We have options we've never had.
Exports can be a challenge. The default export process is to Rec.709 unless the user selects the specific presets for each format/codec combination to 'turn on' HDR capabilities at export. So if you're using an HLG or PQ timeline, choose a preset that matches that at export.
But remember ... all clips on the HLG or PQ timeline need to be set with a tranform or override setting to that color space in the bin.
The workflow and behaviors are all very different. And I've communicated here and directly to the team that this was not rolled out in a way that the average user was going to have a clue how to work in it. My guess at this point, is that more log media will become 'recognized' as log media as we go along, again then requiring the user to set the appropriate transform for it.
And we'll get more user CM settings. I've argued for a single Color Management Panel so we have one place, not the current mishmash of different locations, to set BOTH the preferred general defaults and the options for project/seqeunce overrides.
I'd appreciate any upvotes on this ... their upper management (above the actual development teams) make decisions based on metrics. And this is the one way users have to actually create the metrics.
Color Management Panel
Neil
FAQ: Premiere Pro 2022 Color Management for Log/RAW Media
Copy link to clipboard
Copied
I always used H.264 and Youtube 4K preset while exporting my final video. Now the issue is my source is in HLG and when I select my preset it defaults the color management to Rec709. I have no option to change that as it is freezed. I did some digging and found that the only option for me is to use QuickTime format with all source sequence settings. Exporting this way produces extremely large files which are difficult to store and upload to Youtube.
Is there any option that I can use so that nmy colors are not blown up and my file size is also decent?
Copy link to clipboard
Copied
The easiest way is probably to start with their HLG preset, then mod the settings on that to what you need.
You can change any export that is in a format that can do HDR exports ... such as H.264/265/HEVC, QuickTime, some others ... but each one has a very specific set of changes you have to make in the Video tab of the export dialog to unlock the HDR options for it.
Such as with H.264, you need to uncheck the Profile, go to High I think it is, then a couple more settings. They did have a chart publised a year ago on HDR exports with the steps listed.
Neil
Copy link to clipboard
Copied
I don't know if I'm on oversaturation of tech, but I can't make heads or tails of the export problem. Adobe Sr. Tech reset all my preferences and now everything looks normal on the timeline using HEVC files that have a 2100 rec space. But when I export, no matter what I choose for settings, I get blown out images. It looks GREAT on my timeline. Looks like amateur hour on the export. I tried to go back and interpret footage and with teh settings Adobe Tech gave me, if I interpret footage at 709, it's washed out/grey. If I leave it alone at it's original color space, it's perfect in the timeline again. Either way, the export is complete garbage. So once again Adobe has kicked out my kneecaps and the episode I was supposed to release today either goes out looking like garbage or I miss my deadline again. I'll never forgive them for making us suffer like this! I can't believe I haven't been fired yet. I would fire me and I KNOW it's not my fault.
Copy link to clipboard
Copied
I've answered in a couple other threads you're on ... and yea, I understand your frustration.
Neil
Copy link to clipboard
Copied
I feel your pain! After all the time I spend color correcting, etc. and the exported file looks like poop! None of the Adobe techs can fix it. I end up having to make my timeline look horrible in order to get something that looks even remotely like I want it. This is a major issue that needs to be fixed. And I'm also considering going back to Final Cut or AVID over this very serious issue! Did I mention that this is a VERY SERIOUS ISSUE?!
Copy link to clipboard
Copied
Then you're not getting things set right somehow, and yes, it's frustrating as figuring out where & what to do is NOT intuitive. They notified me that my UserVoice request for a single unified Color Management panel for ALL CM controls is now "in progress". So that will come into the public beta at some point over the next couple months or so.
I'd be delighted to work with some of your clips, to see if I can get them sorted. I've only had one clip from one user in the last year I haven't been able to quickly get working within the new system.
Three things have to match ... the CM for the clip in the Project panel/Modify/Interpret Footage dialog end result needs to be set for the working CM of the timeline. And the export preset CM must also match the timeline working space.
- So if you're working a Rec.709 timeline, with HLG iPhone clips, set the bottom Color Space Override-to option to Rec.709. If working with an HLG sequence, set this to HLG.
- If you have log media, use the Color Space Override to set to the log that you are using.
- Set the Sequence Settings CM to the color space for the sequence ... either Rec.709, HLG, or PQ.
- In exports, you MUST use the appropriate preset starting poing. For Rec.709 exports, do NOT use a preset with HLG or PQ in the name. For HLG or PQ timelines, you MUST use a preset with the right HDR format in the preset name ... matching your sequence CM.
And no, the transforms for log are not intended for pretty ... they are built for accuracy and safety. Most log shots will initially 'load' with data perhaps well above the 100nits/IRE 'top' of the Scopes scales, but that data is easily recovered by any of the Lumetri controls for total brightness, whether Exposure or Whites or Contrast in the Basic tab or the RGB Curves tab or the Color Wheels Highlight Luma slider.
But these applied transforms will NOT blow out or crush any data, nor over-saturate any pixels.
It is pretty easy to create Lumetri presets for adjust basic contrast/brightness/saturation/shadows:highlights of varying 'strengths' which can be dropped on individual clips or selected groups of clips in the project panel bin, so you should be able to set this up to pretty quickly get your media looking decent even prior to adding to a timeline.
Neil
Copy link to clipboard
Copied
Regardless of how this issue is explained I see only 1 outcome: it takes 2-3 times more editing a small video. I need to combine different media in my timeline, some rec709, some slog, etc. this is a nightmare, an unwanted annoyance and frustrating after so many years of Premiere Pro having to now learn another program to ease my workflow. I am aware that "the pros" want more more control, work with hdr timelines, etc, that is not what most of us need acording to my everyone in my network. We want to be able to deliver a video as good and as fast as possible. Adding steps to my workflow is not cool at all, whatever the reason might be. Why can't it be optional?
Copy link to clipboard
Copied
Which set of options do you want? Workflows are all over the place these days. This app must allow for all sorts of different needs.
There's no way to remain the old style totally Rec.709 app it once was.
So yes, we all have to learn how to organize projects and media and steps for fastest proceses. And all of these steps can be applied as bulk options to large groups of clips.
So learning to sort by media type, applying presets or actions to whole groups becomes part of the job.
Neil
Copy link to clipboard
Copied
This doesnt fix my clients logos colours.... Nor does this fix a exported title animation from after effects that i have pulled in that also has a colour shift... and lastly when I go to export my file once i do have both the Color Management and Sequence settings Color Management matching the export looks over exposed for no reason.
Fail upgrade that's costing my business.
Copy link to clipboard
Copied
I just went through playing around for 3 hrs to get logos close.... what I did was pull logos into after effects. Export them at QuickTime but you have to change the codex to Apple (something) 444 to get rgb +alpha channels so the backgrounds are transparent. Doing this will allow you to change the cooler management under project files (modify>intupert>colour management)
this took me hours and is not sutieble for beginners or professionals... this almost cost me my client and is completely BS
Copy link to clipboard
Copied
I reported on this to here https://community.adobe.com/t5/premiere-pro-discussions/just-upgraded-to-v22-hlg-footage-overexposed...
However, changing timeline to 2100 does not match the colors of my previous project in v15. It's less saturated and faded. ( by a little but noticible difference) which one is correct i don't know. but they are different for sure.
I shoot in HLG3, rec709 color on Sony a7iii.
Either way, Proxies don't render correctly because there is no way to set color space on them as far as i know
I want the old functionality back please,
Copy link to clipboard
Copied
I'm having this exact same problem. I shoot the same camera, same profile, and I expose for a corrective LUT in the field. HLG 2100 throws my colors way off, so that's not a solution here. I've done the modify, interpret solution, and that works fine for my main footage, but my proxies are overexposed.
I think my main concern is how they will fix this problem. I don't want to make proxies for 1TB+ of footage, get started cutting, and then have that workflow thrown apart by a new update somehow. Maybe it's best to redownload an older version and just work in that.
Copy link to clipboard
Copied
Ideally, you never want to remove the older versions whenever there is a major update.
My typical approach is to download the new version while keeping the older version installed, kick the tires on the new one with a new or non-critical project when the opportunity arises, and if all is well, continue those and new projects there, while finishing older critical projects on the old version.
If things go sideways, I'll go back to working in the old version for new projects until updates are released.
Sounds like you might be better off going into the older version, but a suggestion I could offer if it's too big of a hassle, is LEAVE your HLG footage tagged as Rec. 2100 HLG, and add an adjustment layer over your footage with SDR Conform added to it. I haven't tested this yet but if your proxies are also assuming the same color space you use for the originals, then the SDR Conform adjustment layer will still work.
If for some reason your proxies are assuming Rec. 709 and look underexposed, then disable the track with SDR Conform on it while your proxies are enabled, and then your proxies will appear more or less normally.
Copy link to clipboard
Copied
Learning that one the hard way! Thanks for the suggestion, that sounds like a great way to leave room for future updates to fix this problem while leaving the footage itself unmodified. Since this is a critical project, I think I'll adopt your older version method. Thank you!
Copy link to clipboard
Copied
Ha it's okay @Nick Weiss We've all been there.
If you can believe it, the yearly X.0 releases, and releases in general HAVE been more stable out the gate than in years past (I'm thinking back to the 2015, 2017-2019 era), because those didn't have public betas for each release. It was worse then - I wouldn't even BOTHER testing the new one for several months. Now I feel comfortable with the hyrbid approach I mentioned above, and so far, I've been doing just fine with 22.0
Really the big 2 issues I've seen so far are:
- Dynamic Link issues with macOS
- This color space matter which took everyone by surprise.
To be clear, I actually don't see the second as an issue, I just think people now are being forced to properly manage their HDR footage when being applied to SDR sequences. Before it "worked" because Premiere assumed most everything was Rec 709 with little way to rectify that, and people got away without thinking twice about it.
However, from a production perspective I like to have control over both my footage and working color spaces, so in general I like the feature. If I put HDR footage on an SDR timeline, I should expect to have clipping. The luminance range of HDR exceeds that of SDR. To me that's a no brainer, but it definitely has taken folks by surprise.
I think a good compromise could be a Premiere Preference checkbox that's like: "Automatically conform HDR footage to SDR for SDR sequences", and then you get more or less the same behavior by letting Premiere assume for you and apply SDR conform effects to those clips. This way, for folks who don't want to think about it, they can let Premiere do the work, but for those who want manual control - they have that too.
Copy link to clipboard
Copied
I agree! I would prefer manual controls as well. I don't have an HDR moniter, and I've noticed that the SDR conform effect still messes with my color in a way I'm not happy with, so really that's my main issue.
Copy link to clipboard
Copied
It would be nice to let the "Program" viewer window in Premiere actually be what determines the color space for exporting media. It would also stand to reason that with all of the processing power and advances in computing that the "numbers" of these finite color spaces be crunched to protect against over exposure without destroying the integrity of the color which seems to happen when the Rec2100 color acquired footage is "interpreted" into the Rec.709 color space.
