Inspiring
October 26, 2021
解決済み

Just upgraded to v22 HLG footage overexposed

  • October 26, 2021
  • 返信数 11.
  • 23320 ビュー

Hello,


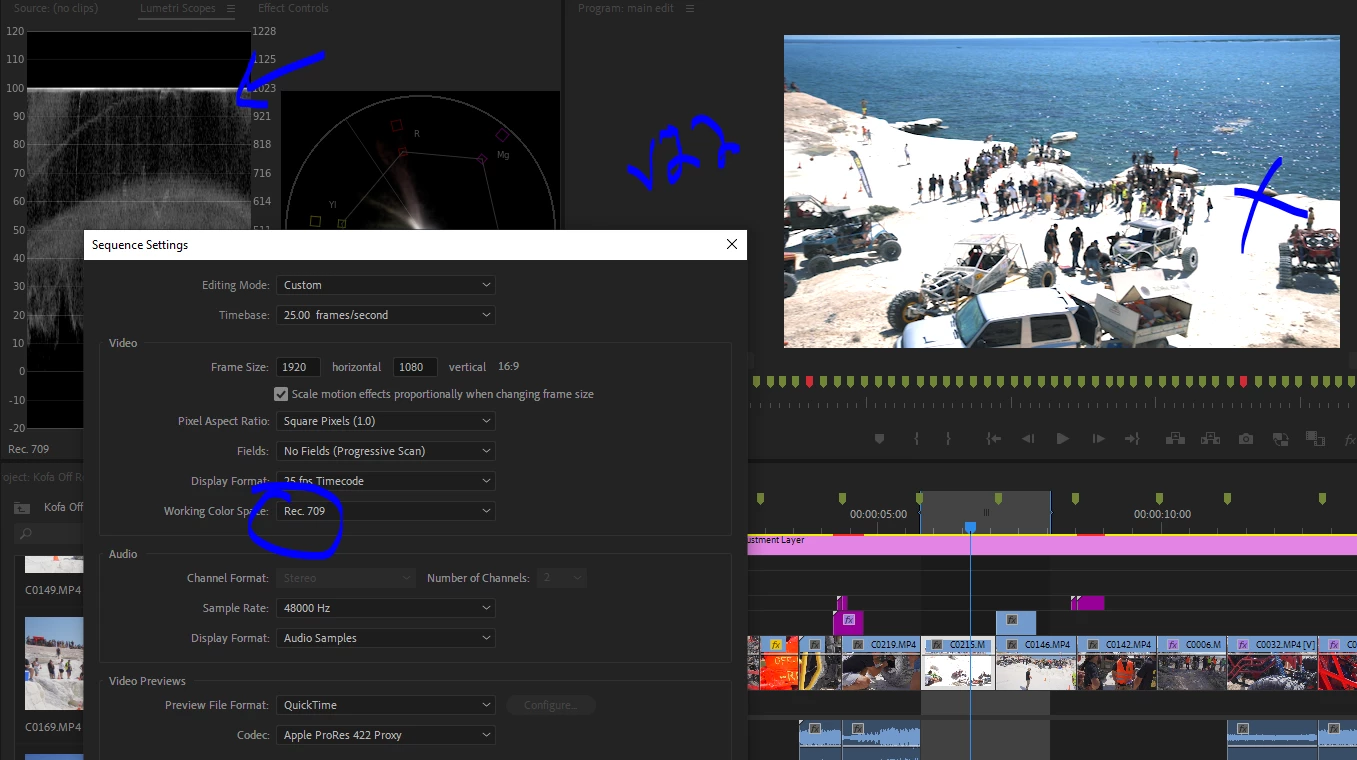
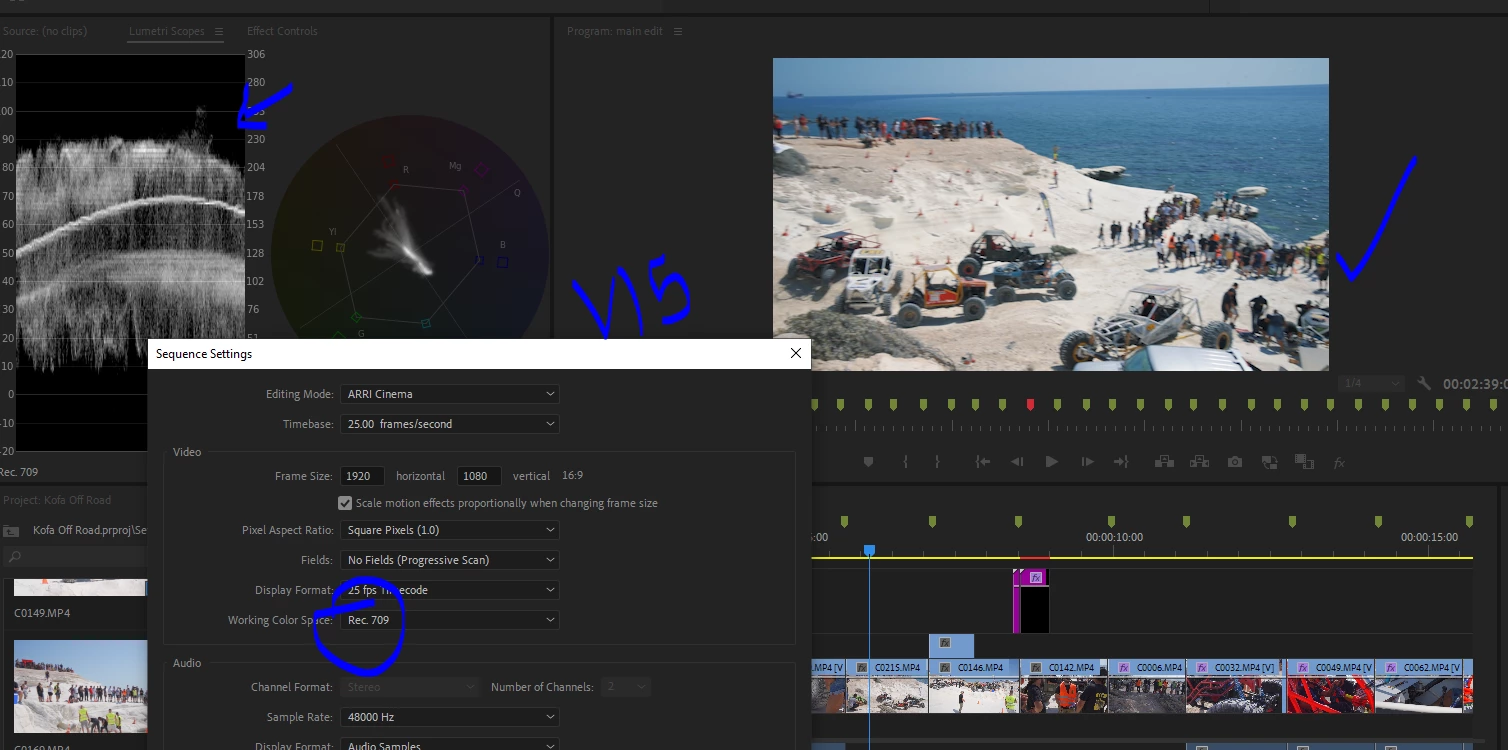
I updated and opened a project which i already delivered, using hlg3 clips.

Now in premiere 22 the footage is overexposed 


I cleans the cache in settings but also emptied the cache folders.

How can i refresh the previews? or resolve the issue? its a big project with many clips all 'over exposed' now in v22..


Even on export the exposure is wrong now.


thanks


/J


このトピックへの返信は締め切られました。
解決に役立った回答 vasileiosk65998977

Hello, i had the same problem after upgrading to Premiere 2022.

I solved the problem by selecting sequense/sequence settings/working color space/rec2100 HLG

返信数 11

R Neil Haugen
Legend
November 30, 2021

As user Johhnyk9 .... posted in this thread, the proxy color management is totally broken.


I've created a UserVoice for this issue, and please, everyone go upvote it. Metrics get us users results.


Neil


Proxy Color Management

Everyone's mileage always varies ...
Inspiring
May 12, 2022

It's been 6 month! have they not fixed this yet? I mean the Proxy and Media encoder work flow.

I am still on v15. Proxy workflow is useless at the moment with mixed content timelines.


Anyone know if they are they working on it? or did they comfirn the issue?


thanks


/J

R Neil Haugen
Legend
May 12, 2022

It seems fixed in the public beta at this time.


Neil

Everyone's mileage always varies ...
R Neil Haugen
Legend
November 30, 2021

If you are exporting to any wider dynamic or color range media, whether HLG/PQ, there are several very specific things you have to set in the Video tab of the export dialog even if your sequence is HLG/PQ.


Premiere does not seem to apply the high/wide dynamic and color range to the export without the user changing to the proper settings.


For H.264 HDR, go down to the Export dialog's Video tab. Set the "Render at Max Depth" button to on, set the Profile to High (minimal) or High 10. High 10 gives more further options but is only needed at this time for professional delivery specs.


If you are just starting out trying to get something for YouTube or whatever, stick with the default settings that come with the High profile. The HDR Graphics White should typically be 203, and is the grayed-out text starts with 203, you're good to go. If not, uncheck that box, and set the value to the " 203 (75% HLG, 58% PQ) " option.


And your export should work for most HDR devices. Always test your settings of course!


If you need to set further controls for content delivery specifications, then select the High10 profile, then an export color space to meet your specs from Rec.2020, Rec.2100HLG, or Rec.2100PQ.


You would then set the rest of the options to match the specifications you are working for. Which ... most of us aren't but some do need to do.


Neil

Everyone's mileage always varies ...
Kevin-Monahan
Community Manager
Community Manager
November 30, 2021

Karl's video may help you understand how it all works.


Kevin Monahan - Sr. Community & Engagement Strategist – Pro Video and Audio
Inspiring
November 30, 2021

Proxies are still overexposed, that needs a solution too.....


thanks


/J

R Neil Haugen
Legend
November 30, 2021

Yep, proxies totally busted for say an S-log-3 with a conversion LUT to Rec.709, then "create Proxy".


It is NOT a Rec.709 proxy, and in fact, doesn't actually mirror the original clip on any HLG or PQ sequence either.


Not ... good.


Neil

Everyone's mileage always varies ...
Participant
November 13, 2021

Great thread, and definitely have the same issue. 2 Questions:
1. Has anyone figured out a way to create proxies that don't have this issue? 
I currently used the Modify > Interpret > Colour Space Rec709 method (which is really annoying to do it every project for every file) but still have the issues with proxies- look super over exposed. 


2. I shoot on a Sonya73 and to date the best profile for me has been Sony HLG2 - wondering if until Adobe fixes this issue do yous beleive it's worth switching to a different picture profile? (just being open minded as I don't want this issue haha)

Participant
November 12, 2021

I was able to get my old workflow back by dragging My HLG3 footage into Premiere, then as another user stated right click the footage > modify > interpret > click "color space override" and switch to Rec.709.  Once you do that, you can drage the footage into a timeline and apply a conversion LUT of your choosing. (I like to use Leeming luts for example).  Once you go to export, colors should look as they do in the timeline.  The key for me was leaving display assist off and interpreting as Rec.709

Participant
November 12, 2021

Yes, I did all that and my footage now looks the same in the timeline as in the project folder. I changed both the Sequence Settings and the Interpret settings for each file in the project (although I set it to rec2100 HLG and not Rec709, since that's what worked for me to avoid the overly bright look).


So I thought everything was fine and dandy - but then I exported the video and then the overexposed look was back. I.e. the exported video looks different than what I can see in the timeline in Premiere Pro (and even in the export preview). 

Participant
April 1, 2022

This is exactly what I am experiencing now. Did you ever find a solution @Sara Louise?

Participant
November 12, 2021

So thankful to find this thread - it saved my a lot of headache trying to correct the colours back to normal. Now everything looks great in Premiere Pro, but alas, it still looks the same overexposed way when I export to mp4. I tried changing the preset to "H264 - match source - HLG", but then the video wouldn't play at all.


Does anyone know what I need to adjust in the media export settings? I prefer mp4  file format 

emabal
Participant
November 15, 2021

the same thing happens to me

creophoto
Known Participant
November 5, 2021

I like that Premiere is getting smarter, but I think something weird is still going on. I shot this footage on my Sony a7Riii via Atomos Ninja. Sony was set to HLG3 Gamma, and rec.709 Color. Ninja was set to HLG gamma and rec.709 color. The Premiere Project matched those settings. Even still, my h.264 export is off. See screenshot of the export below the Premiere browser.


Inspiring
March 12, 2022

First of all, apple applies BT.1886 in their natibe app. Second of all they do color managment of primaires to display p3, whether it is with sRGB transfer curve or PQ (thus HDR).

Inspiring
October 31, 2021

I had the same issue after upgrading to 22.  I opened an older PR file with a mix of footage from Sony a7iii HLG3 to DJI D-Cine.  What a mess.  I had to follow the same steps on the indivudal files and the sequence:

Project tab, Right click footage > Modify> Interpret footage > Color space rec709

and

Sequence> sequence settings> working color space> rec709


Thank you for starting this thread.  I really hope this wont be the case for all older PR files.  It seems like there should be a way to deactivate the auto color management in future updates.

Inspiring
October 31, 2021

Generate a Proxy and see what heppens 😉 They realy need to give us option to turn it off.

Participant
October 30, 2021

Thank you so much, johnnyk7917700.

I had save problem and your solution was the best.

HLG files from GH5, in Japan.


Participant
October 28, 2021

I had the same problem. Do i have to do this everytime now? And why??

Inspiring
October 29, 2021

Hello, i had the same problem after upgrading to Premiere 2022.

I solved the problem by selecting sequense/sequence settings/working color space/rec2100 HLG

Inspiring
October 29, 2021

Thanks but i dont think that the correct answer. I mean maybe if you want to work in rec2100, but most of us are working in rec709. Was not an issue in v15. Proxies are still overexposed with this setting.