- Home
- Premiere Pro
- Discussions
- Re: FAQ: Premiere Pro 2022 Color Management for Lo...
- Re: FAQ: Premiere Pro 2022 Color Management for Lo...
FAQ: Premiere Pro 2022 Color Management for Log/RAW Media
Copy link to clipboard
Copied
The Premiere 2022 release, the 22.X build series, introduced several new Color Management options and changed the default handling for several LOG and RAW media types. Also changed were the default handling for 'device produced' media in HLG or PQ. Users need to be aware of the changes to continue using several Sony, Canon, and Panasonic cameras in particular. And with the media now produced from most phones and "devices".
I'll give a short practical control setting list, and then a more complete explanation below.
(Also check out this article on monitoring HDR within PrPro2022)
Clip Color Management
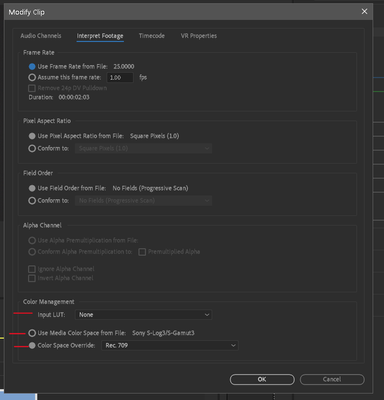
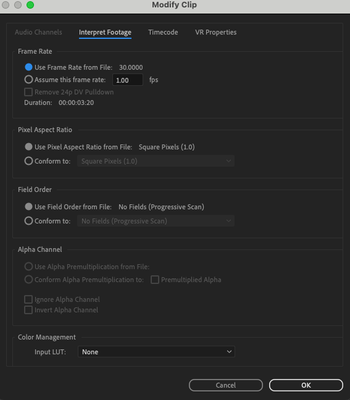
There are now color management settings for clips in the Project panel. Right-click one or more clips, Modify/Interpret Footage. Down at the bottom are several color management options. If your media is 'blown out' on a working timeline, this is where you will start to correct it. For most work at this time, you will want to use the Rec.709 override option.
There were a few manufacturer Log formats that had default transform behaviors in the previous version. Those have all been changed, and many more log formats are now recognized as such.
In Premiere Pro 2022, recognized Log formats may or may not be transformed into Rec.709, the user may need to do so in the Project panel.
And any phone or other "device" produced media that has an HLG or PQ color tag, may or may not be transformed to Rec.709 on import.
Again, unless the user chooses to do so in the project panel.
One further caveat: if you have a clip that Premiere recognizes as HLG or PQ, and use the command to "create new sequence from clip" ... Premiere may still create a sequence with a Rec.709 color space. While dropping the HLG clip onto that sequence without applying color management to Rec.709.
You must check the Sequence color space now.
These are major changes in default color management behavior. And at this time there may be inconsistencies in the process. And still, some media types allow a user CM setting in the Project panel, but some do not.
Sequence Color Management
There are now color management settings for Sequences. With the timeline panel 'active', with a blue line, go to the Sequence/Sequence Settings menu. There are now options for sequence color space there. Again, for most work, using the Rec.709 color space is still the 'normal' expected one for output deliverables and monitors. This should (nearly) always be set the same as the clip's color management.
At this time, Premiere may still 'default' to creating a Rec.709 sequence even when you drop an HLG or PQ on a blank timeline, or use the "new sequence from clip" command from the bin. Yet not apply any transform to fit the clip to the sequence. You have to check and correct sequence settings as needed.
Scopes Color Management
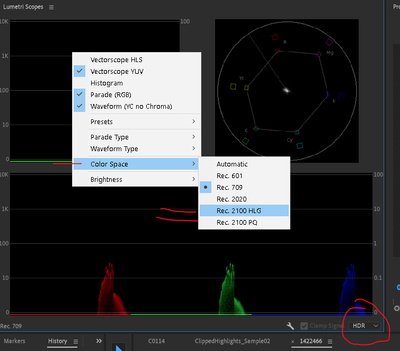
There are also color management settings in the Scopes panel. Right-click, select the desired color space from the list of Rec.601, Rec.709, Rec.2020, and Rec.2100 in either HLG or PQ. If you are working in HDR, then after setting the scopes to an HDR color space option, you will need to also set the scope scales to HDR with the control in the lower right corner of the Scopes panel.
Export Color Management
To export in HLG or PQ, anything other than Rec.709, you should scroll down through the Preset list for your desired Format to select the HDR options, for either HLG or PQ. They now do have the presets, and it makes exporting in an HDR format much easier and more reliable.
But you do need to SELECT the HDR presets to get a proper HDR export.
SDR Exports from HLG/PQ Media*
To get "standard dynamic range" or SDR exports from sequences or clips that are HLG/PQ, you need to set your format/preset in the Export dialog, but also go to the Export Dialog Effects tab and select the "SDR Conform" option.
The default settings for Brightness, Contrast, and Soft Knee may work to at least get the image within usable values. To get an exact result, you would need to test those settings yourself.
Making SDR Proxies from HDR/HLG/PQ Media*
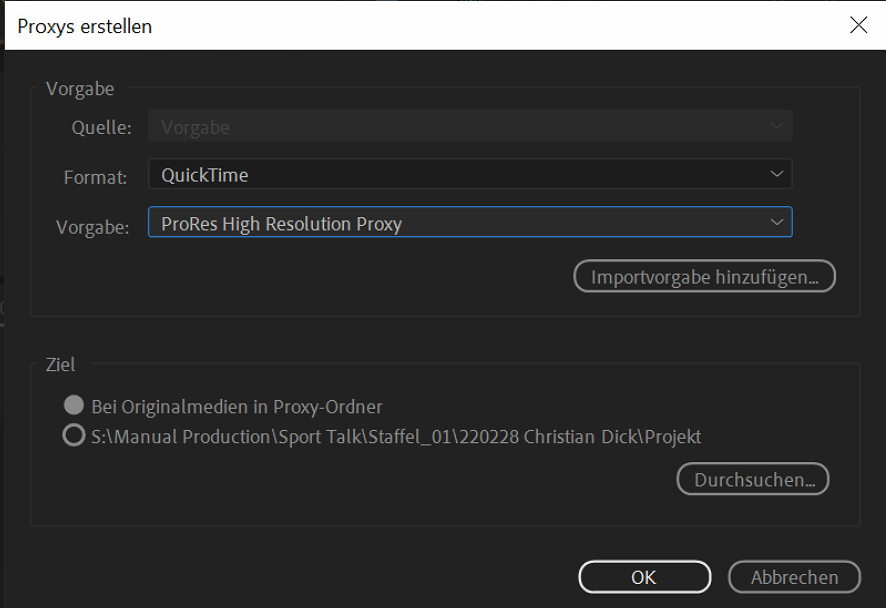
To make proxies from HLG/PQ media that can be used in an SDR/Rec.709 timeline, you need to (as above) go to the Effects tab of the Export dialog, and select the SDR Conform option.
Why did things change?
The nature of the business and the gear is changing rapidly. As of this date, 26 November of 2022, most of the many colorists I know have still not delivered a single HDR job professionally. A few others have done quite a number. But the vast majority of content being produced at the moment is still Rec.709's "SDR" ... standard dynamic range.
So why are changes being implemented in Premiere Pro at this time?
Because first, the cameras are changing rapidly. Many prosumer and pro cameras are now able to set a CM for a clip to either HLG or PQ. Camera operators are frequently selecting those settings because they want the widest dynamic range possible. So for many editors, the HLG or PQ or other wide dynamic range media is what they are getting handed to work with.
Even though many of the other visual assets of a job, and the final output, will still be in Rec.709.
Second, many phones and "devices" are now defaulting to recording in HLG/PQ, and so many prosumer users have media that is in those wider color spaces. Many of the clips that have been posted on this forum since the 2022 release are phone media with HLG or PQ 'tags'.
And third, more content is being produced or delivered as HDR, and the percentage of content produced as HDR is going to go up perhaps fairly rapidly over the next year. The users need an app that can accomodate the new dynamic range and tonal range needs.
What are SDR, HDR, and Rec.709 versus "wide gamut color"?
There are two differences between Rec.709 media and most HDR media, whether P3, HLG or PQ.
The first is the tonal range difference. Total image brightness, or contrast range. Rec.709 is now referred to as SDR, or standard dynamic range. It has a far narrower tonal range limitation for the visual data. It is designed to be used compressing the visual tonal range into a 100 nit total brightness range. It is what we've been using all along. The broadcast TV standard.
HDR media, whether HLG or PQ, is non-limited for tonal range values. And may vary up to several "stops" of tonal difference past what SDR allowed.
The second difference between HDR and Rec.709/SDR is the color space and gamut difference.
Rec.709 specifies the color space using the sRGB color primaries. It is also a fairly "shallow" color gamut.
HDR can be one of several wider color gamuts such as P3/D65 or Rec.2100HLG/PQ or Rec.2020. The difference is not only that the color space is "wider", the gamut ... think of this as the 'depth' of color hues available ... is also "deeper". (Currently Premiere handles all wide-gamut media in a Rec.2020 or Rec.2100 "container".)
To demonstrate the difference, this Sony S-log-3 MXF clip shows dramatic dynamic range and color space/gamut differences in the Lumetri scopes and Program monitor, depending on how it is "managed". As imported, it was interpreted as an HLG clip in the bin. Creating a sequence from the clip, Premiere made a Rec.709 color space timeline.
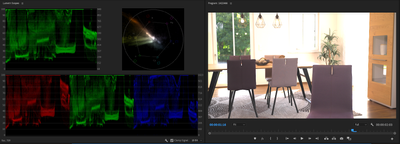
But when this HLG clip is placed on a Rec.709 timline, the scopes and the image will be completely blown out.
That HLG-interpreted clip will not be displayed in a usable fashion on a Rec.709 sequence. This shows the scopes of the Rec.709 sequence, scopes set to Rec.709, but the clip properties set by Premiere to HLG.
Note how note only is this clip totally 'blown out' to whites for much of the image, but the Vectorscope YUV color data is way outside of allowable range.
This next graphic shows the same clip. I went into the bin, using Modify/Interpret Footage, and selecting the CM option to Override to Rec.709. Now Premiere showed it in visual "log" manner within the Rec.709/SDR range, with tonal values from 18 to 85 nits.
Just to get it to the full 0-100 nits of SDR took expansion of the image via contrast controls. And after a slight contrast expansion, it was a very nice image. This is the behavior we have expected in the past.
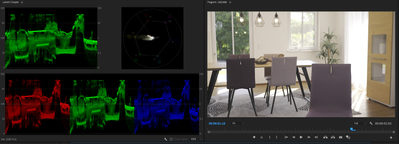
But the same clip, using the "original" Sony S-log-3 Interpretation in the clip properties, but with a change in the Sequence Settings and the Scope color management settings to HLG/HDR, is shown here:
The only clipping is the whites of an outside window, and there are no color excursions. You would need an HDR capable monitor set properly between the OS and Premiere to see the image correctly in the Program monitor, of course. And note those nit values on the left-side scale! In excess of 4,000 nits!
By simply adjusting the Exposure slider down, and lifting the Color Wheels 'shadow' tonal slider, I was able to get a very good HDR image displayed with very little clipping anywhere. This on my little 358 nit monitor in its "HDR Emulation" mode.
That is a massive difference in the display of the same image: from a 69 nit tonal range in SDR, to a 4,000 nit tonal range in HDR! And both images are quite nice images when the entire color management 'chain' is set properly. The image can be used either Rec.709 or HLG.
How usable are HDR videos at the moment?
Very few current consumer devices can even sustain 1,000 nits. The only displays fully capable of 4,000 nits and up that I know of currently in use, are the high-end Grade 1 Reference monitors by FSI and Sony. Those monitors sell for above $20,000 USD.
Relatively few screens can actually show brightnesses above 400 nits. And most colorists consider an absolute minimum of 600 nits as necessary to allow for a 'base' feel of HDR-ness to the content. It is coming yes, but ... fully HDR capable screens of the 800 or better nits for consumer use are still spendy and not that common.
Previous Behavior for LOG/RAW Media
In 2021 and prior releases, the log and RAW media types, where PrPro had any 'default' behavior, it was to apply a manufacturer's transform process to conform the clip to a Rec.709 "view". Most users were unaware of this process. There were only a few formats where Premiere applied a default transform.
And if Premiere applied a default transform, any changes the user made in the Lumetri color panel were applied after the default transform process. If the transform process clipped whites or crushed blacks, that image data was simply gone.
Many other log media types were simply displayed as "log" images, but with an assumption of Premiere Pro within the Rec.709 standards. And showed in the monitor with the narrow or compressed 'native' tonal range we are all used to seeing for Log media. The user needed to manually 'normalize' the contrast to a full Rec.709 tonal range.
There were (and are) several formats where there is a special panel on a sequence for Source settings. Such as for RED, Arri's ArriRAW, and BlackMagic BRAW camera media. Those haven't changed.
Changes in Premiere 2022
The Log and RAW media types that had a default transform to Rec.709 in previous versions may not do so anymore. Premiere Pro 2022 also does recognize many more of the Sony, Canon, and Panasonic log formats on import. And then may or may not apply a transform to Rec.709 when those images are applied to a timeline.
We users understand and expect that a Log image, displayed on a Rec.709 timeline, looks very "log-ish". That grayed-out look, no blacks, whites, or saturated colors.
But take that same clip, without any transform process, and drop it on an HDR sequence. The image will show as the full range image from the camera. In fact, with a very high dynamic range from blacks to whites, and full color. Yet again, this is without any "interpretation" or transform on the part of the program.
HLG is 'Hybrid LOG Gamma"
And that is what it seems we are all seeing with Premiere Pro 2022 and some log media formats. Log media is at times simply displayed at full image values as if on an HDR timeline set to HLG, unless the user overrides the new display default. And those values are typically well above the 100 nits max of an SDR/Rec.709 timeline.
Again, until and unless the user changes the clip properties.
The old default: transform to Rec.709. The new default at this time seems to be:: no transform unless the user chooses to do so.
That is a massive difference in how the same file is 'interpreted'. How it is displayed.
Processing changes: bringing back clipped White values
The processing 'chain' has also been changed. For "clipped" data due to any auto-tranform, the Lumetri panel tonal controls may all be used to bring down too-bright values. The Exposure slider in the Basic tab has by far the widest capablitity for White tonal value changes so that should be your 'default' control to bring back blown out whites.
If additional control is needed, the Basic Whites control, the RGB Curves tool, and the Color Wheels tonal slider can provide additional changes. Clearly, the default transform is applied after the Lumetri controls.
Both the Rec.709 and HDR/HLG images will be useful and valid for certain workflows. But the user MUST know how to manage the color management within Premiere Pro to get the desired result for each job.
R. Neil Haugen
(image used by permission, and courtesy user " maRedlich ")
[Edited 7 December 2021]
[* Edits added 5 January 2022]
Copy link to clipboard
Copied
As noted in the edited version just corrected, there are some Log type media that will apparently work correctly on some computers: they will be correctly transformed when applied to a Rec.709 sequence without problems.
But Premiere Pro will still display some Log type media formats in full 'log-HDR' mode even when applied to a Rec.709 sequence without proper transforms.
And this is something that is being checked out by the engineering staff at this time.
Neil
Copy link to clipboard
Copied
Hi There
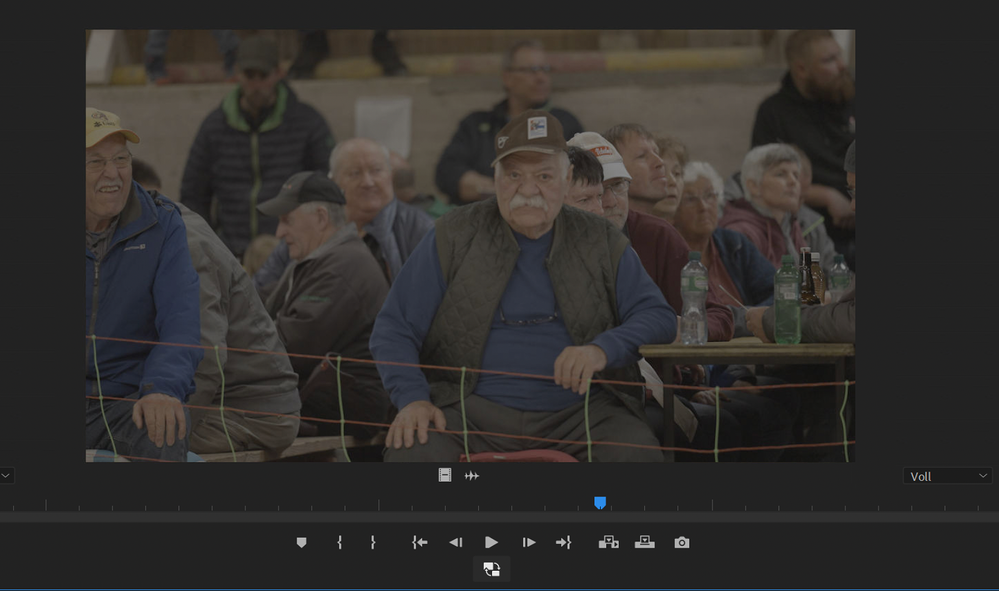
Since the Update to 22.2, my Proxys from S-LOG 3 Footage are darker than the Original S-Log3 Footage.
Does anybody has the same issue?
I generate Proxys with Premieres default presets.
Copy link to clipboard
Copied
I didn't have time to test this yesterday, and may not today. But I'll try and get to this today or tomorrow.
Neil
Copy link to clipboard
Copied
This looks like a Levels issue to me. If you put a Full to Legal Range Lumetri Preset on the darker clip, does it make it look like the original? You should be able to search for that in the Effects panel.
Your source media probably has a metadata tag telling Premiere that it's Full Range (Slog is always natively Full Range), but ProRes media is always treated as Legal Range unless it happens to have a metadata tag that says otherwise. When Premiere encodes your media as ProRes proxies, it probably isn't adding that Full Range tag, so then when it sees the footage later it treats the footage as Legal Range, which adds a little contrast.
It should be perfectly seamless to put that Lumetri Effect on your footage after the fact. The only time it might not is if information was clipped out.
FYI, if you ever record externally to ProRes or DNx and compare it to an internal recording, you'll see the same thing there. Unless something changed in the last year or so, Atomos and BM external recorders don't save a Full Range metadata tag when they record your camera signal, so when you import the footage into any NLE it'll get a little extra contast added. Not sure if that changes with Atomos recorders when you have the new(ish) "Legalize" button turned on, but I wouldn't expect it to be any different, and with ProRes Raw this isn't an issue.
Didn't mean to steal your thunder here, Neil! I've dealt with this a lot and happened to get a notification 🙂
Copy link to clipboard
Copied
Thanks a TON for that post, Nate!
And yea, that full/legal issue thing is something I'd read about, but ... you're right, it didn't pop up first in my head. And you're probably correct for this instance too ... so double thanks!
The S-log3.cine is designed to be "fluid" between Rec.709 and HDR, and as high-end HDR is full, they designed the S-log3.cine to be 'full' also. And yes, with the external recorders not putting the 'full' tag on the files, that is an issue.
I've seen this come up in discussions of colorists working in Resolve, for when they manually do their own CM for shots on a timeline. Some S-log is fine, some isn't, what the ... and the answer is the ones that aren't were externally recorded. As your answer is, there it was go into the clip properties and set to full, with Resolve then mapping that to the legal of the timeline.
We're starting to get some decent CM in Premiere. For example, there's a tonemapping you get for some S-log3 files in the newest Premiere that is really an awesomely beautiful display of that media within Rec.709. Well past what you can do manually to "normalize" the file. But Premiere has to see the file as the correct type for it to give you that option, you can't force Premiere to allow you to add that manually! Which is bizarre to me.
So for some S-log3.cine I've tested, I've confirmed that the tonemapping when allowed is great, when it's not, the normalization is not nearly as good ... and it was the same camera, just whether internal or externally recorded. That ... is frustrating.
Now throw in the full/legal issues ... what a joy. We may need separate proxy presets for internal and externally recorded. Right! Ask the DP, was this clip internal/external ... ? Um ... yea.
Neil
Copy link to clipboard
Copied
Thank you for this. Big help
Copy link to clipboard
Copied
Thank you @R Neil Haugen for taking time to write this article. Very insightful!
Copy link to clipboard
Copied
The shipping 2022 caught me somewhat unawares, even having done ALL my MAX class prep work in the public beta.
So some things threw me at first, and of course there were comments "here" and elsewhere about ... what the HAY???? ... so I got an array of media from my own sources and some other users and started testing to figure out what the hay was going on.
And ... in the process, found some things that in conversation with engineers wasn't exactly what they'd ... expected ... either. Sigh. 'Tis always thus it seems ...
Neil
Copy link to clipboard
Copied
Why doesn't my version of Premiere 22 have this option?
Copy link to clipboard
Copied
Which version of Premiere? 22.0. ...? .... what?
Neil
Copy link to clipboard
Copied
Hi,
I'm running PP v 22.1.2 showing up-to-date on CC
Copy link to clipboard
Copied
What is the media involved?
Neil
Copy link to clipboard
Copied
It's iphone footage. Sent from someone else so not sure which one but here's the codec:
Copy link to clipboard
Copied
First thing with that footage, go to the media in the bin. Select all of it, right-click/Modify/Interpret Footage.
Use the option to Override to Rec.709 in the color management options, see if that helps.
Neil
Copy link to clipboard
Copied
So that's the problem. I don't have the option in my version of Premiere, as per the first screengrab
Copy link to clipboard
Copied
Wow ... what machine are you running on? That's supposed to be there ...
Neil
Copy link to clipboard
Copied
Thanks Neil
That was my initial question. Why is the option not there? I don't think it's to do with the version I'm running.
I have a macbook pro mid2015 but this should be fine as the software is all up to date. (awaiting delivery of new mac mini which i'm told will be a super fast editing machine!)
Copy link to clipboard
Copied
Copy link to clipboard
Copied
I was facing the same issue than you, I didn't see the Color Space Override, turns out that it was hidden, I had to go to the bottom of the window and drag it to expand it and then it showed the missing options, there was no scrollbar and scrolling with the trackpad didn't work either, awful bug. Anyway, having followed the steps in this detailed article didn't help, my footage still looks "off", luckily it wasn't anything important, I will test recording everything in slog3 and see, very dissapointed in Adobe today.
Copy link to clipboard
Copied
I have to fully expand the window in order to see that option
Copy link to clipboard
Copied
Very very helpful and informative. Just what I needed. Thanks for your depth and ability to "translate" for many of us.
Copy link to clipboard
Copied
Thank you for this. The moment I updated to 2022 I began seeing the "double-LUT" look as I called it then, and figured out what was happening.
So far, it's been (barely) manageable to go back and retroactively change the color management of our log footage from our Sony FX9.
HOWEVER: we are now in process of hiring an editor to do some work for us who doesn't have a fast enough machine to deal with full-rez 4k, so today I started cooking proxies. To test, I then started toggling proxies in the timeline to make sure it was working, I discovered that the proxies look "double-Lut"-ed. What???? There doesn't appear to be an interpretation taking place in Interpret Footage that would explain this.
Can you help?
Thanks in advance.
Copy link to clipboard
Copied
First, skip the "double-LUTed" concept. What is actually happening is simple, if frustrating: Premiere 2022 has a new color system/engine, that is agnostic to being Rec.709/SDR or any HDR like HLG/PQ.
The next part is easier if you understand the difference in encoding methods between SDR and HDR ... SDR (Rec.709) is typically "integer-encoded" as I've heard it put, and all forms of HDR are log-encoded. Keep this in mind.
But some media that is log-encoded is expected to still be SDR/Rec.709 for color space and gamut. And other media that is log-encoded is expected to be HLG/PQ/whatever form of HDR. Premiere is supposed to be able to tell them apart by the color space tags of the file.
And currently, Premiere gets mixed up with some of the Rec.709 log-encoded media, and simply treats it as HDR ... specifically, as HLG. Again, it's supposed to be able to sort out the differences, according to the engineers, but plainly, it's not always correct. This is probably what is happening to your Sony clips.
So to work that properly as log-encoded SDR/Rec.709, you need to (as listed above) go into the Project panel, select one or more clips, right-click Modify/Interpret Footage, Override to Rec.709. Then make sure your sequence settings are for Rec.709, and you're good to go. Export to a standard Rec.709 preset.
But ... proxies ... that's a right thoroughly broken thing if Premiere thinks your original media is HLG or PQ. As when you Override to Rec.709, then create proxies ... it makes HLG proxies! NOT useful at all, right?
I tried changing the Proxy Preset, adding the effect tab option of SDR Conform. But that didn't get 'honored' in the proxy creation.
So it seems that at this moment, you need to export from the original media with the SDR Conform option chosen in the Effects tab of the Export dialog. Essentially, a transcode or intermediate clip. Then you make proxies from those 'conformed' clips. Then "attach" them to the original clips.
Convoluted, yea. The engineers do know about this and are working on a fix, but ... when? No clue.
Neil
Copy link to clipboard
Copied
Oh my, that's terrible news. 150 hours of footage....
I can think of some other things to try that would be less devastating. I'll write back when I learn more.
Thank you for your quick reply!
Find more inspiration, events, and resources on the new Adobe Community
Explore Now