 Adobe Community
- Home
- Premiere Pro
- Discussions
- Re: How can I import Canon C300 Log LUTs into Prem...
- Re: How can I import Canon C300 Log LUTs into Prem...
How can I import Canon C300 Log LUTs into Premiere Pro CC 2015?

Copy link to clipboard
Copied
Premiere Pro 2015 doesn't appear to have built-in support for the Canon Log 2. (but let me know if I'm missing something obvious)
Canon posted some LUTs for Canon Log 2 last year, and I'd like to import them to use as Input LUTs in the Lumetri color panel.
But I've been unable to import and use the LUTs Canon posted for Canon Log 2. I've tried loading the several LUTs found on this page:
At this path:
Drivers & Downloads > Software
And then various LUTs packages released on 8/05/15
And I've tried editing text strings and such to get things to work. I hope I'm missing something simple.
I'm working on a Mac running OS 10.10.5, btw.
Has anyone here been able to import and successfully use those Canon LUTs into Lumetri on either a Mac or a PC?
If so, how did you do it? I'm especially interested in answers from people working on Macs, but I'd be happy to hear of the experiences of people working on Windows.
Thanks!


 5
Replies
5
5
Replies
5
.png)
Copy link to clipboard
Copied
Not sure if you've already seen these, but take a look at:
adding LUT's to Lumetri color?
and
https://mixinglight.com/portfolio/adding-technical-creative-luts-to-the-lumetri-color-panel/
They might be of help!

Copy link to clipboard
Copied
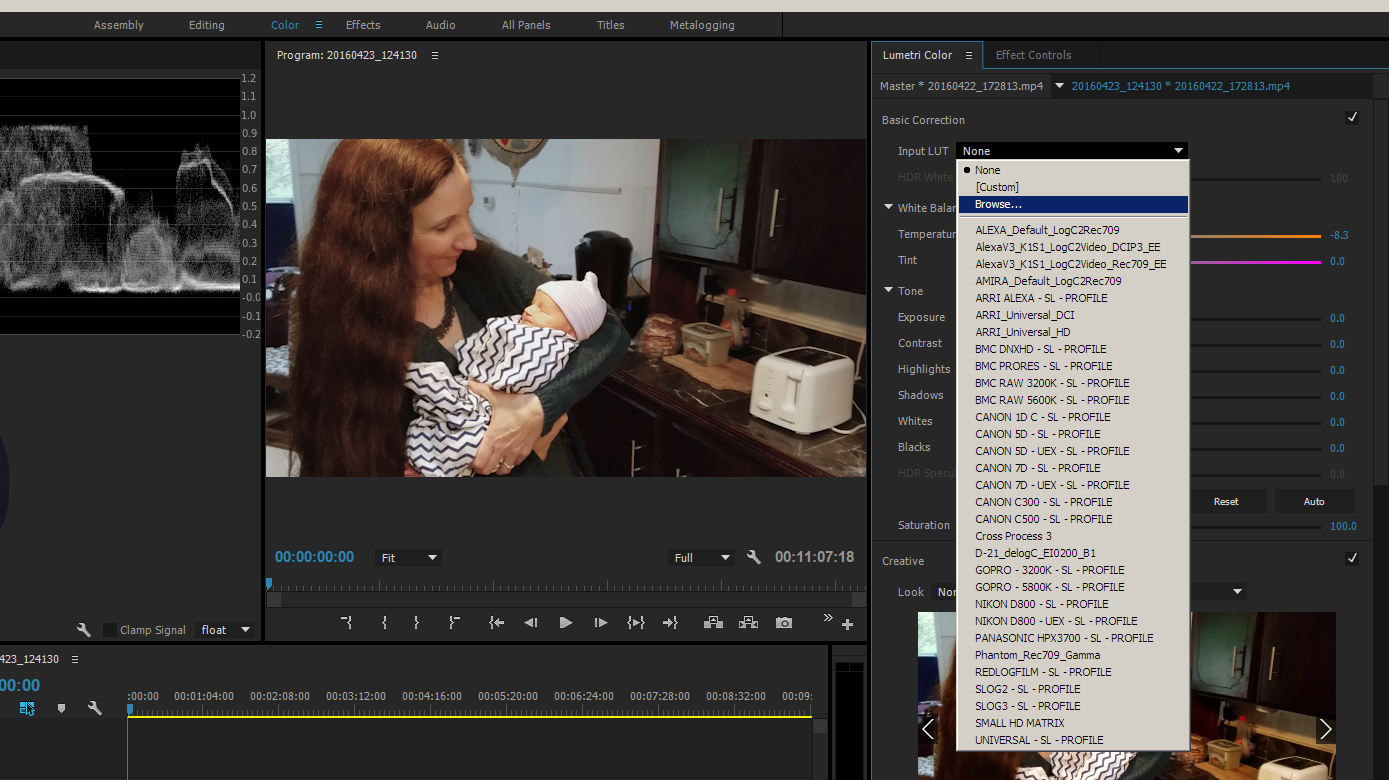
For most "external produced" LUT's you need to navigate to them from within the Lumetri panel's two LUT/Look drop-down selectors, the first at the top of the Basic tab panel, the second at the top of the Creative tab panel.
In the Basic tab, it's the "Browse" option as here in blue, then navigate to your folder of and particular LUT you want to use ...
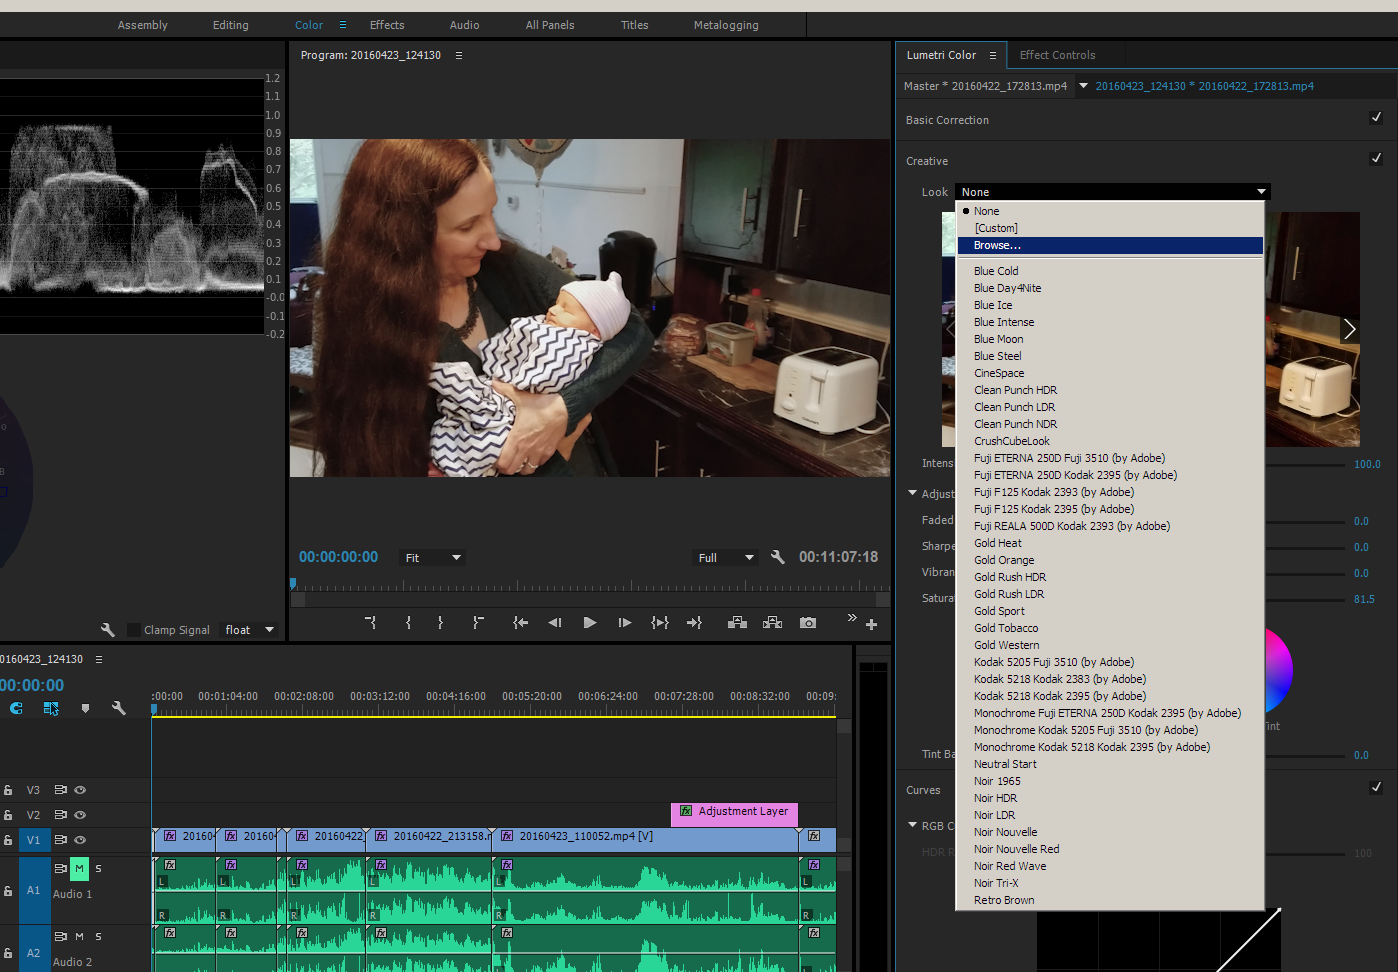
In the Creative tab, it's almost identical in process ... shown here ...
Neil

Copy link to clipboard
Copied
http://www.thebrutesquad.com/c300mkii-c-log2-luts-for-premiere-pro/
TO INSTALL:
Download my converted C300mkII CLOG2 LUTs for Premiere
In Applications find Adobe Premiere Pro CC 2015
Right-click Adobe Premiere Pro CC 2015 and select “Show Package Contents”
Navigate through the folders: Contents > Lumetri > LUTs > Technical
Drop all the .cube lut files into the “Technical” folder and restart Premiere.
Copy link to clipboard
Copied
Neil, thanks for the help but I'm not --THAT-- confused.  Not that you could have known since I didn't call out that I tried browsing to the LUTs.
Jason, interesting links. I'm going to keep the "convert/wash in SpeedGrade" idea in my back pocket. Alas, the process didn't work with Canon's .cube files, though it did with some others. First, my goal was to create Input LUTs to use in the Basic Correction pane. The other Input LUTs are .cube files so the files I converted to .look files were (as expected) greyed out when I tried to load them through the Browse... option. i.e., I couldn't even load them.
Weirder: When I tried to load the .look files based on Canon's .cube files in the Creative pane, the clip turned into a red-and-white checkerboard pattern. It might be a file-path issue as (partly) suggested below, but seems like since Lumetri offers a Browse option, that might not be quite right (or might not be the intended solution):
Clip turns into red and white checkers after grading in Speedgrade CC Direct Link
Chris, yesterday I came across a couple posts on the internet that suggested the fix that I'm guessing (and only guessing) dewydb at Brute Squad used to tweak Canon's .cube LUTs. And I tried the tweak. Basically, I opened one of the .cube files in a text editor, and a small edit that then makes the .cube file work in Premiere Pro on my Mac. Specifically, I changed the line "LUT_3D_INPUT_RANGE 0.0 1.0" into a comment by adding a # sign (so it becomes #LUT_3D_INPUT_RANGE 0.0 1.0).
That seems to work, but does the edit change the look or range of the LUT or cause other problems? I mean, I presume that the line is in there for a reason. I don't know enough about LUT file formats to really know (but see below). I'll do a bit of looking and scoping, and if it seems the text change doesn't mess up the LUT, then I'll download the Brute Squad .zip file and save my self a lot of time over editing all the Canon LUTs.
So what the heck is going on here? I still don't know. But here's one possible explanation. Geoff Smith at AbelCine wrote last week:
"Canon created these LUTs in what's often referred to as Da Vinci Resolve's "legacy" .cube format. Premiere takes a variant of .cube which is often referred to as Adobe/Iridas format (Iridas is the company that originally produced the SpeedGrade grading application) which is the same as Resolve's "modern" .cube format. You could convert these LUTs to the Resolve "modern"/Adobe/Iridas variant of .cube using a LUT utility such as Lattice or, using Resolve itself (including the free version ) since it will read both formats. You would do this by applying one of the stock LUTs (with no other corrections) and then right-clicking on the clip's thumbnail in the clip strip and choosing "Generate 3D LUT (CUBE)." Then load the resulting file into Premiere/Lumetri."
He wrote that in response to a comment in this article (their blog is pretty darn good, btw):
http://blog.abelcine.com/2015/12/15/canon-releases-new-3d-luts-for-the-c300-mark-ii/
So maybe I'll try converting some of Canon's .cube LUTs in Resolve and see if the results look any different from the edited-text/Brute Squad approach. Sure seems like a lot of work, though.
I really appreciate you all responding to my query and helping me find a potential solution. Thanks!
I don't think I want to mark my question as answered yet, though. Perhaps someone else will chime in with another thought, explanation, or solution.
Copy link to clipboard
Copied
Well Jim ... yes, I don't assume people starting out with a post on this have as much experience as you because ... normally, they don't! So, welcome to the forum ...
Look files, which is an Adobe SpeedGrade format ... don't work in the Basic tab as you've noted, at least in 2015.x. Whether that will still hold true in 2016, I don't know. I was going to ask about that at NAB but in all the time I spent talking about and working with the engineers there that question did NOT pop into my brain. Ah well. This has always seemed odd to me, and I'd asked about that in the past. The answer ... the Team assumed the Basic tab was where "technical" LUT's would go, so only "built" that input to accept formal "LUT" types ... especially the .cube files.
Was that restriction ... necessary? I don't see why it should have been, but maybe it cut some developing time or maybe it was just a 'design' decision.
Among other and perhaps more major issues is the placement of the input LUT in the order of operations. This has been noted elsewhere, and one of the other PrPro users I've "met" over various forms was talking with an engineer when I walked into the booth at NAB and asked me to explain to that engineer what he was trying to get across ... that order of operations MATTER.
Specifically, most "tech" camera-correction LUT's are built on the assumption that the media 'captured' by the camera is essentially 'studio quality' ... correct white-balance, exposure, and contrast ratios and "balance" captured in-camera.
With 'field' footage, and even much studio work, this ain't reality. So ... the LUT is designed to correct a perfect capture and does a ton of subtle changes in slopes, hues, and such ... but for it to work properly, you need to FEED that LUT what it is designed to "cure" ... a carefully prepped high-quality image. So ... you need to have the LUT after the basic correction controls to fix white balance, exposure, and contrast to give the LUT what it needs to do its best job.
PrPro's Lumetri Basic panel puts that Input LUT first ... and you correct afterwards. As we were able to show to the engineer when he did test this out at NAB, there was a very different outcome when he put the same clip twice on a timeline ... put the input LUT on the first, corrected using the Basic tab controls afterwards ... and put the same input LUT into the Creative tab on the second instance, correcting using the Basic tab therefore before the LUT.
The second ... correcting before the LUT ... took less adjustment to get a better image.
Which is one of the reasons why Patrick Inhofer, colorist and teacher of such things, uses multiple "instances" of the Lumetri panel in 'grading' in PrPro 2015. Each instance is to do a specific part of the job ... neutralization, shot-fixing (masks and such clean-up work), shot-matching, and over-all "look" being done in four applications of the Lumetri panel, using the Effects panel to go from one to the next.
Now to your direct problem:
Another way to apply 'foreign' Look/LUT files that have difficulty within PrPro, is to open up SpeedGrade in a 'native' mode making a new Sg project, load a clip, without doing ANYTHING to it going to the layer's panel in the lower left, adding a " + " layer, selecting "Film" from that layer's options which gets you to a LUT loading dialog out in the middle of an otherwise blank controls area. Navigate to the LUT/Look PrPro has had an issue with (your Canon for for example), and apply it. Sg seems able to work with LUT/Look files that often PrPro doesn't like.
Now ... in the lower left corner "layer stack" in Sg, at the bottom right, there's an icon of an arrow pointing down to a folder ... "Save Look" it says if you hover. Click that, and you get a saved Look in the Look Management browser ... which you get to by selecting the "Look" tab in the Timeline area, then the bottom right of that panel, the little squarish ... old 3.5" "floppy" looking icon ... and now you see the Look Management area. A thumbnail of your "Unnamed" Look just saved is there ... right-click, 'Export Look" ... and you get a dialog box asking what format/s of Look/LUT file you want to export, and what precision (16, 32, 64).
An option at the bottom is the Iridas .cube LUT, and that seems to work well within PrPro. Name & export, then try importing that into PrPro. It should work perfectly.
Neil

 AdChoices