 Adobe Community
- Home
- Premiere Pro
- Discussions
- Re: New 2017 update has caused issues with the LUT...
- Re: New 2017 update has caused issues with the LUT...
New 2017 update has caused issues with the LUTs in Lumetri Color.

Copy link to clipboard
Copied
Just finished a commercial last week. I'm now working on the deliverables. Foolish of me I updated Premiere to 2017 before hand, and now I'm paying for it. 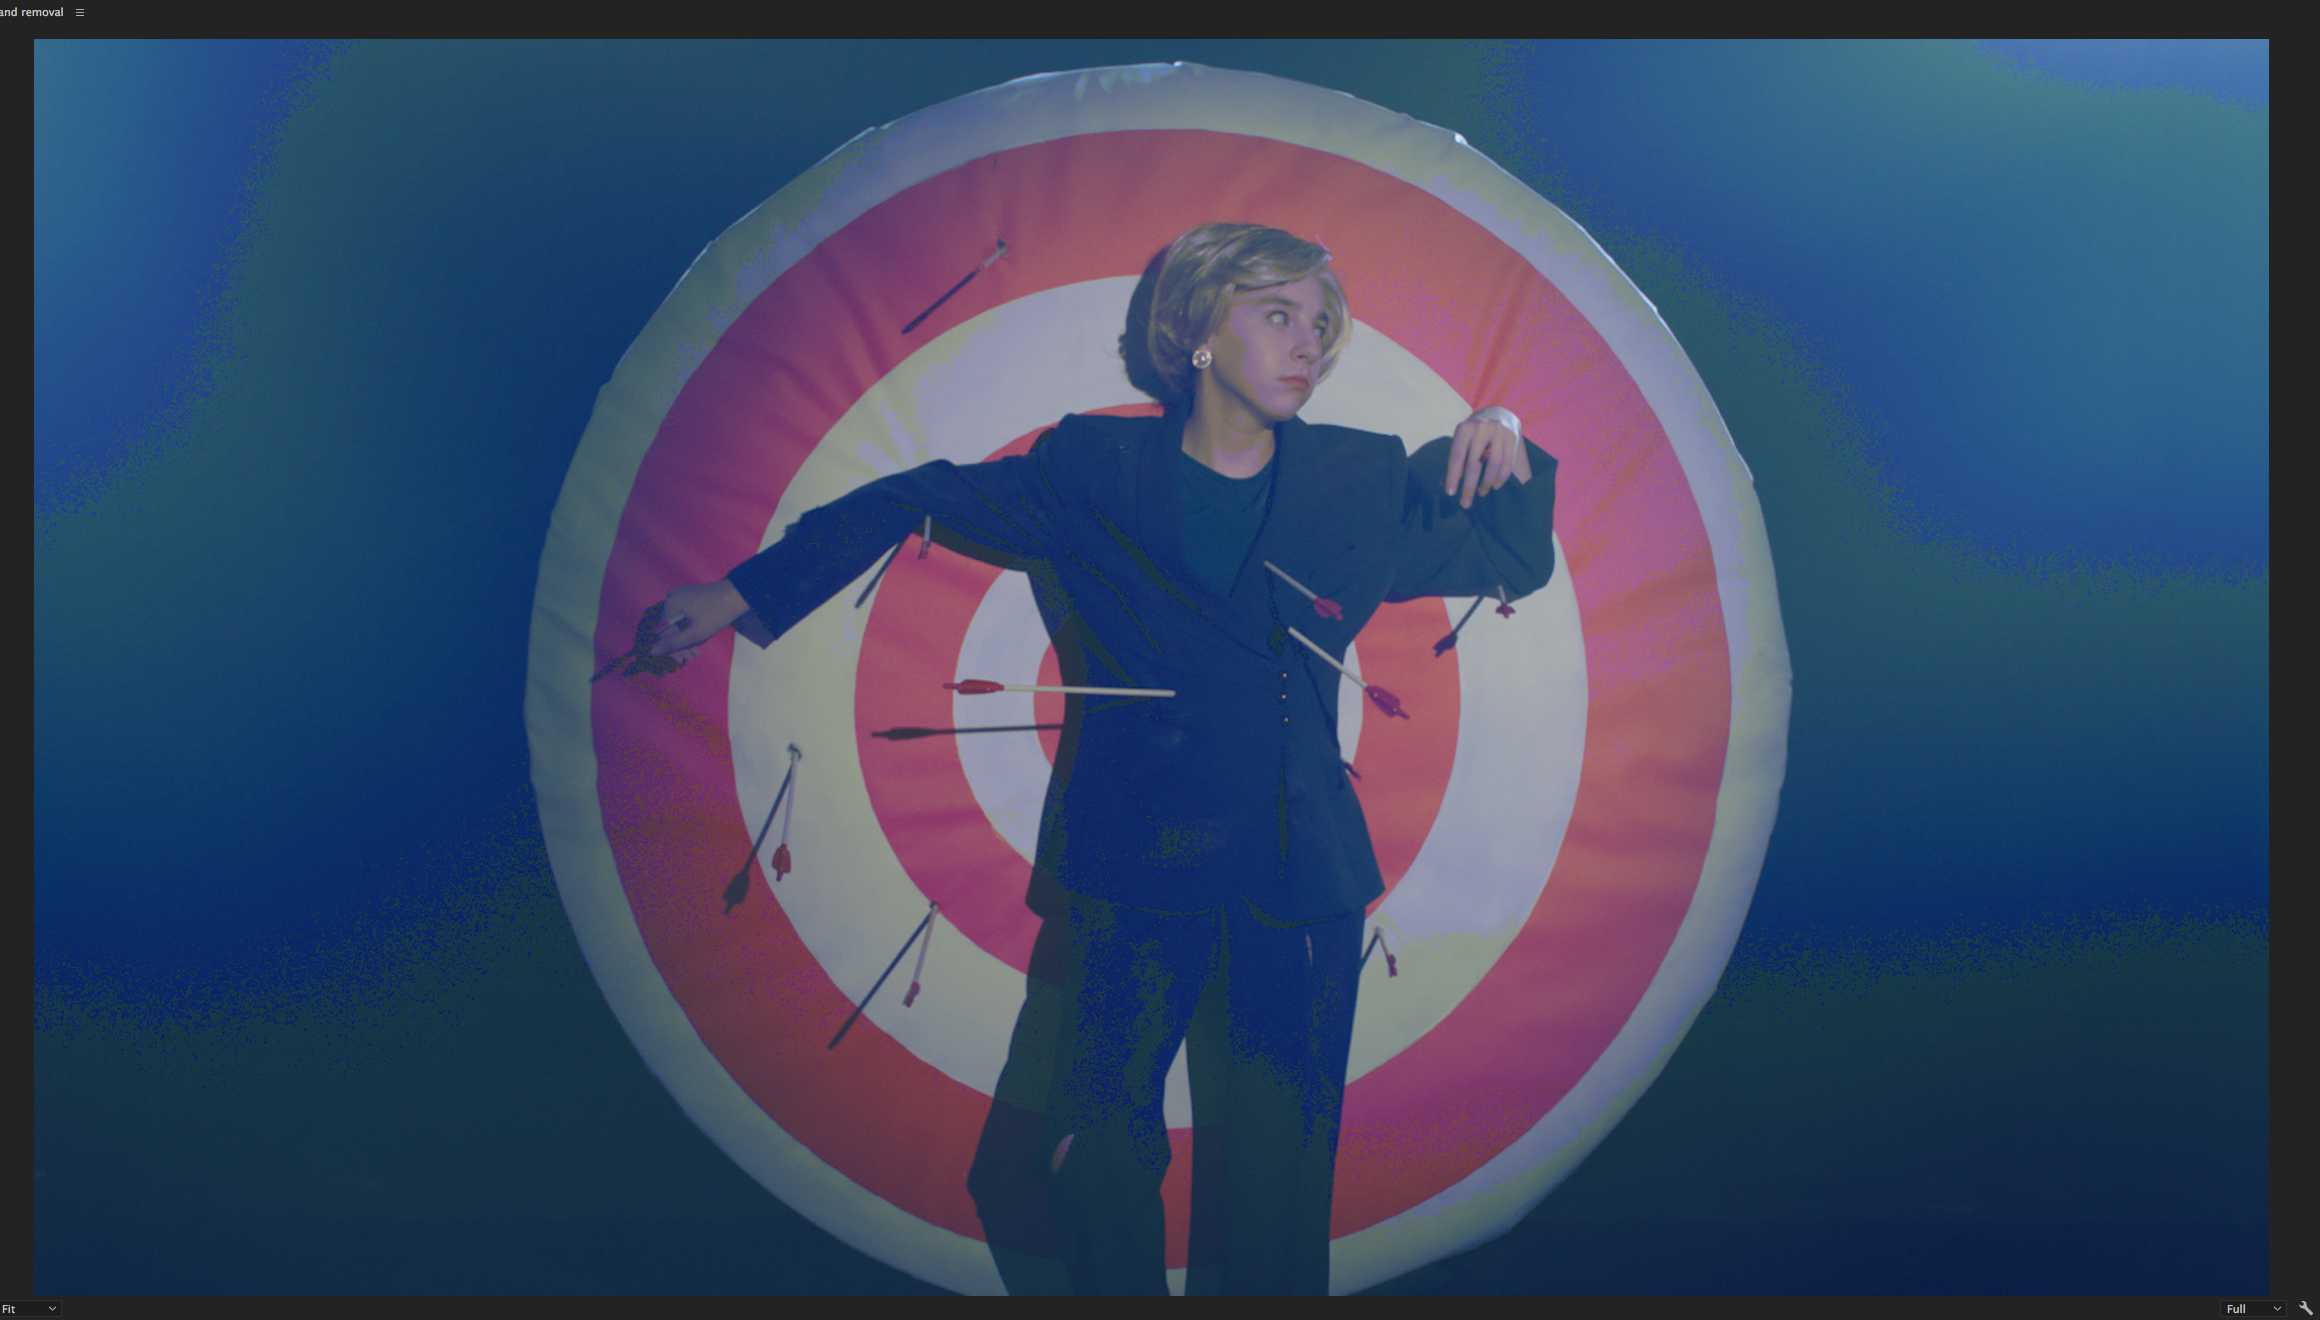
This image was shot with the Alexa, and in Premiere i applied a standard 709 LUT in Lumetri Color. When I opened the project today this is the image I get.
Ive tried replacing the LUT, trying other LUTs, nothing.
I've already submitted a bug report. Any thoughts?
Thanks,
Heath


 51
Replies
51
51
Replies
51

Copy link to clipboard
Copied
Just spent more time with colorist Robbie Carman here at Adobe MAX today. As he notes ... and as I've tended to do in my own work ... as a pro colorist he doesn't tend to utilize 'tech' or camera LUTs very much, as in the time it takes him to navigate to the LUT, he can pop the black/white points and saturation into place manually. And modify the gamma if need "to taste".
So for the job, you may need to just manually handle this.
I take it the lovely green swag through the image is not by intent?
We just worked some using that LUT here today and it worked fine. Weird.
What's your OS?
Neil

Copy link to clipboard
Copied
the time it takes him to navigate to the LUT, he can pop the black/white points and saturation into place manually. And modify the gamma if need "to taste".
That won't necessarily give the same results, though. There's often more to going from Log to Rec 709 than contrast and saturation. This is even more true for some of the creative LUTs.
Copy link to clipboard
Copied
A good colorist like Robbie can match/exceed the camera-makers 'tech' LUTs in seconds ... they pretty much know exactly what's the deal. Except there are a few that do say separate curves (essentially ... via a matrix table) per color. So for a select few cameras Robbie would normally pop the maker-LUT down. For most Log cameras, he and most of the colorists I've talked with just "know" what they'd do with X camera, and pop out most of the "corrective" work in 'manual' mode.
I've watched Robbie demo what say the Alexa LUT for a particular camera/setting does, and whether within Resolve or Lumetri even, do as good or better in a couple seconds. Especially if he's working on his panel. Comparing with scopes the whole time of course. Whether in Resolve or PrPro, pretty easy to do one clip from a cam, apply to the other clips from that camera for a basic start.
The "creative" Looks/LUTs actually do a lot fancier math much of the time ... say, for a camera-stock/print-stock LUT/Look like the Kodak 5205 (the camera film-stock)/Fuji 3510 (print-stock) combo. Those set very specific curves, roll-off, and end-points for each color channel.
If you play with the image after applying a print-stock LUT, well ... you don't have the same "look" anymore of that particular release stock.
Neil

Copy link to clipboard
Copied
Go back to 2015.4 finish and start fresh in 2017.

Copy link to clipboard
Copied
Upgraded to CC Premiere Pro 2017 today.
No "default" LUTs work on previous version Upgraded projects. Have to add the same LUT again and mimic the previous settings. 
Note to see the actual video I need to disable the original LUT or delete it.
MAC El Capitan 10.11.6
Have sent through a bug report.

Copy link to clipboard
Copied
I'm not sure this is exactly the same....but I Updated to 2017, and every project I open looks faded and really warm looking. and LUT's were previously applied so IDK...
Copy link to clipboard
Copied
When we users get especially a full version upgrade like going from the 2015.3/4 to 2017 it is always recommended to complete projects in the the version they started in. Start new projects in the new version.
Not always practical but when you can ... it is often are easier.
Neil

Copy link to clipboard
Copied
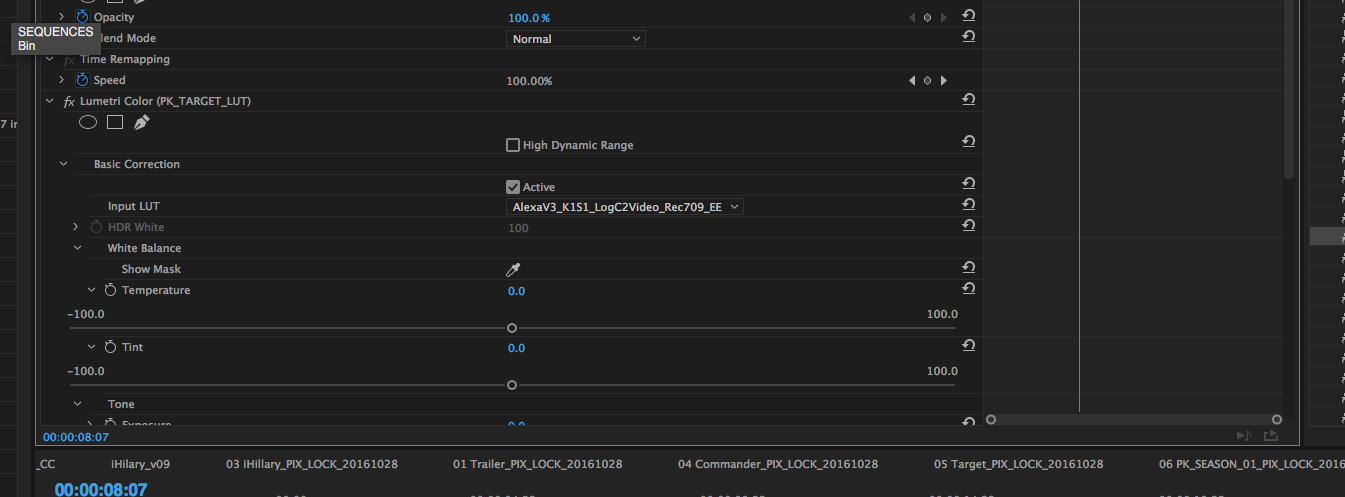
Ok, I think I have an answer to most of the problems people are experiencing with LUTs. I figured out a while ago that in the Lumetri Color Panel, when you select a LUT from the drop downs, then you save your project, it doesn't actually save a reference to the exact LUT you're using. It actually saves the index number of the LUT you are using in the menu. So if you select the 4th LUT on the list, close your project, delete LUTS from the menu and reopen your project, it will again use the 4th LUT on the list, which might now be a different LUT.
Hopefully that makes sense, but just in case, here's an example.
Say you have these in your drop down menus (doesn't matter if it's the basic or creative section of the Lumetri Panel):
Awesome LUT
Basic LUT
Creative LUT
Delicious LUT
Efficiant LUT
So you choose Delicious LUT from the dropdown (if you navigate to a custom LUT, it will save that reference) and save your project. Your project says, "This Lumetri Color Effect is using the 4th LUT on the list." NOT "This Lumetri Color Effect is using the Delicious LUT" or "This Lumetri Color Effect is using Delicious LUT.cube."
Now this is fine, AS LONG AS you don't change your list of LUTs. But, if you add LUTS or delete LUTs from Adobe's list, or you upgrade and your list of LUTs changes because of that, then it's going to be using the wrong LUT.
*Side note, if your project now shows no LUT, then I believe you were probably using something like LUT #100 on your list, and you no longer have 100 LUTS, so it has nothing to point to.
So using the example above, I'm using Delicious LUT, I save the project and exit Premiere. I decide I don't like Awesome LUT, so I delete it. I reopen Premiere later and open my project, and the colors are now all wrong because it will now be using Efficiant LUT instead, because it's looking at the 4th LUT on the list, which is no longer Delicous LUT, and is now Efficiant LUT (since Awesome LUT was deleted).
So, if you copy over your LUTs from CC2015 so that all the same LUTs exist in the directory, your project should go back to your original colors.
I hope that all makes sense. I know it's a little convoluted.
Copy link to clipboard
Copied
Very correct observations of the Creative tab LUT selector line.
From my testing, IF you create a subfolder in the Lumetr/LUTs/Creative folder ... the LUTs (made or acquired) you put within that subfolder appear in the drop-down list, but don't screw with the "4th LUT down" relative listing of that selector.
It seems to have worked for those I've suggested it to also. But I'm not sure that's the issue the OP is having.
Neil

Copy link to clipboard
Copied
This doesn't seem to work on Mac in Premiere 2018. Not sure if something has changed. Any other ideas for a workaround?
Copy link to clipboard
Copied
As there's been a lot of stuff posted in this thread, a bit of specificity as to what's not working for you, and how you're doing it, is needed.
I know quite a few that are using this without issue on a Mac, so it's "possible" to probably get your issue fixed, though never a guarantee.
Neil
Copy link to clipboard
Copied
Sorry, thought I had replied to a specific comment there. I'm referring to the workaround of creating a subfolder within LUTs/Creative, or for that matter, LUTs/Technical, in which to drop new LUTs. Doing so still seems to break the index of previously selected LUTs on clips within projects. I would love to find a way to get this to work, so let me know if you have any ideas.
Thanks
Copy link to clipboard
Copied
Ahh. That was a great process up until 2015.3, the first of the 10.x builds, and they'd changed the Creative tab's LUT/Look functions to what seems to be (in spreadsheet terms) a "relative" link rather than an "absolute" link ... as in, the fourth LUT/Look in the folder rather than the ArriUltraCool or whatever is the name of the (at that moment!) fourth LUT/look.
So ... while you can use the Input slot on the Basic tab's "Technical" folder still, and scroll the options, you are best NOT to do anything with the Creative tab's folder in the program tree.
You can either set a folder that's quick to navigate to and use the "Custom" option, which will default to the last used folder, and also save your built/purchased LUTs in say a folder in your Creative Cloud online CC library. If you do the last, you can use that to access them from any computer that you log into with your own CC account.
Neil

Copy link to clipboard
Copied
What I did was create an adjustment layer and apply the LUT to that. In my case I named the adjustment layer "SLOG2 to REC709".
I place that over any of the applicable footage.
(You apply the LUT before you place the adjustment layer on the timeline).
This way, if any of the LUTs get messed up by an application upgrade, or opening the file on another computer which may have a different set of LUTs, you only have to fix it once by opening the adjustment layer (from the project panel) and applying the correct LUT.

Copy link to clipboard
Copied
I have the same issue
Copy link to clipboard
Copied
Which LUT are you using in which panel, and what do the RGB Parade and Waveform (Luma) scopes look like before and after applying the LUT?
If you manually approximate what the LUT does what does it look like?
Would be nice to have screen grabs.
Neil
Copy link to clipboard
Copied
Hi, these are my screenshots. I use slog 2 luts from deluts (shot is slog2 too). I used these luts one year on old premiere and everything was ok and now I have these problems. In authors premiere (he has the same version like me) its ok In one project after totally deleting luts and installing them from beginning its ok, but in other project like this its the same.


Copy link to clipboard
Copied
I have the same problem
with SONY A7S Mark ll 

Copy link to clipboard
Copied
Hi HeathVerite,
For any Lumetri issues after updating a project to CC 2017, remove the Lumetri effect and apply a new Lumetri effect. See if that solves the issue.
Thanks,
Kevin
Copy link to clipboard
Copied
I tried this, I deleted all luts from mac and from project and redownload it all again. Nothings change. Its bug? Or what is the problem? thanks
Copy link to clipboard
Copied
I made new project with importing everything from beginning and now its ok, so its bug propably....but solve this problem with alone project for color grading its not good solution.
Copy link to clipboard
Copied
Migrating a project from one version to another is often not the best way to work. Finishing a project in the version it was "built" in is the "best practices" recommendation. I rarely ever try to move my projects (comparatively small though they are) from one version to another, keeping them in the version I built them in.
If I think of moving one, I'll test it first ... and I always have previous versions of complete "sets" of the Adobe DVA's on my machine, currently only 2015.2 and 2017. For quite a while I had projects in 2014, 2015.2, and 2015.3/4. I've finished those earlier projects now.
And I learned never to just "open" a project in a newer version, but to create a new project in the new version, then import the previous project file into that version, along with any assets needed. That works better (most of the time) than migrating.
Much as "supposedly" it should work to migrate, and sometimes it does, it's better for sanity sake to keep projects in their own version. And you meet deadlines that way.
Neil
Copy link to clipboard
Copied
I'm having the exact same issue. It only appears to be happening in CC2017 and no issues in CC2015. Exact same LUT for both. Also ran this clip through Resolve with the same LUT and it comes out clean.
Here is an example - Left is CC 2017 with color banding issue, right is CC 2015 which is clean.
A few notes - doesn't matter what LUT is used (Adobe or otherwise). This is a PRORes422 clip from a BMD Pocket Cinema Camera. Recording in RAW helps a bit, but it is still present. This LUT is applied to the basic color correction tab and no other adjustments are made. Also tried to apply as a creative lut, but same result. This was a fresh install of CC2017, also tried on a second CC2017 system with same result.
Copy link to clipboard
Copied
A couple questions ... it sounds like this is in new projects started in 2017, and not in 2015-era projects opened in 2017, but I do want to be sure about that. So the problem you're having is in a new project created in 2017, using any of 2017's built-in LUTs creates this type of banding with BMD Pocket Cinema footage, correct?
Next ... could you show a screen grab of the Lumetri scopes ... either/both RGB Parade or Waveform, both before and after applying the LUT to the media?
Neil

 AdChoices