 Adobe Community
- Home
- Premiere Pro
- Discussions
- Re: Premiere Pro CC 2017 to Blu-Ray disc
- Re: Premiere Pro CC 2017 to Blu-Ray disc
Premiere Pro CC 2017 to Blu-Ray disc

Copy link to clipboard
Copied
I had another forum thread going with this topic but it was getting to be quite long and was not giving me the answers I was looking for so I thought I would try starting a new discussion.
Before you reply to this question, please understand that while I have dabbled off and on (mostly off) with simple video editing with Premirere Pro for nearly 10 years, I still consider myself a 'beginner' so if you want to respond, please use language that a beginner can understand. For instance; " Create an iso image" is WAY over my head! I have no idea what that means or how to do it.
I'm currently using Premiere Pro CC 2017 . I've already done all of the editing and now just need to burn the 1 1/2 hour sequence onto a Blu-ray disc that my client can play on a home Blu-ray player. I'm using a PC with Windows 7 and I do have a Blu-ray burner. I have also downloaded Encore CS6.
Here are my questions:
1. Exactly what Format and Preset settings should I use in the Export section of Premiere 2017 to create the files needed to author a Blu-ray disc (NTSC 1080)? 1080i or 1080p? Is frame rate critical (the sequence was edited at a frame rate of 29.97 but it's OK if the output is 23.97 fps)? There will be no menus and the quality should be good but doesn't 'have' to be broadcast quality. As long as it plays in my client's home Blu-Ray player without any problem. It's fine if it just starts playing as soon as they insert the disc. I want to keep this as simple as possible!
2. I have tried Exporting the sequence several times with different settings and I've noticed that Premiere creates 4 different files; MP4, XMP, XMPSES and WAV. Are all 4 needed to author the Blu-Ray or just certain ones? Which ones?
3. I'm aware that there is no longer a dynamic link between Premiere 2017 and Encore CS6. Therefore; exactly how do I import the files (and which files?) into Encore CS6 and then what are the steps to authoring a Blu-ray disc?
If you don't have the time or patience to give a complete and thorough responce, or can't stand dealing with 'beginners', then please don't bother. I've been struggling with this for weeks now and I just want to get 'er done as simply as possible!
Big thanks to everyone who has helped or tried to help me with this dilemma! I really do appreciate all the good will!
Chris
[Moved to Encore forum by mod]


 19
Replies
19
19
Replies
19

Copy link to clipboard
Copied
Your best bet is to ask this in the Encore forum: Encore
Copy link to clipboard
Copied
I have edited this post, changed and added information.
3. I'm aware that there is no longer a dynamic link between Premiere 2017 and Encore CS6.
There was no dynamic link beginning with the first CC. There is no difference for CC2017. There may be a couple slight differences. Many users never liked or used dynamic link even with using PR CS6.
The workflow described in the following tutorial (Using Encore CS6 with PremierePro CC « DAV's TechTable) still applies. It is here:
http://blogs.adobe.com/davtechtable/2013/05/using-encore-cs6-with-premierepro-cc.html
Scroll down to "Here’s a workflow video for using Encore CS6 & Premiere Pro CC."
2. I have tried Exporting the sequence several times with different settings and I've noticed that Premiere creates 4 different files; MP4, XMP, XMPSES and WAV. Are all 4 needed to author the Blu-Ray or just certain ones? Which ones?
This is not correct regarding the mp4, but I think your listing the mp4 is an error here, because you would not get the wav if it were an mp4.. When you use the correct format (H.264 Blu-ray or MPEG2-Bluray) you will get an m4v or m2v and the wav and the other two. So let's assume that you used the H.264 Blu-ray format and that what you have are: m4v, xmp, xmpses, and wav. In Encore, select in the Project Panel and then File -. Import as Timeline, navigate to the folder where you saved the files, and select the m4v and wav. This will add them to your project, will create a new item (a timeline), and will display the timeline in a viewer. Select the timeline, set the end action to "stop."
Check to see that your files are BD legal: in the Project Panel, select the video asset and look to see what it says in the "Blu-ray Transcode Status" column. (You may need to scroll to the right.) It should say "Do Not Transcode." If not, you have a problem in your PR export settings, and Encore will transcode the video.
In the Build tab, click the "check project" box and then "start." You will get a warning that the title remote is not set. Technically, this is not an error as much as a warning. But it is better to set it.
Go to the Flowchart and select the Disc icon. Then look at the Properties panel. Set the title remote as you wish - where will the user go when they push the top menu button.
You asking for a "no menu" version, which should work fine. When you add the timeline as the first item in an Encore project it sets it as "first play" (when the disk is started, the movie will play.) When you add a menu as the first step, the menu is first play. Encore also sets the "title remote" for you.
In the build tab, set the format to Blu-ray, and the Output to "Blu-ray Image." Select a location and a name for the disk and click "build." This will create an image. Burn with ImgBurn. Encore may burn the disk fine - set the Output to disk - but it is often fussy, and many of us never burn with Encore.
You must keep the xmp and xmpses files in the same folder as the other files, but you do not do anything with them. Encore does that for you. They carry chapter (and other) information (even if you do not have chapters).
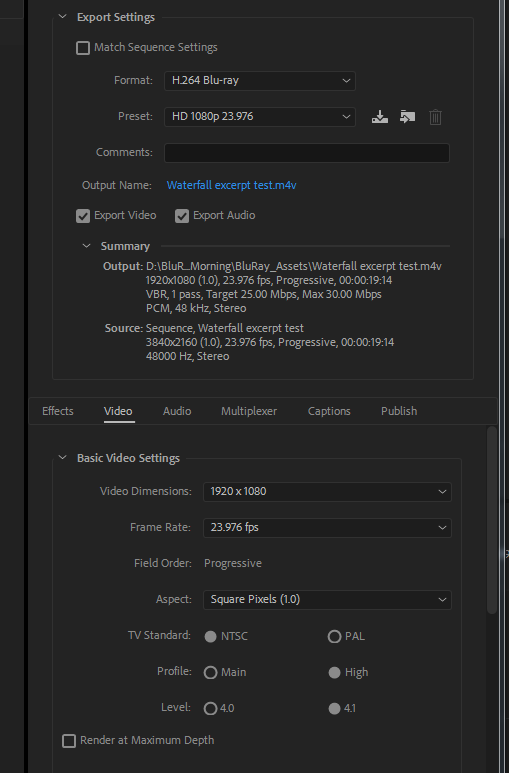
1. Exactly what Format and Preset settings should I use in the Export section of Premiere 2017 to create the files needed to author a Blu-ray disc (NTSC 1080)? 1080i or 1080p? Is frame rate critical (the sequence was edited at a frame rate of 29.97 but it's OK if the output is 23.97 fps)?
Your files may already be okay. In the PR export dialog, I assume you used the H.264 Blu-ray Format. As Neil pointed out, 1080p is not Blu-ray legal; it must be interlaced. See this list:
Encore-supported Blu-ray Formats
Keep the same framerate.
Copy link to clipboard
Copied
Hi Stan;
Thanks for the detailed info! However; when I go to the ImgBurn website (
http://www.imgburn.com/) and try to download it, I get sent to another
website:
http://www.easypdfcombine.com/index.jhtml?partner=BSBxdm091&gclid=CJf6jbzNodICFQcOaQodGxEFhw
<http://www.easypdfcombine.com/index.jhtml?partner=BSBxdm091&gclid=CJf6jbzNodICFQcOaQodGxEFhw>
which seems to have nothing to do with burning discs.
However; I did download another disc burning software (free trial) called
iSkysoft DVD Creator. However; it will not allow me to import any of the
files that were created by Premiere no matter how I have the output
settings set.
To keep things simple, I would prefer to just use Encore to burn the disc
if possible. (Is it?)
Again; as long as it plays in a home player, I'll be satisfied. I know
that I used Encore many years ago to burn discs and it worked fine so I
would prefer to go with what I know works (or did work years ago!).
Thanks!
Chris
On Mon, Feb 20, 2017 at 1:12 PM, Stan Jones <forums_noreply@adobe.com>
Copy link to clipboard
Copied
To get the most help, you need to follow the steps. And if anything does not work as indicated, report back what specifically you tried and what happened. For example, if you import the m4v and wav to Encore, and the m4v shows as "Untranscoded" instead of "Do Not Transcode" as I indicated, there is a problem that we can help you with.
Sorry; I thought I said in my post that you can try to burn with Encore. Just do that first.
To avoid the unwanted links in the ImgBurn program, see this link:
http://forums.adobe.com/thread/1322583
(John, is that still the best version of imgburn download steps?)

Copy link to clipboard
Copied
The reason you are not getting the aswers you want is because you dont give us the info we need.
Still dont know what your source material or sequence setting in Premiere are, which determine the export settings.
See post 20 other thread.
Copy link to clipboard
Copied
Tutorials for Encore:
Copy link to clipboard
Copied
Hi Ann;
I think that part of my issue may be that the event was shot with 3
different kinds of cameras; Sony camcorder, Panasonic camcorder and Nikon
D3s. However; I used Adobe Media Encoder to convert all 3 to MP4 files at
29 fps before importing them into Premiere. As for the output; I just want
it to be in a format that I can burn onto a Blu-Ray disc for viewing on a
home Blu-ray player. At this point, I'm very frustrated with this project
and just want to get it finished. It doesn't have to be perfect; it just
has to play. The next time, I will be more careful about how I have the
cameras set so I don't have to do any converting. My client is not at all
fussy; just as long as it plays on his home Blu-ray player.
Is this the info you wanted? If not; what other info would be helpful?
Thanks!
Chris
Copy link to clipboard
Copied
chriss95559358 wrote
Hi Ann;
I think that part of my issue may be that the event was shot with 3
different kinds of cameras; Sony camcorder, Panasonic camcorder and Nikon
D3s. However; I used Adobe Media Encoder to convert all 3 to MP4 files at
29 fps before importing them into Premiere.
Why would you convert. Premiere can play all those formats native.
Converting before loading it up in Premiere means an unnecessary generation loss.
Anyway your export setting based on the above and assuming (you are very difficult to pull info out) its 1920x1080: H.264 bluray HD 1080i 29.97.
You get 4 files.
Only import the m4v and wave into Encore.
Put this on a timeline and set timeline to First Play.
Make iso
Burn this is with e.g. CDBurner XP (or Imgburn) as an image.
Done.
Just as easy as making a dvd.
Copy link to clipboard
Copied
Hey Ann;
'Funny' thing; the Panasonic camcorder (consumer grade) creates a file that
can only be opened with their software. (although, I have to admit, I have
not tried importing that file directly into Premiere, I only tried playing
it with Windows Media Player which usually play all common video files.)
So I ran the video through the Panasonic software and saved it to my
computer. It seems that's the only way it works.
As for the Sony camcorder; it has a 5.1 stereo mic built in and I had it
turned on which cause problems when I tried to Import it into Premiere so I
ran it through Adobe Media Encoder to change it to 2 chan. stereo.
Anyway ...
Since burning a Blu-ray seems to be ridiculously complicated (and not even
necessary in this case), I decided it would be easier to just burn a
standard DVD.
I Exported the sequence from Premiere, settings for DVD, then imported the
video and audio files onto a timeline in Encore CS6 and it seemed to be
working fine; I could play the sequence in Encore and all was working
fine. Then I tried to Build the DVD. Everything seemed to be working fine
except that when I put the DVD in my home player, there was no audio.
What might I be doing wrong?
Thanks!
Chris
Copy link to clipboard
Copied
this is how you timeline should look.
I am locking the other two threads
No point having 3 threads on the same subject too confusing for all of us.
Copy link to clipboard
Copied
Please continue here.
Copy link to clipboard
Copied
Chris, nothing about Blu-ray is simple. It is all complicated so best just keep this in mind.
Video formats first.
You are starting with a lossy H264 file in an MP4 wrapper, and then editing this and re encoding to another H264 variant as an M4V - this seems counter productive to me and is guaranteed to reduce the quality of the footage.
You also have 3 different codecs and each codec has either 15 or 18 variant resolutions allowed, making for a large number of video forms and resolutions. Here's the list.
i/. 1920x1080 (aka"Full HD") allowing frame rates of 29.97i, 25i, 24p and 23.976p
ii/. 1440x1080 allowing frame rates of 29.97i, 25i, 24p and 23.96p
iii/. 1280x720 allowing frame rates of 59.94p, 50p, 24p and 23.976p
iv/. 720x576 allowing a frame rate of 25i
v/. 720x480 allowing a frame rate of 29.97i
However, this list is not as straightforward as it might seem at first because although many people will try to tell you the whole PAL/NTSC thing is a dead duck this is not the whole story, as 25i is simply not going to work well - if at all - on a large number of displays that run on 60Hz mains (IE, USA and NTSC regions) and the same thing happens with 29.97i in PAL regions - although that said you have far more chance of a 29.97 frame rate running on a 50Hz system than the other way around. This is purely the way these things work.
Best advice I can offer is to always shoot at 24 or 23.976fps (they are pretty much the same thing anyway, although you would do well to remember that all 24 and 23.976 timecode in Premiere Pro is output at 24p values) as this can be progressive scan and will work universally on all Blu--ray players as the support for this frame rate is mandatory at 1920x1080, unlike 29.97i and 25i which are both optionally supported (read "probably not supported" on cheaper players) and I can vouch for this from personal experience - been there, done that, cocked it up.
All that now said (and I have not even started with the audio oddities) if all you want to do is a single playlist item, this should not be too difficult as long as you adhere to some basic rules, and the main one is to prepare all assets outside of Encore, and feed Encore just the final elementary streams using it solely as an authoring tool and not an editor of any sort at all. This will seem complex, but please believe me it is the easiest way to proceed.
Let's begin with planning.
Before you start with anything - including the shoot - make certain you know what you are trying to do, so the first thing is to work out exactly where you want this disc to be playable. This can be broken down broadly into 2 options - PAL regions or NTSC regions. Some will tell you this does not matter but from my experience it absolutely does matter because each of those 2 regions is different not out of bloody mindedness but because of the frequency of the mains supply. PAL regions tend to operate on 50Hz and NTSC on 60Hz. Have you ever seen a film where there is an old CRT TV in the background, where the film is being shown in a region different to the one it was shot in? The display on the film will appear to roll, or have a pronounced banding effect and we need to avoid any display problems. You also need to consider what resolution you will be shooting in, as some regions allow frame rates others do not have to support & if you use 25fps in an NTSC region, even if the player can read the disc the odds are high that all you will see on the display is a black screen, or a message that the resolution you are using is not supported.
If shooting at 1920x1080 your only progressive scan option is 24 or 23.976 (23.98) - both 25 and 29.97 are interlaced display only. See image below for a comparison of the 2 where the top image is PS and the lower is interlaced:
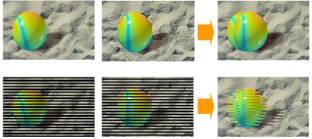
As you can see, interlacing can leave nasty artefacts which should be avoided.
The way to get around this is to use progressive scan at 24fps (or 23.976 of course) because although 1920x1080@25p and also 1920x1080@29.97p are both in the SMPTE HD specification, neither are in the Blu-ray specification - those resolutions are interlaced only and optionally supported. I know I keep repeating myself but this is important to understand if you do not want to get returns and/or complaints about discs not playing or image quality.
Another option is to use a lower resolution that will allow 25p or 29.97p, but you will still have issues with the frame rate not working in other regions so it is really for the best to avoid those frame rates if at all possible.
The Shoot.
Do not shoot to a lossy form if you need to edit the results. Whilst setting a camera to AVI or MOV (QuickTime) may appear to be all you need to do you should check the camera manual to be sure just what codec they are putting out, as both those stream extensions are what we call "wrappers" - it is very likely that even though you choose AVI or MOV you are still shooting to a lossy file type. Check the camera manual & use the highest quality it is capable of in lossless for preference.
Next, it is a good idea to avoid using different brands - even models - of camera if the results are to be mixed, as you may well run into serious colour space & Gamma problems. If a multi-camera shoot, try to use the same camera types across the board all set to the same settings, and make sure your black levels & white balances are matched to avoid issues later. I have taken footage at face value before from a client that was not properly graded, and the whites turned Blue after being encoded. Seriously.
The Edit.
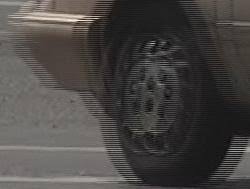
This is where things can go horribly wrong on a display, but if using a computer monitor you may not even notice the problem - especially if using interlaced footage, as most mainstream computer monitors will automatically remove interlacing unless you have set them up properly & told them not to. The end result can be a clip that if someone waves an arm you will get a trail of ghost arms following. At the worst case this will be totally unwatchable and in the best case it will be extremely irritating.

See also this excellent Cow Forums thread on the subject - it is specific to FCP and Quicktime but applies equally to PPro - Filed/interlace issue with Quicktime export : Apple Final Cut Pro Legacy
Specifically pay attention to post 6 - most people think this is a problem, but the poster there is correct when he says it is not a problem, it is how it is supposed to be - the only error is in mixing field orders at the edit, or a failure to properly prepare your assets in the first place. Just remember computer monitors will automatically deinterlace when this should be done by the editor as job #1 after ingest (assuming any interlaced footage is present of course) - read post 6 and learn this - it is really important if you carry on shooting at 25fps. Also, bear in mind this will happen to you one day sure as the sun will rise in the morning, so it is good to know how to deal with it and ideally prevent it happening in the first place as correcting this after the event is close to impossible and with lossy output it will be exacerbated.
Quicktime is not your friend. This has been deprecated by Apple now (and you were never allowed to create ProRes on a PC anyway as Apple refused to allow this) so if on a PC use either a lossless AVI such as Lagarith, or better still DnxHD (which will have an .mxf extension) as this is truly cross-platform (and is also the form used for DCP exports (Digital Cinema Package) using JPEG2000 codec).
Never scale and transcode to lossy at the same time. Always scale first and import this back - check carefully (preferably on Glass or else on a proper TV display, not a computer monitor (unless you have a certified and correctly set up display) and only then output your final form for disc.
Oh - I almost forgot. Premiere Pro has a "Smart Rendering" codec option. Be very careful here, and before you make a setting please read the following page very carefully:
Smart rendering in Premiere Pro
Export for Blu-ray or DVD
This should be the final operation, and for DVD you should use MPEG-2 DVD codec in AME (unless you have a better 3rd party plugin or standalone encoder) and for Blu-ray I would always use H264 rather than MPEG-2 or VC-1 as it is a much more efficient compression algorithm and will output the same quality as MPEG-2 at half the file size.
H264 for Blu-ray will default to a multiplexed stream (m2ts or m2t) and this is not what you need - Encore prefers elementary streams, so under the "multiplex" tab in the export dialogue (and this applies mainly to 3rd party plugins such as the very good TMPGEnc 264 Premiere Pro plugin) make certain you are set to NONE as it will try to default to an m2t stream multiplex including the audio inside the wrapper. See example below for this plugin
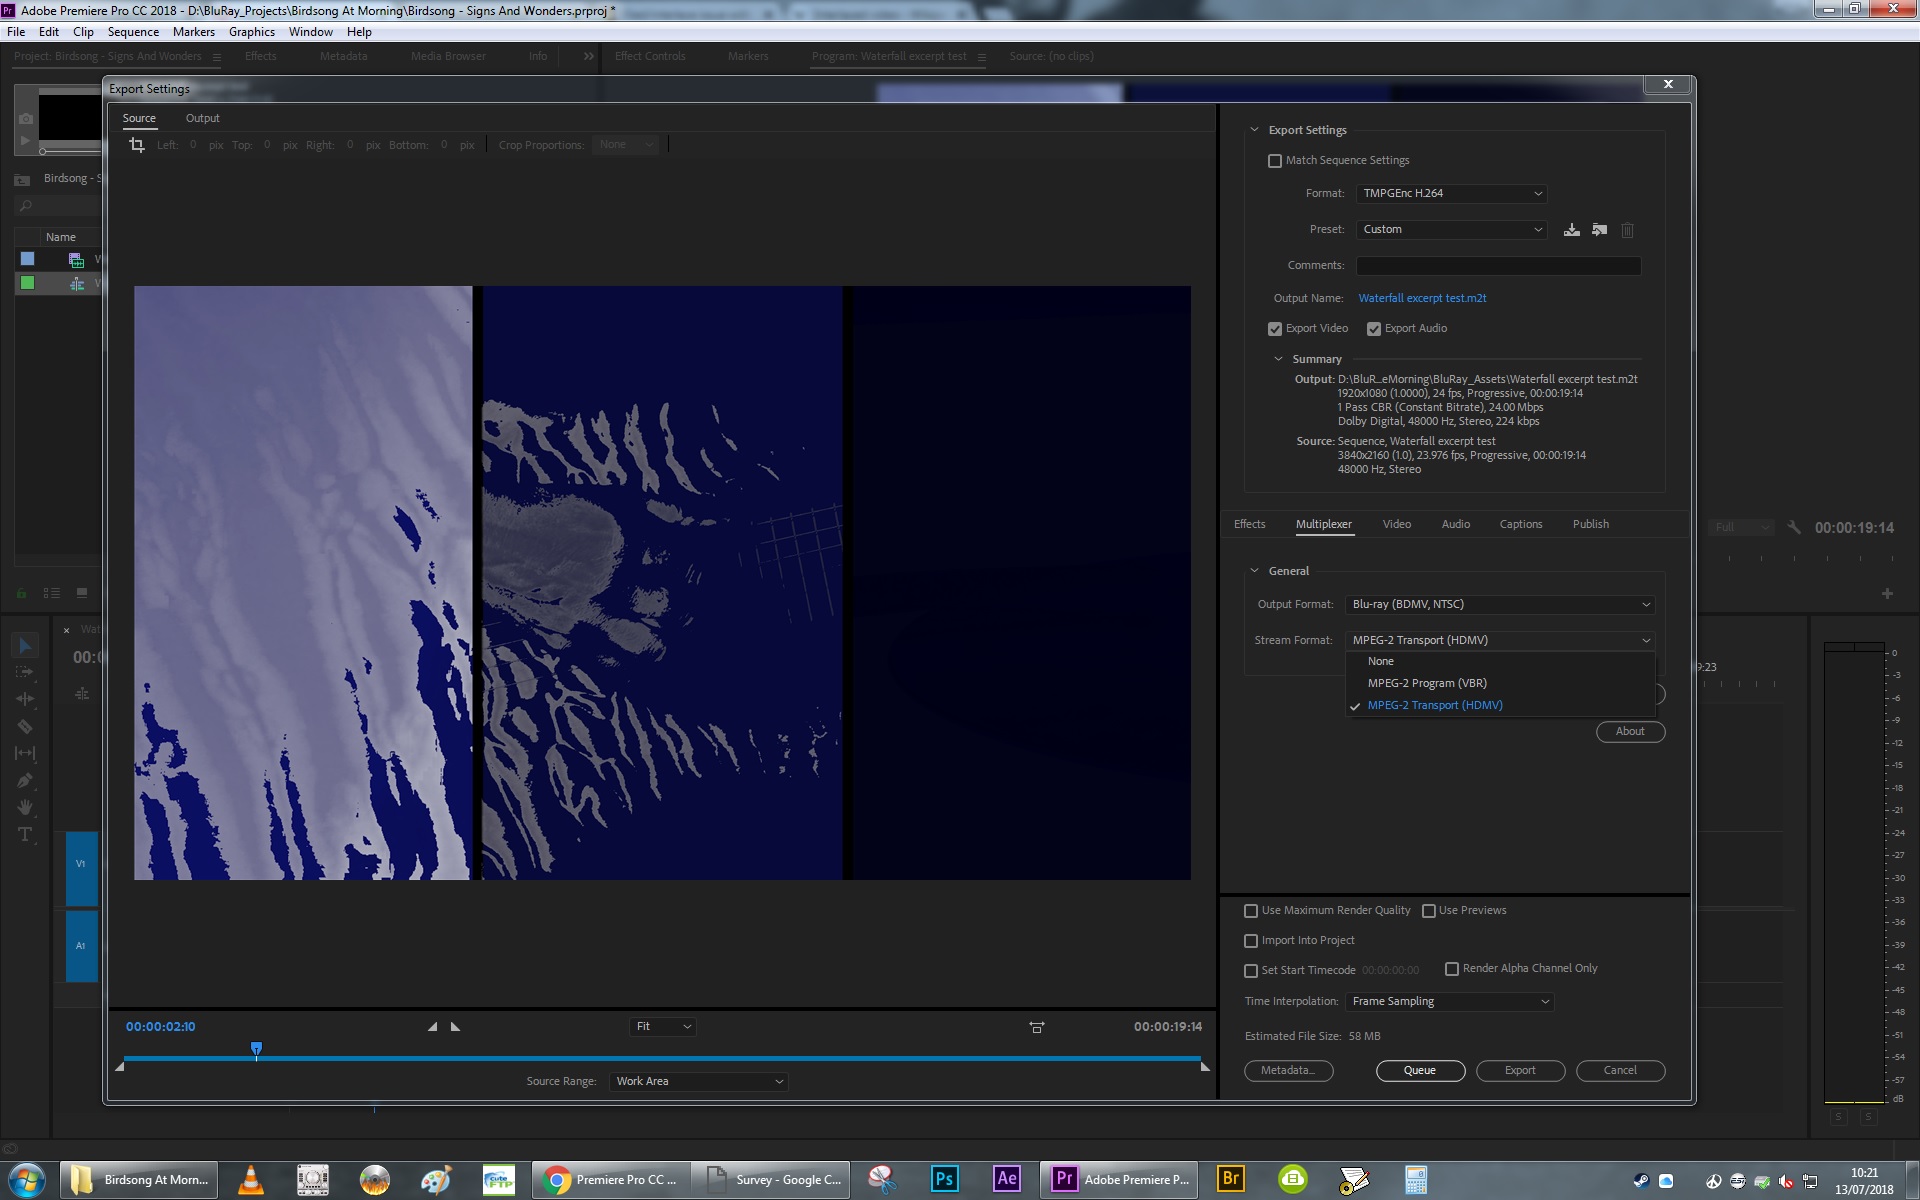
I repeat this will not happen if you use the right source material type and the AME H264 Blu-Ray option will always output m4v and pcm audio if you are using the correct source footage
Have you spotted the deliberately left default settings error? This is a nasty "gotcha" waiting to trap the unwary, as if in the UK the AME always seems to default to 25fps when I think it should always default to "Match Source".
Additionally, there is a second error here that is another common thing. I shall not tell you what the 2 mistakes here are, but if using a setting for Blu-ray you need to be aware of the assumptions the AME will make & be ready for them. Below is what it should look like:

Can you see the changes?
One more thing to watch out for in Premiere when scaling and exporting - when you start out with a stereo interleaved audio file it often outputs to dual stereo, with L and R on separate tracks - despite this option not being selected. This is a bug pure and simple so please be careful and check carefully.
Encore.
If Encore is used as an assembly tool, you will have no real problems. It is just fine at doing this and the troubles always start when editing source material through Encore. Just don't do it.
I hope this helps in a small way and please post back with any questions
Copy link to clipboard
Copied
Best advice I can offer is to always shoot at 24 or 23.976fps
I dont think that is good advice when living in PAL-land.
My camera's dont offer 24p and even when it did, mixing that with 25 or 50 fps is a big pita.
Copy link to clipboard
Copied
https://forums.adobe.com/people/Ann+Bens wrote
Best advice I can offer is to always shoot at 24 or 23.976fps
I dont think that is good advice when living in PAL-land.
My camera's dont offer 24p and even when it did, mixing that with 25 or 50 fps is a big pita.
Sorry you feel this way Ann - but I have yet to see a decent camera that cannot shoot at 24.
Plus of course shooting at 25fps or 50fps is going to guarantee returns & complaints of sold in NTSC regions - simple. This I know from hard experience in proceeding Optical Discs for worldwide replication & release. PAL frame rates are simply unreliable in the USA and Japan - period.
IF you are shooting entirely for UK/EU, then go with 25fps but it cannot be progressive scan, only interlaced.
Copy link to clipboard
Copied
Hi Ann;
If it makes any difference; the sequence plays perfectly in Premiere. So
it seems to me that there ought to be a clear set of steps to transfer it
to a Blu-ray disc. Am I wrong?
Thanks!
Chris
Copy link to clipboard
Copied
chriss95559358 wrote
1. Exactly what Format and Preset settings should I use in the Export section of Premiere 2017 to create the files needed to author a Blu-ray disc (NTSC 1080)? 1080i or 1080p? Is frame rate critical (the sequence was edited at a frame rate of 29.97 but it's OK if the output is 23.97 fps)? There will be no menus and the quality should be good but doesn't 'have' to be broadcast quality. As long as it plays in my client's home Blu-Ray player without any problem. It's fine if it just starts playing as soon as they insert the disc. I want to keep this as simple as possible!
This is really important.
IF your sequence was edited at 29.97 then depending on the resolution you might be forced into using interlaced outputs as you cannot use 1920x1080 at 29.97fps in progressive scan. It ain't allowed.
BUT - if you edited at 29.97 then you probably shot at 29.97 as well, so leave it alone unless you want to run the risk of some pretty nasty artifacts from the frame change. This can be done, but is usually expensive to outsource and there are some dreadful pitfalls waiting for you if you try it yourself - I would not recommend this for a beginner, but if you want to get the best results from Blu-ray then you should not be using interlaced footage.
See my other reply for a detailed breakdown on creating & importing assets.
Just remember that in setting up the project your frame rate is critically important and must match your source files. If you shot in progressive (although I cannot think of any reason to shoot progressive at 29.97 as it is not Blu-ray legal) thyen you must excport from Premiere as interlaced - set to upper field first & remember this choice.
Copy link to clipboard
Copied
I edited my post above to add additional information, and changed it some also.
Copy link to clipboard
Copied
Hi Neil;
Thanks for your responce! You've given me some new and valuable info! I
was trying to Export at progressive at 29.97 and then trying to burn a
Blu-ray! Perhaps that's been my whole problem!!!
Part of the problem may also be because I used 3 different cameras to shoot
and was not diligent as to how I had them set since I was under the
impression that Premiere would "take care of everything automatically!"
(foolish me!)
But I did use Adobe Media Encoder to transform the 3 different files to the
same type and was easily able to edit them in PP CC 2017. And the sequence
plays just fine in Premiere, I just need to burn it to a playable disc!
At this point, I just want to get this project done! If it would be easier
to create a standard DVD than Blu-ray, then that's what I want to do! My
client is not fussy at all; he just wants a disc that will play in his home
player. I did shoot it in 1080 but creating a standard DVD rather than
Blu-ray would be fine, especially if it's easier!!! In that case; how
should I have my Export Presets set in Premiere? (for standard DVD)?
Thanks!
Chris
On Tue, Feb 21, 2017 at 6:30 AM, neil wilkes <forums_noreply@adobe.com>

Copy link to clipboard
Copied
chriss95559358 wrote
Hi Neil;
Thanks for your responce!
I really hope you found your answer here and got your project finished.
But, oh...for the love of God...
It is spelled "response"!

 AdChoices