- Home
- Premiere Pro
- Discussions
- Re: Single black frame or frame from previous clip...
- Re: Single black frame or frame from previous clip...
Single black frame or frame from previous clip?
Copy link to clipboard
Copied
First, I'm fairly new to PP and have been using it for about 6 months but have been doing editing for years. I do curation of stock footage though and have done probably 30-40 clips and several 20 minutes YouTube videos in PP so far and haven't had this problem before. I feel like I'm such a newbie that I'm missing something that will be obvious to everyone else, however, in my searching I cannot find anything on the forums that seems to match this exactly. So here's hoping someone can set me straight.
Issue synopsis:
As I said, I do stock footage. I normally grab a section of video that has multiple clips that I will be exporting and dump it into PP, do my color editing, and then hack it into clips that I will then export individually. Usually there are 2-3 clips to export per sequence. This has worked numerous times. This time however, I have a slightly larger clip than usual and after hacking it into 11 pieces, I started marking the clip selection and then exporting. Usually my marker isn't on the first frame so I don't notice anything odd when exporting. It's when I go to upload into my stock system that I see the first frame is black or even worse, the first frame of the clip is the last frame of the previous clip!
Exact method to duplicate issue:
1. Create project setting media files to a separate folder for easy deletion.
2. Import 240fps footage into project.3. Do color editing.
4. Using Razor Tool, cut sequence into clips, ripple delete extraneous clips.
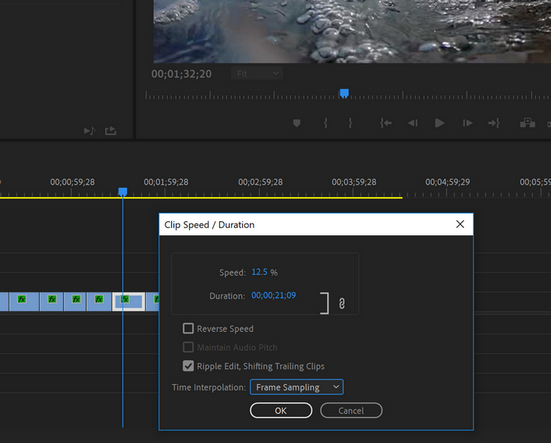
5. Reduce speed on most clips to 12.5% (30fps).
6. Click clip to highlight, right-click marker bar and select "Mark Selection".
7. Click to "go to in" to see first frame is correct.
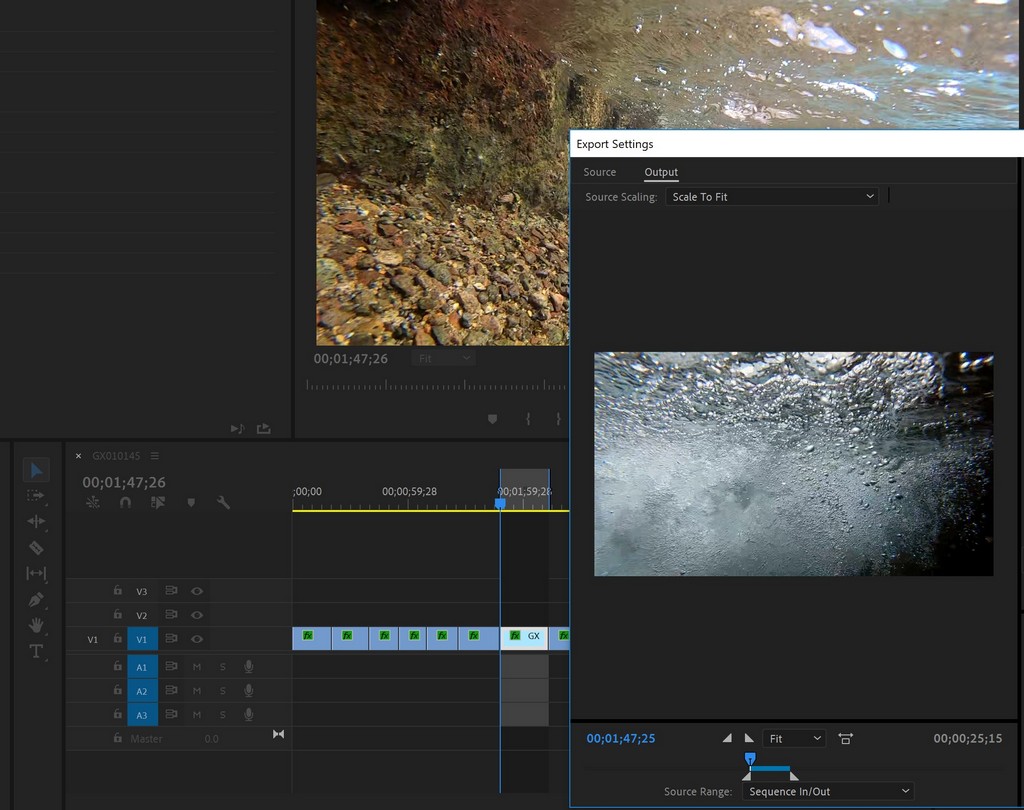
8. Export->Media (Ctrl+M) and see that first frame is now the last frame from previous clip.
9. If exported, the resulting footage will contain that bad frame at the beginning.
See screen shot:

My initial solution is that I have to make each clip a sub-sequence and then export the sub-sequence itself. This is an extra step that seems unnecessary considering this process has worked in the past.
Some notes:
- I am using PP CC 2019 v13.0.2 (build 38).
- The footage is in 240fps from a GoPro - Normally I work with 60fps footage.
- I am creating slo-mo at 30fps of most of the clips.
- If I put the marker on the first frame and then export the clip, in the preview it will show either the black frame or the frame of the last clip.
I've already tried deleting the media/preview files.
I saw something where someone was having issues with random black frames (not my issue) and they were told to set the sequence frame rate before editing. I'll admit that I haven't tried this yet as it wasn't exactly my issue and I didn't want to have to start over on this sequence since I've got about 4 hours in it. (I know I know...)
Thoughts?
-Mike
Copy link to clipboard
Copied
All I can see is the cti in the export settings is not on the same frame as in the timeline.
Copy link to clipboard
Copied
I thought this too, but you don't adjust that until you get to Export settings, correct? By then the issue is already there. I've tried changing it to match (I usually make sure it matches the correct FPS) and then exporting assuming it would fix it, but it doesn't.
I just ran the update to go to v13.0.03. This didn't change anything.... ![]()
Copy link to clipboard
Copied
Can you post a screen shot of your sequence settings?
Is the 240fps source material imported as a 240fps clip?
5. Reduce speed on most clips to 12.5% (30fps).
How are you doing this?
MtD
Copy link to clipboard
Copied
Here you go.
Yes, source is a 240fps clip as shown below.

To change the speed:
I right-click the clip and select "Speed/Duration". Here's a screenshot:
Note: Since I'm doing stock, I delete the audio track completely.
-Mike
Copy link to clipboard
Copied
And your sequence setting are?
MtD
Copy link to clipboard
Copied
Oh! sorry, I misunderstood... here:

Since you said this though, I got to thinking that maybe I should be setting the timebase here to what I expect to use for an FPS? I was under the impression that this should match the source. But I just hit up YouTube and saw someone recommending that it match the FPS of the clips I'll be editing.
The issue I had with this clip is that some of these clips are 30fps, and some are 60fps... Would I need to create separate sequences for each or at least know that I'll have to make a sub-sequence so I can export correctly?
-Mike
Copy link to clipboard
Copied
1) I had no idea that Premiere would create a sequence with a timebase of 239.71 fps. Thought the upper limit was 60fps. Learn something new everyday.
2) If it were me - since you seem to be using sources with a variety of frame rates - I would create a sequence with the frame rate set to the frame rate I wanted to export in.
Then I would interpret the frame rate of the 240fps footage to that frame rate using Clip > Modify > Interpret Footage to that same frame rate ( the clip will now play in slow motion).
You can try creating a new sequence with the preset frame rate, then copy and paste the selected footage from your existing sequence into the new sequence and adjust the speed of the clips as needed - and see if that gives you the results you expect.
MtD
Copy link to clipboard
Copied
Thank you! You've given me some ideas to try. You have no idea how hard I searched for answers and I'm a tech guy with pro Google skills! LOL
I'm suspicious that you're right on this. I'll report back if I figure anything out!
Copy link to clipboard
Copied
You could start small and just make a test sequence with a couple of clips to verify the workflow works for you.
MtD
Copy link to clipboard
Copied
Hey have solved this problem ? I have been facing the same issue, it's very annoying.
Copy link to clipboard
Copied
Hey I'm still having the same issue. Premiere adds a single black frame at the begining of the exported video UNLESS you're at 00:00:00:00 in the timeline. The only way to "solve" this is to set your in point at the 2nd frame of your video, so it will export adding the previous frame to that, but this is really unproffessional. DO SOMETHING, ADOBE.
Copy link to clipboard
Copied
I am guessing the vfr is the culprit.
Copy link to clipboard
Copied
this is still an issue. no vfr on my timeline
Copy link to clipboard
Copied
Problem Resolved, It was occurring because of the wrong timebase in Sequence Settings.
Copy link to clipboard
Copied
Years later, STILL have the issue. Exactly the one described in the original post here above. All my clips are at 30fps, sequence as well, so it's even a "simpler" case, still does it, first frame is black or the previous clip. Any solution ?
Copy link to clipboard
Copied
And let me guess, as you didn't provide any useful details (which are always necessary for troubleshooting!) ... your media on that timeline is mp4/H..264/5, right?
Copy link to clipboard
Copied
Sorry yeah not sure which details are useful as I could provide pages of them.
Footage is MOV
Color Space: Rec. 709
Video Codec Type: HEVC 10 bit 4:2:0
Export settings don't really matter cause that bad frame appears right away in the export window regardless of the export settings
Copy link to clipboard
Copied
Typically for troubleshooting, the entire computer specs (CPU/RAM/GPU/drives) and the specific program version, plus specific media and effects in play are required.
In this case, I was assuming it was H.264 from your complaint. Because of the nature of long-GOP media.
Why? Well, the first frame of those clips isn't the first frame of that clip Premiere needs to make. It has to start at the previous iframe ... the previous complete frame of video ... recreate every frame up to the first frame on that sequence from simple pixel by pixel datasets referencing typically both iframes before and after that frame ... and then it has that first frame to use in the export.
If something goes funky in the processing, then ... funkiness prevails.
Total intraframe media ... like ProRes, Dnx, Cineform, will not have that problem because every frame is a complete image frame, in and of itself. Not the interframe mess of a complete frame, then a bunch of "frames" that are only datasets of the pixels that have changed or will change by the next iframe.
Rendering that sequence prior to export might help.
Copy link to clipboard
Copied
Unfortunately I do not understand what you are talking about, thank you though.
Also for the ones having the same issue, a work around I finally found is to go on the sequence settings, and display format : Non Drop Frame Timecode. Seems to take care of that first frame issue.
Copy link to clipboard
Copied
Let us know if that solution keeps working for you. Many of us use NDF timecode, but not to fix issues. Cheers!
Copy link to clipboard
Copied
If you're dealing with long-GOP media, the H.264 and HEVC/H.265 mp4 files, you really should get a basic understanding of that format. It's a heavily used capture format, because specialized chips in the cameras can cut the data down dramatically yet leave a file that can mostly be re-created in post.
But because of the way it works, it's a mess in any major pro editing program. Unless ... you've got specialized chips in your computer to help. Then it's not as bad a thing to work with.
As I said, and it's kinda simple, it creates an iframe every so many 'frames' of camera media. That's a frame that is a complete image in and of itself.
But between iframes, it only writes to the card a dataset chart essentially, of the pixels that have changed since the last iframe, or the next iframe, or both. There isn't an actual frame of image data, just a chart of pixel changes.
That's why, to display most any frame of that clip, it has to first find and process the iframe before that frame, and the one after, and then recreate the entire set of frames .... store them ... then do playback of that section of the video.
It's a hardware slog.
So look up long-GOP online.
