Copy link to clipboard
Copied
Hi guys, I love the effect used on this video:
Coldplay - Hypnotised (Official Video Cover by Sam Itani) - Kaleidoscope New EP Album - YouTube
I always use Lumetri presets in my video but I can't seem to find anything like this: any suggestions for presets I can import to get this effect?
 1 Correct answer
I made a screen-grab of a stopped-frame playing this on my reference monitor. Then imported that into PrPro, went to the Color Workspace, dropped the clip on the "new item" icon to make a fresh sequence, then looked at the scopes. The scopes are the key ... the Mark I Eyeball is not a good instrument for that much in colorist work!
Here's the frame I grabbed ...
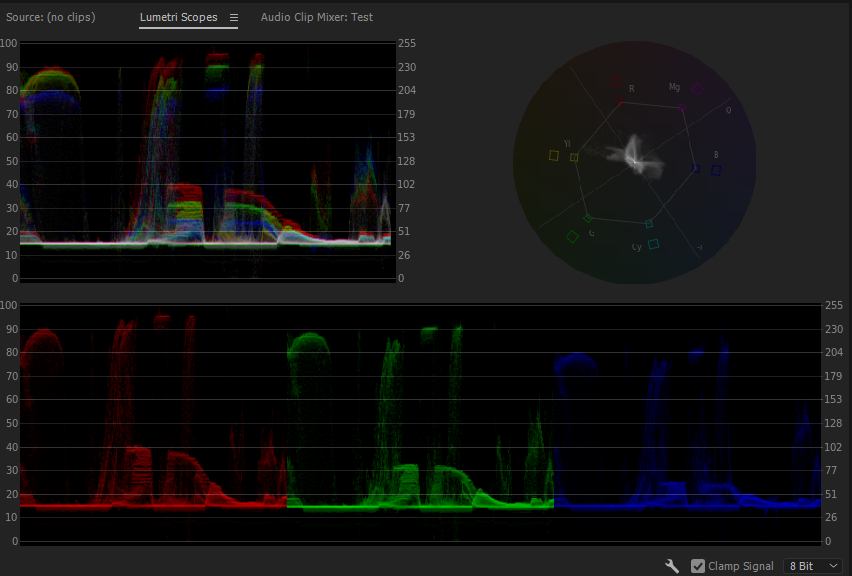
And here's the scopes ...

Note something about this? Or several things, really ... first, the image appears to the eye to have a lot of sa
...Copy link to clipboard
Copied
Not sure what you mean by "this effect".
Are you talking about the general grade on the singer, or the way they mix opacities to sort of "ghost" a pair of video tracks together?
Neil
Copy link to clipboard
Copied
You're right: it was a biut ambigous. I'm talking about the general grade. For the video tracks I guess it's just enought to experiment a bit with the blending modes. But the grade ... I find it magnificient ![]()
Copy link to clipboard
Copied
You need to craft the grade your self and not rely on instant fix eg Lumetri Presets.
Study the reference and analyse what it is eg the blacks are crushed.
Where are the mid tones, where are the highlights....
The Blend Mode is likely to be Screen with various Opacity parameters
Copy link to clipboard
Copied
This is a possibility, thanks. I could try and see what happens ...
Copy link to clipboard
Copied
I made a screen-grab of a stopped-frame playing this on my reference monitor. Then imported that into PrPro, went to the Color Workspace, dropped the clip on the "new item" icon to make a fresh sequence, then looked at the scopes. The scopes are the key ... the Mark I Eyeball is not a good instrument for that much in colorist work!
Here's the frame I grabbed ...
And here's the scopes ...

Note something about this? Or several things, really ... first, the image appears to the eye to have a lot of saturation, but it really is moderately low for sat ... the Vectorscope YUV shows not hardly anything except for some skin tones (and maybe that yellow wall) past the middle of the way out to the outlined "limit".
It's the contrast that's the big thing here. Look at the middle of the RGB Parade scale (bottom one) or the Waveform upper left. Note how there's almost nothing in the mid-tones, the area between 40 and 60? Almost all data has been pushed up above 65 ... or pulled down below 40. Really strong contrast moves there.
Yet ... look at the tops & bottoms ... nothing is actually clipped (pushed above 100 on the left-side scale numbers) nor even crushed at the bottom ... for all they've stacked a ton of detail at the bottom, it's all at what, 15? Now, this part could partly be seen as the 16-235 scale of some old-style codecs from 'tape' broadcast days ... but the tops do go up to the mid 90's, so I'm thinking this is more likely a choice of the grade.
You would use perhaps the Color Wheels or adjust the Curves section for this ... I'd find the Color Wheels my choice, but some would just grab the white "luma" curve and play. Whichever floats your boat.
After doing that, I'd go to the HSL Secondary, and key for the skin ... and then apply a blur by lowering sharpening and maybe lower contrast in the skin tones also. Sharpen a moderate bit down, contrast just a titch down.
You might be able to get pretty close in one "pass" of Lumetri, though it might take a second to really get the finished look you want. I think it's quite do-able.
But personally, for something pushing data this far, I'd normally head to SpeedGrade, though it does take some learning and practice to use. Bummer they removed the Direct Link connection so you can't just bop from PrPro to Sg like before. I'm using Pat Zadrobilek's awesome (and inexpensive!) app PrPro-BCC from his Ntown site to auto-convert a 2017 project file (the prproj file) which works by changing one character (a number) so that Sg2015.1 can "see" this as a proper PrPro file to work ... and after saving my work, wash the prproj file back through PrPro-BCC to up-convert it back to a PrPro 2017 file. It works great with PC's but isn't Mac-available. There's a manual hack available that worked in PrPro 2015.3/4 but some users can't get it working in PrPro 2017.
Here's a SpeedGrade forum thread concerning the Ntown app ...
Update: My little Speedgrade/Premiere Project Converter still works with 2017
And here's a thread of the manual 'hack' with sections for both Mac & PC.
Direct Link manual Hack for PrPro 2017/SpeedGrade 2015.1
Neil
Copy link to clipboard
Copied
After further looking at the scopes, look at the Vectorscope ... see the way there's a cluster of image toward the red target, and another toward the blue, with a smallish one towards yellow that then has very faint extension out towards the yellow target, farther out to "saturated" than anything else.
My guess is they pulled the skin and nearly everything else of the yellow-orange/orange are where skin "lives" over to red and probably moved some of the magenta hues towards red also, which would require a pretty decent secondary or two for the most part. And secondary or two to pull all the greens and cyans to blue.
You can do that with secondaries, but admittedly Red Giant's Colorista plugin has a hue/hue control, it's a circle like a color wheel, with dots for each of the six hues of primary/secondary tones. You can just grab a dot and move it "in" to the center to de-saturate some, and to any other hue to re-set the selected hues to something else. So ... you can grab say the cyan dot and move that over to blue, and now all the cyans are shown as blue. It's handy, as you can shift tones in a way that would take several secondaries to do the same thing.
Neil
Copy link to clipboard
Copied
It could be Magic Bullet Looks. Buy Red Giant Magic Bullet Looks | Download the free triall
The nice skin tone could be Magic Bullet Cosmo layered in. Buy Red Giant Magic Bullet Cosmo II - Download the free trial
Copy link to clipboard
Copied
This one looks great: not cheap, though ... Guess for that quality you must be ready to shell some bucks ... I guess there are no cheaper alternatives ?
Copy link to clipboard
Copied
You should be able to reproduce that look within Premiere itself. It has the tools you need for primary and secondary colour correction. Instead of just using a preset, dive a bit deeper into the Curves and Color Wheels on offer, and start going nuts with those crushed and tinted highlights and shadows.
The Hue Saturation Curve Wheel that they have is pretty handy tool for quickly doing some secondary colour work.
If you want to put in extra work on the face/skin, like perhaps applying a little blur or other effects, you could try to pull a color key to isolate the skin and then work on that as a separate track.
If you have access to SpeedGrade, it has a pretty useful Shot Matching feature, which generally gets you more than halfway there most of the time. Would love to see this feature make it into Premiere soon.
Copy link to clipboard
Copied
Hi Antonio D,
antoniod19097390 wrote
Hi guys, I love the filter used on this video...
Some great info here. I hope you are getting some good details from Neil.In Adobe land, we refer to these as "Effects" not "Filters." "Filters" (a term originating in Photoshop) refer to destructive effects, while "Effects" are non-destructive. A small point I thought you might want to be aware of.
I changed the title of your discussion to reflect that.
Thanks,
Kevin
