 Adobe Community
- Home
- Premiere Pro
- Discussions
- Re: Brown Spot on Face - How to Remove?
- Re: Brown Spot on Face - How to Remove?

Copy link to clipboard
Copied


 1 Correct answer

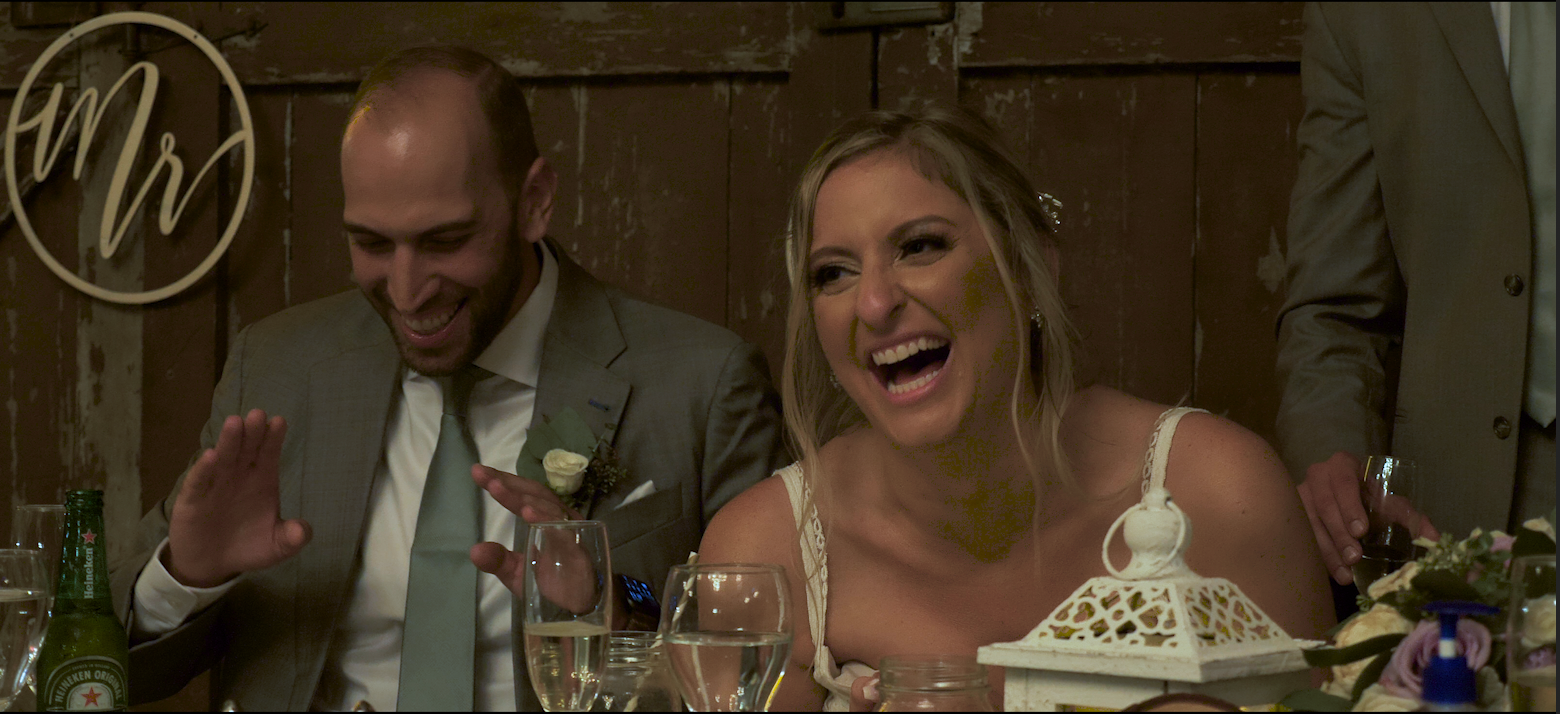
[Edit: reworked, getting down to one instance of Lumetri.]
Ooh, that's a nasty out-of-gamut situation there. Note the Vectorscope YUV of the original showing the spike and ghosting out-of-limit over the Yellow graticule?
So ... first thing was attempt a curves change with the Hue V Hue to bring the color back in, but ...it wasn't working. Too much "outside of gamut" ... so I went down to the Sat v Sat curve, did this ...

After doing that, watching the vectorscope while setting it, I went to
... 4
Replies
4
4
Replies
4
Copy link to clipboard
Copied

Copy link to clipboard
Copied
[Edit: reworked, getting down to one instance of Lumetri.]
Ooh, that's a nasty out-of-gamut situation there. Note the Vectorscope YUV of the original showing the spike and ghosting out-of-limit over the Yellow graticule?
So ... first thing was attempt a curves change with the Hue V Hue to bring the color back in, but ...it wasn't working. Too much "outside of gamut" ... so I went down to the Sat v Sat curve, did this ...
After doing that, watching the vectorscope while setting it, I went to the Hue V Hue curve, grabbed an eyedropper in a couple places, but the one that seemed to allow best selection was down on her neck actually. So watching the vectorscope some but mostly the image, adjusted the Hue V Hue curve to this ...

Which is better but not great. So I went to the HSL tab, grabbed an eyedropper of her lower neck area, and worked the Hue selection alone to get the most of her affected skin tones, then turned Sat key back on adjusting until I kept the Hue data but got rid of much of the rest of the image, then turned on Luma key and again, worked to get all the Hue data selection from above but eliminate as much of the rest of the image as possible. I tend to work keying with the color/gray mask on. Gray will be unaffected, color area is where any changes will be applied.

Then turning off the mask, I worked with the Shadows wheel, slightly lightening the selection and pulling it towards blue, watching both the vectorscope and image as I did so, to simply minimize as much as I could without making it weird. Then I pulled a little contrast out of the selection, trying to again just minimize notability of it.

And here's the final, the image taken from my reference monitor ... not perfect, but a lot better. Less noticeable, which is often about the best you can do.

Neil
Copy link to clipboard
Copied
Neil,
What an INCREDIBLE RESPONSE! THANK YOU!
Copy link to clipboard
Copied
You're most welcome of course. I love working with tricky color issues. Now, the best way to handle these sorts of things is to avoid them whenever possible. But with the variety of odd lighting you can get these days, in venues you have to work in, you can't always even have a clue some stupid bulb is going to put parts of the image out of gamut.
You want to capture without too much saturation, but you don't want to dial it all out either, as forcing added sat in post can give artifacts too. But even doing the best you can with tons of experience behind you, working weddings can get you quite a pickle like this one.
Neil

 AdChoices