Participant
April 17, 2010
質問

How to Step and Repeat around a circle or radius

  • April 17, 2010
  • 返信数 7.
  • 94229 ビュー

For those looking for the simplest way to create multiple shapes evenly (equally) spaced around a center point, here's the only solution in Illustrator.

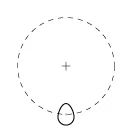
1. Begin by drawing two intersecting guidelines, centered on your page. Turn on Smart Guides (CTRL + U) so you can make sure you are aligning the finished product.

2. Draw the object you want to use. Center the object on the guidelines.

3. Drag the object away from the intersecting guidelines.

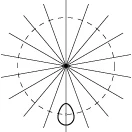
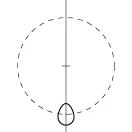
4. Draw a vertical line along the guideline.  Make sure that it extends through your object.

5. Decide how many objects you want to create.

6. With the vertical line selected, double-click the Rotate tool (Object > Transform > Rotate...).

7. From the chart at the left, select the angle associated with the number of objects you want.

8. Enter that number and click the COPY button.

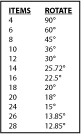
9. With the new line still selected, hit CTRL + D to repeat the duplicated line until it repeats completely around the circle.

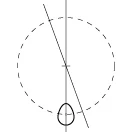
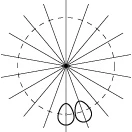
10. Select the object. (Make sure Smart Guides is ON).

11. Click the Rotate tool.

12. First click the intersection of the guidelines to establish the rotation point.

13. Select the center point of the object and hold down the ALT key to move and duplicate the object.

14. Move the object until it intersects with the next line. You'll see Smart Guides say "Intersect".

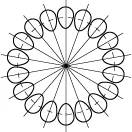
15. Hit CTRL + D to duplicate the objects around the radius.
16. Delete the lines.   You're DONE!

    このトピックへの返信は締め切られました。

    返信数 7

    Participating Frequently
    November 8, 2015

    I really like the suggestions that are non-destructive and permanent. Keep them coming folks!

    lorevidela
    Participant
    June 10, 2015

    And what about distribute objects evenly around an oval?

    Monika Gause
    Community Expert
    Community Expert
    June 10, 2015

    There are plugins, scripts or the blend function for the oval thing.

    lorevidela
    Participant
    June 10, 2015

    Thank you Monica! I found the way to do it by creating a pattern brush. It worked! It's easy and quick...

    Joe Paris
    Participating Frequently
    September 21, 2010

    GRW1444,

    Even though there are many solutions, not just one, I'm wondering why you are complicating yours by drawing/rotating/deleting lines when all you need do is rotate the shape around a pivot point and then repeat Ctrl+D?

    September 21, 2010

    Except for "simplest" and "only," GRW is exactly right. On those two words, he was just kidding.

    Participant
    September 21, 2010

    This is the ONE thing that bugs me about illustrator. In Freehand you had the chance to change the number of objects in a blend after creation, then apply that editable blend to any path, closed or not.

    If this could make its way into the next illustrator I for one would be VERY happy!!!

    Larry G. Schneider
    Community Expert
    Community Expert
    September 21, 2010

    Object>Blend>Blend Options will allow the change in a number of objects in an already made blend. Just select the blend and follow the path indicated.

    JETalmage
    Inspiring
    April 17, 2010
    ...the simplest way...the only solution...

    As you can already see, certainly neither the "only" nor the "simplest"; just arguably the most laborious.

    This is a very common topic in this fourm, and has been repeatedly explored ad nauseum.

    JET

    Inspiring
    April 17, 2010

    Not really the only waythoughtis a good way

    you can also do a blend and then make an ellipse cut the path of the ellipse and use the replace spine command. the two end objects will overlap but one could expand the blend and remove one.

    Like such:

    Jacob Bugge
    Community Expert
    Community Expert
    April 17, 2010

    GRW,

    here's the only solution in Illustrator.

    There is (almost) always more than one solution.

    Another one, or two:

    1) Draw the object and place it somewhere appropriate (maybe at a certain distance below the lower left corner of the Artboard X=Y=0);

    2) Draw a no fill no stroke circle with a centre appropriately aligned with the object (such as X=Y=0) and a diameter large enough for it to enclose the object, group with 1) or just select both;

    3) One of the following performed on 1)+2):

    3a) Object>Transform>Rotate inserting 360/N, where N is the number of items round the circle, repeat (Ctrl/Cmd+D) once less (delete the circles if desired);

    3b) Effect>Distort & Transform>Transform, rotate similarly  with one copy less (this requires grouping); Object>Expand Appearance  if desired to have independent separate objects.

    Some of the angles in the table are approximations and therefore inaccurate; 360/N is accurate.

    A new Circle Thread is born.

    Who is next?