

- Home
- Premiere Pro
- Discussions
- Re: Adobe Premiere Green screen - green around mo...
- Re: Adobe Premiere Green screen - green around mo...
Adobe Premiere Green screen - green around moving hand

Copy link to clipboard
Copied
Hi
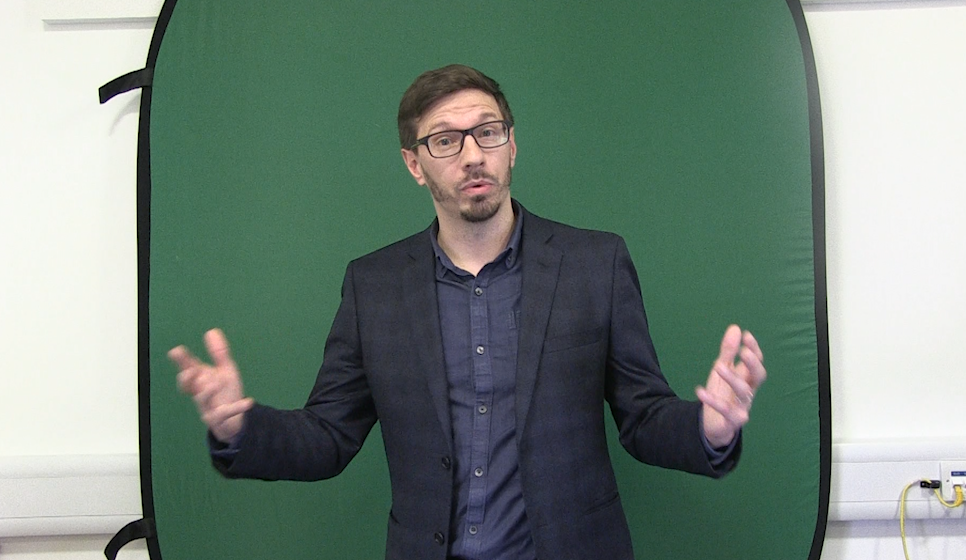
I'm tried to edit some footage, shot against green screen. Green screen removed fine but the person talking is very active with his hands causing and area of green to be associated with the motion. Can anyone advise how I remove this or at least make it less visible?
Many thanks in advance,
Kim


 33
Replies
33
33
Replies
33

Copy link to clipboard
Copied
Please provide a still frame grab showing the issue, perhaps with and without keying applied. Also, do the Sequence Settings match the source video? If you are inadvertently changing the frame rate or something, that can make things worse.
Thank you
Jeff
Copy link to clipboard
Copied
Thanks Jeff 🙂
Copy link to clipboard
Copied
The pics are very helpful. Not all green screens are created equal - yours looks very dark, and a brighter more saturated green is going to work better. I actually use a bright green sheet from a fabric store. Almost a neon green. I also do have a pop-up like yours and it just doesn't work as well. Chroma Keying works off the color value of the pixels and the dark green just doesn't given enough saturation value to the pixels to set them apart from the foreground subject.
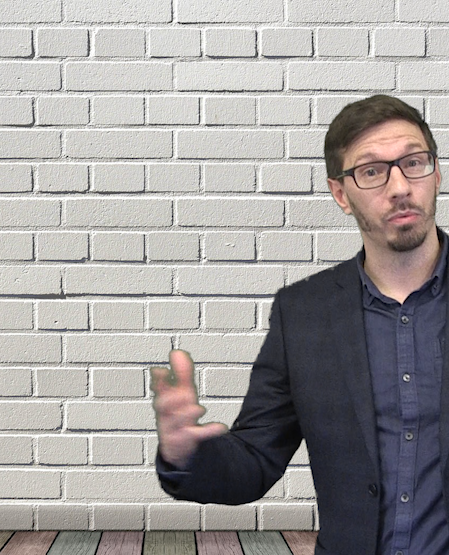
If you look at talent's right shoulder and arm, it's not really a good key, has chunks missing. Just more apparent on the hand due to motion.
What are the camera recording settings settings, for instance 1080i, 1080p30, 1080p60? And recording to what format, like AVCHD or?? You will get best results recording to a 4:2:2 format versus 4:2:0 which records less color information in the signal. Some cameras will offer both recording modes. What model are you using? You want to at least use the highest quality, highest bitrate record mode you can to give you an edge with the keying.
One will usually get a better keying result recording progressive (1080p etc) versus interlaced (1080i).
Of course, lighting is the most important factor in getting a great key result.
I'd definitely try a different background for starters though. The pop-up is convenient, but that shade of green is not helping you one bit.
Thanks
Jeff
Copy link to clipboard
Copied
Thank you SO much for your excellent detailed response I cat tell you how helpful you've been! In terms of the green screen I've just placed an order for this so fingers crossed! https://www.amazon.co.uk/ESDDI-Lighting-Adjustable-Background-Continuous/dp/B0799BM4HK/ref=sr_1_12_s...
My bit rate resolution is set to: 35 Mbps 1920x1080
I'm using a Canon XF105
Frame rate: 50i
MPEG-2 MXF (Media eXchange Format)
🙂
Copy link to clipboard
Copied
Now that's the bright green I'm talking about, yes!
Looking at online specs for the XF105, it does record using 4:2:2, so that's a real plus not found on many cameras!
However, I would recommend bumping recordings up to the 50Mbps settings, and using 25p or even 50p if available, which should provide better results than interlaced 50i. Without getting too technical, each "frame" of interlaced (1080i/50) video is split into two "fields", one made of the even-numbered scan lines and the other the odd-numbers. And a small amount of time elapses between each field being captured, so when the subject is waving his hands, the hands will be in two different places in the two fields therefore adding to a motion-blur type of issue which does not help the keying.
By recording 25p or 50p, each frame of video is captured all at once. Interlacing is just an undesirable thing we are stuck with from decades ago when CRT TV displays required that kind of technology because they couldn't handle a progressive signal. And if your video is destined for online/computer use, that MUST be progressive anyway, so why start with interlaced? Just create an all-progressive workflow and get away from interlaced if you can.
No need to read all the text, but check this link Interlaced video - Wikipedia and find the image of the car wheel to see the results of interlacing. Then understanding that keying must try to define a clean edge between the foreground subject and green background...how can it do that when hands/fingers are in two places at once with combing effects between them?
Also, very important - make sure the Sequence matches the footage, mentioned earlier. Easiest thing is to drag a clip onto a blank timeline sequence and it will match the settings for you. Or right click a clip in Bin and choose New Sequence from Clip.
Thanks
Jeff
Copy link to clipboard
Copied
A few more tips:
Position subject farther from background. You can't right now due to screen size, but try for like 3 feet at least (1m).
Light green background and subject separately. You want the green color to be even, not shadowed from bright to dark in areas (such as behind talent's elbows/lower torso). Note that it's possible to over-light the background - it does NOT need to be real bright, just evenly lit. Too much light and green reflects onto talent causing more issues, green reflections spill onto head and shoulders and messes up the keying.
If you can get a small soft light positioned from above and behind talent, that will keep edges of head and shoulders from being dark/shadowed which tends to blend into background and does not provide a sharp contrasted edge for keying.
Use MANUAL focus on camera so it never hunts when subject moves.
Use MANUAL exposure, and disable/turn down GAIN. Seems to be grain in sample image. Grain is going to mess with the keying, you want the image as clean as can be to start with, no noise. Sometimes going a stop or two lower on exposure than AUTO wants to do helps. If talent and/or background is too bright, not good for keying.
MANUALLY white balance your camera to get truer colors and avoid/minimize need for color correction, this also helps get the best keying.
Try to experiment and get the workflow dialed in before talent arrives to cut down on setup time and avoid re-shoots.
Good luck!
Jeff

Copy link to clipboard
Copied
everything Safe said is true and important. especially about lighting screen separately and moving subject further away from that green 'background' so you can light them separately. That means the screen would be wider so you can fill the frame better and you ordered stuff to make it easier to do that.
One thing people sometimes do, for a cleaner key ( chroma key which makes a mask with an alpha channel so you can drop in your new background later ) is to shoot vertical frame. Sounds weird but you get better key that way sometimes, cause your subject fills up the frame more. Look at all the wasted space to the left and right of you horizontal frame. If you key using a vertical frame ( get more of the subject in frame ) you can rotate that in post 90 degrees, scale it down to match your other footage, and it works well for a cleaner key in that situation.
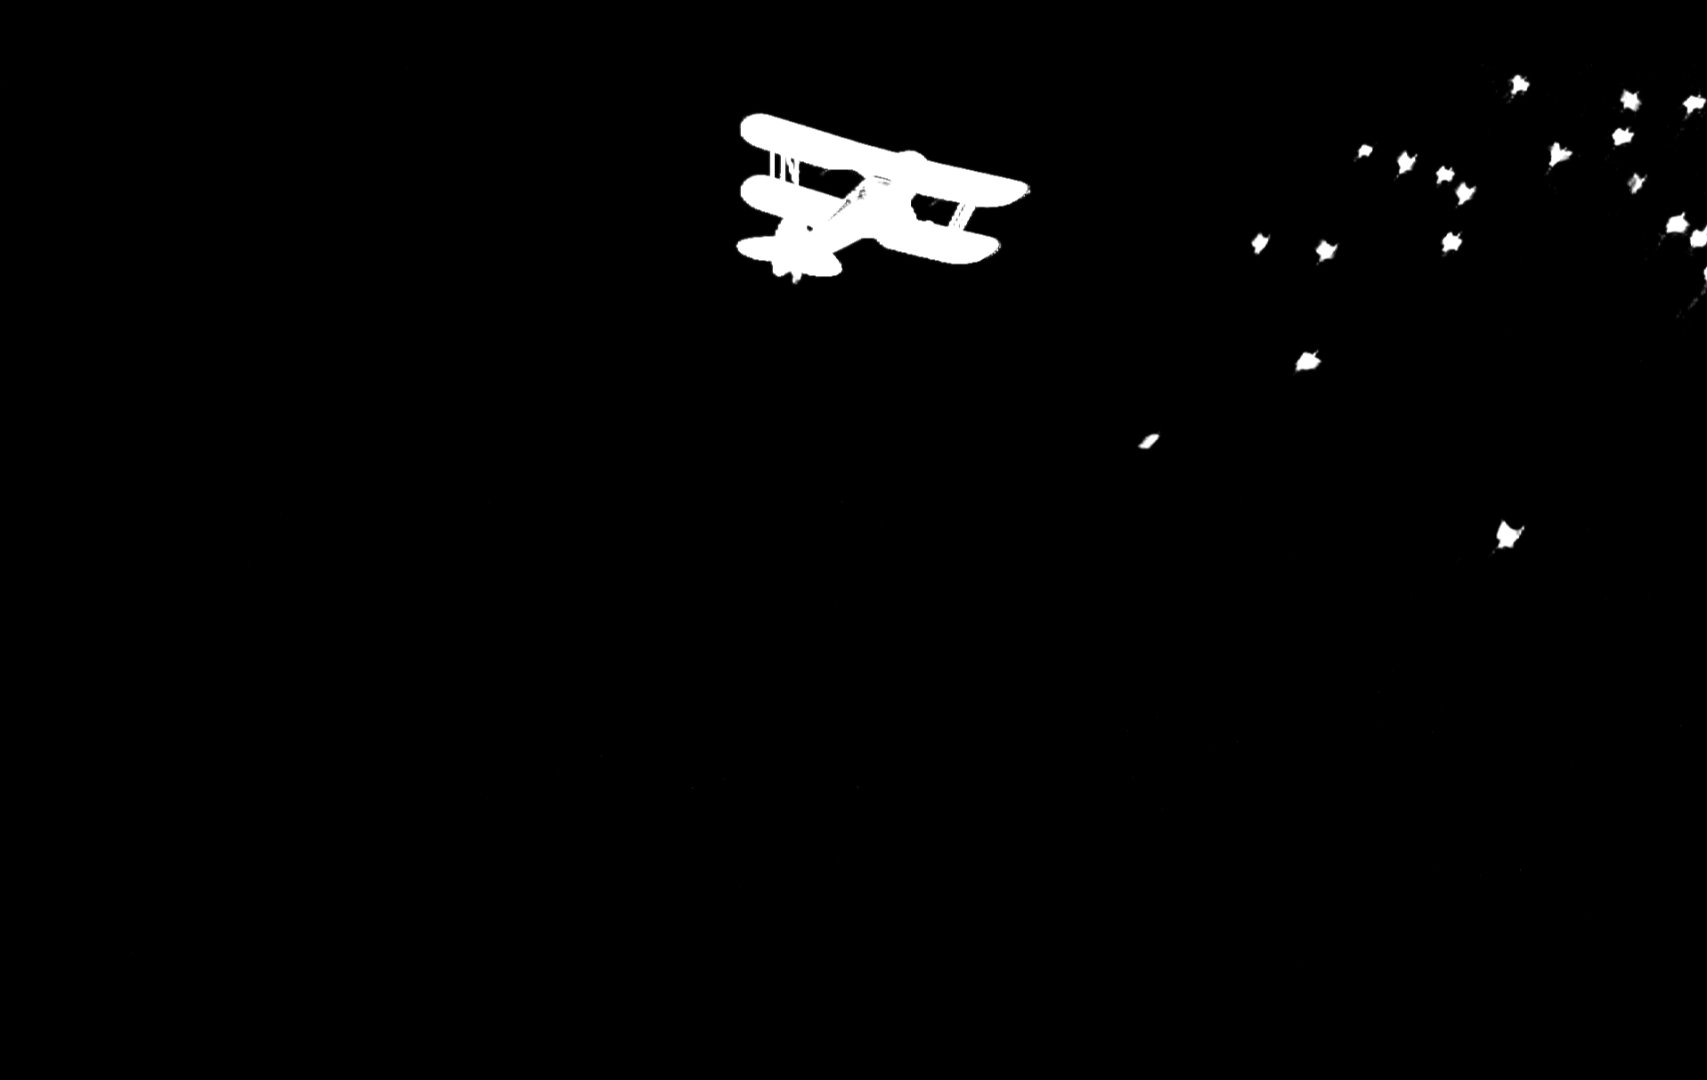
A key makes a mask. Like this... with white and black denoting the mask properties. IN the case below the white stuff will be influenced by color adjustments etc.. while the black stuff is unaffected. That black stuff in essence is your alpha channel. To drop your background into it you may have to invert that, but that's done automatically for you with PPro when you use the chroma key stuff. The main thing is to look at the mask and how CLEAN it is... no speckles of white stuff in black area, very sharply defined lines around the white objects. There are tools in AE to clean up keys like this, and AE is the best place for adobe users to make 'composites' using keys.
you are on the right track and doing well, and it's really cool that you are shooting nice stuff.. so good luck and keep it up !
: )
Copy link to clipboard
Copied
what's the difference between how green and blue screens are used today making movies and dropping background stuff into the alpha channel during a " live " broadcast" or " Movie" ???
The reason those two chroma key colors exist is important re: how it is handles with live broadcast TV ( like a weather map that gets put behind your favorite morning weatherman ) or making moves with computer generated or other type clips.
The cool thing is that it can be done LIVE. On the set of Pan Am TV show ( which I liked working on as a dolly grip ) it was possible to shoot and composite LIVE because the computer visual special effect guys were on set and could 'drop in' the stuff AS WE SHOT...
It was just to get an idea sometimes ( cause final tweaking of rotoscoping masks would be done fast in post later on ) .. but the basics were there to see LIVE, as you shot ( with video tap on pro cameras ).
Pan Am - Video scenes and visual effects (Exclusive) - YouTube
In essence that's what you want to be clean.. the key … and the masks … and AE is your best bet for this.
But the point I'm making is.... you don't need chroma key to make masks for what you are doing... not really.. you can make the same mask by just sampling a range of colors and making it that way... as long as that range is at least close in hue chroma luma etc...
That's how your new lumetri can do curves based on 'hue v saturation' and so on...
You see that the new thing you ordered with green screen also has white and black. … not blue.
The more you learn the more fun you'll have …. trust me.. it's very cool what we can do at home on small computers and CC stuff.


Copy link to clipboard
Copied
Hi Kim,
All those things will help you pull a better key, I just want to add that the specific problem is motion blur caused by a slow (or "cinematic") shutter speed. Check out this video (starting at 3:32) for a demonstration: Better Green Screen Tips! - YouTube
And this one at 13:08: BASICS OF GREEN SCREEN - Everything You Need To Know - YouTube
You can add motion blur back within After Effects or Premiere after you key the footage. Here's an example from a project I did several years ago adding motion blur in After Effects: Moving boxes animation - YouTube
I haven't tried this one, but here's an example how to do it in Premiere: 100% Real Motion Blur in Adobe Premiere Pro - YouTube
I hope that helps you for future shoots. For footage that has already been shot, you'll need to get into After Effects and use some 3rd party plugins to attempt to clean that up. greenscreen motion blur fix - YouTube
Hope that helps and good luck!

Copy link to clipboard
Copied
I agree with what texasbelch has posted; it's a tricky key. You probably need to isolate the hands and use a more aggressive spill suppression and edge correction for that layer, and use a milder key for the rest of the head and torso. Something like this:
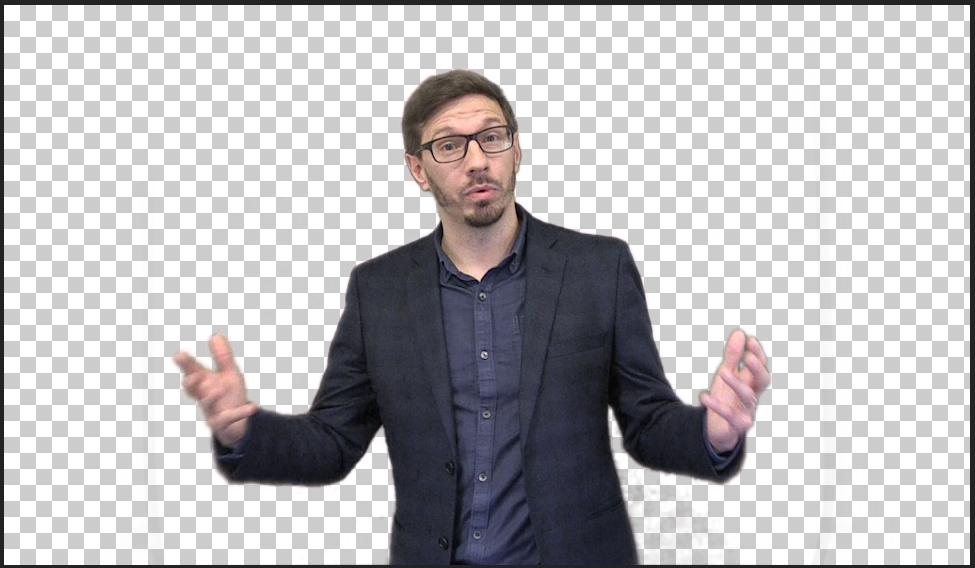
It obviously still needs work, but if you use a similar setup, in conjunction with a background colour that works with the key well, it might be ok.
This was done in After Effects using Keylight. I've uploaded the project file here:
Copy link to clipboard
Copied
WOW Thank you to everyone who has contributed to this discussion, I'm working my way through each point one by one so I understand everything.
I've only done a tiny bit of recording in the past and only ever used this camera once before so just from reading the above I have larnt so much!
🙂

Copy link to clipboard
Copied
Don't think you will be able to fix that: too much motion blur.
I would settle for a greenish background.
Copy link to clipboard
Copied
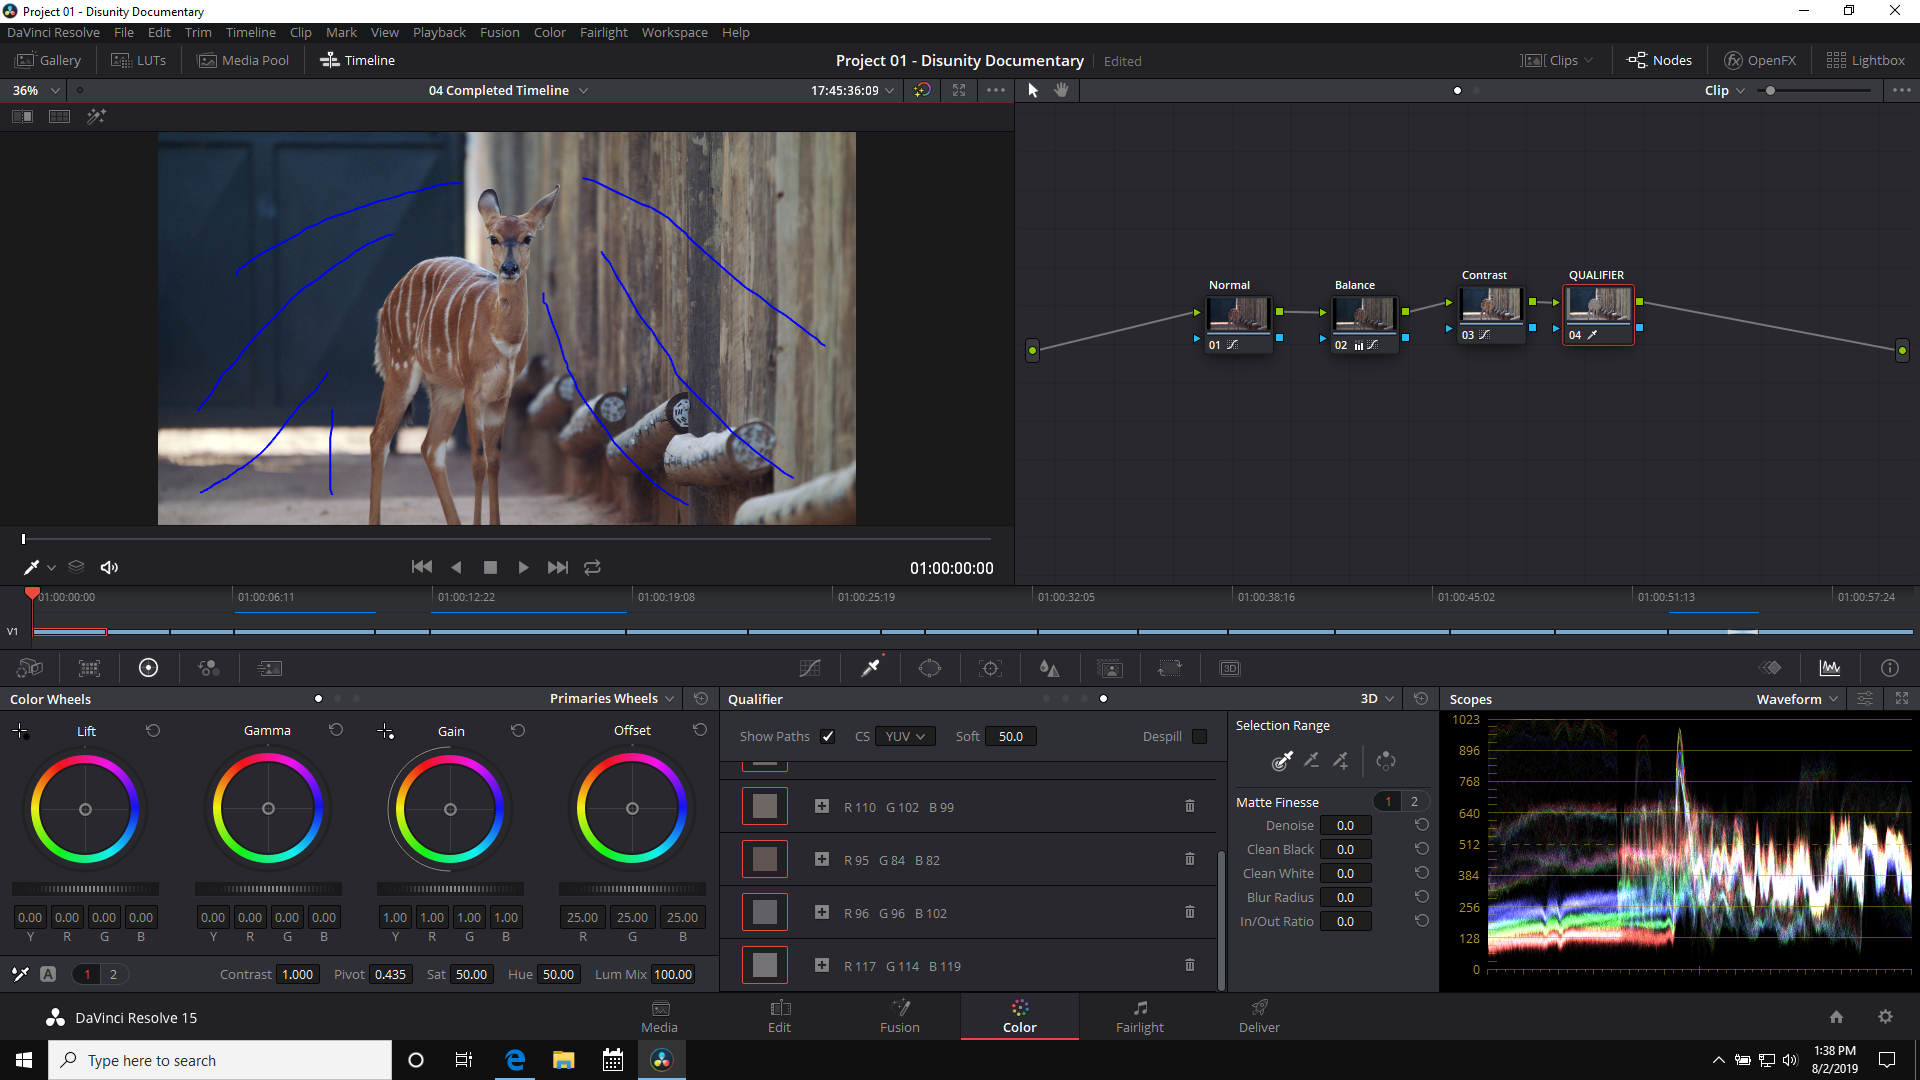
I disagree, but I'm using resolve now instead of CS6. Even without going to fusion I could fix that. 24fps is normal so it's not blur, it's the 'key' ( adjustments via simple )
example....
animal with all colors ( no green screen ) selected by a 3d qualifier tool.. ( range of color = each blue lines )…
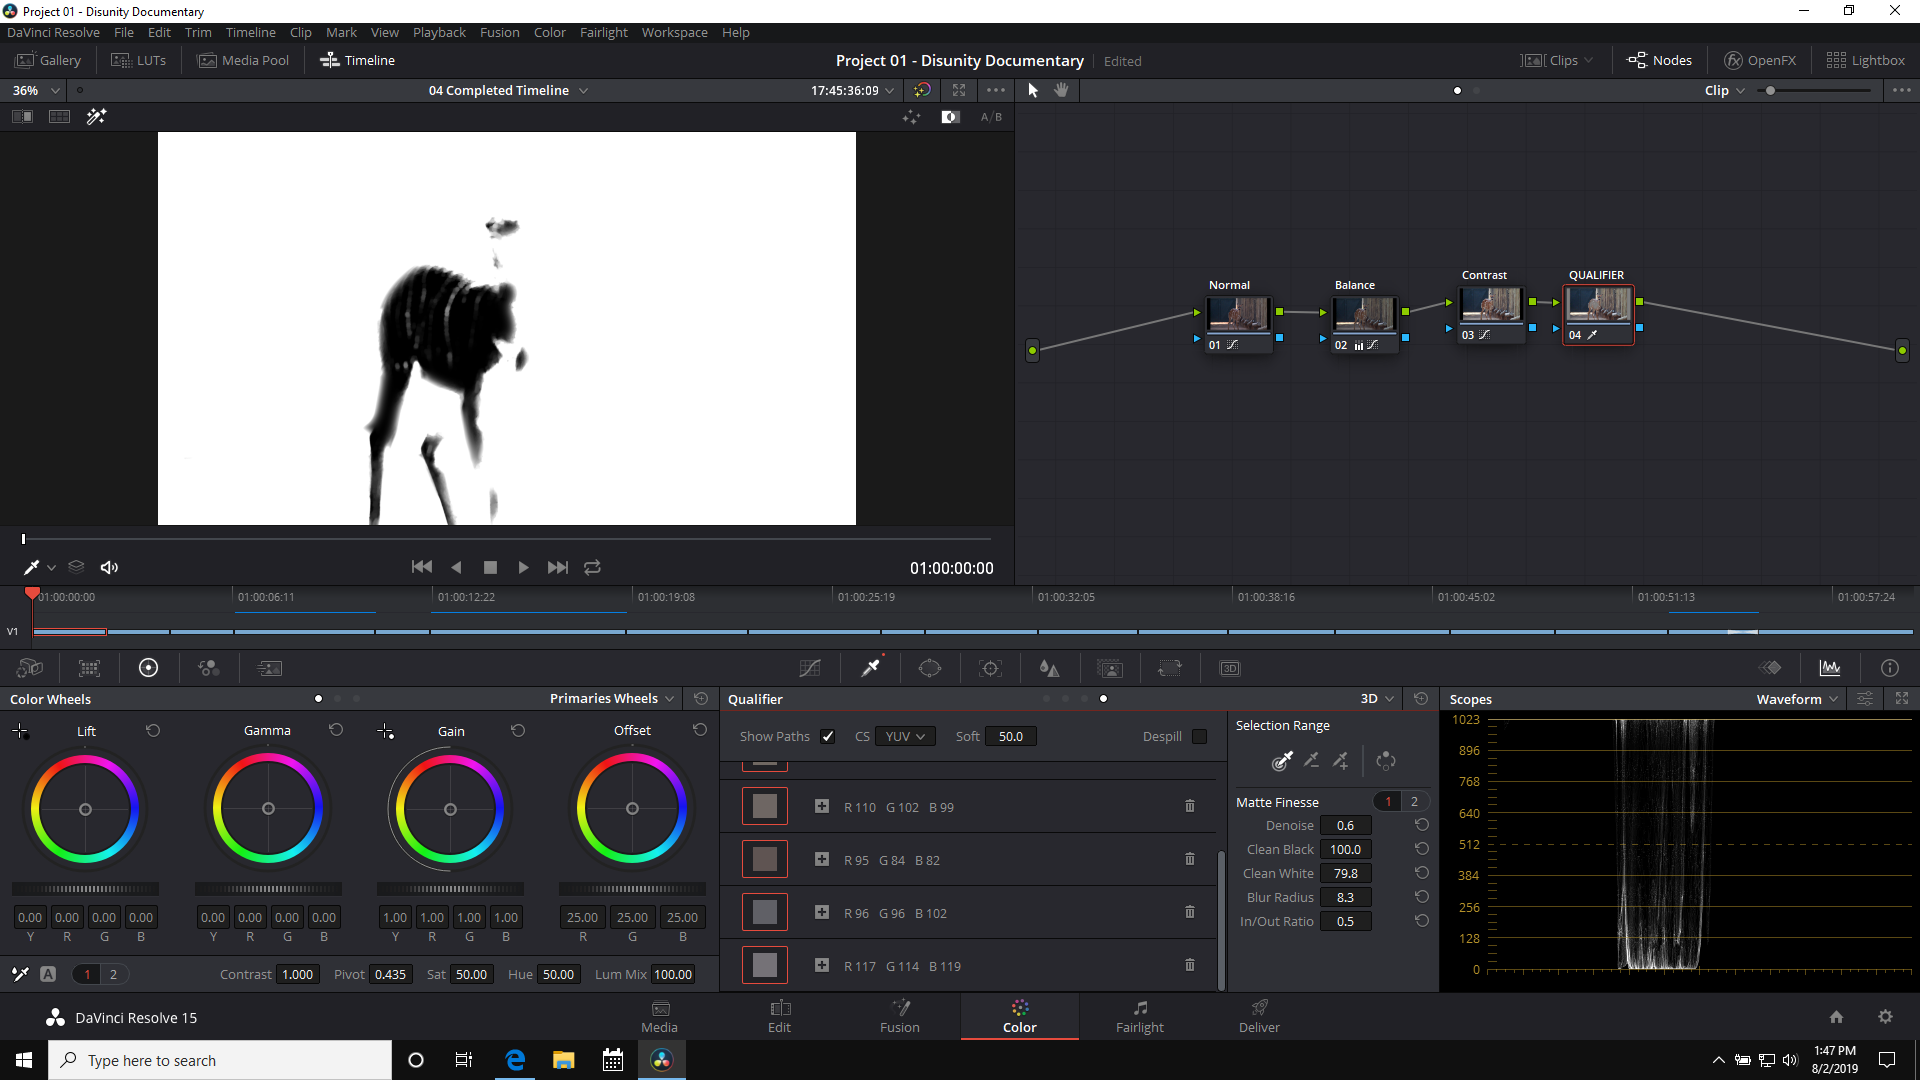
mask revealed = next image
basic cleaning of key = image 3...
If I can do THAT ( using all the colors shared by nice animal and his surrounding... imagine how clean it would be with your green screen !!!
blur has nothing to do with it...

AE can do this
Copy link to clipboard
Copied
As interesting as this subject is....
All I can say is, " Thank god the person is frame doesn't have animal ears on his head, and a black nose painted by magic marker with black magic marker lines on cheeks imitating 'whiskers' … and he is not dressed in a skin tight leotard …
That freaked me out and will give me nightmares for the next week probably.

Copy link to clipboard
Copied
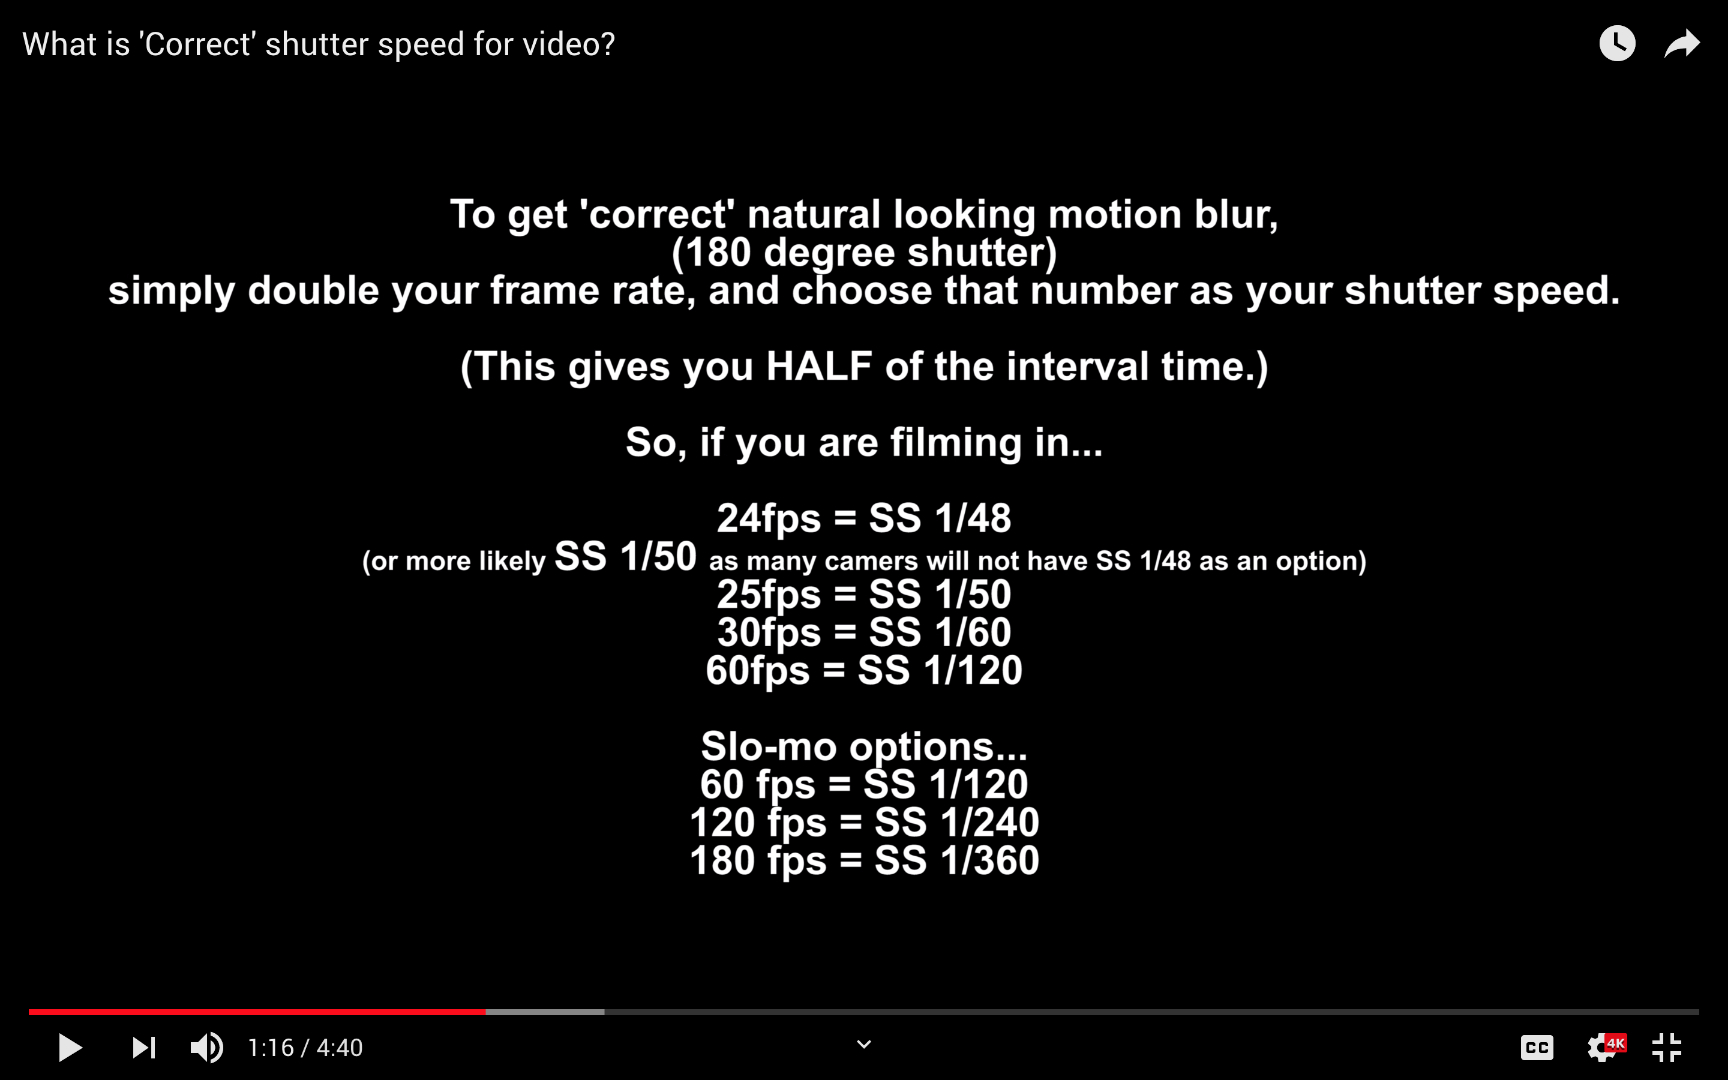
Great contributions and screenshots! I could be wrong, but it seemed you as if at least one of the posts was equating frames per second (fps) with motion blur. Just to clarify my remarks for anyone who may not know the difference, framerate is the number of frames recorded per second (ex: 24fps, 30fps, 60fps). Shutter speed is how long the shutter stays open during recording of the frame and is measured in fractions of a second (ex: 1/50 sec, 1/60, 1/120). Generally, a "cinematic" shutter speed is considered the reciprocal of double your frame rate (see below):
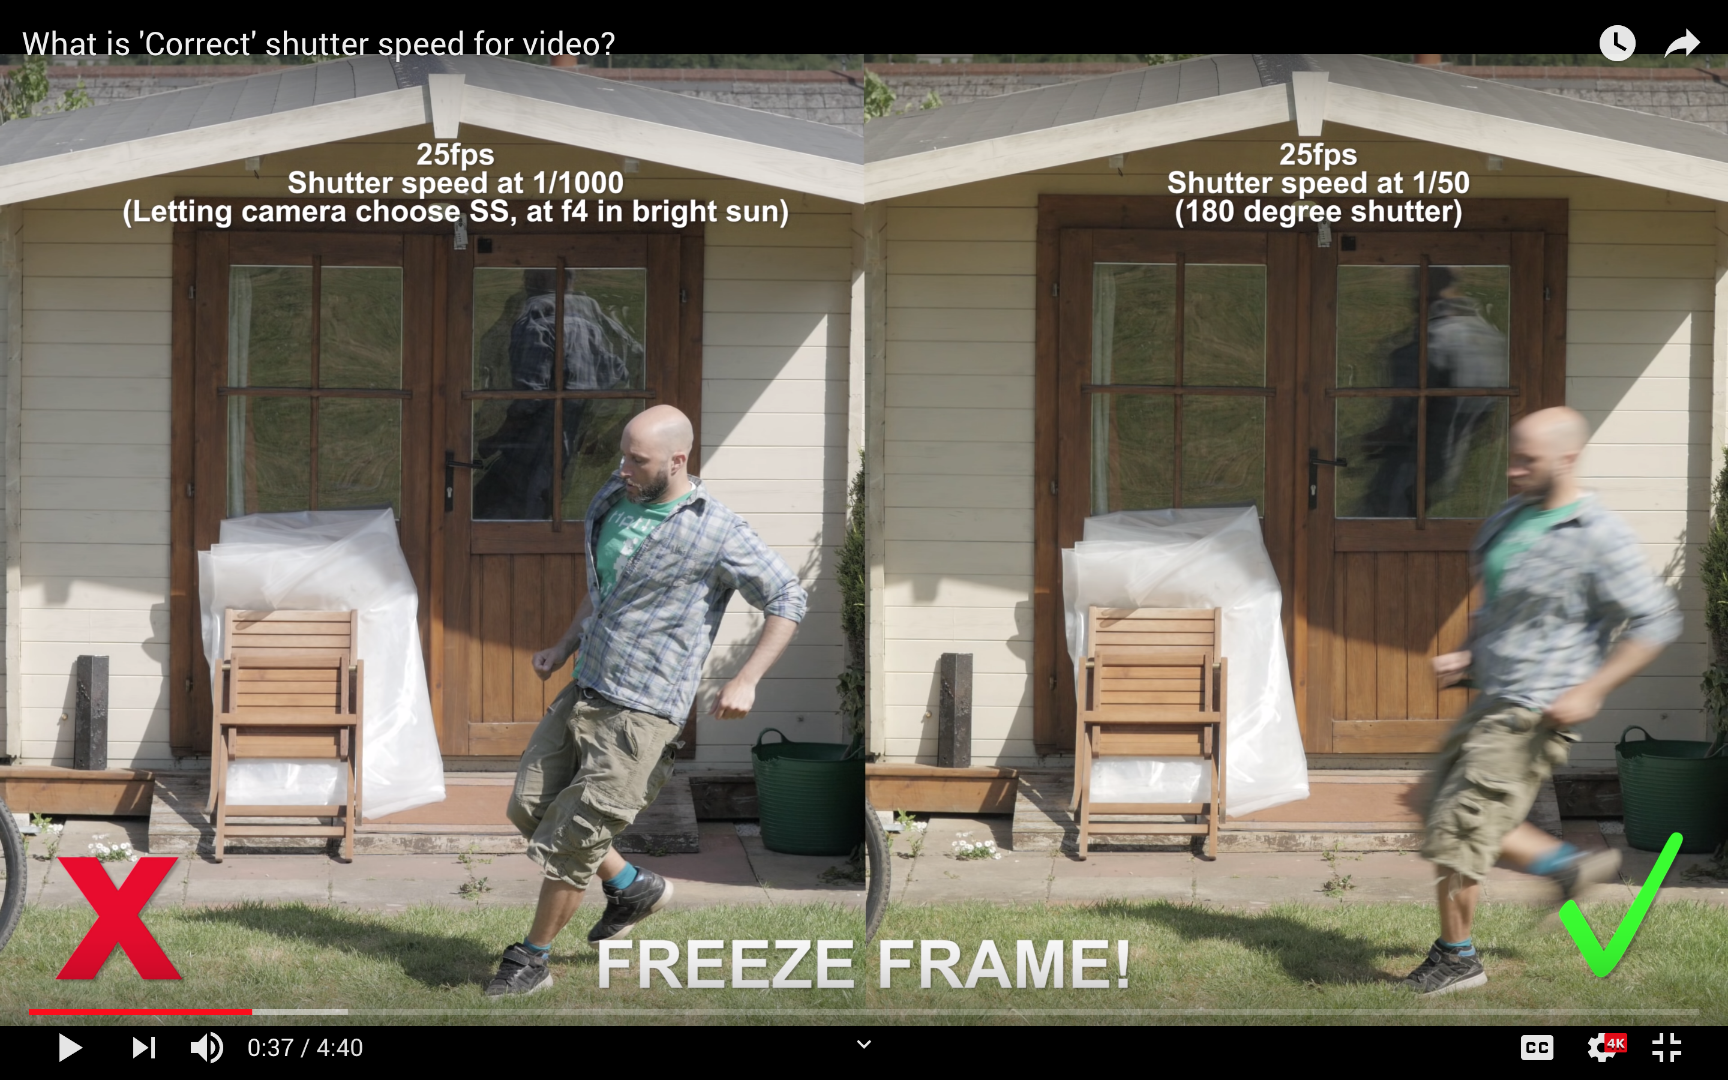
The example below illustrates while using the same framerate (fps), the shutter speed you choose will determine the amount of motion blur present when the subject is moving (in this case, he is running into the frame). Notice that everything that is not moving is sharp, but the person is blurry. In fact, his left foot is less blurry because he's stopping right at that moment.
Going back to Kim's initial post she said, "the person talking is very active with his hands causing and area of green to be associated with the motion."
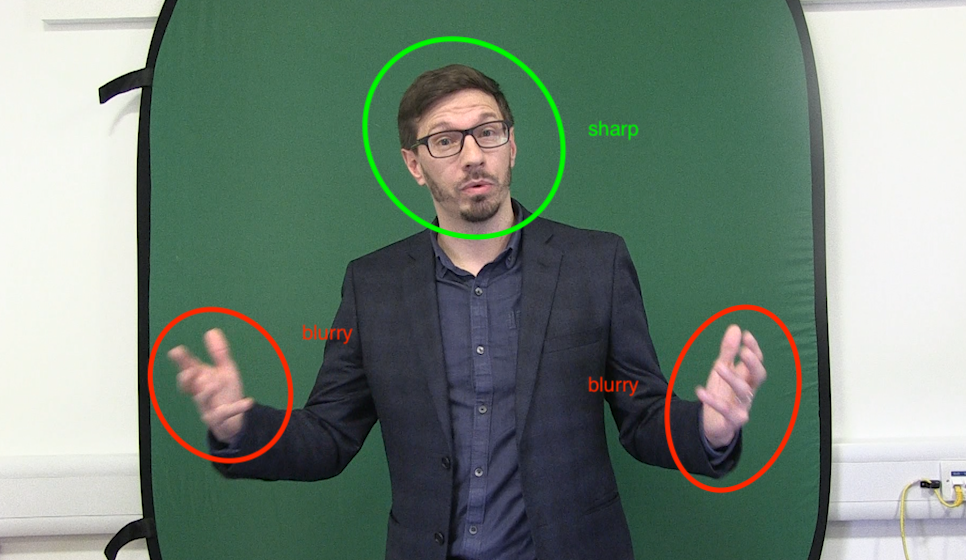
Because the areas in motion don't have well defined edges (as a result of a slower shutter speed), it is a difficult fix. There are some videos on YouTube that attempt to show how to reduce the effect using After Effects and some 3rd party plugins. This one looked helpful (profanity warning!) How To Key Bad Green Screen Footage - AE Tutorial - YouTube
Hope that helps clarify "the why" and point you towards a suitable post production resolution.
Copy link to clipboard
Copied
Thank you Texas, for clearing that up.
It might be a good idea to pull a key on a frame that has less motion ( or NO MOTION ) to get the initial key and mask established... then, low and behold, when the stuff that is blurry comes into play it is already separated by the mask and just looks like blurry " hand ", for example... and does not have a bad key around that blur … it's just blurry flesh colored hand.
???
yippee... got that straight !
thanks !
Copy link to clipboard
Copied

Copy link to clipboard
Copied
after you drop in your background to the alpha channel ( your mask made from key) you can render it and look at it before exporting..and believe it or not you can actually SEE what is working or not... you can SEE the stuff around this guys hand that is not working....
What to do ???
Golly, go back to key ( mask ) and make adjustments via clean black clean white, grow, shrink, pixel range, all sorts of stuff to adjust to get the clean key... yes, it's true !
Try it and you'll love it.
Copy link to clipboard
Copied
the problem is NOT THE shot on green screen.. the problem is the RESULT !
Copy link to clipboard
Copied
look at this one more time...
this is 24 fps 180 deg shutter... figure it out... the people are MOVING.. it is ALL GREEN SCREEN.....
open your eyes...
Pan Am - Video scenes and visual effects (Exclusive) - YouTube
Copy link to clipboard
Copied
Thanks again so much, I honestly can't tell you how helpful you have all been 🙂 Just one more bit of advice - I've changed my settings to the following - will these give me much better results?
- Changed my Bit Rate / Resolution from: 35 Mbps 1920 x 1080 to 50 Mbps 1920 x 1080
- frame rate from 50i to 25p
- Make sure my Premiere sequence matches my footage
- Aim to position my subject three feet from the background
- Light the green background and subject separately
- Changed from auto focus to manual focus
- Gain set to low
- Manually white balance (just looking into how I do this)
- Changed shutter speed to 1/50
- Try vertical shooting...
Is that everything? Have I missed anything?
Many thanks in advance!
Kim
Copy link to clipboard
Copied
Hi Kim,
Not familiar with your exact camera - check the manual - but in general, there is usually a WB button that toggles between various presets (Indoor, Outdoor, etc) and MANUAL will be one of the options. Then once in manual WB mode, there is usually another button to SET the WB. What you will do is use something white - a shirt, a piece of paper, etc - and place it where the subject would be, so you are getting the same lighting the subject would get on the white item.
Zoom in so white item fills the screen, then SET WB. The camera will use the white as a reference to adjust all colors accordingly for best color reproduction. There are special white cards one can purchase for setting WB but a white object/paper has always been good enough for my needs. Even at a wedding I can just use the altar cloth, table cloth at reception, or even the shirt of a busboy (If he sits still long enough, doing this in stealth from afar!).
Another tip - your camera should have HDMI output - connect that directly to a monitor/display on set so you can better check the focus and quality of what you are shooting, rather than relying on tiny viewfinder or camera LCD.
Thanks
Jeff

Copy link to clipboard
Copied
Kim,
Have I missed anything?
I'd say one of the more important points was made by eikonoklastes
Mask off the hands and key the hands as a separate keying job on another video track.
I'd start there.
Thanks,
Kevin
Copy link to clipboard
Copied
Hi everyone!
Here's my new green screen set up...
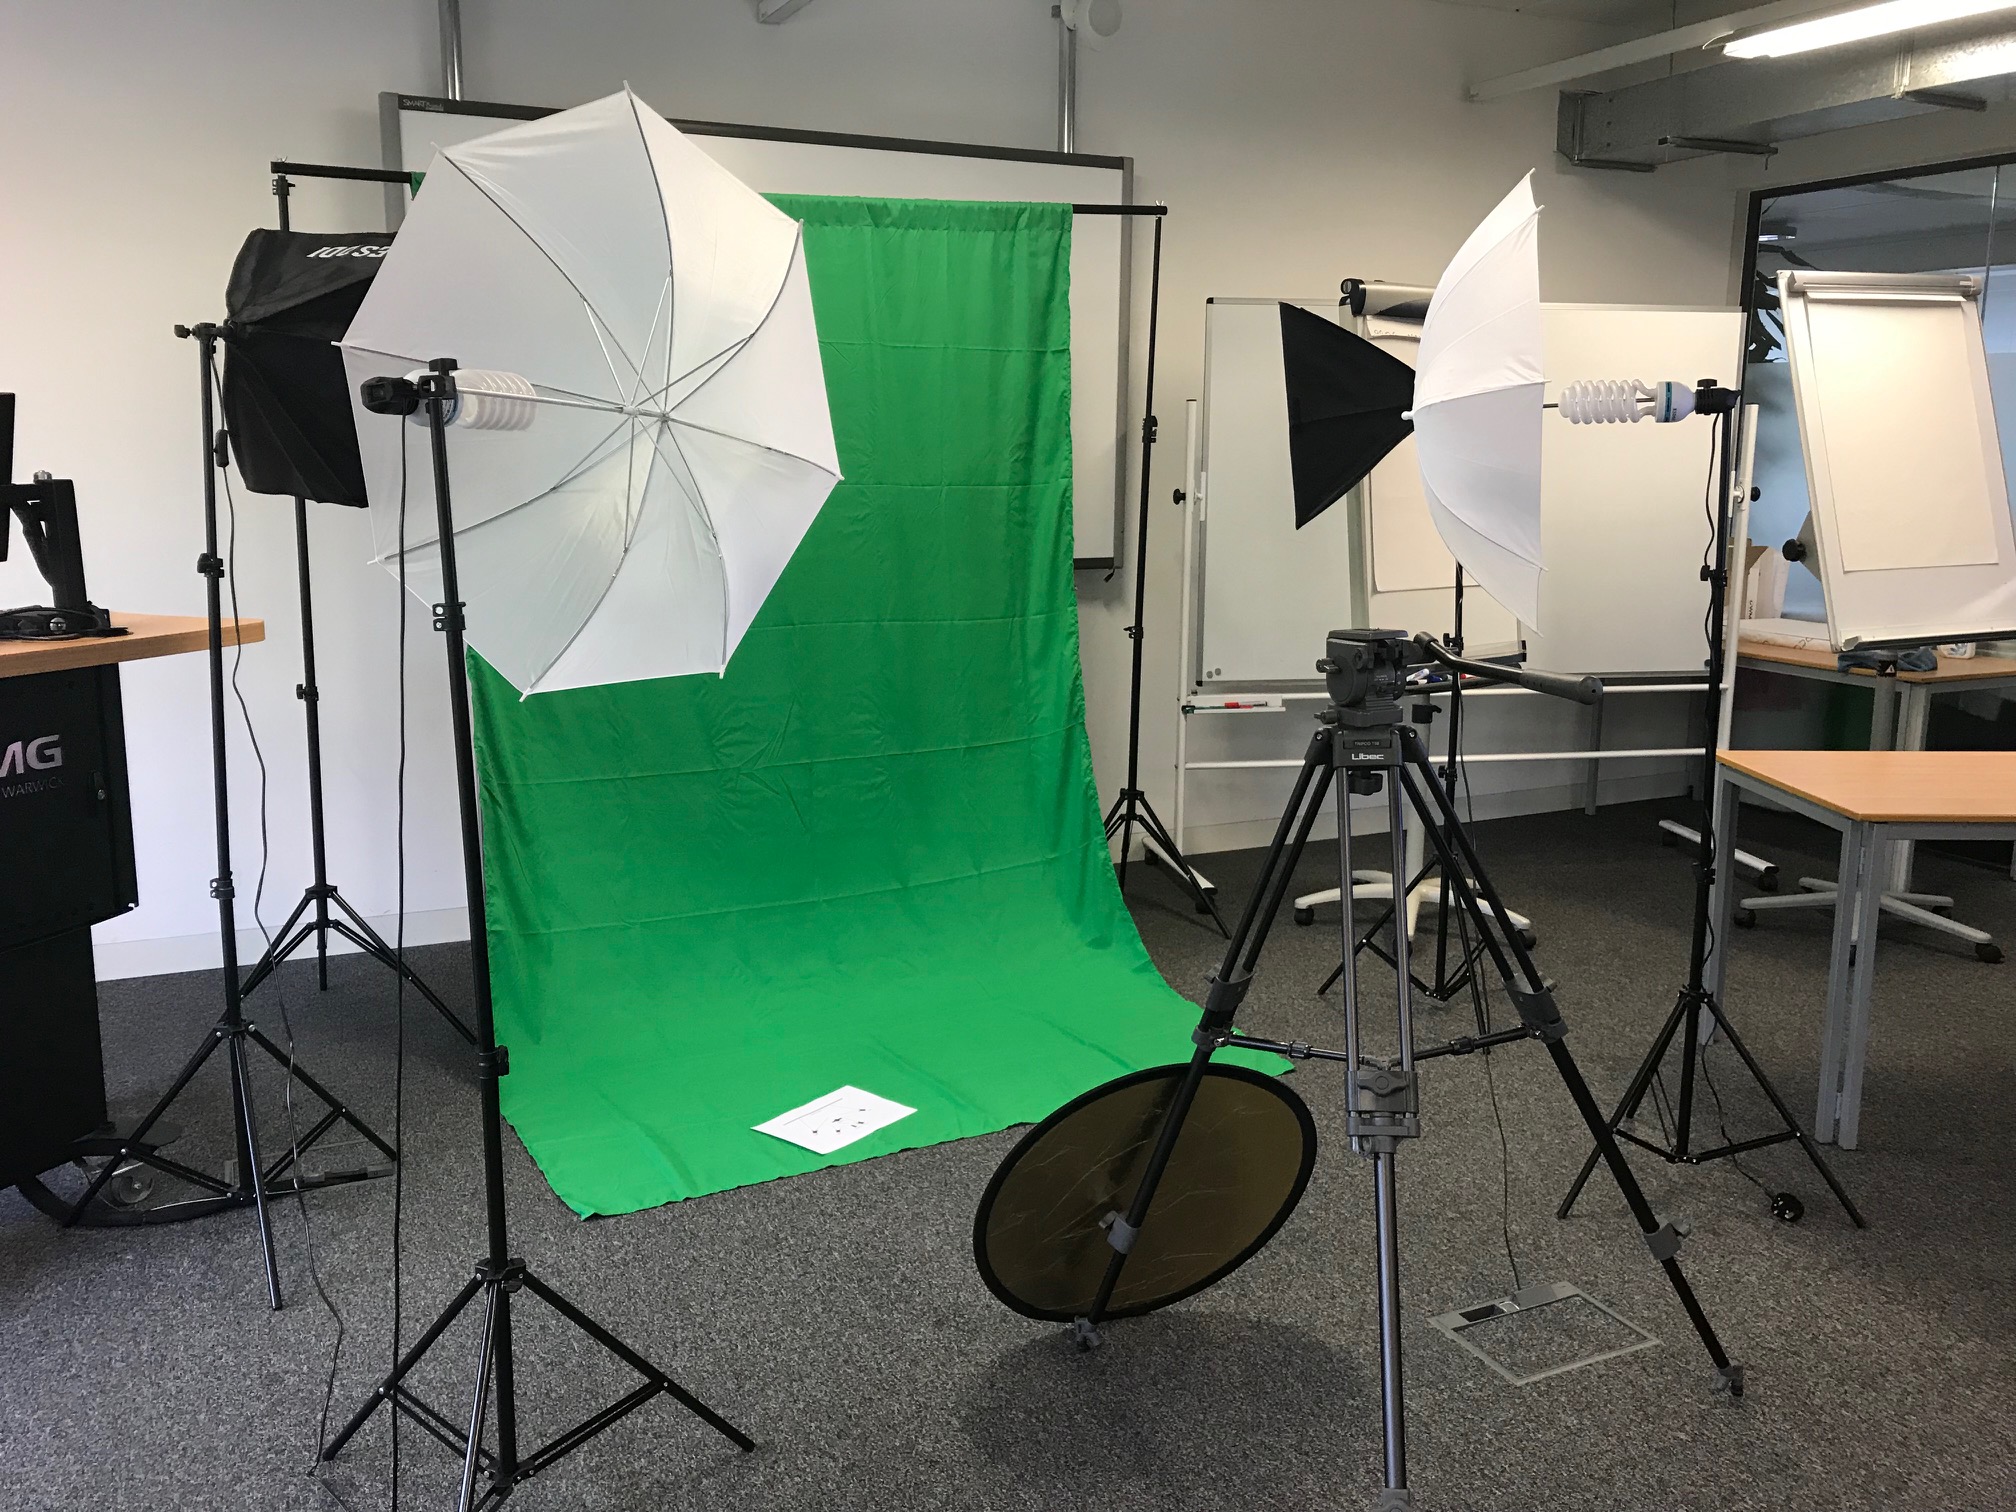
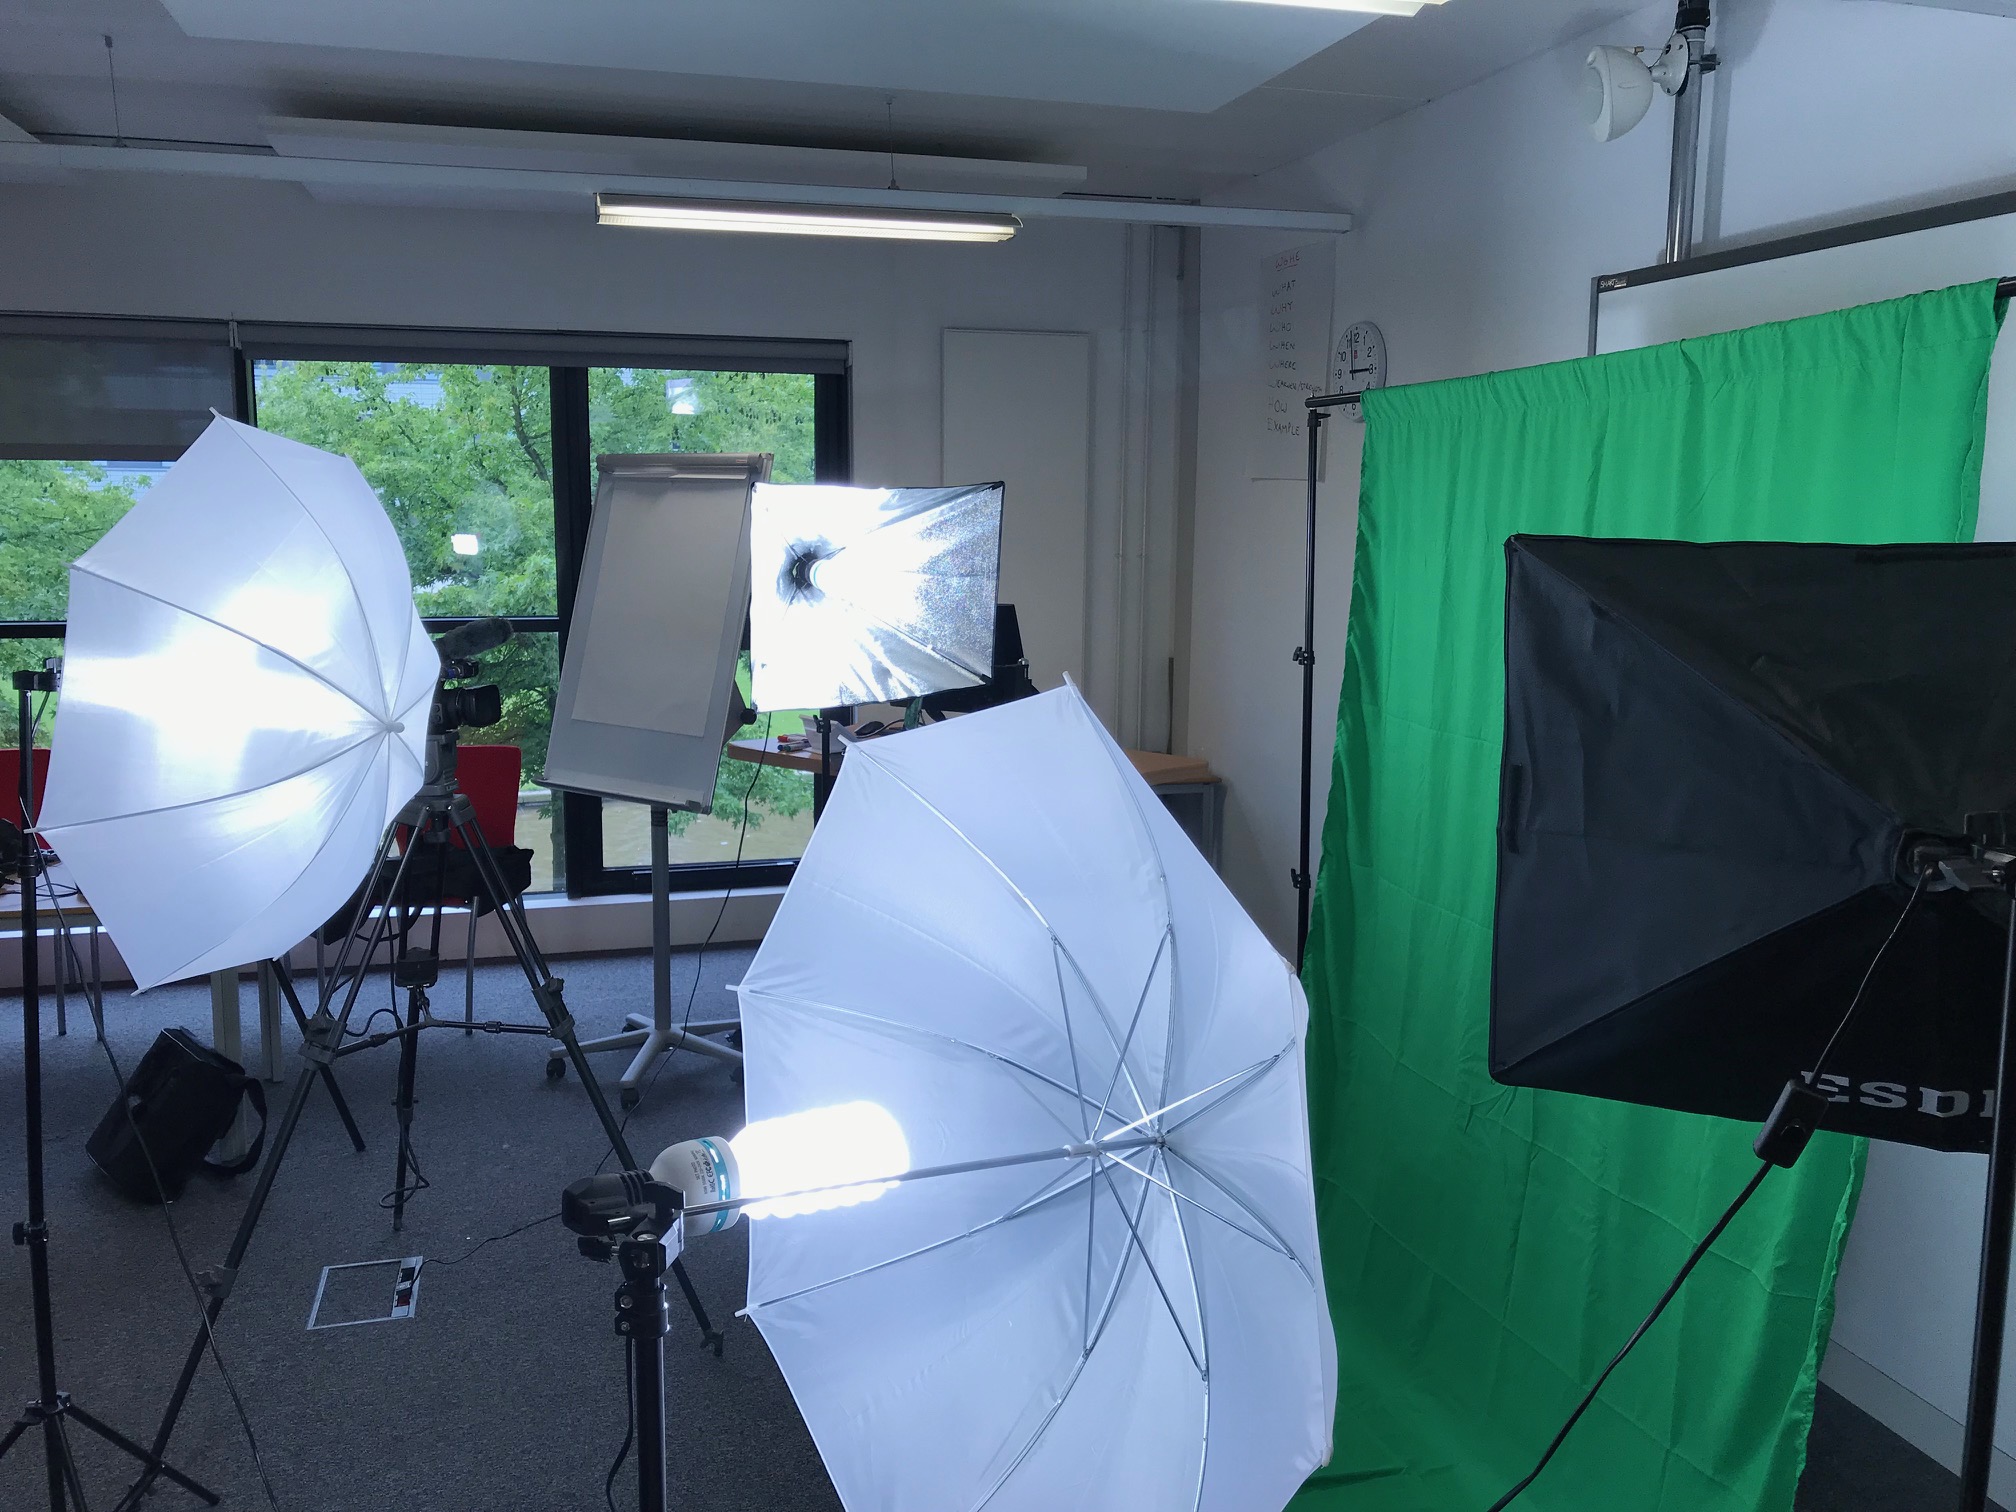
I am using two lights to light the green screen and two to light the subject.
The camera settings as previously mentioned are:
- Changed my Bit Rate / Resolution from: 35 Mbps 1920 x 1080 to 50 Mbps 1920 x 1080
- frame rate from 50i to 25p
- Made sure my premiere settings
- Aim to position my subject three feet from the background
- Light the green background and subject separately
- Changed from auto focus to manual focus
- Gain set to low
- Manually white balance (just looking into how I do this)
- Changed shutter speed to 1/50
- Unable to vertical shoot with our tripod....
Here's the footage (just a quick test!) - much easier to key however I can see a green tint on my colleague's face and I'm still not happy with the resolution - it just doesn't look 'crisp' enough... can anyone offer me any other advice? i'm determined to get the best possible result.
Here's my test footage: Sequence 01 - YouTube
Many thanks
Kim
-
- 1
- 2

Get ready! An upgraded Adobe Community experience is coming in January.
Learn more
 AdChoices