- Home
- Premiere Pro
- Discussions
- FAQ: How to fix saturated/over-exposed HLG/HDR cli...
- FAQ: How to fix saturated/over-exposed HLG/HDR cli...
Copy link to clipboard
Copied
With Premiere Pro v 22, new features around color management for H.264 and HEVC have been introduced. This FAQ will show you how to fix clips that appear overexposed or oversaturated due to these new features. Caution: iPhone shoots HDR by default.
- In case you don't want or need the HLG/HDR workflow and want to return to the standard workflow, please follow these steps to avoid oversaturated and overexposed previews.
- Right-click on your media in the Project panel.
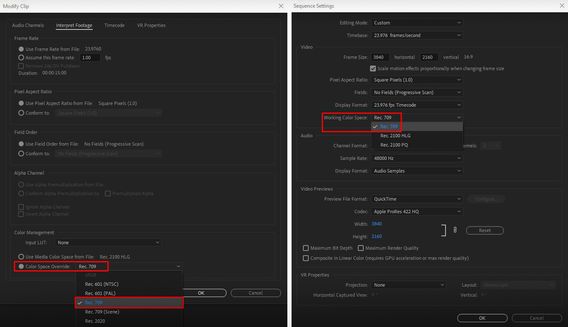
- Select Modify > Interpret Footage > Color Management.
- Set Color Space Override to Rec.709.
- Sequence > Sequence settings, set Working Color Space to Rec. 709.
- In case you do want to edit & deliver in HLG/HDR, please follow the steps mentioned below. Also, see R. Neil Haugen's in-depth article for the full pro workflow: Premiere Pro 2022 Color Management for Log/RAW Media
- Turn off HDR shooting on your iPhone by following the directions here. This allows you to return to a standard iPhone workflow.
So why do HLG files look saturated/over-exposed in Pr v 22?
In the previous version of Premiere Pro (v 15.x), HLG media was treated as Rec.709 & the sequence created from that media also used Rec.709 color space.
In Premiere Pro v22, H264 and HEVC are color managed, and the HLG media is treated as Rec.2100. So a timeline created from HLG media in v 22 will automatically be assigned HLG color space.
However, in v 22 opening a project created in the previous version (which had HLG media on Rec.709 timeline) results in HLG to Rec.709 conversion. This causes the clips to look saturated/over-exposed in the newer version of Premiere Pro.
Note: This only happens with projects (HLG media + Rec.709 timeline) created in the previous version. Newer project files will have the appropriate color space assigned and will show the correct preview.
How to solve this issue in v 22?
You may manage the color space of the entire timeline made from HLG clips.
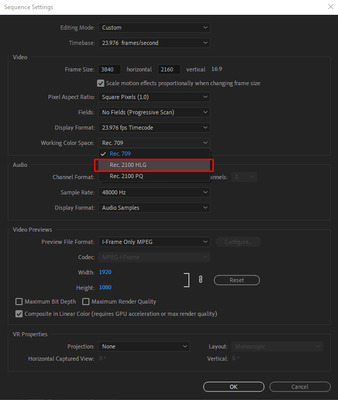
- Highlight the sequence & navigate to Sequence > Sequence settings.
- Under the Video tab, set Working Color Space to Rec.2100 HLG.
You may also color manage individual media files.
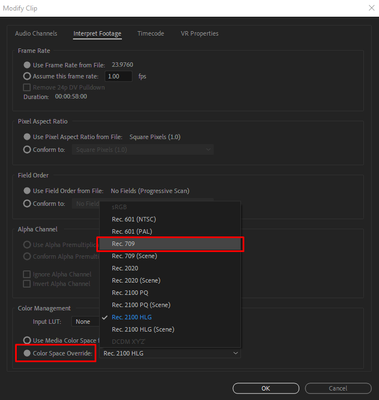
- To do so, right-click on the HLG file in project panel & navigate to Modify > Interpret Footage.
- Under Color Management, set Color Space Override to Rec.709. This will create a preview that matches the color of Premiere Pro v15.x.
How to correct saturated/over-exposed previews during H.264/HEVC export?
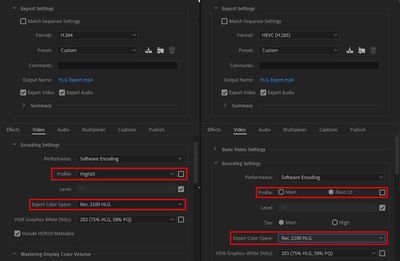
If you have edited in an HLG timeline & would like to export in HLG, please ensure that you use the following export settings.
- Select your Format as H.264/HEVC.
- Navigate to Video tab > Encoding Settings.
- Set Profile to High10 (for H.264) or Main10 (for HEVC).
- Set Export Color Space to Rec.2100 HLG.
Please note that the Match Source presets use Rec. 709 color space & might result in an incorrect preview if used to export a sequence based on Rec. 2100 HLG color space.
For the full HDR broadcasters workflow, see this page in the Premiere Pro User Guide.
Hope this helps.
- Sumeet
 2 Correct answers
Karl's video may help you understand how the HDR workflow all works.
For users recording their footage on a Sony Venice camera, using the Modify>Interpret Footage workflow will not work for those clips!
Venice uses the older unmanaged workflow, with a Source Clip Effect that has a toggle switch, and LUTs to adjust from there. You can batch-adjust these clips with an effect preset.
To see what I mean, load a clip in the Source monitor, and then open the Effect Controls panel. You should see something like this!
You can remove the source effect from there.
...Copy link to clipboard
Copied
Glad to help my friend ✌
Copy link to clipboard
Copied
Hi Mr/Ms Default!
Sorry for that. In my opinion, it's because it's a total hack that doesn't work in all cases and can break the sum total of all my work on a project? Just saying. That might be the case. Don't perform this kind of surgery on any working project, please use a copy/duplicate as a test.
For me, it's still a no go. XML is the way to go that is also sanctioned by engineering. So, that's the route I go.
Cheers,
Kevin
Copy link to clipboard
Copied
Copy link to clipboard
Copied
The problem is if you open a project in 22 then you can no longer open it in 15.4 because then the file is ready
Copy link to clipboard
Copied
That's true... it does however prompt you to save new version as a different file name....so next time do that.
For now open the latest auto-save file on old version and hopefully it's sufficient.
Autosaves saved me so many times!
Copy link to clipboard
Copied
Never ever do that! That is always a user choice ... you can duplicate the file and open the dupe in the new version, or as often noted, the better choice: create a new file in the new version, use the MediaBrowser to import the contents of the old version project.
Either way, you still have the working original project file in whatever version it worked in. And a new version file to test in the new version.
As to the new color management options ... they have to bring color management choices to the app. For exactly this reason, that it would confuse some, they have resisted a long time after PrPro should have had user controls for color managment.
But with several different HDR forms out there now, they have to move forward. I've complained that spreading them around various places is inherently confusing, but ... they've done it this way as to the developers that's where users would 'think' to look for CM option.
I want a new CM panel.
Neil
Copy link to clipboard
Copied
Never simply "open" a project file in a newer version. That process can work but has far more likelihood of being a partial to full disaster than a different way of migrating.
Create new project files in the new PrPro version. From those project files, use the MediaBrowser to navigate to, select, and import the assets of those projects.
You have a clean proper project file of the new version, with all the assets of the old version.
And you still have the old version project file intact and usable.
Now ... test the project in the new version. If it works, great! If not, continue working that project in the old version.
Neil
Copy link to clipboard
Copied
You just saved my day and project. I was ready to throw my pc in the trashcan and pay back my costumor.
Mod note: Please do not use profanity, even if only implied. We have minors reading here.
Copy link to clipboard
Copied
This update watesed me one to struggle with the HLG color Problem......
Still cant get the excat color of the oruginal HLG videos....
Finally go back to the previos vesion to advoid this problem......
Copy link to clipboard
Copied
I appreciate this attempt to help, but my HLG footage is ruined when trying either of the suggestions.
If I manually set colorspace to Rec.709, the footage is blown out and oversaturated.
Whether I do it to the sequence or the video, the result is the same.
The closest I've gotten is applying SDR conform upon export, but it's still adjusting color values.
Please help... why did you guys make this so difficult for Sony HLG users??!!?!
Copy link to clipboard
Copied
So you have HLG footage from ... which Sony cam, and what settings in-cam?
What are you setting the clip color space to in the Project panel?
What sequence settings?
Is your monitor set to handle HDR and your OS also ?
Neil
Copy link to clipboard
Copied
Thank you for your help, and apologies for the lack of context. It just suprised me that my original workflow needs a revision upon updating Premiere...
Testing new HLG3 footage shot this morning, from Sony a7r3
Shot at 4K XAVC 30p 100M
Clip Color Space in the project panel is usually left as default, but today I'm trying intrepeting to Rec709 with no luck, colors aren't right. So either default color or Rec709.
Sequence settings is either derived from the video itself, matched, or using a RED 4k Timeline, or sometimes a custom timeline for social media cropped to 1920 x 1080 vertical. Either way, old workflows don't seem to work with HLG anymore.
And my monitor.. no clue.. I never used to have any issue. I use a 2014 Retina 5k iMac.
I'm a bit of a novice when it comes to the technical side of video, codecs, compression, output, etc. I've had zero issue in Premiere from 2012-today, I just want to learn and keep up with the updates. Especially because I primarily use HLG on my Sonys.
If I apply SDR Conform on export, it kind of helps, but it's still adjusting colors more than I'm comfortable with.
Thank you so much.
Copy link to clipboard
Copied
Why on earth would you make this change to PP? Now, I have to make these edits to EVERY freakin' clip???!!! Please remove this feature ASAP! I have spent HOURS trying to figure out how to fix this issue until I came across this blog. Please, please, please change it back!
Copy link to clipboard
Copied
What you said here, is incorrect: "Note: This only happens with projects (HLG media + Rec.709 timeline) created in the previous version. Newer project files will have the appropriate color space assigned and will show the correct preview." My new files do not show the correct preview. They are EXTREMELY oversaturated!
I have imported new videos from my iPhone 12 pro max - filmed today - and the oversaturation is still occurring. The suggestion you gave, changing it to Rec.709 does not provide the adequate coloration so I chose Rec.2020, which seems to appear closer to the original clips but the color is still off.
I am concerned that I will have to make these adjustments for every clip. Is that so? Is anyone else having this issue with new clips?
Copy link to clipboard
Copied
Here is another problem I found with the development of color.
INTERPRET Color Management PrPro v.22.0 | Pay atte... - Adobe Support Community - 12512772
Copy link to clipboard
Copied
Copy link to clipboard
Copied
What a complete mess. All my old projects are completely blown out and most people arent experts at using interperet footage or understanding why the source image is fine but the sequence image is horrendously blown out.
Its taken me hours to work an old project out.
Company logos are all a strange colour and the LUT presets I had are all over the place...!!!
Great for the high end editor... using the REC whatever but for us normal editors this is a HUGE issue
Copy link to clipboard
Copied
New update came out tonight and resolved this issue for me!
Copy link to clipboard
Copied
Make a screenshot of the build version
Copy link to clipboard
Copied
I just realized all it did was fix the footage looking over exposed in the playback window, when I go to export it still over-exposes my footage. UGH
Copy link to clipboard
Copied
it turns out they didn't fix it
Copy link to clipboard
Copied
What are your export settings? If you've got an HLG sequence, you have to go down through some fairly specific settings to ensure a proper HLG export.
Neil
Copy link to clipboard
Copied
Can you share what settings I should look at specifically to ensure a proper HLG export?
Copy link to clipboard
Copied
You have to roll the Video tab options down until you see the option for Export Color Space. And it can vary from codec to codec.
Say for an H.264 export, you have to change several things to get anything but a Rec.709 allowed ... like (on many machines) setting the Performance to Software Encoding. Then set the Profile to High10.
At which point, the option to set the Export Color Space becomes available. And you can set for Rec.2020 or 2100 in HLG or PQ.
Neil
Neil
Copy link to clipboard
Copied
This saved my project. Thank you!


