 Adobe Community
- Home
- Premiere Pro
- Discussions
- FAQ: How to fix saturated/over-exposed HLG/HDR cli...
- FAQ: How to fix saturated/over-exposed HLG/HDR cli...
Copy link to clipboard
Copied
With Premiere Pro v 22, new features around color management for H.264 and HEVC have been introduced. This FAQ will show you how to fix clips that appear overexposed or oversaturated due to these new features. Caution: iPhone shoots HDR by default.
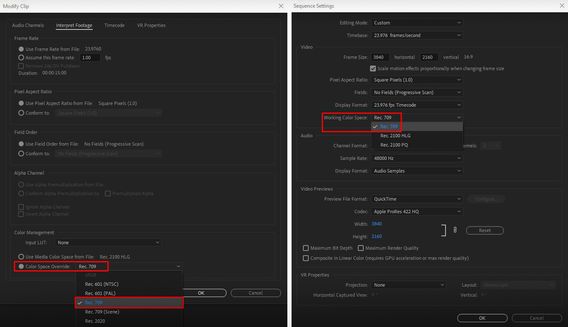
- In case you don't want or need the HLG/HDR workflow and want to return to the standard workflow, please follow these steps to avoid oversaturated and overexposed previews.
- Right-click on your media in the Project panel.
- Select Modify > Interpret Footage > Color Management.
- Set Color Space Override to Rec.709.
- Sequence > Sequence settings, set Working Color Space to Rec. 709.
- In case you do want to edit & deliver in HLG/HDR, please follow the steps mentioned below. Also, see R. Neil Haugen's in-depth article for the full pro workflow: Premiere Pro 2022 Color Management for Log/RAW Media
- Turn off HDR shooting on your iPhone by following the directions here. This allows you to return to a standard iPhone workflow.
So why do HLG files look saturated/over-exposed in Pr v 22?
In the previous version of Premiere Pro (v 15.x), HLG media was treated as Rec.709 & the sequence created from that media also used Rec.709 color space.
In Premiere Pro v22, H264 and HEVC are color managed, and the HLG media is treated as Rec.2100. So a timeline created from HLG media in v 22 will automatically be assigned HLG color space.
However, in v 22 opening a project created in the previous version (which had HLG media on Rec.709 timeline) results in HLG to Rec.709 conversion. This causes the clips to look saturated/over-exposed in the newer version of Premiere Pro.
Note: This only happens with projects (HLG media + Rec.709 timeline) created in the previous version. Newer project files will have the appropriate color space assigned and will show the correct preview.
How to solve this issue in v 22?
You may manage the color space of the entire timeline made from HLG clips.
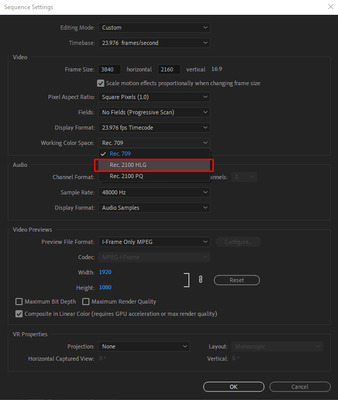
- Highlight the sequence & navigate to Sequence > Sequence settings.
- Under the Video tab, set Working Color Space to Rec.2100 HLG.
You may also color manage individual media files.
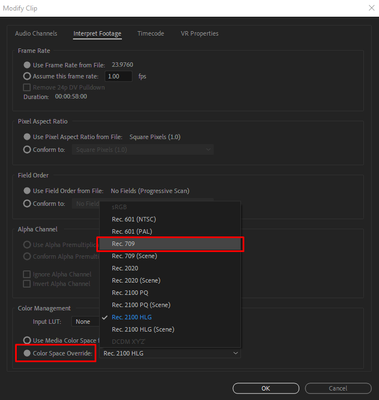
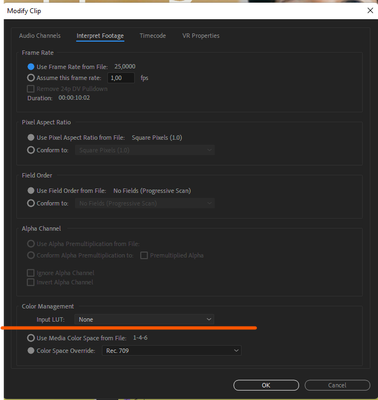
- To do so, right-click on the HLG file in project panel & navigate to Modify > Interpret Footage.
- Under Color Management, set Color Space Override to Rec.709. This will create a preview that matches the color of Premiere Pro v15.x.
How to correct saturated/over-exposed previews during H.264/HEVC export?
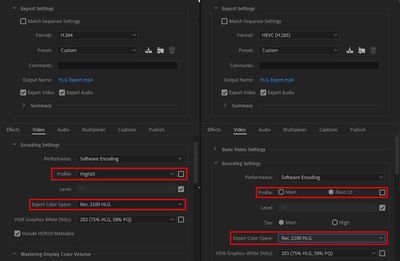
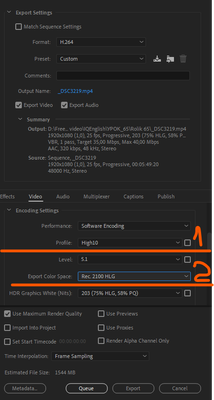
If you have edited in an HLG timeline & would like to export in HLG, please ensure that you use the following export settings.
- Select your Format as H.264/HEVC.
- Navigate to Video tab > Encoding Settings.
- Set Profile to High10 (for H.264) or Main10 (for HEVC).
- Set Export Color Space to Rec.2100 HLG.
Please note that the Match Source presets use Rec. 709 color space & might result in an incorrect preview if used to export a sequence based on Rec. 2100 HLG color space.
For the full HDR broadcasters workflow, see this page in the Premiere Pro User Guide.
Hope this helps.
- Sumeet
 2 Correct answers
Karl's video may help you understand how the HDR workflow all works.
For users recording their footage on a Sony Venice camera, using the Modify>Interpret Footage workflow will not work for those clips!
Venice uses the older unmanaged workflow, with a Source Clip Effect that has a toggle switch, and LUTs to adjust from there. You can batch-adjust these clips with an effect preset.
To see what I mean, load a clip in the Source monitor, and then open the Effect Controls panel. You should see something like this!
You can remove the source effect from there.
...Copy link to clipboard
Copied
Sorry, this isn't helping me. I need to output 709 color space for viewing in a browser. No matter what I set the sequence to for color space, the 709 output looks like garbage.
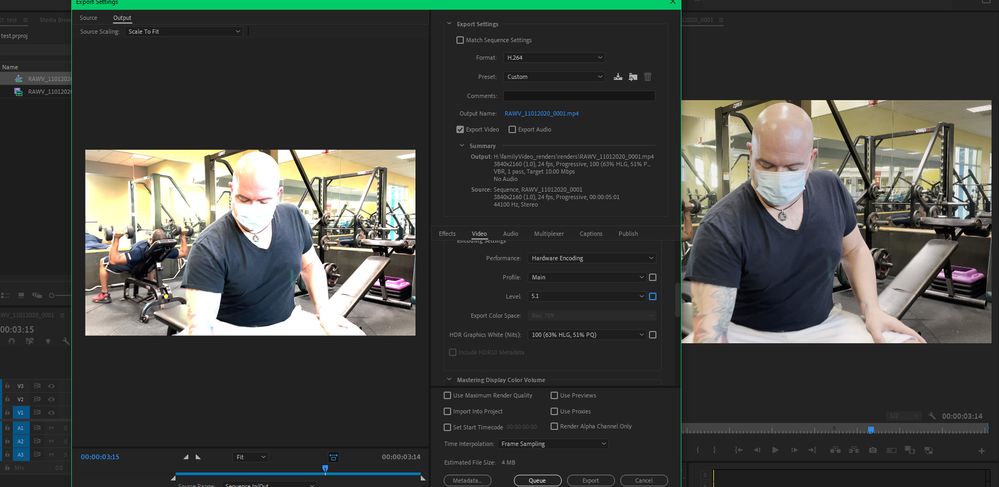
I'm importing footage from my 5dMk4, and the sequence has the Rec 2100 HLG working color space set automatically, and the footage looks fine in Premiere. No matter what I set the export settings to, keeping the Export Color Space set to Rec. 709, it looks blown out.
So, what do I do here?
Copy link to clipboard
Copied
Remove this version of premiere and install the previous one v15. That's what i did, no point struggling with this issue, it's utterly ridiculous. Let them fix it first then upgrade.
/J
Copy link to clipboard
Copied
enjoy ✌️
Copy link to clipboard
Copied
Thanks for not reading what I posted. I need to output in Rec. 709.
Copy link to clipboard
Copied
What worked for me was to change the seq to Rec709 and I terperate the hlg footage to rec709 and then export with a 709 setting.
I had assumed that I could edit on a hlg with hlg footage and export in 709 but that doesn't seem to work. The only way I could make it work was as noted above. Effectively manually changing it that makes it work like prev version of Prem where it ONLY had 709 support.
Copy link to clipboard
Copied
Copy link to clipboard
Copied
In this case, it's your own fault, since you can't set the initial settings for what you want and get the result as it is at the output. Why shoot in HLG to end up losing on quality? Unclear
Copy link to clipboard
Copied
Set the working (timeline) color space to Rec.709. And probably go to the Project panel, Modify/Interpret Footage to over-ride the input settings to Rec.709.
Neil
Copy link to clipboard
Copied
Karl's video may help you understand how the HDR workflow all works.
Copy link to clipboard
Copied
It should already be clear. Why some face difficulties in determining the correct color space. Everything is painted in the Video. Kevin, just a moment, check if the function of interpreting a video shot in LOG using a developing LUT works in your Color Management??? There's probably a flaw on the part of the engineers.
Let me know.
Copy link to clipboard
Copied
That option works as expected here on my Win10 rig. I can add LUTs without any troubles.
If this isn't working for anyone, it would be helpful if they listed their OS/hardware, media, the LUT involved and where it "lives" on the computer so we get enough data for troubleshooting.
Neil
Copy link to clipboard
Copied
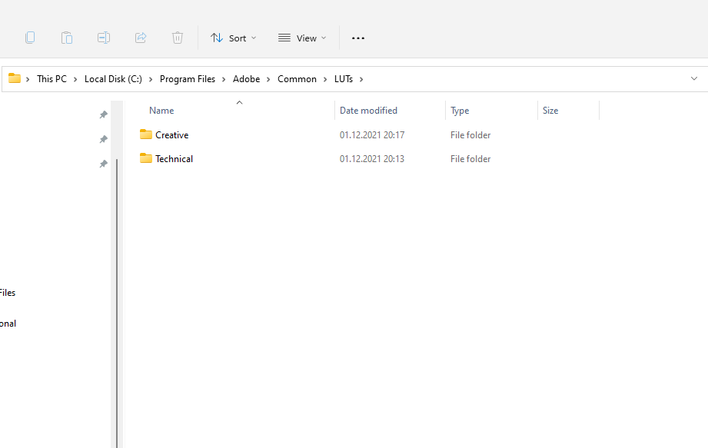
Neil, I can say with confidence that the LUt from the Interpret footage panel does not work. The LUTs themselves are placed strictly along the previously specified path. Here are the screenshots. Please note that lut was applied ONLY on the timeline. And in the window, look what's going on. It does not display. I'm tired of talking about it. Engineers are going to fix it. If we created this function, let's make it humanly working, and not just be like ballast.
Copy link to clipboard
Copied
I've applied several without trouble via the "input LUT" option in the Modify/Interpret Footage CM section.
So ... what's happening with your rig is a puzzlement. Which ain't surprising given the current state of CM in Pr2022, which has way too many broken points.
Proxies ... do not follow any CM from the clip settings a user makes, and we have no way to manually correct them ... as just one of the major issues.
I re-read a PDF they put out a few months ago on CM in 2021. Ann Bens posted it, and I went back and re-read. Included in that was the statement that proxies would follow clip CM which they don't.
And that if you modded the clip CM Premiere would make appropriate sequences for that clip. Which it doesn't. Take an HLG clip and override to Rec.709. Right-click, "new sequence from clip" or drag to a blank timeline panel. Either way, you get an HLG sequence.
Scopes supposedly auto-readjust to sequence CM settings, but ... no, they don't. You have to manually reset them.
Yea, there's a lot of broken here.
Neil
Copy link to clipboard
Copied
Neil, bring this problem to the developers. We need to eliminate this. So it is much more convenient to develop the material than to do it on the timeline, with regard to automation and productivity of the workflow. You set up and work in one place.
Copy link to clipboard
Copied
I'm trying, Baffy, I'm trying!
I've posted on the Public Beta forum about this stuff, which the engineers do see.
Proxy Color Management Broken with Log or HLG media on Rec.709 Sequence
I've posted UserVoice requests here and other places for the new CM panel and the issues with proxy color management. We need people to upvote these.
Color Management Panel
Neil
Copy link to clipboard
Copied
Neil, I didn't stay away.
I ask all users of the product not to pass by and support the speedy correction of flaws with the correct display of color in projects. Follow the Neil link above and vote. It depends on your participation how quickly the developers will see and begin to fix it.
Copy link to clipboard
Copied
SUPER IDEA.I'm waiting for this feature.
Copy link to clipboard
Copied
I followed these steps and it works to view the footage in the correct colors in the preview window of premiere, but the issue appears once again upon export. What's the solution for that?
My footage looks fine in the preview window after following these steps, but to export in H.264, premiere does not let me choose the color space defaults to Rec.709, which again makes the footage all overexposed. I changed the profile to high/high 10, the footage looks fine again, but can't be open with windows media player (which is what my clients use) and it can only be opened with VLC.
So what export settings can I use to have things work as they have always before until this update? How can I have my footage look normal AND be played on regular players after export?
Copy link to clipboard
Copied
Is your sequence color management set to Rec.709, or HLG/PQ?
You need to have the same settings throughout ... clip properties, sequence, and export to get an expected result.
So for your purposes, do you want Rec.709 export? Then check the clips in the bin. If they are other than Rec.709, use the Rec.709 override.
Then make sure the sequence is set to Rec.709.
Then your exports should be able to use the 'normal' export settings, and be as they have been.
If you want an HLG or PQ export, post again, we'll walk through that process.
Neil
Copy link to clipboard
Copied
Hi Neil.
Reading your message made me realize I had only followed the first step, which was to set the sequence to Rec.2100 HLG, but I had not done the override on individual clips.
When I did the override, it seems to now work, but it is quite time consuming as each individual clips have to be modified, and the colors still aren't quite looking as good as they did before.
Does it mean from now on I'll always have to modify every single clip individually for any future project on Premiere? is there a simpler way to do this? (should i change my recording settings?)
Thanks for you help
Those are my clip properties:
Type: MPEG Movie
File Size: 16.82 GB
Image Size: 3840 x 2160
Frame Rate: 23.976
Source Audio Format: 48000 Hz - 16-bit - Stereo
Project Audio Format: 48000 Hz - 32 bit floating point - Stereo
Total Duration: 00:24:37:00
Pixel Aspect Ratio: 1.0
Alpha: None
Color Space: Rec. 2100 HLG
Color Space Override: Off
Input LUT: None
Video Codec Type: MP4/MOV H.264 4:2:0
Copy link to clipboard
Copied
Come to think of it, if it's possible to export in HLG (since that's hwo my footage was shot) and make it readable by something like Windows media player, and looking good, I'd be happy to be walked through the steps 🙂 might save me time for my current project.
Going forward I might just keep using 2021
Copy link to clipboard
Copied
You can select entire groups or bins of clips and do a single Modify/Interpret footage action. Saving time, certainly.
Going forward, they will be undoubtedly adding even more color managment options and default behaviors, probably expanding the media affected. They have to, realistically. As the media is now coming in including so much HLG/PQ and other HDR type color space/gamut from various cameras. Let alone phone media, which seems to heavily lean toward HLG now.
There really aren't many places you can export HDR content to at the moment, though that is changing. So for many people, as we don't have monitors really capable of higher nit counts and especially the needed color width & depth, it's problematic at this point to try and deliver something in say HLG or PQ that actually gets watched in HDR.
So you could simply take your HLG clips in the bin, do a color space override to Rec.709, use a Rec.709 sequence, and the export will be as you've had before with Rec.709 media.
And note, Premiere WILL export in Rec.709 without tonemapping anything if you don't set the export TO HLG/PQ. So an HLG timline that looks fine looks cruddy on export. Again, until you actually set the proper export settings.
Exporting in HLG or PQ is a bit more picky work on the export than Rec.709. Each format/codec that Premiere can export in in HLG/PQ has a different bunch of settings needed. Those are found in the Export dialog's Video tab.
For example ... H.264, you need to go minimum to down to set the Render Max Depth to on, then UNCHECK the Profile box so you can set that, and High is the lowest possible setting. Check that the HDR Graphics White is set to the 203 nit option, and you're pretty much done.
If you've got a deliverable's spec sheet that lists more settings like Min/Max stuff, then ... you need to go to the High10 Profile, which opens up more settings for you. Oh ... joy.
In the QuickTime format, you can select ProRes HLG and PQ presets that set most things for you. But I do recommend setting the 8-bpc or 16-bpc to the 16 bits option.
Neil
Copy link to clipboard
Copied
And I do have a UserVoice request for an actual Color Management Panel. A one-spot panel that we can keep open to set, check, and modify CM from spaces/gamuts through default behaviors with various media types.
This would save us users TONs of time, heartache, frustrations, and ... anger management counseling. It would be nice to get as many upvotes on this as possible. Or this is going to become a nightmare, worse than it is.
One Panel to Rule Them All ...
Color Management Panel
Neil
Copy link to clipboard
Copied
Thank you for taking the time to explain 🙂 the one panel idea is good, I'll vote it up right now 😄
My export now looks how it's supposed to and my headache is (mostly) gone.
Thanks!
Copy link to clipboard
Copied
That headache from banging your head repeatedly against the desktop ... doesn't always go away so fast ...
Yea, been there done that. Ouch.
Neil
