- Home
- Premiere Pro
- Discussions
- FAQ: Premiere Pro 2022 Color Management for Log/RA...
- FAQ: Premiere Pro 2022 Color Management for Log/RA...
FAQ: Premiere Pro 2022 Color Management for Log/RAW Media
Copy link to clipboard
Copied
The Premiere 2022 release, the 22.X build series, introduced several new Color Management options and changed the default handling for several LOG and RAW media types. Also changed were the default handling for 'device produced' media in HLG or PQ. Users need to be aware of the changes to continue using several Sony, Canon, and Panasonic cameras in particular. And with the media now produced from most phones and "devices".
I'll give a short practical control setting list, and then a more complete explanation below.
(Also check out this article on monitoring HDR within PrPro2022)
Clip Color Management
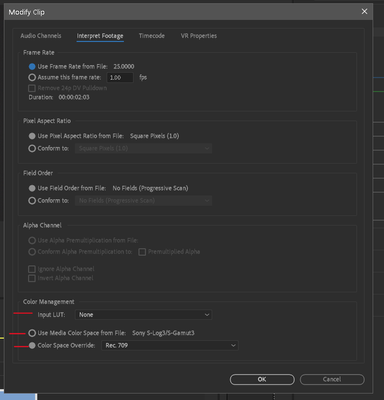
There are now color management settings for clips in the Project panel. Right-click one or more clips, Modify/Interpret Footage. Down at the bottom are several color management options. If your media is 'blown out' on a working timeline, this is where you will start to correct it. For most work at this time, you will want to use the Rec.709 override option.
There were a few manufacturer Log formats that had default transform behaviors in the previous version. Those have all been changed, and many more log formats are now recognized as such.
In Premiere Pro 2022, recognized Log formats may or may not be transformed into Rec.709, the user may need to do so in the Project panel.
And any phone or other "device" produced media that has an HLG or PQ color tag, may or may not be transformed to Rec.709 on import.
Again, unless the user chooses to do so in the project panel.
One further caveat: if you have a clip that Premiere recognizes as HLG or PQ, and use the command to "create new sequence from clip" ... Premiere may still create a sequence with a Rec.709 color space. While dropping the HLG clip onto that sequence without applying color management to Rec.709.
You must check the Sequence color space now.
These are major changes in default color management behavior. And at this time there may be inconsistencies in the process. And still, some media types allow a user CM setting in the Project panel, but some do not.
Sequence Color Management
There are now color management settings for Sequences. With the timeline panel 'active', with a blue line, go to the Sequence/Sequence Settings menu. There are now options for sequence color space there. Again, for most work, using the Rec.709 color space is still the 'normal' expected one for output deliverables and monitors. This should (nearly) always be set the same as the clip's color management.
At this time, Premiere may still 'default' to creating a Rec.709 sequence even when you drop an HLG or PQ on a blank timeline, or use the "new sequence from clip" command from the bin. Yet not apply any transform to fit the clip to the sequence. You have to check and correct sequence settings as needed.
Scopes Color Management
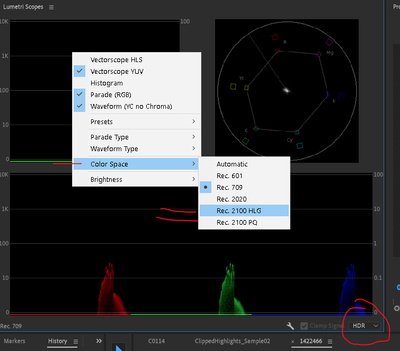
There are also color management settings in the Scopes panel. Right-click, select the desired color space from the list of Rec.601, Rec.709, Rec.2020, and Rec.2100 in either HLG or PQ. If you are working in HDR, then after setting the scopes to an HDR color space option, you will need to also set the scope scales to HDR with the control in the lower right corner of the Scopes panel.
Export Color Management
To export in HLG or PQ, anything other than Rec.709, you should scroll down through the Preset list for your desired Format to select the HDR options, for either HLG or PQ. They now do have the presets, and it makes exporting in an HDR format much easier and more reliable.
But you do need to SELECT the HDR presets to get a proper HDR export.
SDR Exports from HLG/PQ Media*
To get "standard dynamic range" or SDR exports from sequences or clips that are HLG/PQ, you need to set your format/preset in the Export dialog, but also go to the Export Dialog Effects tab and select the "SDR Conform" option.
The default settings for Brightness, Contrast, and Soft Knee may work to at least get the image within usable values. To get an exact result, you would need to test those settings yourself.
Making SDR Proxies from HDR/HLG/PQ Media*
To make proxies from HLG/PQ media that can be used in an SDR/Rec.709 timeline, you need to (as above) go to the Effects tab of the Export dialog, and select the SDR Conform option.
Why did things change?
The nature of the business and the gear is changing rapidly. As of this date, 26 November of 2022, most of the many colorists I know have still not delivered a single HDR job professionally. A few others have done quite a number. But the vast majority of content being produced at the moment is still Rec.709's "SDR" ... standard dynamic range.
So why are changes being implemented in Premiere Pro at this time?
Because first, the cameras are changing rapidly. Many prosumer and pro cameras are now able to set a CM for a clip to either HLG or PQ. Camera operators are frequently selecting those settings because they want the widest dynamic range possible. So for many editors, the HLG or PQ or other wide dynamic range media is what they are getting handed to work with.
Even though many of the other visual assets of a job, and the final output, will still be in Rec.709.
Second, many phones and "devices" are now defaulting to recording in HLG/PQ, and so many prosumer users have media that is in those wider color spaces. Many of the clips that have been posted on this forum since the 2022 release are phone media with HLG or PQ 'tags'.
And third, more content is being produced or delivered as HDR, and the percentage of content produced as HDR is going to go up perhaps fairly rapidly over the next year. The users need an app that can accomodate the new dynamic range and tonal range needs.
What are SDR, HDR, and Rec.709 versus "wide gamut color"?
There are two differences between Rec.709 media and most HDR media, whether P3, HLG or PQ.
The first is the tonal range difference. Total image brightness, or contrast range. Rec.709 is now referred to as SDR, or standard dynamic range. It has a far narrower tonal range limitation for the visual data. It is designed to be used compressing the visual tonal range into a 100 nit total brightness range. It is what we've been using all along. The broadcast TV standard.
HDR media, whether HLG or PQ, is non-limited for tonal range values. And may vary up to several "stops" of tonal difference past what SDR allowed.
The second difference between HDR and Rec.709/SDR is the color space and gamut difference.
Rec.709 specifies the color space using the sRGB color primaries. It is also a fairly "shallow" color gamut.
HDR can be one of several wider color gamuts such as P3/D65 or Rec.2100HLG/PQ or Rec.2020. The difference is not only that the color space is "wider", the gamut ... think of this as the 'depth' of color hues available ... is also "deeper". (Currently Premiere handles all wide-gamut media in a Rec.2020 or Rec.2100 "container".)
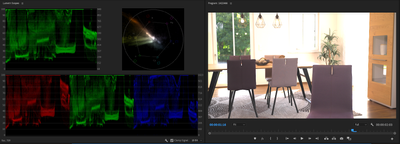
To demonstrate the difference, this Sony S-log-3 MXF clip shows dramatic dynamic range and color space/gamut differences in the Lumetri scopes and Program monitor, depending on how it is "managed". As imported, it was interpreted as an HLG clip in the bin. Creating a sequence from the clip, Premiere made a Rec.709 color space timeline.
But when this HLG clip is placed on a Rec.709 timline, the scopes and the image will be completely blown out.
That HLG-interpreted clip will not be displayed in a usable fashion on a Rec.709 sequence. This shows the scopes of the Rec.709 sequence, scopes set to Rec.709, but the clip properties set by Premiere to HLG.
Note how note only is this clip totally 'blown out' to whites for much of the image, but the Vectorscope YUV color data is way outside of allowable range.
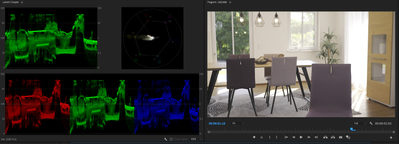
This next graphic shows the same clip. I went into the bin, using Modify/Interpret Footage, and selecting the CM option to Override to Rec.709. Now Premiere showed it in visual "log" manner within the Rec.709/SDR range, with tonal values from 18 to 85 nits.
Just to get it to the full 0-100 nits of SDR took expansion of the image via contrast controls. And after a slight contrast expansion, it was a very nice image. This is the behavior we have expected in the past.
But the same clip, using the "original" Sony S-log-3 Interpretation in the clip properties, but with a change in the Sequence Settings and the Scope color management settings to HLG/HDR, is shown here:
The only clipping is the whites of an outside window, and there are no color excursions. You would need an HDR capable monitor set properly between the OS and Premiere to see the image correctly in the Program monitor, of course. And note those nit values on the left-side scale! In excess of 4,000 nits!
By simply adjusting the Exposure slider down, and lifting the Color Wheels 'shadow' tonal slider, I was able to get a very good HDR image displayed with very little clipping anywhere. This on my little 358 nit monitor in its "HDR Emulation" mode.
That is a massive difference in the display of the same image: from a 69 nit tonal range in SDR, to a 4,000 nit tonal range in HDR! And both images are quite nice images when the entire color management 'chain' is set properly. The image can be used either Rec.709 or HLG.
How usable are HDR videos at the moment?
Very few current consumer devices can even sustain 1,000 nits. The only displays fully capable of 4,000 nits and up that I know of currently in use, are the high-end Grade 1 Reference monitors by FSI and Sony. Those monitors sell for above $20,000 USD.
Relatively few screens can actually show brightnesses above 400 nits. And most colorists consider an absolute minimum of 600 nits as necessary to allow for a 'base' feel of HDR-ness to the content. It is coming yes, but ... fully HDR capable screens of the 800 or better nits for consumer use are still spendy and not that common.
Previous Behavior for LOG/RAW Media
In 2021 and prior releases, the log and RAW media types, where PrPro had any 'default' behavior, it was to apply a manufacturer's transform process to conform the clip to a Rec.709 "view". Most users were unaware of this process. There were only a few formats where Premiere applied a default transform.
And if Premiere applied a default transform, any changes the user made in the Lumetri color panel were applied after the default transform process. If the transform process clipped whites or crushed blacks, that image data was simply gone.
Many other log media types were simply displayed as "log" images, but with an assumption of Premiere Pro within the Rec.709 standards. And showed in the monitor with the narrow or compressed 'native' tonal range we are all used to seeing for Log media. The user needed to manually 'normalize' the contrast to a full Rec.709 tonal range.
There were (and are) several formats where there is a special panel on a sequence for Source settings. Such as for RED, Arri's ArriRAW, and BlackMagic BRAW camera media. Those haven't changed.
Changes in Premiere 2022
The Log and RAW media types that had a default transform to Rec.709 in previous versions may not do so anymore. Premiere Pro 2022 also does recognize many more of the Sony, Canon, and Panasonic log formats on import. And then may or may not apply a transform to Rec.709 when those images are applied to a timeline.
We users understand and expect that a Log image, displayed on a Rec.709 timeline, looks very "log-ish". That grayed-out look, no blacks, whites, or saturated colors.
But take that same clip, without any transform process, and drop it on an HDR sequence. The image will show as the full range image from the camera. In fact, with a very high dynamic range from blacks to whites, and full color. Yet again, this is without any "interpretation" or transform on the part of the program.
HLG is 'Hybrid LOG Gamma"
And that is what it seems we are all seeing with Premiere Pro 2022 and some log media formats. Log media is at times simply displayed at full image values as if on an HDR timeline set to HLG, unless the user overrides the new display default. And those values are typically well above the 100 nits max of an SDR/Rec.709 timeline.
Again, until and unless the user changes the clip properties.
The old default: transform to Rec.709. The new default at this time seems to be:: no transform unless the user chooses to do so.
That is a massive difference in how the same file is 'interpreted'. How it is displayed.
Processing changes: bringing back clipped White values
The processing 'chain' has also been changed. For "clipped" data due to any auto-tranform, the Lumetri panel tonal controls may all be used to bring down too-bright values. The Exposure slider in the Basic tab has by far the widest capablitity for White tonal value changes so that should be your 'default' control to bring back blown out whites.
If additional control is needed, the Basic Whites control, the RGB Curves tool, and the Color Wheels tonal slider can provide additional changes. Clearly, the default transform is applied after the Lumetri controls.
Both the Rec.709 and HDR/HLG images will be useful and valid for certain workflows. But the user MUST know how to manage the color management within Premiere Pro to get the desired result for each job.
R. Neil Haugen
(image used by permission, and courtesy user " maRedlich ")
[Edited 7 December 2021]
[* Edits added 5 January 2022]
Copy link to clipboard
Copied
Ouch!
You could try modding whichever Proxy preset you use, to set the Effects tab SDR conform check box to 'on'. If it works for you, that's a huge timesaver then. If ... sigh.
Neil
Copy link to clipboard
Copied
I would love to try modding the proxy preset, but I can't fnd the file to modify it. It's a Quicktime preset called ProRes Medium Resolution Proxy - one of the few that come up in the Create Proxies dialog box. I'm on a mac - can you tell me where to find it? And I would modify it in ME, yes?
Thank you!
Copy link to clipboard
Copied
They don't make this stuff easy, do they?
I'm outta the shop on my tablet at the moment, and trying to remember the convoluted placement of the presets and all is ... not reliable.
So you might want to make a new export/encoding preset in Me, with the settings you want. Then make that into an ingets/proxy whatever preview in the second step necessary. Then try that back in Premiere. You'd need to check their Help for the full details on creating a proxy preset.
Neil
Copy link to clipboard
Copied
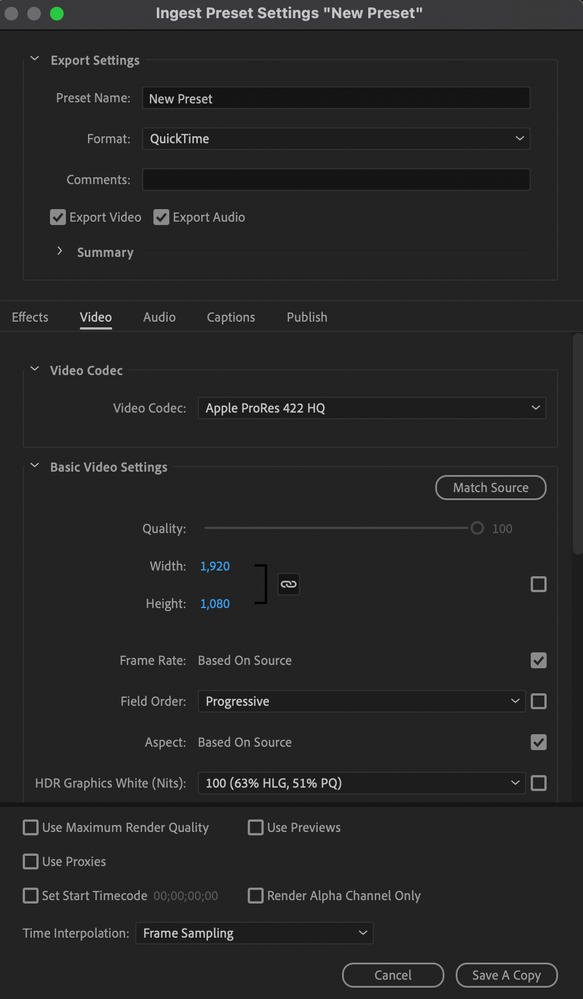
I suspect there's a bug in Premiere that won't allow an ingest preset made in ME to be used as a proxy preset. No matter what I do, if I try to make an Ingest preset in ME and follow all the directions (including making sure that frame rate and frame size are NOT set to "Match Source," in PrPro when I try to use it as a Proxy preset, I get a Preset Mismatch complaint, saying it's not an Ingest Preset.
I'd love for someone to prove me wrong.
Todd
Copy link to clipboard
Copied
Making a proxy preset is a multi step process. The first part is
- making the encoding preset,
- the second part is making an ingest preset that uses the just-created encoding preset for the actual settings.
- Then you export that out of Me.
- Then in Premiere you have to add that new preset in the Proxy creation dialog, "Add Ingest Preset" button.
Video Revealed Working With Proxies
Colin covers it here, skip to about 10:38 to get to the steps to make a new proxy preset. I just made a couple a couple days ago.
Neil
Copy link to clipboard
Copied
When I choose Create Ingest Preset in ME, I get a totally different-looking dialog than the Colin presents in that video. Here's what it looks like for me:
?????
Copy link to clipboard
Copied
Woa, that's giving you the Encoding preset settings, NOT the Ingest ones!
Wonder what's up with that? @Kevin-Monahan you're a Mac dude, got any ideas?
Neil
Copy link to clipboard
Copied
I reinstalled ME and now the proper dialog shows up.
Todd
Copy link to clipboard
Copied
Have had similar wrestle with ingesting FX6 slog footage and modifying every single clip to REC709 and also creating proxies. Left M1 laptop running for a couple of days to create 10 hours of proxies only to find they had ugly colouring and blown out highlights. Pretty amusing, but I've kept the previous version of Premiere and use that for proxies now. Sigh. BTW, no one's ever been delighted with the labyrinthine process of creating proxy presets. Thanks for the above thoughts and help.
Copy link to clipboard
Copied
They completely rebuilt the color system for 2022 ... we didn't have to do any color management prior, as everything was handled in Rec.709. Now, yea, the users have to take control with anything that "could" be either HDR (typically HLG) or SDR (Rec.709).
A bit more work, yea, but select groups or bins of clips, do the CM work in batches ... not on individual files. And some log formats from Sony, Canon, and Panny have been 'assumed' to be HLG ... asl HDR is actually log-encoded and so it's assuming with some of them that as they are log, they're intended as HLG.
Which has been a right royal pain in the tushie. It's getting better patch by patch, but still ... ain't perfect yet.
And yea, their proxy setup isn't as slick as it could be ... sigh.
In the public beta, they've got a better process for creating proxies for log media, that seems to work for most users. And you can have it installed alongside your shipping version without issue.
You can also open a 2022 project in the public beta version, do something like make proxies, close, and reopen in the shipping version without issues.
So you might try that. Test, of course ...
Neil
Copy link to clipboard
Copied
I am perservering with HDR and Premiere Pro just for the challenge and to be able to put a few HDR videos on YouTube although the majority of my output is SDR. Is there any guidance on how to use the scopes for HDR. I understand how to switch them on but would like some guidance on how to interpret them.
Thank you
Copy link to clipboard
Copied
Ahh, HDR ... scopes ... and what the hay do you set them to?
How many sustained nits can your monitor handle? Not that many can even hit 600 steadily yet. Which makes working in HDR dicey to begin with. And that's just dynamic range, we're not even talking about having enough color gamut/volume for full HDR work.
Colorists tend to consider 1,000 nits to be the absolute lowest value for a monitor for grading HDR, and it won't work for full streaming work, as they require more nits in the reference monitoring. Many of "us" out here just testing have to get by with 400/500 nits if we're lucky.
For scopes ... the left side scale is the nits scale, and its logarithmic, so as you go up the numbers get 'tighter'. Which is actually ok as the first 200 nits is really the crucial area.
Essentially, what would be your 100 nits 'white paper' in SDR work, goes to about 200/203 nits mostly. Above that, it's mostly speculars, but in HDR, those speculars may not have detail but they can have full color. In Premiere, it can be a bit hard to see what's the "paper white" and what's specular looking at the monitor.
So the vast majority of your program content should be between 0 and 200 nits, with spikes up above that.
According to most colorists, the two big wondrous gains in grading in HDR are 1) much more shadow detail/depth/volume, and 2) incredibly more colorfulness across the image.
It isn't actually about being brighter per se. And I've got a link to what seems to be monitor setup work in HDR in Pr2022, which is quite different than it was in Pr2021.
Neil
Copy link to clipboard
Copied
Thank you so much for your answer - I have to keep pushing myself although it is good that I can generally retreat to SDR if things get too much (or file size just silly) and I think most people still watch in SDR.
Copy link to clipboard
Copied
Hello, Neil!
Thank you for the time and knowledge spent on creating this post.
I assume you've not found a way to select as a whole that Premiere interpret these Log profiles as Rec.709 like it used to? If I understand correctly, Adobe is more or less saying "ok everyone we're defaulting to an HDR workflow now!" or is it just an error in the Premiere release? My team shoots on Sony FX6s in Cine-EI mode, and as we're slowly updating Premiere we're just going to have to add this frustrating step of telling Premiere to use Rec.709 on every single clip? Is there any reason to Adobe making this move? I can't consider every possibility but it seems like this change will help almost no-one and be frustrating to almost everyone?
Thanks,
Tyler
Copy link to clipboard
Copied
Sadly, there isn't a way to set user selected defaults in Premiere. I've argued for such a thing ... because the current "system" they're creating is to me a total mess. We need the control and abilities they're building in, BUT ... we need to be able to see what's what and make changes quickly and efficiently.
But they're putting the various controls all over the app, because of where "they seem to best fit" ... when that's not HOW we'll use them! And making users hunt for things when you don't even know for sure it exists or what it looks like if you do see it somewhere ... is next thing to insane.
So I've got a UserVoice request for a single Essential Color Management Panel ... one panel to rule them all! ... heh heh ... with all the settings for clip/sequence CM, including defaults and overrides.
As to your clips, at least you don't have to do that individually. You can select groups or entire bins of clips, right-click and apply the override to the whole group.
Neil
Copy link to clipboard
Copied
I keep coming back to this as I have to explain to coworkers at least once a week how to solve this issue, and I had a thought: would it be possible for someone to write a quick plugin to auto conform all clips to Rec709? Might not be worth it for everyone, but my team pulls footage constantly from a server for different projects and the workflow is just not condusive for having to either wait until you have all your footage imported to interpret, seeing the stretched out footage until you do, or interpret footage every time you bring a new clip in... maybe a plugin could potentially solve that? Unfortunately I have no experience writing code like that.
Copy link to clipboard
Copied
No code experience here myself, and I'm not sure a 'simple' plugin could do this.
Which is part of why I think we users need that "one panel to rule them all" for Color Management, where users could set both default behaviors for different types of files, plus override controls also. Similar to the concept of Essential Graphics, Essential Sound ... ergo my UserVoice request ...
Neil
Copy link to clipboard
Copied
Agreed, my thought in a 3rd party plugin is just that I don't have faith in Adobe to solve this problem in a reasonable timeframe. haha but I upvoted your "one panel to rule them all", here's hoping our voices are heard!
Copy link to clipboard
Copied
I need expert help, please...
I have read in great detail how to solve the color managment problem in v22; by changing to HLG in the sequence settings or by forcing the footage to Rec709 by using the interpret tool.
Some background. I started this project in v22 and have made ZERO updates during such time. Over the past 4 weeks I assembly edited (15) 20 min sequences shot on 2 Sony FX9s. Everything was seemles and I was unaware of the new color managment. I finished the edit and the color correction using Lumetri. Everything was fine and looked fantastic. THEN...I opened up the project and evrything is BLOWN OUT. I have read how v22 has been changed, the problem is I made no changes or updates. All of a sudden this happened.After hours on the phone with Adobe techs they are no closer to finiding a solution for why this all of a suddend happened. After 2 days of trying to fix the problem, then Premiere reverted back to the 709, today I opend the project and it's blown out again...it keeps switching back and forth and I don't know how to finish the project?
Second problem, I can not interpret the S-Log footage and force to Rec709 using the modify and interpret dialog box. I originally created merged clips with the sound mix team. This greys out that modify feature . Is there a fix or workaround for that?
I'm at a loss on how to proceed, I cannot even give to the client for review the way it looks. Do I just XML and finish color in another program (losing weeks of work) or Do I overcut my edits with the original footage as to allow me to use the interpret feature that is currently greyed out?
Copy link to clipboard
Copied
Copy link to clipboard
Copied
It is 'recognizing' it as Rec.709, and showing the log-encoded nature of the media. You'll need to do a normalization process manually probably for the first clip, and you can then save a preset or even LUT with that for further clips.
Apply the preset to the clips in the bin, bingo bango bongo done.
Neil
Copy link to clipboard
Copied
Neil, having same issue as issue as above with Sony a7s3 MP4 S-log3/S-Gamut3. Can you give further deatil on "normalization process manually probably for the first clip, and you can then save a preset or even LUT with that for further clips?"
thank you!
Copy link to clipboard
Copied
Hello!
Quick question:
I have a project I am already working on. We used multiple cameras, 2 of them shot in S-log 3.
One was an sony a7sIII, which premiere handles just as before. Giving me a washed out "log" image
The other camera was a fx6 which premiere does recognize as S-log 3 and shows a contrasty image.
Since everything is color graded and done, I used the workaround and interpreted the color managment of the fx6's files to rec.709 and everything looks the way it should in my sequence.
Now when I export a video through Premiere everything looks good. However if I choose to export through Encoder, it ignores the interpretation of the fx6's files and those clip's colors are all broken.
Is there any way to solve this at this moment? My plan right now is ofcourse to export through Premiere pro, but there are a lot of small videos that I am exporting, and doing them one by one is going to take a long time.
Thank you!
Isak Rautenberg
Copy link to clipboard
Copied
That's a very good question. I've not done a lot of exporting via Me recently, the one that had files "with issues" went through fine, though. But that was some iPhone files I'd been sent.
There's an option in Me's preferences that sometimes helps to turn off, for some reason ... it's called "Import Sequences Natively" ... and may try going to the Me Preferences/General dialog, about halfway down, and un-check that Import Sequences Natively box, give it another try.
Me does have some issues with working with media it sees as HDR/HLG though ... may just not work.
Neil
Copy link to clipboard
Copied
Thank you Neil,
I found the option and un-checked it. Unfortunately the problem persist and the log clips from the fx6 comes out ruined, while the log clips from the a7sIII and the other rec.709 clips are all as I want them to, and just like they look in my sequence.
It's gonna be a long night manually exporting videos one by one. 😄
If anyone knows of a fix or work around, please let me know.
