 Adobe Community
- Home
- Premiere Pro
- Discussions
- Re: How to install 3rd party LUTS to Premiere Pro ...
- Re: How to install 3rd party LUTS to Premiere Pro ...

Copy link to clipboard
Copied
I've got some free LUTS I want to try but I also am interested in buying some. I use them a lot for creative reasons. I mostly use the ones in the creative panel which are the .looks LUTS. The LUTS I downloaded are not .looks. Regardless, even if they were I would have no idea how to get them in there. If they are .looks can I just put them in the folder? I am on OSX Mac Btw.
If they are not .looks where can they go? Which folder is the folder that contains the LUTS found in basic correction?
I also am interested in more free LUTS and I would like to buy a suite of LUTS that gets me pretty much all I need. I like some film LUTS but I'm mostly going for using them as a creative type of thing. I have found a few companies online, some are 20 dollars for a suite, some are 50, and some are 200 dollars. I have no idea who is trustworthy, who has the worthwhile LUTS, etc. If you know any website that sells them and possibly offers some free ones let me know.
Other than that, how do I get it in there if it's not a .looks?


 1 Correct answer

 11
Replies
11
11
Replies
11

Copy link to clipboard
Copied
Click the drop down list and choose Browse...
Copy link to clipboard
Copied

Copy link to clipboard
Copied
That's not the correct answer.

Copy link to clipboard
Copied
For most purposes, LUT's and even Looks (just an Adobe-named mini-variant of the cube format) from 'outside' the program need to be accessed by navigating to them. In both the Basic and Creative tabs, the second and third options ... " [Custom] " and " Browse " ... bring up a navigation/finder window, navigate to the folder where you store your created or acquired LUT's/Looks and select one.
Some cube LUT's can ... if put in the "technical" LUT's folder ... show up in the drop-down lists. Many don't. And with many cube LUT's and Look's you can simply change the part after the dot to the other ... and they work fine. Not all do, however.
A bit of advice on the use ... "tech" LUT's are designed to either bring a "flat" camera footage (shot in any of the Log formats) "back to normal" or to take a camera into say Rec709 or from Rec709 to some other color space by applying specially designed curves in their lookup tables for both luma & chroma. They are always built of course with the camera settings totally 'nailed' as far as white balance & exposure within the carefully setup lighting contrast. So ... for best utilization, it is good to 'feed' them a properly WB, exposed, and contrast clip.
How?
The ideal is to have the clip be in the second step of the process chain, and set 'in place' ... then you go back to the first step and correct the WB, exposure, & contrast as seen through the tech LUT in the monitor & scopes. So within PrPro, you'd invoke a Fast or Three-Way color corrector effect first ... then go to the Lumetri Basic tab, and apply your tech (corrective) LUT. Then go back to the earlier effect (which in the Effects Control panel will be above the Lumetri Effect control) and do your basic technical "grading" for again, white balance, exposure & contrast. Watch the Lumetri scopes while you're doing this along with your playback monitor ... though if you learn how to study the scopes, you'll do more in "tech" grading looking at scopes than the monitor. The idea is to get the program looking technically correct ... not stylized.
After this, go back to the Lumetri panel and work away doing your style work. All the actions you do there are in the process after the LUT so they don't affect it at all.
Now ... if you're also using a style LUT/Look, say a film-stock/print-stock combo ... let's say the "Kodak 5205 Fuji 3510" option on the built-in list. A film/print stock LUT is designed to give the "look" of a particularly camera film-stock (in this case, the Kodak 5205) which was then printed for release on the Fuji 3410 print stock. The print-stocks are transparent films with ... well, very similar to a color print's emulsion so it's a positive image ... sort of like an old slide film. They each had their own "feel" so to get a look like a particular film you need to mimic what that film was shot on and then printed on that particular release print looked like.
But wait ... that specialized LUT/Look has the final curves for chroma & luma baked into it ... if you change anything after that LUT, you no longer have that precise look/feel ... so why bother using it in the first place?
So ... very much like the tech LUT above, you need to feed it the right signal content in your styling work so that ... seen through that LUT/Look, your project looks like you want.
To do this ... I suggest adding another Lumetri effect after the first one, as there's no other built-in way to apply LUT's in PrPro. Now ... using the controls from the Effects controls panel (not the Lumetri panel on the right side) ... add in your film/print or 'style' LUT/Look.
Then ... go to that first instance of Lumetri in your Effects Control panel ... and use the controls there while watching your scopes (some) and your program monitor a LOT ... and make your project look ... "right".
Sounds complicated ... but do it once, and it's not. Both steps are realistically the same.
Neil
Copy link to clipboard
Copied
Thank you for this detailed answer. What is the "technical" folder? I'd like to add a .cube file there so that I may use the drop-down menu to access the LUT instead of navigating to it for every clip.
Copy link to clipboard
Copied
In Windows, here's the location ...
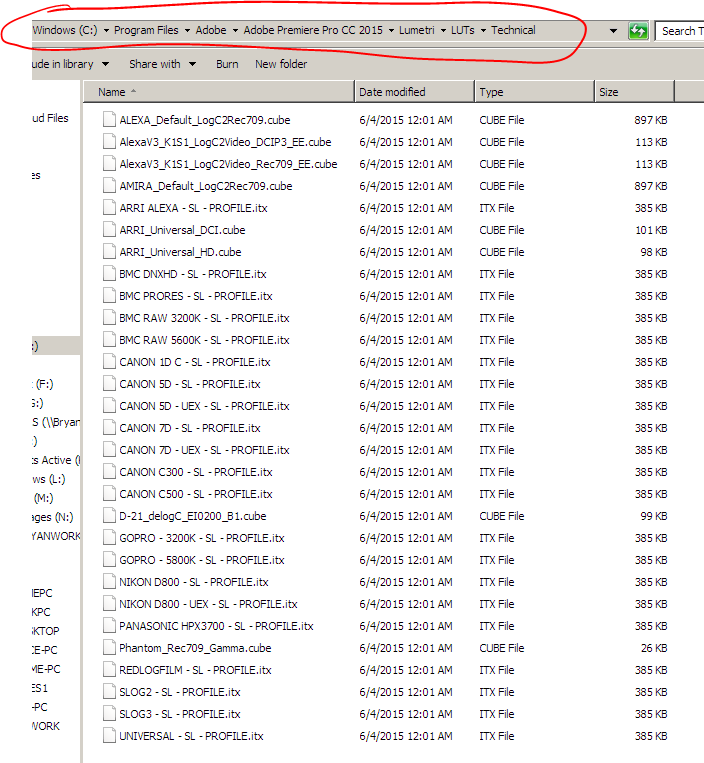
Neil

Copy link to clipboard
Copied
Where is the location on a Mac? Do you know? I have been encountering many problems with importing .cube and .3DL files for LUT presets in a batch. Is it possible to import multiple LUTs so they can accessed between different projects? Would really like to make a custom folder inside the Lumetri Presets Folder in the Effects tab instead of selecting the Input LUT from Browse for each project.
Copy link to clipboard
Copied
Here's a copy of the contents of another thread on this sometime ago ... and you can search the forum for such things, of course ...
-----------------------
Hi, I discovered a solution. It is frustrating because most of the posts I found are from kind people offering advice, but who are using PC's. For this issue in Premiere Pro CC on a Mac, what PC computers see is not what we see on our Macs. The LUTS simply don't populate when the "Select a Look/LUT" window comes up - they cannot be navigated to (without performing a little tweak). As Vinay pointed out, they are contained in the "package contents" of the actual Premiere app on a Mac (as of this writing). Package contents cannot be navigated to from Premiere Pro CC. So, here is the solution:
1. From a regular Finder window (not within Premeire), as Vinay described, "Go to Application folder>Premiere Pro CC. Right click on the Premiere Pro CC.app and select show package contents. Then go to Content>Lumetri."
2. Double click on the Lumetri folder.
3. Locate the LUTs folder.
4. Half-click on the LUTs folder and select "Make Alias"
5. Drag the new LUTs alias folder to a location where you can navigate to it from within Premeire (meaning anywhere but a package contents folder). I put it in my Apllication folder>Premiere Pro CC folder. Make sure you moved the alias, not the original folder.
6. Open Premiere.
7. Go through the process of adding the Lumetri effect to your clip.
8. When the dialogue box comes up to "Select a Look/LUT", navigate to your new LUTs alias folder. Boom.
This worked for me. Hope it works for others as well.
-------------------
Also, here's another thread, with info on putting LUT's/Looks into folders so they appear on the 'pop-ups' within the Lumetri panel. Also, Adobe has a LOT of help/info/tutorial resources you might find useful, check their help & resources and of course, the AdobeTV stuff.
Re: adding LUT's to Lumetri color?
Neil
Copy link to clipboard
Copied
Yea, that does help, but still doesn't solve my question of adding it as a bin so you can easily cycle between different LUTs from the Effects window. Can you make new bins to add your custom LUTs just like there are the Filmstocks and Speedlooks bins?
Copy link to clipboard
Copied
What you do is:
1) apply a LUT or Look to a clip in PrPro's Lumetri window with NOTHING else done to that clip ... then
2) right-click on the 3-bar icon to the right of "Lumetri" on the tab at the top of that right-side panel
3) select "Save Preset" and name it.
Your "preset" now appears on the Presets tab in the Effects panel, with any other saved presets you've made, and you can use those as you would the ones in the Lumetri panel. I haven't yet figured out how to get one into the Lumetri effects panel listing ...
Neil
Copy link to clipboard
Copied
For the Creative tab, just figured a bit more out ... that list is compiled from the similar folder area above, but it's taking from the following two folders:
Lumetri/Looks/Cine Looks
Lumetri/Looks/Filmstock
To be listed in the creative tab, your Look file must be in one of those two places, and MUST be a Look format file ... and will only show in PrPro if it's started up after you put the Look file in those folders.
To make a LUT into a formal Look, open up a clip in SpeedGrade either via Direct to SpeedGrade link from PrPro or a new SpeedGrade project from within Sg. Use a clip with NO grading effects of any kind! Now ... click the "+" icon at the bottom of the lower left corner ...

Then the little arrow left of the "Film option to bring down the list, selecting "LUT" option pointed at by #2 arrow here.
That puts a LUT layer above the primary ... now go to the LUT navigational dot-dot-dot thing as shown here ...
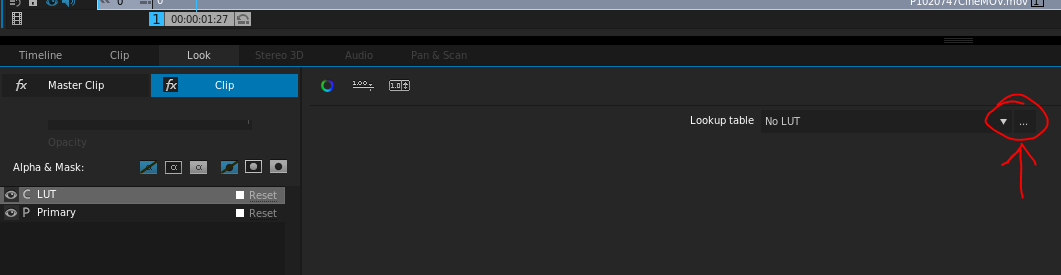
And find your way through your computer's files system to the LUT you want to convert to a Look file. Select it. You'll see your clip change.
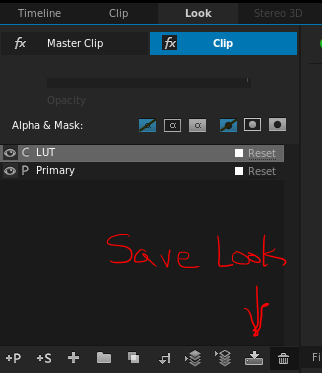
Now ... save that as a Look using the down-arrow-on-a-folder icon lower left ... so:
And bring up the "Looks" bar by the little boxes on the far right bottom of the color-controls panel ...
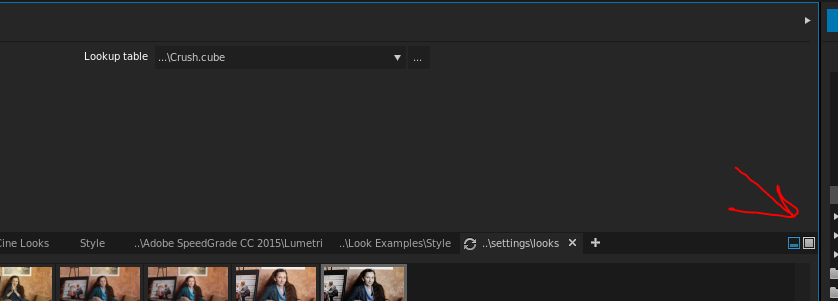
So you can see your Look thumbnail, click in it to rename it ... probably same as the LUT it's made from ...

Then ... hovering over the ". settings/Looks" header directly above the thumbnail, a pop-up shows you the navigational directions to the folder it's in .... copy it out of there, and put it in the folder as discussed above for finding it in the Creative tab.
Open PrPro, and voila ... it should now be in the Creative tab's dropdown list.
Neil

 AdChoices