 Adobe Community
- Home
- Premiere Pro
- Discussions
- Re: How to make all audio the same level?
- Re: How to make all audio the same level?

Copy link to clipboard
Copied
I have a sequence of many clips in premiere pro, and I could swear I heard of a way to make all audio about the same db or level. Is there a way to do this? I have some clips in the timeline with different levels and it would take ages to go in and manually balance their loudness.


 1 Correct answer

There is a way to do what you want, but it needs to be used carefully. If you open the Audio Mixer, select the Track mixer and then the track that your clips are on. Click on the arrowhead in the top left of the track you are working on (you may need to do this twice) and and access the small white window that drops down. (See Adobe Help https://helpx.adobe.com/pdf/premiere_pro_reference.pdf page 365 if you have not done this before) In the right hand side of this window, right click on one
... 12
Replies
12
12
Replies
12
Copy link to clipboard
Copied
There is a way to do what you want, but it needs to be used carefully. If you open the Audio Mixer, select the Track mixer and then the track that your clips are on. Click on the arrowhead in the top left of the track you are working on (you may need to do this twice) and and access the small white window that drops down. (See Adobe Help https://helpx.adobe.com/pdf/premiere_pro_reference.pdf page 365 if you have not done this before) In the right hand side of this window, right click on one of the small back arrowheads and select Amplitude and Compression and then Dynamics.
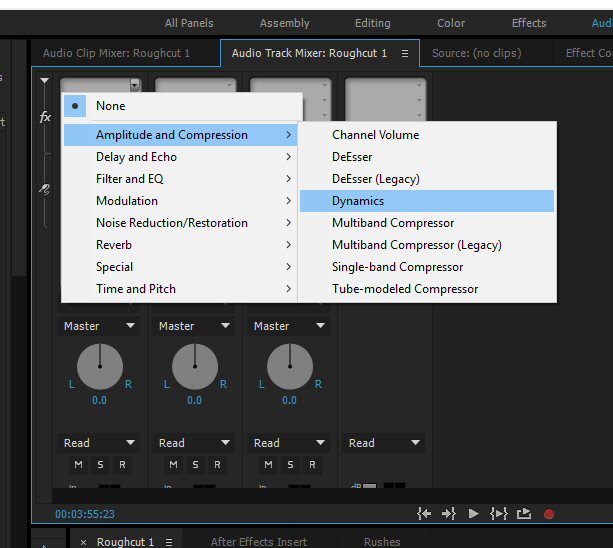
The word Dynamics will appear in the white window at the top of the channel mixer. Left click on the word Dynamics and select edit. I have pasted in below suitable settings.
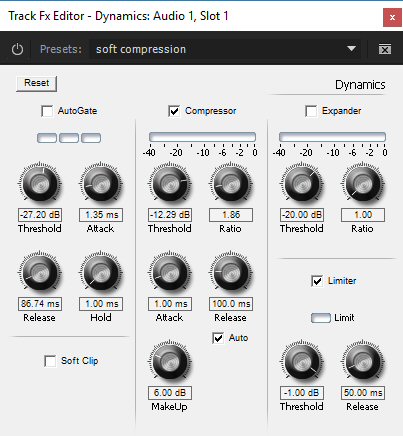
If you are not familiar with Compressor/Limiters use the setting above.
Now play back your timeline and listen carefully while watching the meters These setting should be fine for normally recorded material and hopefully you will not have to do anything more. If there are still problems the following may be necessary. Any clip that is too soft drag onto the audio timeline below (2). Anything that is too loud drag onto the timeline below that (3). For audio timeline 2 repeat the process with the Dynamics effect but change the MakeUp setting to 12.00dB. For audio timeline 3 change the MakeUp setting to 0dB. This is not perfect but it should give you a rough and ready fix. I hope this helps.
Copy link to clipboard
Copied
Thank you very much for the in-depth reply, I tried your settings but they were a little too harsh, but I played around with them and got something good.

Copy link to clipboard
Copied
Old thread, but here's to hope!
This helped a lot, thanks GuyUK ... but it still has a lot of difference between the loud and quiet parts, could you take a peek at my question please? Make all audio the same level

Copy link to clipboard
Copied
Improve audio with Dynamic Link to Audition | Adobe Premiere Pro CC tutorials
http://www.premiumbeat.com/blog/premiere-to-audition/
Select the Sequence in the Project, right click and choose “Edit in Adobe Audition > Sequence”.
in audition,
effects - match volume
select all files
drag into match volume
rms or peak amp
use limiting
click run

Copy link to clipboard
Copied
I´m not really an expert, but I select all audio tracks in timeline, click the right button and chose "audio gain / normalize max peak to: -6 dB, for example. Am I doing it wrong?

Copy link to clipboard
Copied
armandontg wrote:
Am I doing it wrong?
Not if it works for you.
MtD

Copy link to clipboard
Copied
This is the method I normally use. Select an audio clip, hit 'G' and set to normalize all peaks to 0. Of course now that I have that workflow, some other unknown is messing with it. Now I have all of my audio set to peak at 0 but instead of doing that, it peaks around -8. If I set to peak at +8, it peaks around -5. Set it to +9 and it peaks close to 0. I haven't adjusted track levels or the clips' sliders. I've concluded that Adobe puts these "quirks" into their software to force us to open another vein and rent more of their "quirky" software.

Copy link to clipboard
Copied
If you have Premiere Pro, you also have Audition available ... so you can quickly work in both Pr and Au for audio work. Pr has a widened set of audio capabilities since this thread started, but also has a much better link with Audition including non-destructive audio work if you use multi-track in Audition.
Neil
Copy link to clipboard
Copied
If someone has Premiere Pro it doesn't mean he also has Audition or After Effect or any other Adobe product, they cost lots of money, if you have the Adobe Cloud package good for you, Premiere Pro is an expensive product, and you can do all the audio editing on this application. I don't understand when people recommend to go fix a stupid thing that is normalizing the audio into another paid application.
On Premiere Pro, first check the waveform of your audio track, to see if there are strange peaks in the amplitude, if you don't have any strange spikes, use the Audio Gain option or the Essential Sound panel to normalize the audio. If you have strange spikes, bring the audio into the timeline, take a small section of 20~30 seconds of that audio without strange spikes, and try do the same process, than go over the audio track with the mouse and write down the gain that Premiere Pro calculated for you (you should see an infotip with the gain), than select all the remaining part of that clips that you should have in the timeline, than right click, Audio Gain, than Set Gain to, and enter that gain, and should have normalized correctly the audio.
So always clean your audio first, than apply the right gain, than go with denoise, compressor, deesser, eq and whatever effect you want to use, all on Premiere Pro!
Copy link to clipboard
Copied
The vast majority of users are using the CC version, the numbers of CS6 and earlier keep dropping, of course.
Other than that, you provided a very useful post ... thanks. The more experienced people helping on here, the better ...
Neil
Copy link to clipboard
Copied
I have the subscription for Premiere Pro CC only, Adobe provide different monthly subscription packages, among them there is the single application subscription. I tell this in case people are not aware of it.
Copy link to clipboard
Copied
Good catch.
I use so much software these days ... sheesh.
Neil

 AdChoices