 Adobe Community
- Home
- Premiere Pro
- Discussions
- Re: poor video quality after exporting
- Re: poor video quality after exporting

Copy link to clipboard
Copied
So I wana export my project, but no matter how I fiddle with the settings nothing seems to get it to download high quality. I've attached what I hope is useful information. I've changed my audio settings and added effects so I feel like that is what is affecting it, but surely there is a way I can export my video with the highest possible quality.
Any help would be GREATLY appriciated!


 3 Correct answers

When editing the video, I would sometimes select scale to frame size on the video file, because it would appear very zoomed in on the Program Monitor Panel and it was hard to edit that way, is that what is messing with my export?
By @Charlotte5FBA
Since you are using Scale to Frame Size it indicates that your footage has a resolution that is larger than your sequence settings. One way that always degrades the footage is to use lets say 1920x1080 footage and placing it on a 720x576 non-squa
...
There are several way of fixing this. You can either drag one of your clips to the New Item icon in the Project panel. (See image below) This will create a new sequence based on the properties of the footage. Straight forward and convinient.
Or, if you already have edited your footage you can go to Sequence > Sequence Settings and change the settings manually. The image below show you the settings. One thing that may differ is the Field Order. If you set the Project panel to Icon View and sele
...
Okay so I changed everything to look like what your second picture does, includig the PAR which I realized you already included. Now the quality of my export is higher! However its kind of small??
By @Charlotte5FBA
Yes, since you scaled down the footage in the first place it looks, and is, small. That´s why i earlier wrote "...you must also manually scale up the footage you scaled down. The new value for scale should be 100."
To scale up:
Select the clip in the timeline and go to the Effec
... 19
Replies
19
19
Replies
19

Copy link to clipboard
Copied
Your overall resolution is very low there, probably due to coming from home video tape unit I'd guess. And computer monitors don't do a great job 'up-rezzing' that.
However, TVs don't do so badly with uprezzing. Still, that is simply lacking the data for making a large image.
Neil
Copy link to clipboard
Copied
Hello Neil,
Thank you for taking time to respond to my post! The camera I used to film is a Cannon 5D Mark II. The footage before I put it in Premier is fine and high enough quality in my opinion so I wasn't expecting to run into exporting issues. Of course my footage isn't going to be $2,000 camera quality, but when I export it is just so soooooo blurry and pixilated, it's unusable. Is there any way at all that I can get a high quality export or at least as high quality as possible? If yes, what settings should I use. If no, why is it that the original footage can look fine, but post-editing it's so low quality? (I'm very new to all this so I'm just trying to learn.)
Thank you again.
Copy link to clipboard
Copied
How did you create that sequence? Because that is the initial problem ... the sequence is only 720x576, and has non-square pixels. Note the PAR (pixel aspect ratio) of what, 1.094?
I wouldn't expect either of those .. .that framesize nor PAR out of that camera.
Typically, to create a new sequence, one can drag/drop a clip onto a blank timeline panel and PrPro creates a sequence with settings to fit the media. Or right-click a clip in a project panel bin, "create new sequence from clip", and again you'll get a sequence that's a perfect fit.
Neil
Copy link to clipboard
Copied
To create the project I added audio and video files to the project panel and then dragged them into the timeline panel to work on them. Before adding audio files I changed the settings from stereo to mono, I also put audio I recorded on a microphone over the audio from the videos, in the timeline panel. Could any of that have messed with the settings?
I have attached a screenshot of my sequence settings. I have also attached two screenshots one from my original video file and one from my exported project, you'll notice even the dimensions have changed, I'm not sure why. When editing the video, I would sometimes select scale to frame size on the video file, because it would appear very zoomed in on the Program Monitor Panel and it was hard to edit that way, is that what is messing with my export?
Thanks again for your help so far, I greatly appriciate it.
Copy link to clipboard
Copied
When editing the video, I would sometimes select scale to frame size on the video file, because it would appear very zoomed in on the Program Monitor Panel and it was hard to edit that way, is that what is messing with my export?
By @Charlotte5FBA
Since you are using Scale to Frame Size it indicates that your footage has a resolution that is larger than your sequence settings. One way that always degrades the footage is to use lets say 1920x1080 footage and placing it on a 720x576 non-square pixel timeline and scaling it so it fit´s the timeline.
You must know the resolution and frame rate of your source footage. Right click on the video clip in the Project panel to find out.
If your footage is 1920x1080 your sequence should be 1920x1080 and you should be exporting to 1920x1080. All three must match for best result, frame size, frame rate and pixel aspect ratio should be the same throughout the entire pipeline for best results. Any deviation from that will indeed reduce the quality of your output.
Copy link to clipboard
Copied
Okay so I clicked on all my video files in the project panel. When I select "properties" they all say:
Image Size: 1920 x 1080
Frame Rate: 29.97
However the big sequence file in the Project Panel it says this:
720 x 576
00;36;07;12, 25.00 fps
Lastly, when I go to export the file and click Video -> Basic Video Settings, I see that it is set to:
Width: 720
Height: 576
Frame Rate: 25
Where should I go from here? Thank you for taking the time to respond.
Copy link to clipboard
Copied
Is the solution to select my sequence file in the Project Panel -> Sequence settings -> change the time base to 29.97 fps and change the frame size to 1920 x 1080? When I try to do so a warning pops up letting me know that "Changes to the Preview File Format or to the frame size require all preview files to be deleted. This operation canot be undone." Obviously I don't want all my work deleted, but if this is the only option please let me know.
Copy link to clipboard
Copied
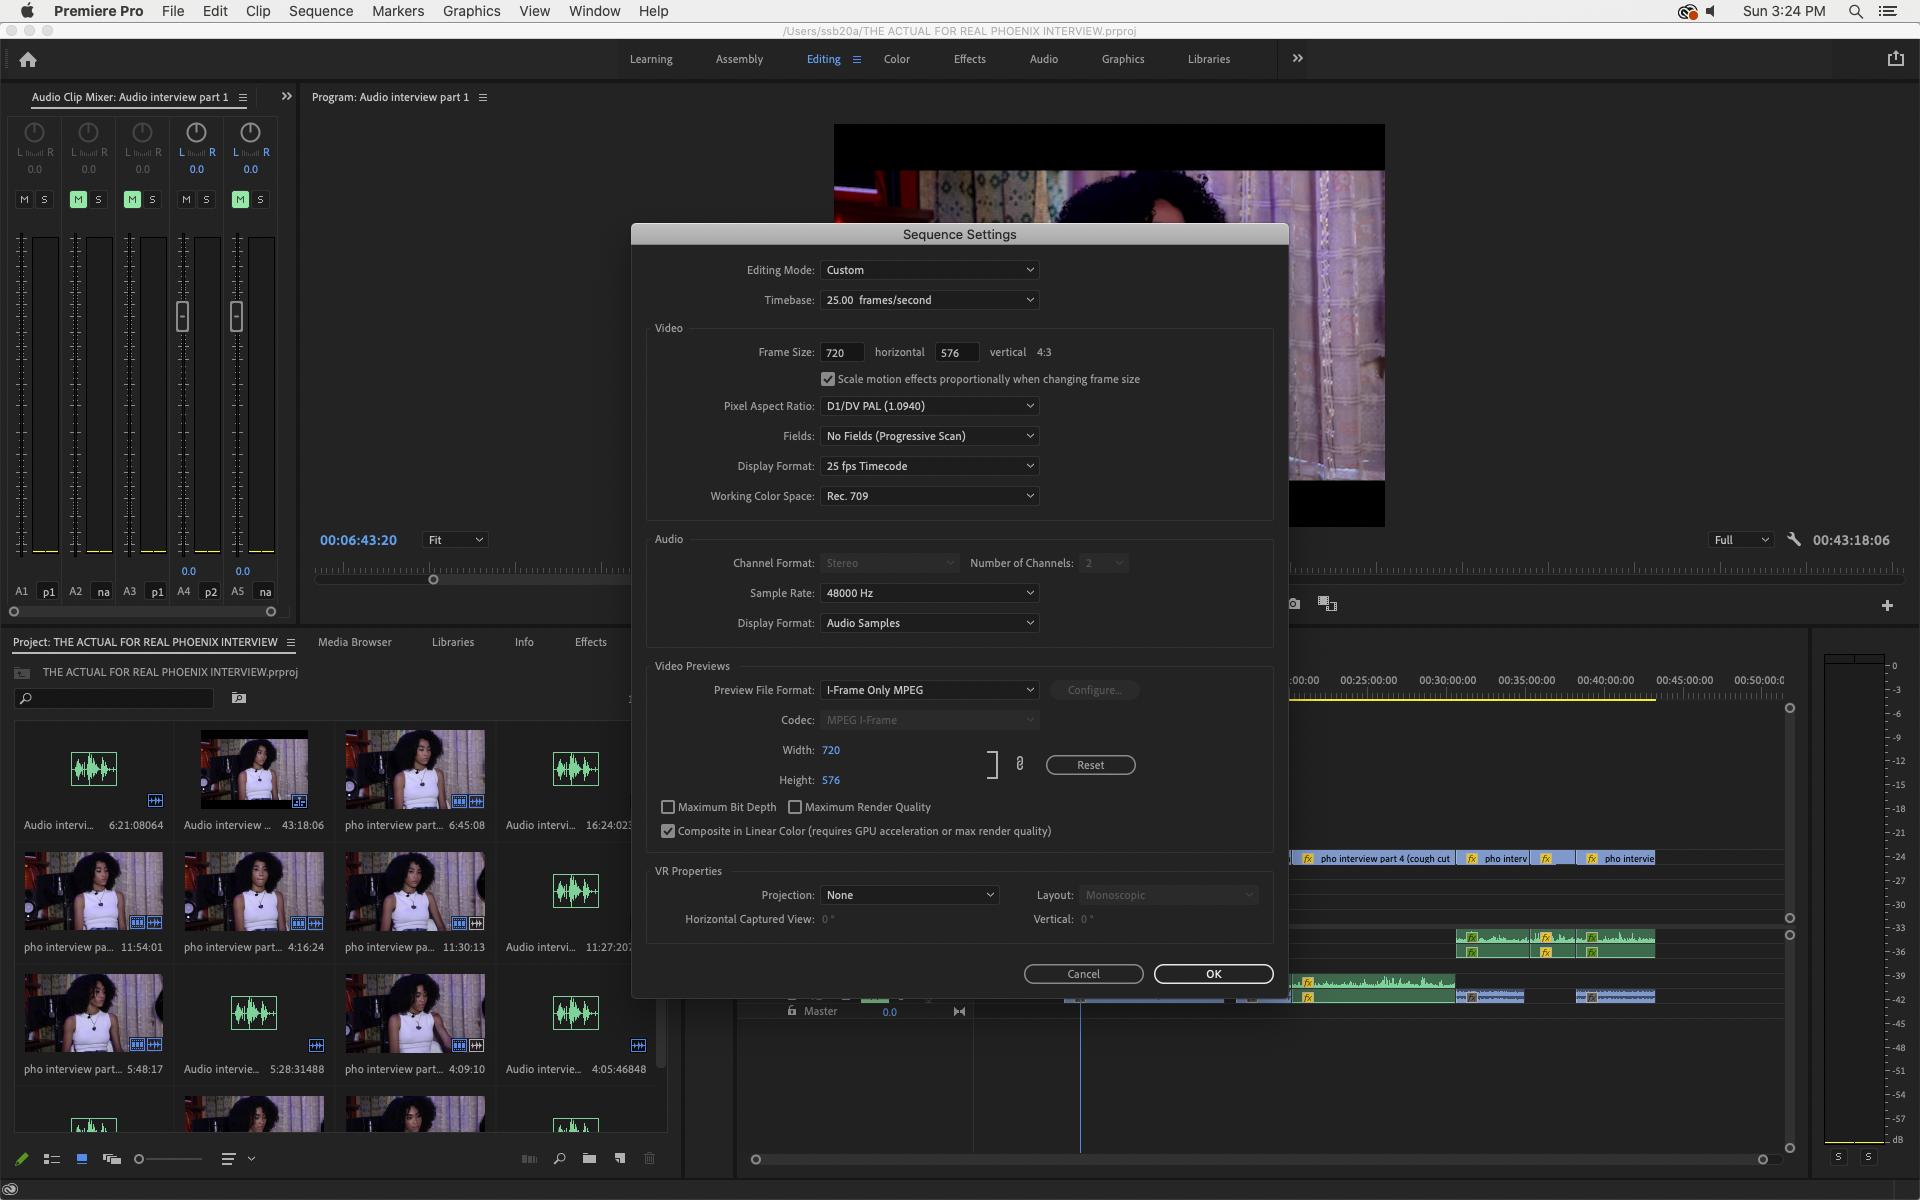
There are several way of fixing this. You can either drag one of your clips to the New Item icon in the Project panel. (See image below) This will create a new sequence based on the properties of the footage. Straight forward and convinient.
Or, if you already have edited your footage you can go to Sequence > Sequence Settings and change the settings manually. The image below show you the settings. One thing that may differ is the Field Order. If you set the Project panel to Icon View and select one of the clips it will say either UFF or 29,97p. If it says UFF, set the Field Order in the Sequence Settings dialog to Upper Field First. If you do it this way you must also manually scale up the footage you scaled down. The new value for scale should be 100.
Or skip Icon View and just drag the clip to the New Item icon and go to Sequence > Sequence Settings for that timeline to find out the Field Order.
Once done, next time you export it will default to 1920x1080 @29.97 fps.


Copy link to clipboard
Copied
Should I also take the Pixel Aspect Ratio: D1/DV PAL (1.0940) - which is what my current sequence is set to- and change it to Square Pixels (1.0) - which is what my original clips are set to?
Copy link to clipboard
Copied
Copy link to clipboard
Copied
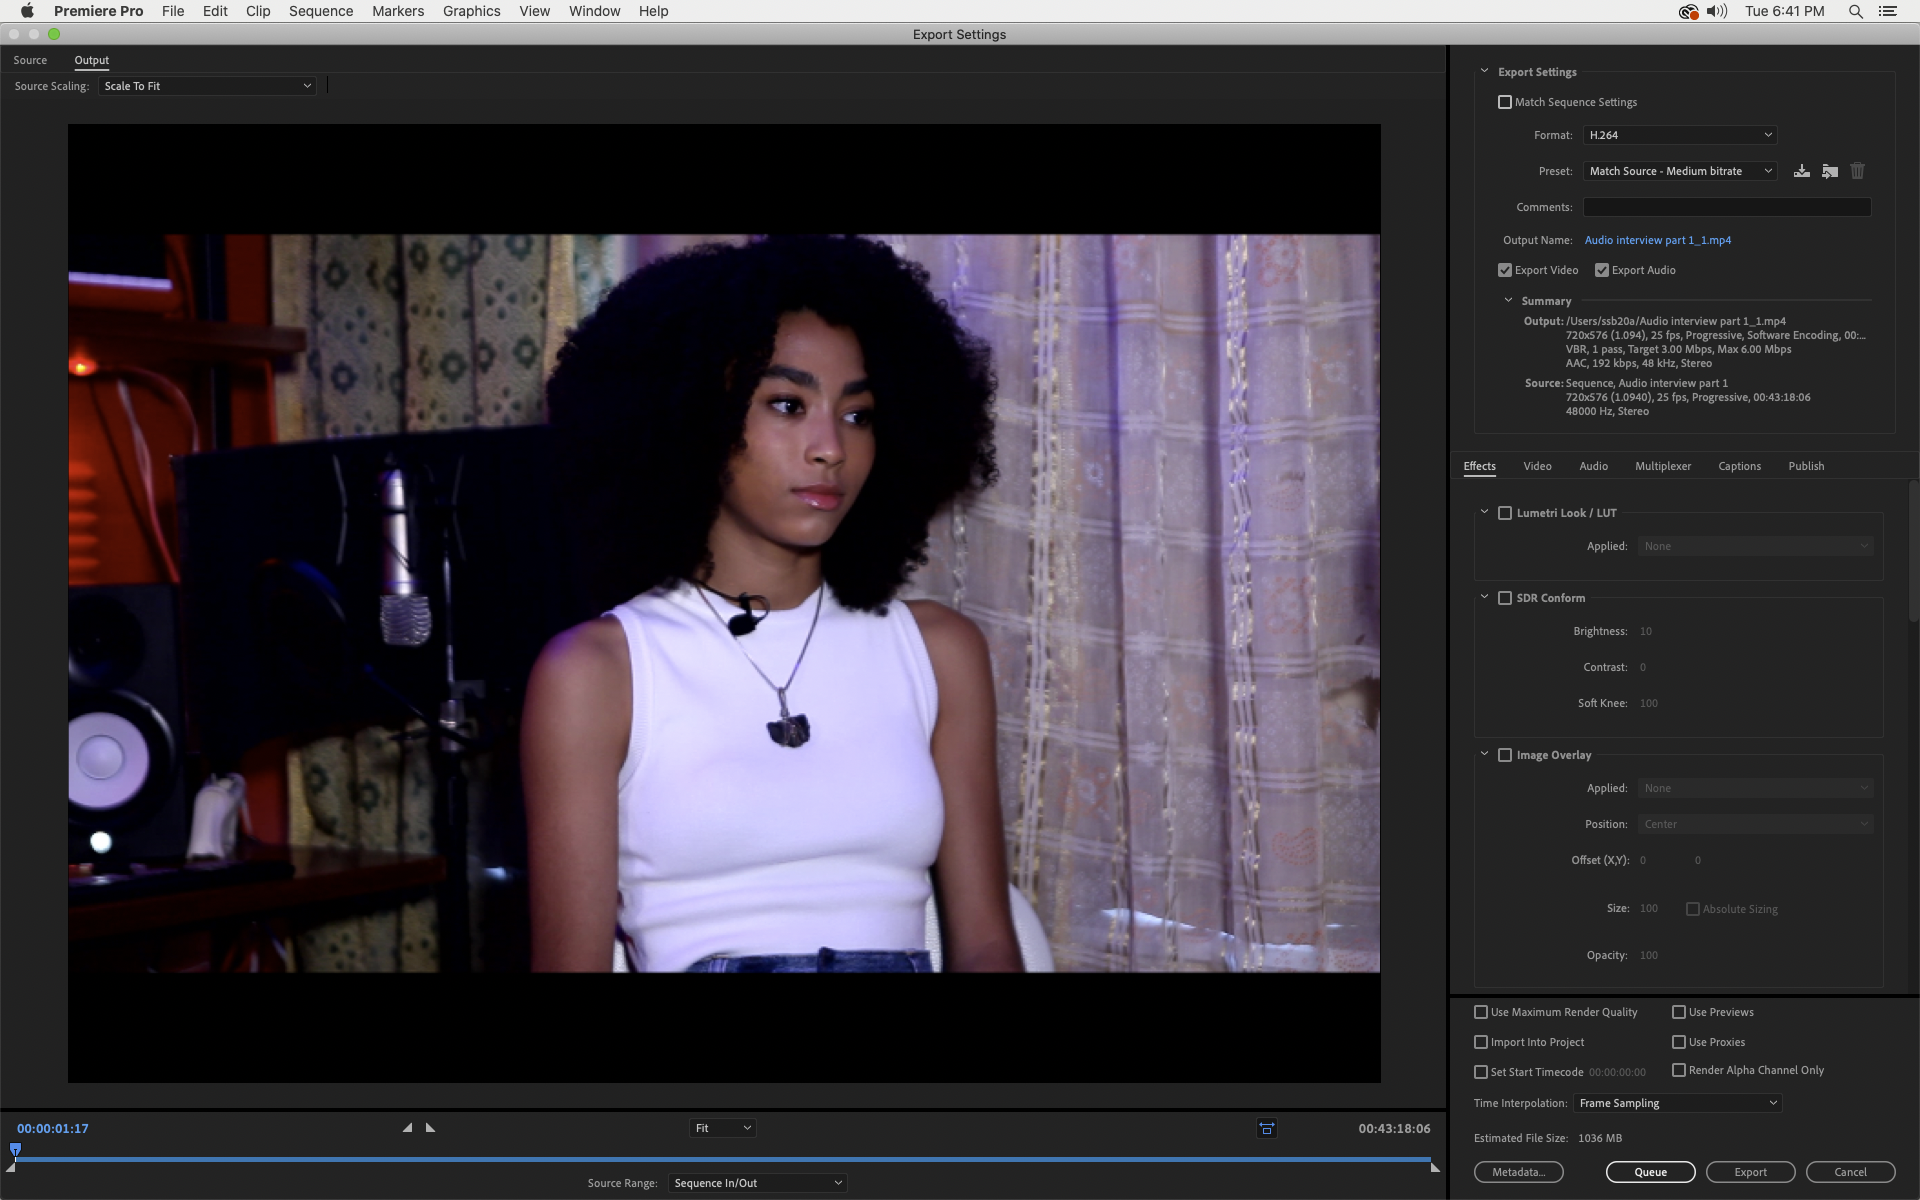
> However its kind of small??
You may still have the clips scaled down? Post a screenshot of the export setting that shows the Summary with Output and Source.
Stan
Copy link to clipboard
Copied
Okay so I changed everything to look like what your second picture does, includig the PAR which I realized you already included. Now the quality of my export is higher! However its kind of small??
By @Charlotte5FBA
Yes, since you scaled down the footage in the first place it looks, and is, small. That´s why i earlier wrote "...you must also manually scale up the footage you scaled down. The new value for scale should be 100."
To scale up:
Select the clip in the timeline and go to the Effect Control panel and set the Scale to 100 by clicking the Reset Parameter button. (See the attached image) Unfortunately this must be done once per clip.

Copy link to clipboard
Copied
Thank you!!!!
Copy link to clipboard
Copied
I would follow Averdahl's advice to drag one of the 1920x1080 video clips to the "new" icon. Then it should just work.
We don't know why, but you created a PAL DV "sequence" and added your media to that. You would have been prompted to change the sequence or not. But once you did not, the sequence is off is several ways.
If you have done much editing, you can probably copy/paste from the original sequence. Then remove any scaling you added.
Stan
Copy link to clipboard
Copied
Should I also take the Pixel Aspect Ratio: D1/DV PAL (1.0940) - which is what my current sequence is set to- and change it to Square Pixels (1.0) - which is what my original clips are set to?
By @Charlotte5FBA
Your setting for Pixel Aspect Ratio in the new sequence must be 1.0.
Copy link to clipboard
Copied
What is that clip from ... what made it? And what is the original file's framesize?
There's a free utility called MediaInfo ... download and install it. When there's an icon on your desktop, drag/drop the original file from Finder/Explorer onto that icon. It will open MediaInfo, and then select the Tree view in that utility.
Do a screen-grab of the Video information and drag/drop that onto your reply box.
Neil
Copy link to clipboard
Copied
Copy link to clipboard
Copied
Then make sure the sequence is set to the 1920x1080 of the media. Export using a preset to match.
Neil

Copy link to clipboard
Copied
After you export this video, you can use AI to enhance the video quality.

 AdChoices
.png)