 Adobe Community
- Home
- Premiere Pro
- Discussions
- Re: Premiere Pro CC color / gamma shift on export ...
- Re: Premiere Pro CC color / gamma shift on export ...
Premiere Pro CC color / gamma shift on export - is a Premiere not Quicktime problem

Copy link to clipboard
Copied
I know this is a topic of major frustration for many of us - washed out colors and a very visible gamma shift when exporting out of Premiere Pro. From what I have seen on this forum, people post all kinds of solutions / explanations as to what could cause this problem. Many people think it' a Quicktime problem, some say it has to do with video card drives, or with checking "render as linear color space" or not.
I just did a round of major testing on my iMac running OS 10.12.5 and the latest version of Premiere Pro CC 2017 - and I have to say - nothing I do fixes it or makes any difference. Whatever I export - and that's the key here - Quicktime movies, TIFF sequences, stills - EVERYTHING has a washed-out gamma shift and desaturated colors.
When I take a screenshot of my media within Premiere Pro - colors and gamma of the resulting PNG are exactly as I see them in Premiere. If go through the EXPORT function and export a still image - the colors are faded and the gamma is washed out. And it doesn't matter what is clicked in the export window - maximum depth, linear color space... nothing makes a difference.
Here is another interesting thing I found - when I reimport these washed-out exports (stills or quicktime movies, doesn't matter), inside the Premiere Pro world they look perfectly normal. When I import the same washed-out exports into Final Cut Pro X, the washed out colors and gamma stay. So there must be something in these exports (hidden tags?) that Premiere adds and that it then uses to display the media correctly. Unfortunately every other app in my Mac universe doesn't do the same and is off dramatically.
The problem is - I can't just stay inside Premiere Pro. I have to send tmy cuts out and share them with clients. I need them to see what I see inside Premiere Pro.
Does anyone on the Adobe side have any insight into this? This issue has been going on for years on this forum. I cannot believe that we are still nowhere close to a solution.
Thanks in advance for any hint.
Markus


 163
Replies
163
163
Replies
163
Copy link to clipboard
Copied
Hi! I know you guys are having a lot of hard times caused by these. So do I. I took me quite a lot of time before I figured a solution to my problem (Color shift after rendering). Just a little background on what I was doing, I was making a video with different dimension. one 1080p and a vertical one 480x596. I did not experience the problem with the 1080 render but after I changed it to 480x596, the color shift started. I tried and tested a lot of solutions I after countless of render I figured that I somehow managed to found a solution. I hope this also works to you guys.
So what I did is I went to the sequence settings.
1. Changed the frame rate to "30fps" instead of the 29.97 fps. ( I dont know if it really affects but this is what I did)
2.Then to the Video Preview settings, changed preview file format to "Microsoft AVI"
3. and changed codec to "uncompressed"
4. Then, i checked the "maximum depth" box
5. and checked the "maximum render quality"
I leave the rest at its default as well
When I rendered using these settings, I was ecstatic to find it works. I hope this helps to you guys.
Cheers and more love to everyone.
-Naz

Copy link to clipboard
Copied
I've been tearing my hair out tonight, with exported video looking flat and nasty compared with how it looks in Premiere.
My problem was that I was using a 3rd party LUT that I had installed into Premiere, but not into AME. Video looked fine in Premiere – and when exporting from Premiere – but flat and awful from AME because the LUT was (obviously) unavailable.
Copying the LUT into /Applications/Adobe Media Encoder CC 2018/Adobe Media Encoder CC 2018.app/Contents/Lumetri/LUTs/Creative solved it for me. Hopefully this is helpful for someone else!
Now it's 1am and time for bed. Sigh.

Copy link to clipboard
Copied
That is NOT the proper solution if you are using the 12.x versions.
This is the chart ... create a Technical and Creative folder at these locations, and put your LUTS/Looks in the folders for use in Basic tab slot (Technical) and Creative tab slot (Creative). Then they will pop up in the browsing functions of those tabs in Lumetri, and be seen by both PrPro and Me.
DO NOT put LUTs/Looks into the application/package folders. They will mess up the sort order there, period.
Neil
Copy link to clipboard
Copied
Hi everyone! Just to follow up - giving Media Encoder access to the LUT I needed was the solution to my problem, but adding that LUT to the Application/Package folder wasn't the best way to do it.
I've recently learnt that a better location for custom LUTs is:
- Mac: /Library/Application Support/Adobe/Common/LUTs
- /Creative
- /Technical
- Win: \Program Files\Adobe\Common\LUTs
- \Creative
- \Technical
Even if putting LUTs where I did doesn't cause you any obvious side-effects (my sort order was correct, period), hacking the app is a bad idea because you lose all your LUTs when the next version is released 
Thanks Neil for your clues that led me in the right direction to solve my problem in a more effective way.
Copy link to clipboard
Copied
Yea, that whole thing's been a pain for a while. This at least makes everything "work" and gets the LUTs/Looks we make or acquire 'browsable' in the normal fashion. Especially handy in the preview pane of the Creative tab.
Neil

Copy link to clipboard
Copied
Hi Nadia,
I know this is an old thread but thought I’d let you know and anyone else experiencing this problem when editing on 5K MAC 2017.
I resolved it by collaborating to sRGB ! Sounds simple but it worked!!
Footage now looks the same inside Adobe CC and after export
All the best
Paul

Copy link to clipboard
Copied
hi Paul, sounds good but what do you mean? How do I calibrate CC - can you post the actual menu clicks?
cheers!
Alex
Copy link to clipboard
Copied
Hi Alex,
I mean collaborate your iMAC!
System Preferences ...
Displays
Collaborate
Choose
sRGB IEC61966-2.1
Done
Copy link to clipboard
Copied
Cool, thanks - it's been a while since I played with this so I'd forgotten how to change the settings. My solution is to daisy chain an old iMac to my iMac Pro (yes...) and use the colour from the old one.
Because:
Premiere will ignore the System Preferences. To prove this, watch the Program monitor when you change the system preferences, you'll spot that it changes for a split second then changes back again. You cannot get round this. You'll see everything else change, so for example if you've set clip colours to Yellow they'll become more saturated in the timeline but the Program monitor will always stay the same.
The fix is for Adobe to allow you to adjust the Program Monitor to whatever YOU/I want - that would solve it.
That said, if you've sorted it, fair play but I tried that when I first went down this route so I'm not sure how you've managed it
Alex.

Copy link to clipboard
Copied
I made a tutorial on how to fix it.
Fix Premiere Color Shift when Exporting - YouTube
Basically export with High10 for H.264 and use rec 2020
Copy link to clipboard
Copied
Sorry, but the colorists I know and work with would either be rolling their eyes or howling with laughter. You completely ignored the actual issue, treated the symptoms on your computer, and produced something that ... viewed on mine? ... looks ... ugly. Way too contrasty, crushed blacks, over-saturated especially in the blues.
Why?
Your computer/OS/viewing setup is not using appropriate color management for Rec.709/sRGB/Gamma 2.2/2.4 video, period.
So rather than set your gear up correctly, you hyped the color and contrast a ton. And it seems ok outside Pr on your Mac P3 setup with all wrong configuration.
But when viewed on any computer/device with properly setup video-standard sRGB/Rec.709/Gamma 2.3/2.4, it's gonna look like dung. As it does on mine.
And it looks incredibly amateurish on mine as one assumes naturally that video that looks this bad is done by someone who's ... well ... amateur.
We all have to get control of our color space/gamma configurations and settings first, then calibrate the monitor. For anyone ... on any computer OS ... this is the first and absolutely required step to produce decent looking content for even web use. When you have your gear such that a Pr export looks the same in VLC or Potplayer as within Pr, then ... you've got at least close.
To be guaranteed of broadcast-quality output, you have to use something like the BlackMagic Decklink cards or equivalents from AJA or Kona to get a signal totally un-touched by your OS out to a broadcast monitor that you've calibrated with nifty gear to tight standards.
Neil
Copy link to clipboard
Copied
Thank you for your reply.
1. Could you point me to a link to set my monitor up correctly? I am on an iMac 5k Retina.
2. I understand that monitor settings make a difference. I am not making content for broadcast, I am making content for the web and general public. Majority of which all have their monitors on default settings. Would changing my monitor settings make it look better for the general public? I'm genuinely asking.
3. Thank you for any advice you could give.

Copy link to clipboard
Copied
I'm also an amateur––I even came here looking for a solution to the original issue myself––so please forgive me if I misunderstand your question or explain something which you already comprehend.
Changing your monitor settings will not affect the data, rendering, or processing of a file in any way; it would merely affect the way that data is interpreted by your monitor. I expect the fast and cheap solution would simply be matching your monitor with the settings with the most common monitor and media player settings.
Concerning the original topic, this is what worked for me:
The situation: I imported a couple .jpg files edited from Ps to Pr, but the colors looked wrong. I assumed it was caused by incongruous color management profiles, but I didn't know how to resolve it. After a quick search, I fixed the issue by going into "Preferences>General" and checking "Enable Display Color Management (requires GPU acceleration)". Now the colors displayed represented what I wanted/saw in Ps. Perfect!
Unfortunately, the issue returned once I rendered a preview in Pr. I tried exporting. No change. Then I found this thread and it gave me the idea convert the files in Ps to sRGB (from ProPhoto RGB) and update them in Pr. After the conversion, I rendered a preview. It looked fine. Then I exported. That too was fine. So, I assume, Pr does not have the ability to properly convert color profiles. Thus, files should be converted to the software's native profile before being imported. It seems rather obvious in hindsight, but how do you know if you don't know? Ya know?
I hope this helps someone
Cheers
Copy link to clipboard
Copied
Premiere is built to work with Rec.709 standards ... and will rigorously apply them. The internal monitors are hard-wired to be displaying properly on a full-on Rec.709 broadcast system. If you work with Premiere on such a system, it is rock-solid spot on for color.
On my system, which is fully calibrated and profiled in Lightspace, Premiere, VLC, Potplayer, AfterEffects, and Resolve set for it's color managed RCM mode all show nearly precisely the same image. The colorists that I work with all the time have no trouble whatever with color management in Premiere either ... but then, again, their systems are fully color calibrated/profiled.
No, Premiere doesn't allow the user to muck around with changing media profiles ... although this is something that I've been pushing for now for some time. They are working on making color management choices available to the user such as with AfterEffects or Resolve. But it ain't shipping like that yet.
The media actually does have written standards for most things. And in general, it's much safer not to muck around modding a file's color space/profile. Yea, you can, but then ... it looks ok on X, but when shown on a fully managed Rec.709 system, doesn't look so good. But ... that's real life Out In The Wild.
And it's only getting wilder.
Neil
Copy link to clipboard
Copied
Hi Neil and fellow video and film colleagues,
First, let me say that nothing is wrong with your videos after exporting from Adobe Premiere Pro!
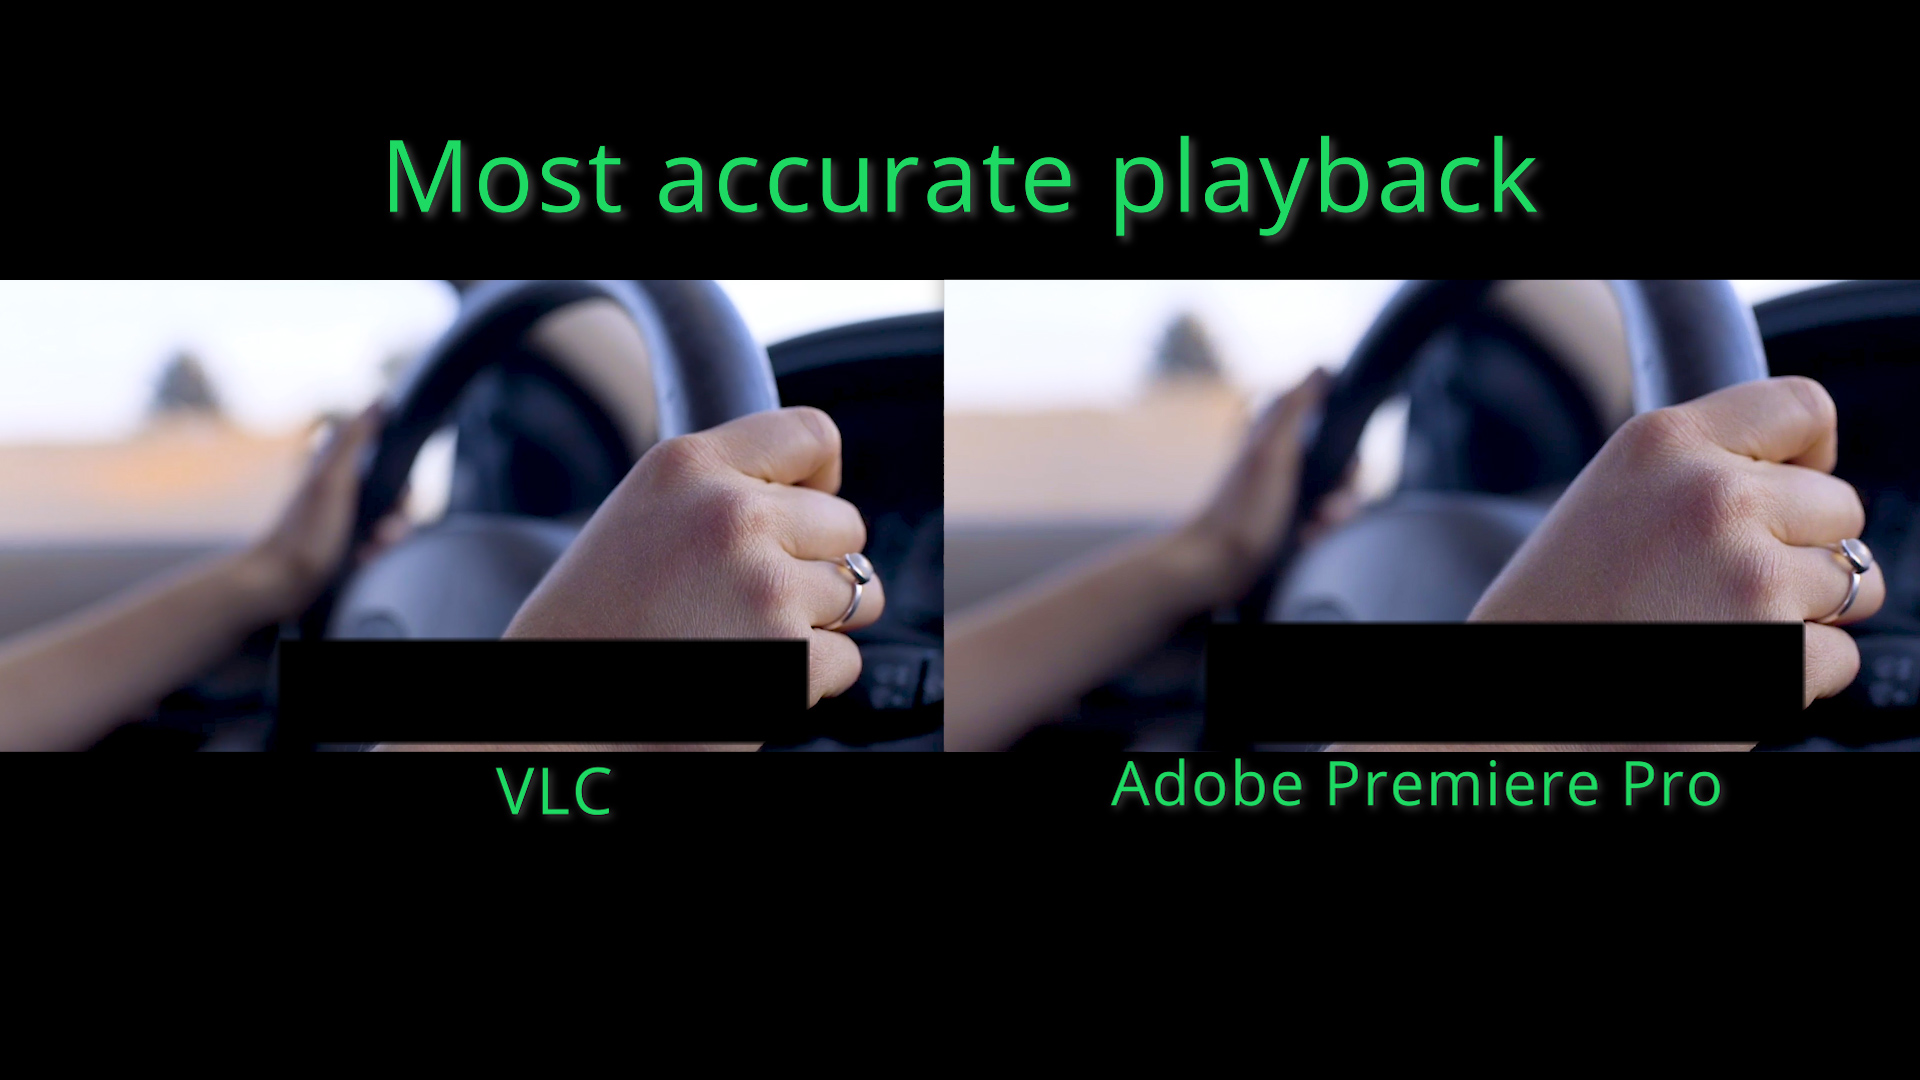
I've had the same issues of color desaturation and gamma shifting hotter in Quicktime player. The main reason for that is Apple designed a ColorSync profile built-in to the Quicktime player. My colleagues and I have found a solution. VLC player.
After rigorous testing with the same issue looking at our videos on Quicktime, MPEG Streamclip and comparing it to the Premiere Pro Client Monitor. We have determined that VLC player tends to have the best results of color and gamma reproduction for reviewing your videos after export. Once you post it online or see it on Broadcast TV, your video is accurate and should match with what you originally had in your edit NLE. No need to export your videos with needless workarounds like adding a LUT etc.
Yes, you should calibrate your monitors using Datacolor's Spyder or X-Rite's i1 Display Pro to accurately tune in your monitors for color correction and grading. Just know that you're not alone and I hope the screenshots are helpful for those of us who are freaking out about our videos and want our work to look it's very best!

Happy Editing!
Regards,
Caleb M.
Copy link to clipboard
Copied
That’s all very well but all our videos are watched online - Vimeo, Facebook, YouTube etc. So they’re coming out differently. i have never used VLC for anything, I don’t even own a copy and I don’t know anyone who does use it - strikes me that Apple need to fix it - or - is I’ve mentioned - Premiere just needs to allow me to change the colour profile of its program monitor.
Copy link to clipboard
Copied
Neither solution you offer is actually going to fix anything. The problem is a growing fracture in the type, color space, and settings of the devices used to watch media.
Both solutions you offer would fix only one specific set of viewing troubles. And would look worse on others. As you can't make a Rec.709/gamma-2.4 file designed for a 100 bit max brightness look even close just plopping it into most players on say a Mac P3-Display screen, using a wider color space and 1.96 effective gamma and maybe brightness up around 235-270 nits.
And a file created on that Mac P3-Display for 250 nits and effective 1.96 gamma ain't gonna be great on a Rec.709/gamma-2.4/100-nits sytem.
If the systems and players do not have built in controls to display media appropriately on the hardware involved, you can't create a single file that will play most everywhere.
So at that point you either choose a particular standard and let the chips fall where they will, or try different outputs on different services suggesting that your viewers use your different output services on specific gear.
Neil

Copy link to clipboard
Copied
Hello, colleagues! Does someone use Premiere CC2019 on iMac 5K? Does it have the same problem? I have old projects on my iMac 2014. Is it a bad idea to buy iMac PRO to work with ProRES material coloured in Davinci? The question is not for Neil, but for someone really using Premiere pro on iMac.
Copy link to clipboard
Copied
The problem is the color space used by ALL newer Mac rigs ... the beautiful if mostly unique Retina monitors. And the intriguing P3-Display profile that Apple created for them.
Coupled with the way the Mac OS works, and Crome and Safari browsers ... therein lies the rub.
None of those Mac rigs works with the standard video profile used by everyone else and all older Macs, nor is there any auto-remap capability that anyone has found to display imagery "correctly" cross-profile.
Video files are simply data sets. Coordinates if you will. X pixel has Y value. But ... how Y appears is completely dependent on the space it is mapped into. It doesn't have a specific "look" separate from that mapping. So Y will have "this" appearance in one color space, and the same value in a different color space will be very different.
As someone working with video data, you have to take control of that mapping process. If you leave it up to the computer you cannot match images with anyone else ... period. PC or Mac, really.
Neil

Copy link to clipboard
Copied
My Mp4 exports were looking different than my MOV timelines when exported through Media Encoder. I switched the setting in ME preferences: "Import sequences natively", and my exports looked correct. No idea why it works but it did for me. It got rid of my captions, but that's the next step I guess.
Copy link to clipboard
Copied
So many posts and no answering from abobe team. Neil, you are just a troll. I thing paid by Abobe or maybe just you have nothing to do. Thank you for all you knowing issues. But the question is - what we are paying for??? Is it not system requrment iMacPRO retina p3 for premiere???? Why a f#$@ we are seing different colors after render. Again: it's question for Adobe. Not for allknowing Nail...
Copy link to clipboard
Copied
Why do no colorists ever have this trouble? Seriously ...
Neil
Copy link to clipboard
Copied
Neil, please give us the link where Adobe informing us about troubles with colour graiding on iMacPro etc. with sys rq. or about warnings about WYSIWYG for mac users?
Copy link to clipboard
Copied
OMG WTF...
Copy link to clipboard
Copied
Here's a video by a Filmlight staffer going over the issues of video file mis-representations in Apple's OS system.
You're welcome to view it. I saw it first on the LiftGammaGain forum which is primarily inhabited by pro colorists who have more in calibration gear than most of us have in the entire workstation.
They live and breathe color management.
And most were pretty 1) impressed by the understanding of Daniele and 2) totally unsure how to apply his fix.
QuickTime Colour Management on Vimeo
Neil

 AdChoices