 Adobe Community
- Home
- Premiere Pro
- Discussions
- Re: Still getting horizontal lines in video when e...
- Re: Still getting horizontal lines in video when e...

Copy link to clipboard
Copied
Hello again fine professionals,
I'm using Premiere 6 on a Windows 7 machine.
I'm still getting horizontal lines in my video when exporting to 720x480 AVI, even with "deinterlace" turned on.
I had a question about it on another thread and robodog2 said it was interlace file lines that don't appear when using a progressive file export choice...
http://forums.adobe.com/thread/852077
So I found the "Deinterlace" check box via "Export Timeline>Movie>Settings>Special Processing>Modify>Deinterlace", but whether or not I have that box checked, I still get the horizontal lines.
Below are the screenshots of the same base video before importing in to Premiere to get a reverse effect, and after I saved the resulting 720x480 AVI file... the final file appears with the same horizontal lines whether or not Deinterlace is checked.
The lines are even more prominant when viewing the video in Windows Media Player than they appear in these screenshots below... the lines actually have very prominent edge characteristics. The lines look like an old TV sometimes used to when the antenna wasn't getting good reception. Also, I'm saving successfully via the "Export Timeline>Movie" path by using different codecs (this is no longer a file generated from previewing, as I was talking about in the previous thread on this topic)... so I am sure of all of the settings with this version and I'm getting this result with three different codecs, with and without the "Deinterlace" box checked... I had the same experience over and over last night while working with a different file too.
Does anyone know what is causing this?... please see the images below
Thanks,
digiday
Before saving in Premiere - Clean original 720x480, 30 fps AVI file
After saving in Premiere 6
Horizontal lines showing in this Premiere 6, 720x480, 30 fps AVI file


 1 Correct answer
Hi David,
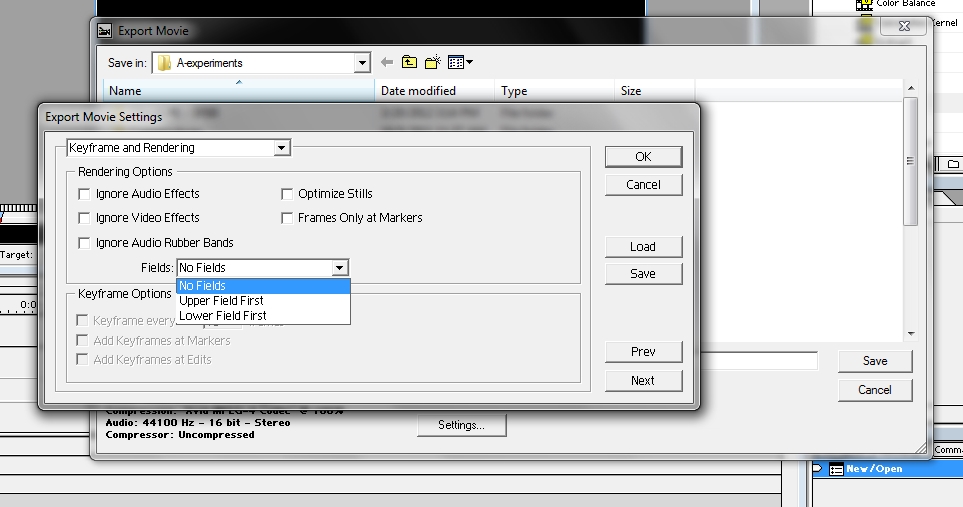
Yes, I finally did solve this problem based on a coincidental comment on another forum. On a different forum a guy once mentioned the "NO FIELDS" setting within the "Rendering Options" in the "Export Movie" dialog when I'm exporting my movie to an AVI file, as seen in my screenshot below. Otherwise, I think that setting was defaulting to "UPPER FIELD FIRST".
Mostly I was getting those terrible horizontal lines when I exported graphic effects that I had created with imported Photoshop l
... 19
Replies
19
19
Replies
19

Copy link to clipboard
Copied
What avi codec did you use.
Best i to use the DV NTSC under the Microsoft AVI format.
Copy link to clipboard
Copied
Hi Ann,
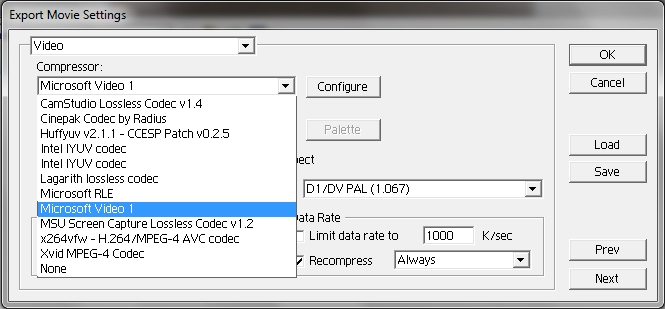
I don't have that codec available through Premiere at all... below is a screenshot of the available codecs that I have showing up in Premiere. I tried three of them last night... the CamStudio, the MSU, and the Microsoft Video 1.
Today I found the WMV export dialog and I am able to save to WMV successfully without any horizontal interlace lines, but I don't think the WMV is as sharp as AVIs that I've got with other profiles that I've used successfully in Premiere 6 that resulted with no interelace lines in the past weeks. Those were saved with a custom 856x480 profile that I created in Premiere for a different project... my current project is in 720x480.
Thanks,
digi
Copy link to clipboard
Copied
No wonder its bad, not a very good codec.
Try using Lagarith or None, mind you they will be large files. Uncheck Recompress.
I find it strange there is no Microsoft dv codec.
I do not know if there is a way to get the codec.
However i do know Mainconcept has a DV codec but its not free.
http://www.mainconcept.com/en/products/apps-plug-ins/codecs-conversion/dv-codec.html
There is also a Panasonic dv codec, but i have been reading you cannot install it op W7.

Copy link to clipboard
Copied
I noticed in your screenshot that the "pixel aspect ratio" is set to DI/DV PAL (1.067). When you first imported your clips into Premiere 6 you should have choose Microsoft DV (NTSC) as your preset project setting. This would give you a frame size of 720X480 and a pixel aspect ratio of DI/DV NTSC (0.9). When you go to export to movie your project setting will remain as Microsoft DV (NTSC).
Regards, Allan
Copy link to clipboard
Copied
Hi Ann and alsclips,
Now, using "File Type: Microsoft DV AVI" gives me the the choice for "Compressor: Microsoft DV (NTSC)"... now using "D1/DV NTSC (0.9)" for the Pixel Aspect Ratio... "Recompress" unchecked... "Deinterlace" now turned off (and tried it with it on)... this takes me back to the "An error occurred while making the movie. Error writing file (disk full?)"... but my hard drive is not nearly full, with over 30 gigs left open on it... as discussed on this thread...
http://forums.adobe.com/thread/852074
This is why I started trying the different codecs that are only available when I choose "Microsoft AVI" instead of "Microsoft DV AVI" for the file type.
So I'm in a vicious loop of getting only an error message, or horizontal interlace lines.
What is causing this conflict that is keeping me from saving any decent looking AVI file (or any AVI file at all) in the 720x480 format in Premiere?
Thanks,
digiday

Copy link to clipboard
Copied
Is your destination HDD perhaps formatted FAT-32, and not NTSF? If so, that would cause a Disk Full error, as the file size limitation is ~ 4GB. DV-AVI is a lightly compressed format/CODEC, and the file sizes are larger, at ~13GB / hour of Duration.
If your HDD's ARE FAT-32, see this ARTICLE on how to Convert to NTSF.
Good luck,
Hunt
Copy link to clipboard
Copied
Hi Bill,
I'm working, in the case of these errors, with a 50 second clip... so at 13 gigs per hour, well you do the math... it would amount to something around a 200 megabyte file, if it ever rendered in AVI with the settings that "alsclips" has recommended, which are the settings that are somehow causing this erroneus disk full error... in WMV it renders as an 11 meg file... I'm not working with gigantic clips here.
I have no idea if my hard drive is formatted in FAT-32 or NTSF, this is just an average PC by Dell that has a normal hard drive stock from the factory. And AVI files always save to this hard drive via other movie programs... and I'm able to save to AVI format through Premiere if I use the "Microsoft AVI" file format and one of the other codecs instead of the Microsoft DV AVI file format selection with the Microsoft DV (NTSC) codec, but then I get the horizontal interlace lines, or whatever they are.
So I either get horizontal lines or no file at all with an erroneous "disk full" error message.
As much as I don't mind writing out long hand all the details of what I'm troubleshooting, I always hope that it will be clear enough for everyone to understand... but I do appreciate your thoughts and recommendations.
Thanks,
digi
Copy link to clipboard
Copied
What player are you using to view the exported file?
Try VLC player with deinterlaced on.
Copy link to clipboard
Copied
Hi Ann,
I'm using Windows Media Player and IrfanView... and it looks the same way within the Premiere preview window and when I import the funky file in to any other movie making app. I tried VLC a ways back and it produced useless files in a couple of conversions tests, so I uninstalled it.
I don't think it is an issue with any player... it is an issue with the file itself... which leads back to why the eroneous error message about disk full comes up when using the recommended save settings that wouldn't give me the horizontal lines... and the file size would only be about 200 megs.
Thanks for the continued ideas.
digi

Copy link to clipboard
Copied
Have you solved this problem? I have the same thing happening on my Windows machine.
I'm running CS6 and I'm getting horizontal lines on rendered out movie.
I've saved the short movie I made as a MPG4, MOV, H264 file and still the horizontal lines.
I shot a bunch of footage with a Sony FS700 (MTS files) I got ahold of Premier pro and imported the footage, added some music and tried exporting the film. But I get the horizontal line issue.
The footage looks good in Lightroom and in Premier Pro during editing but upon export the horizontal lines start showing up.
Forgive my ignorance if the answer is simple and in the archives somewhere.
Copy link to clipboard
Copied
Hi David,
Yes, I finally did solve this problem based on a coincidental comment on another forum. On a different forum a guy once mentioned the "NO FIELDS" setting within the "Rendering Options" in the "Export Movie" dialog when I'm exporting my movie to an AVI file, as seen in my screenshot below. Otherwise, I think that setting was defaulting to "UPPER FIELD FIRST".
Mostly I was getting those terrible horizontal lines when I exported graphic effects that I had created with imported Photoshop layers in to my movie projects... in those kinds of exports the horizontal lines were much worse and far more obvious than if I was simply exporting a project with actual video that I had imported in to my project.
But still, even with imported video, like the sample images that I posted on this thread, even then I could see the horizontal lines.
So some guy on another forum mentioned something about the "NO FIELDS" setting in my export dialog. It relates to something else about deinterlacing that is better for this problem than the "UPPER FIELD FIRST" or the "LOWER FIELD FIRST" settings.
As can be seen in my screenshot below, that's the setting I'm talking about, but I was using the old Premiere 6 from around 1999, and the export dialog options in the newer versions of Premiere are different. The guy on the other forum who mentioned that setting, which ultimately solved my problem, said that setting was different in a newer version of Premiere that he was using, but I found that setting in my "Export Movie" dialog, and that solved the problem.
It was so simple, and I went through so many things to try to solve it, including running my files through other apps to try to pre empt the problem, and none of it worked... it just turned out to be THAT simple "NO FIELDS" setting and that solved the whole problem.
Premiere 6, and some newer versions of Premiere, seem to have other problems, like creating an oblong, egg shaped rotating image from a round graphic after importing it and applying a rotate effect, but otherwise, once I figured out that horizontal lines solution, I did pretty well figuring out a lot of things in that old Premiere, and I got pretty good results.
Viel Gluck!
Copy link to clipboard
Copied
Thank you so much. It worked!
I was so scared there was something wrong with my footage.
But with your help I solved it.
So, I right clicked on each shot and changed the Field Options to "always deinterlace."
Then when I went to export I scrolled down and like you said their was the Field Order box and it needs to be set to Progressive.
I need to learn more about all this stuff!
Thanks again
David
Blog: http://moenkhaus.wordpress.com/
Twitter: @DavidMoenkhaus
Copy link to clipboard
Copied
Hi David,
Cool, I'm glad it worked and you were able to figure out the nuances of that setting in your newer version of CS6. Now that you mentioned the "Progressive" setting, I remember that's what the guy on the other forum who tipped me off about this said that his setting was. I remember writing back to him, saying that I didn't have a setting called "Field Order", but I had something just called "Fields" and he asked what that was defaulting to in my old Premiere 6, and he said try setting it to "NO FIELDS", and maybe that was the equivalent of "Progressive", and it worked.
Before I answered your question last night, I went through some old bookmarks that I had saved, trying to find that thread from this other forum where I had that conversation with the guy who tipped me off about that setting, but I didn't search for it too long, and I couldn't find it.
I remember it was on a forum that had to do with another video utility that I was trying to run my videos through AFTER I exported to an AVI file out of Premiere, and this guy had gone round and round with me about how to try different settings in that video utility and it wasn't solving my problem with deinterlacing. Then he finally started just naming settings within HIS version of Premiere, and he mentioned that "Progressive" setting within his "Field Order" settings, and I said I don't have that, but I have this other thing that sounds similar.
I'm pretty sure that conversation took place on a forum for XMedia Recode, but that utility wasn't helping me. There are other things you can do with that app though.
I remember that this guy and I went round and round so much on the topic of trying that utility to solve my problem that the moderator started posting on my thread and he was very sarcastic. But right about the time that the guy who was helping me mentioned that "Progressive" setting, the moderator pissed me off with his sarcastic comments and I vowed never to return to that forum again. Thankfully, I had a chance to thank the guy who was helping me for going the distance and tipping me off about that setting.
The odd thing is, I posted several question threads on this Adobe forum on this subject and no one ever was able to give me that simple bit of advice... it was only due to a video utility forum with one helpful guy and one sarcastic, a-hole moderator that I got the problem solved.
I had started doing things like frame-by-frame animation to work around the problem that was coming with the horizontal lines appearing in motion graphic videos that I had created with the standard video motion effects within the Premiere app. I went to an ENORMOUS amount of work with a couple videos to work around that problem, and then I got it solved with the help of that guy on the other forum right about the time that I was finishing one of those videos where I had done so much work with stop-frame animation as a work around.
Oh, well, live and learn... glad I could help. I do have a newer version of Premiere CS to install that I'm looking forward to using... I got that when Adobe opened up a bunch of their old early CS era apps to download for free.
digi
Copy link to clipboard
Copied
I just came back here to mark this thread as solved, or whatever, because I realized that since I started this thread originally, I'm probably the only one who can mark an answer as correct.
But I've gotta ask these three additional questions, just in case there are any Adobe experts who read this thread who can give me a legit answer... why does Adobe put this "Fields" setting in Premiere at all? I mean, it seems that if that setting is set at "UPPER FIELD FIRST" by default in my old Premiere 6, and set at whatever is the opposite of "PROGRESSIVE" is in the newer versions of Premiere by default, isn't that just setting people up to be saving their videos with big, horrible horizontal lines going through them whether it's on imported video or created motion graphics no matter what?
It seems that Adobe should just name that "Fields" setting the "JACKED UP VIDEO QUALITY" setting, and they could have a drop down menu that gives the choices of "JACKED UP VIDEO QUALITY" and "NOT JACKED UP VIDEO QUALITY", and that would make it a little more obvious about how that setting should be set.
OR, here's an idea, how about just making it so there is only one way to export one's videos with respect to that setting... WITH GOOD QUALITY, WITHOUT BIG HORIZONTAL LINES GOING THROUGH THE VIDEO!
What I'm saying is, why would anyone choose having big, horrible horizontal lines going through their final video, in that Premiere is set to default that way, but that setting can otherwise be set so there are NO big, horrible horizontal lines going through one's exported video?
And my other question would be, how exactly does the term "NO FIELDS" equal out to mean the same as "PROGRESSIVE"? At what point did Webster's dictionary replace the term "NO FIELDS" with "PROGRESSIVE"? Did that happen some time after 1999, after Premiere 6 was on the market?
And who, at Adobe, makes this stuff up?... who botches things like this that otherwise seem like they would be no-brainers?
Just wonderin'.
digi

Copy link to clipboard
Copied
Hi this was a great thread . . .
I only started exporting avi movie files in the last year and I also found the exact same 2 problems.
VERY annoying and time consuming.
First of all I'm really excited about trying that 'no fields' option and as nearly every movie I have
made uses imported photoshop layers, they export covered with those lines, it's really horrible and
disheartening, please see sample here . . .
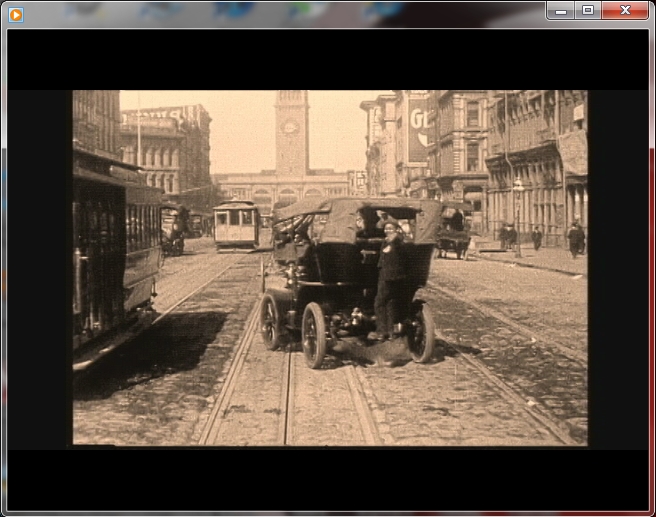
http://www.youtube.com/watch?v=ZZiF9kNJDOU
Note how when the tram comes into view and all the way down the street it is flashing and pulsating
with these ugly lines. That tram is simply one single photoshop layer image moving from point A to point
B. This has happened to a lot of my short animations and ultimately ruined them so i was delighted to
find this thread . . .
The other thing is the AVI file sizes? Did you solve that? What I noticed is that when exporting to avi files
they were also massive which I found very annoying but what I did notice was the 'bitrates'. I checked some
other standard avi files i had by right clicking them and checking their properties and what I saw was the
audio and video bitrates were usually around a couple of hundred but the AVI files i exported from premiere
were in their THOUSANDS, im not entirely sure how to lower the bitrates or use compression, maybe there is
a specific codec for compressed AVI files?
Copy link to clipboard
Copied
Hi Ginger,
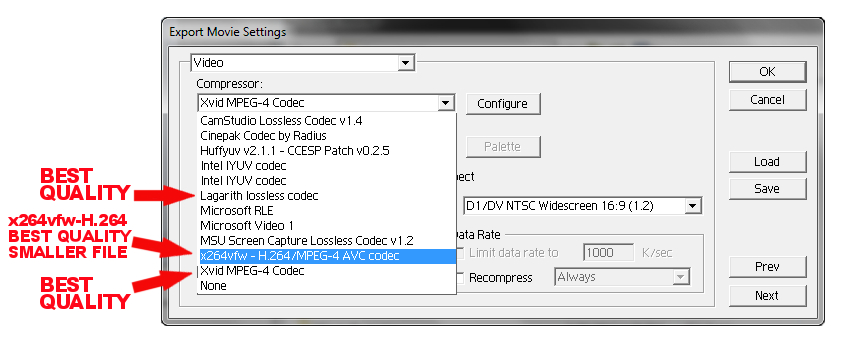
First let me answer your question about the AVI file sizes as best as I can. Yes, AVI files sizes made with codecs that export sharp files (which I'm always going for) are very large. I found that I would use the Xvid MPEG-4 codec, which gives me very large files. The Lagaith lossless codec also gives me very large files.
But if I want a much smaller AVI file that has nearly the same sharpness (an almost undetectable difference from the other two codecs I mentioned) I use the x264vfw - H.264/MPEG-4 AVC codec, and AVI files saved with that codec will also import back in to my old Premiere 6 app, whereas some AVIs saved with other codecs will not import back in to my Premiere 6... you may have different import options with a newer version of Premiere.
I don't remember the exact file size comparison, but it seems like the x264vfw - H.264 codec makes AVI files about half the size of the AVI files that I get when using the Xvid codec.
Of course once you save your AVI file or multiple files, you can always import them in to something like Windows Movie Maker or iMovie and save a much, much smaller WMV file or a MP4 file, but of course, depending on the color and the motion in your movie or animation, you get artifacts (fuzziness and pixelation) after saving to one of those formats.
I love that absolute brilliant sharpness and color of a full size AVI file that I save with the Xvid codec, but the x264.vfw - H.264 codec saves one pretty nearly as sharp and with as good color, but with a much smaller AVI file size...
See my screenshot at the bottom of this post.
Now, as for your video... that is one of the coolest things I've ever seen! I'm going to watch all of your YouTube videos, but just that one little Dublin Animation is so cool. How did you get the bicycler's legs to move and the horses legs to move?! Anyway, I absolutely love it.
Also, even though I can see the lines that we're discussing in your little streetcars, bikes and horses, they are hardly noticeable in that video... it's only because I was looking for them that I noticed them, whereas on my older videos that I made before I figured out that problem, you can really see those horrid lines in my animations.
Here's why I appreciate your animation so much... because I sometimes do the same thing with movies about San Francisco. In a lot of my movies, you can see the horizontal lines that we're talking about on this thread because I made those movies before I finally figured out why I was getting those lines.
Only movies that I made towards the end of those that I have posted on this YouTube channel, are one's that I exported AFTER I figured out the right setting to use to get rid of those horrid horizontal lines. You can see quite a bit of evidence of the horizontal lines problem in the two videos linked below, each with a regular and with an HD full page size link...
"A FLIGHT THROUGH TIME IN SAN FRANCISCO - PART 5IVE - LIVE IN TECHNICOLOR"
regular YouTube link: http://www.youtube.com/watch?v=Y3Ha4HtDwQ4
full page HD link: http://www.youtube.com/embed/Y3Ha4HtDwQ4
"A FLIGHT THROUGH TIME IN SAN FRANCISCO - PART SIX - ON THE SILVER SCREEN"
(YouTube apparently removed this one for a music copyright violation, but it was up there for over two years before they did, so here is the Vimeo link for it, below)
Vimeo link: http://vimeo.com/27873952
Another coincidence is that I also, for a while, was using my own variation on the MGM lion opening, somewhat like you are, but I inserted a little animation of my cat instead, and named mine "Metro Digiday Mayer", as can be seen in the video linked below...
"LITTLE ROCKET"
(this one is from after I figured out the horizontal lines problem)
regular YouTube link: http://www.youtube.com/watch?v=IS1UHTOKeFQ
full page HD link: http://www.youtube.com/embed/IS1UHTOKeFQ
So, really Ginger, I love your animation in that video and I'm going to check all of your others out now... keep up the great work, and please tell me how you made the little legs move in your Dublin Animation.
Ciao,
digi
Copy link to clipboard
Copied
Hi yeah thats great, can't wait to try those codecs.....
yes it is funny the amount of coincidences in our videos.... the best way for me to explain the moving photos is simple key frames made in photoshop. I seen you done a bit of it with the Tony Bennett and Mark Twain characters..
The very first thing i did was open an old photo in photoshop and use the clone stamp tool to take out all the people and vehicles.
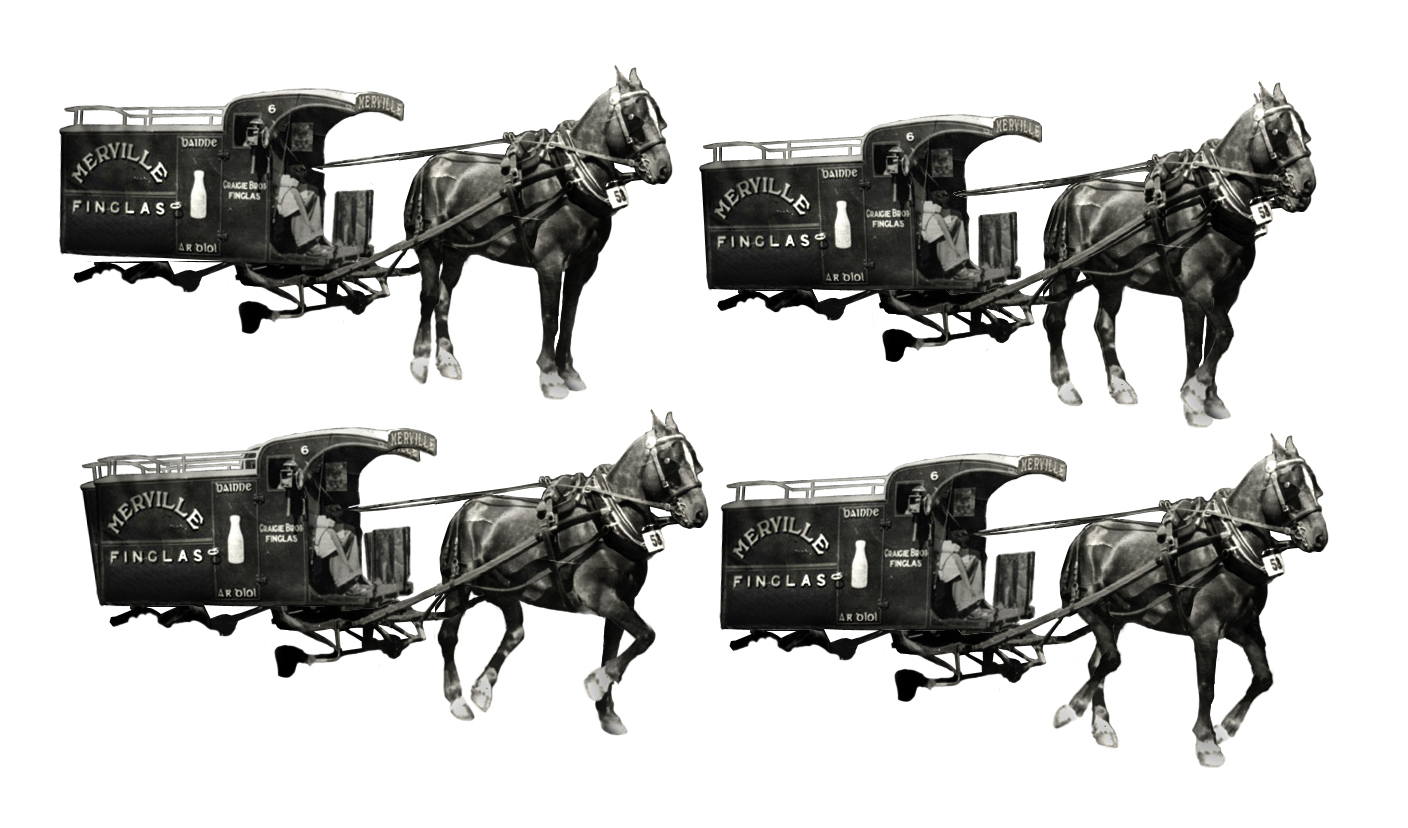
Next, i cut out the foregrounds and middle grounds i.e. lamposts and statues etc... so now i have the same old photo but it has layers so i can have things moving behind statues or behind other buildings. (Note the horses are walking behind the lamposts) these are just simple photoshop layers brought in to premiere on their own video tracks.
Now for the cyclist.... again I simply cut him out in photoshop and then cut out his limbs and filled in the gaps.... up close you can see how rough it is.... each one of these will be brought in from photoshop as seperate layers with no background, then place them along the video track in sequence and loop it....then the important thing is to export is as a seperate video, i found out that if you export as a Quicktime with the Animation Codec..... this will give you a video with a transparent background, then you simply bring it in to your scene as a new video and as far as i remember i simply looped it and using the key frames move it from point A to point B in the time line so it's an illusions he is cycling from one point to the other.
And if you want to bring the shadow in seperate, after you set up the cycle path then all you have to do is right click on the attributes (scale, motion etc etc....) and paste them on to your shadow layer and hey presto, the shadow will now follow and move along perfectly with the cyclist.

Again, you can see how rough it is up close, but remember this is all illusion. Again cutting out the legs and manipulating them and then using the clone stamp tool to fill in the gaps. For the wheel i put it on it's own seperate layer and had it rotate in front of these horses, then simply brought that it all onto the premiere timeline, looped it and exported as it's own seperate video as above. So while the horse walk loop is repeating the whole is moving from point A to point B in the motion panel. (To have it seem to change direction and walk "down" the street and the same with the cyclist i used the corner pin in the effects panel...)
These are all still in the experimental stages, the latest one i was trying to figure out was the moon roatation where i used a simple mask on a moon video from NASA. Took a while to line it up and in fact i cant remember how i did that, I really need to start taking notes....
Anyway my next stages will be to go out and start taking my own photos and cutting out loads more horses vehicles and people and have a whole populated old city.... musch fun work to be done...
Take Care
Ginger
Copy link to clipboard
Copied
Hi Ginger,
I have some other stuff to ask and add on these topics later, maybe tomorrow, but for now I just wanted to say how cool your video animation of the spinning moon and the bicycle on the street is.
You can use a "spinning globe" script in Photoshop or GIMP to make a spinning moon in layers, then import those layers in to Premiere and then get a spinning moon to put on top of anything you want without needing to make a mask for your moon video like you were describing. This moon is from a 120 frame animation, which is easy to import in to Premiere and set up in the timeline to make a very sharp animation at any size. The more frames in the animation (a specification in the plugin) the smoother the motion of the rotation.
I found a flat map of the moon (which is what is required to make the GIF animation layers that I'm talking about) and I did a little test animation of the moon as an example, seen below.
There's just one minor problem though... in real life the moon doesn't rotate... the same side of the moon always faces the earth! It orbits around the Earth, but it doesn't actually rotate. Imagine the lower property values of the side of the moon that doesn't face the Earth if the moon was ever populated!
Apparently it did rotate early on in its life before the Earth's gravity finally pulled on it enough to stop its rotation. See this article linked below...
http://www.universetoday.com/19699/does-the-moon-rotate/

But no matter... a spinning moon looks pretty cool under any circumstances, and especially in your video.
All you need is a flat map (rectangular flat image of the surface of your chosen planet or moon) like the one I found in a huge 2000x3000 pixel image of the moon online (seen below) then size it to just a little bigger than what your final spinning moon needs to be, then scrunch the image so it's square, then run it through the "spinning globe" script, then it gives you an unsaved file with all the layers for the GIF, which you can then save as a PSD, then import all the layers in to Premiere and you can put that on top of anything since your PSD layers have transparency in Premiere...

This technique is how I created the rotating Saturn animation in the little, short 4 minute "elements" video linked below that I made...
"The Elements of the Rotating Saturn and its Spinning Rings"
And here's the full video that rotating Saturn is from...
"LITTLE ROCKET"
More later.
Thanks for the tips... I may have a question or two.
digi

Copy link to clipboard
Copied
this works!! UNTIL i render the sequence, then it goes back to acting crazy.

 AdChoices