
Inspiring
April 5, 2017
Answered

Customized Next and Previous Button (Within the slide not as part of Navigation bar)

  • April 5, 2017
  • 1 reply
  • 517 views

Hello Friends,

I want to have 'Next'and 'Back' button in my content screen wherein I want the learner to view the images using these buttons.

These buttons will be present in the content space. I am finding it difficult implement in my project.

Please help me out.

Thanks in advance.

Regards,

Ramya
    This topic has been closed for replies.
    Correct answer Lilybiri

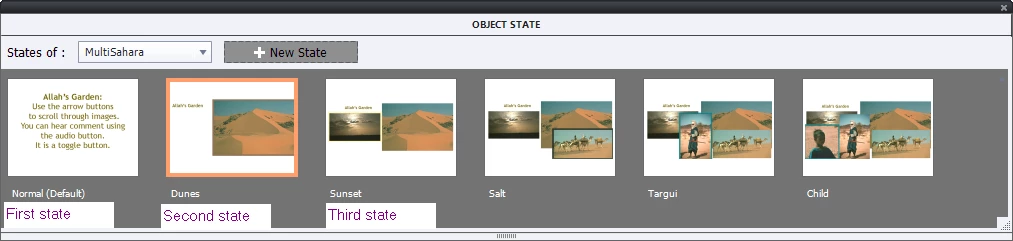
    Use a shape with the first image. Use the state view button to open the Object states. Add more states and in each state you change to another image. Here is a screenshot, this one added an image in each new state, but you can delete the previous image in a following state as well

    The normal state here has only a text, the other states have images. I used a Back and Next button to switch to the following state..

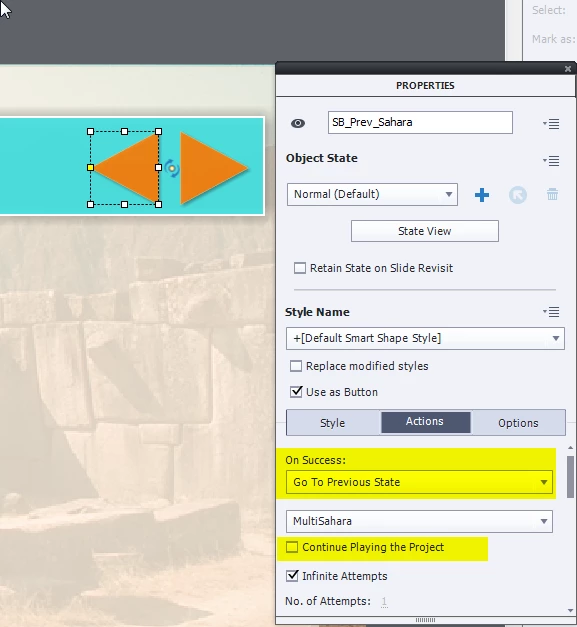
    This is a screenshot of the Back button, with its Actions tab:

    1 reply

    Lilybiri
    Legend
    April 5, 2017

    Which version are you using? Do you want to use those buttons only to switch to the next or previous image? In that case, and if you use CP9,  the easiest way is to put all the images in one shape used as multistate object. You trigger the command 'Go to Next State' with the Next button, and the command 'Go to Previous State' with the Back button. Do not forget to uncheck the option 'Continue Playing the project' to keep the playhead paused at the pausing point of the two buttons, which should be at the same time. Have a read of this article:

    Pausing Captivate's Timeline - Captivate blog

    Inspiring
    April 5, 2017

    Hi Lilybiri,

    Thanks for the quick response.Yes, You got me right. I'm using captivate 9.

    But, still am not clear with the solution suggested by you. Please elaborate it.

    Regards,

    Ramya R

    Lilybiri
    LilybiriCorrect answer
    Legend
    April 5, 2017

    Use a shape with the first image. Use the state view button to open the Object states. Add more states and in each state you change to another image. Here is a screenshot, this one added an image in each new state, but you can delete the previous image in a following state as well

    The normal state here has only a text, the other states have images. I used a Back and Next button to switch to the following state..

    This is a screenshot of the Back button, with its Actions tab: