Participant
September 10, 2012
Answered

H.264 gamma shift/washed out colours on export

  • September 10, 2012
  • 14 replies
  • 181982 views

I know this has been discussed before but I've been researching this topic for the past two hours and still can't find a solution.

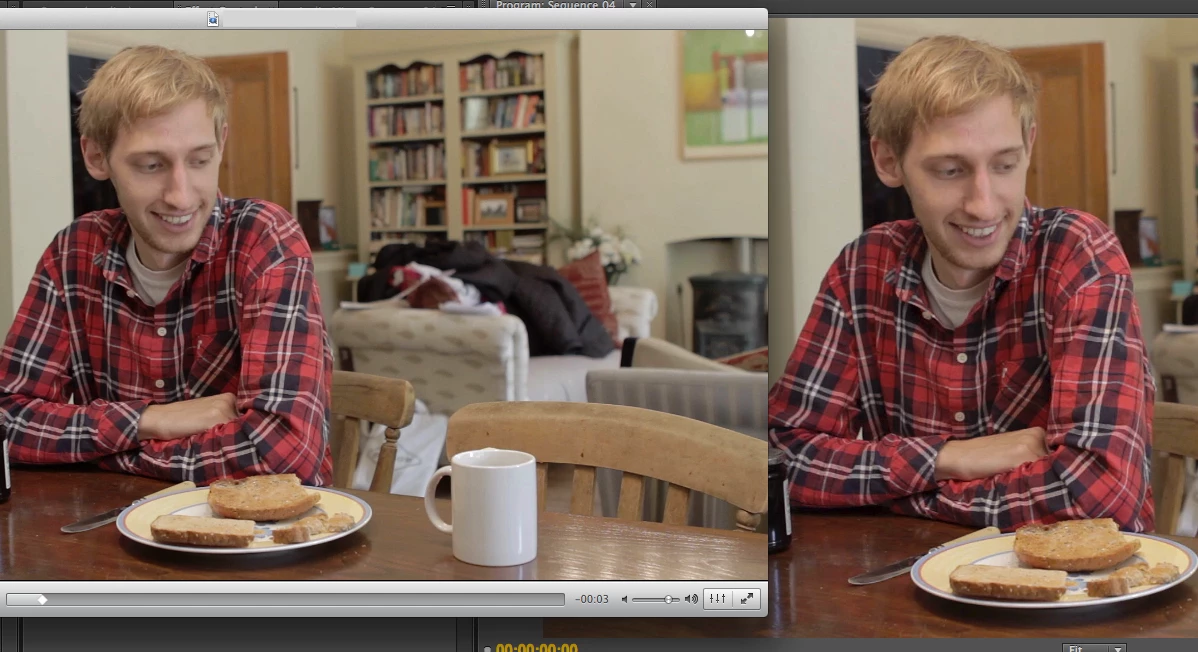
I have .mov source files from a Canon 7D. Exporting them from PP CS5.5 (Mac OS X - Lion, 10.7.4) in h.264 or by 'matching sequence settings' results in a gamma shift/desaturated colours. Playing the resulting h.264 file in QuickTime Player, VLC, Elmedia all result in the same colour shift so this is not an issue with QT simply interpreting the gamma incorrectly.

Uploading to Vimeo and Youtube results in the same gamma shift. The monitor I'm using is not calibrated but when puling up a VLC window of the exported file next to the Program Monitor (on the same monitor) shows that there is a definite difference. Below is a screenshot.

Is there any way to produce an exported file for Vimeo use that reproduces the gamma as I see it in the Program Monitor?

Any help would be massively appreciated.

Thanks.

This topic has been closed for replies.
Correct answer digabyte

I do indeed have an NVIDIA card - NVIDIA GeForce GT 330M 256 MB - running on OS X 10.7.4. Your theory sounds quite close to what the problem actually could be.

Here's a test clip (mp4) - https://www.dropbox.com/s/12h1htyacchr8dk/Gamma%20test%206.mp4

Here's an MPEG2 for comparison as well - https://www.dropbox.com/s/tprd7k7blprpztl/Gamma%20test%207.mpg

Both look identical in both VLC and QT, ie. washed out compared to what I'm seeing in PP.


The fix may be within your Nvidia Control Panel settings.  I was having this issue when exporting from Premiere CS6 and uploading to Vimeo (the video once posted to Vimeo was washed out and/or hazy).

From this link: http://danbeahm.blogspot.com/2011/01/fix-windows-media-center-andor-vlc.html

The fix I found was to use the NVIDIA control panel to control your video playback instead of the video player’s settings. 

  1. Open your NVIDIA Control Panel (type NVIDIA in your start menu search field and select NVIDIA Control Panel).
  2. Go down to Video and select “Adjust video color settings.”
  3. Under #2 (How do you make color adjustments), select “With the NVIDIA settings.”
  4. Under the Advanced tab change the Dynamic Range with the drop down to “Full (0-255)” (not “Limited (16-235)”).
  5. For my display to look as it should, I had to uncheck “Dynamic contrast enhancement.”

My video now appears as it should (not washed out).

14 replies

Participant
March 24, 2023

What about this solution?

https://mac.eltima.com/blog/h264-player-mac/

Has anyone tried it yet?

rickyc86994001
Participant
September 21, 2022

Hi All, I have been getting a shift in colour when exporting. This is only a simple 9 second animation but the background black is ending up alot lighter than it seems inside AE. 

Here are all the settings of the project and the comp. I am exporting through the media encoder and using high quality 2160p 4k preset, nothing altered. 

I have altered the colour workspace in project settings following an article in another adobe forum, this does help but doesn't just output the exact colour I need as the video needs to match the background of the website.

jorgea66074511
Participating Frequently
April 11, 2019

Any solution for Mac? I have a Radeon PRO Card so the Nvidia solution doesn't work for me. Thanks.

Kevin-Monahan
Community Manager
Community Manager
May 26, 2017

Sandeep The Fifth, the OP never returned. We assume that the NVIDIA control panel is at the heart of any issues not caused by the same issue perceived in QuickTime Player. If there is another finding by Sandeep The Fifth, please respond.

Regards,
Kevin

Kevin Monahan - Sr. Community & Engagement Strategist – Pro Video and Audio
bryantjcoffey
Participating Frequently
January 9, 2017

Hi guys, I never saw a correct answer to this question, but this used to work for me when I was in the FCP7 days was to export a ProRes and then use Quicktime 7 to add a filter to it of Brightness -2 / Contrast +2.  I didn't want to roundtrip it through QT7 anymore so I fiddled with an adjustment layer to enable on (in my case, Vimeo 720P Preset) with a brightness / contrast filter, brightness -2, contrast +4, a Gamma Correction filter set at 10, and a Lumetri Color with saturation boosted to 110.  It looks like crap in Premiere, but on export it seems to get close to the original edit. 

Also, there's this that I found in my research: Video Tutorial: Maximizing Brightness and Contrast in Adobe Premiere Pro CS6 - Streaming Media Producer

Let me know what you guys think.  Thanks!


B

Participant
May 24, 2017

Bryan- that's a very close work around- thank you!  The LUT at this link is only slightly better:

fixmyyoutube - Creative COW

Really crazy this is such a big issue.  For years now...

R Neil Haugen
Legend
May 24, 2017

PrPro is built on standard Rec709 output. Full 0-255, standard gamma ... and apparently there's a spot in the file header to mark something on "space" or whatever they don't bother with as Rec709 is supposed to be full range. YouTube uses actually an older "view" of things that tends to assume 16-235 unless something states otherwise. The PrPro engineers don't see the need to back-design their product, and I think feel that YouTube should join the modern world.

Engineers that see things differently ... don't typically come together, it seems.

My outputs to YouTube seem to come through fine, as do many others. Some users get hammered with the main problem of this thread, YouTube displaying their upload in a 16-235 manner, looking flat, low-saturated, and muddy in the shadows.

One suggested export option from PrPro is to use a QuickTime format, but in the video codec section, choose DNxHD/R. That may work for you without needing alterations.

Neil

Everyone's mileage always varies ...
Participant
November 20, 2016

Hi,

I too have been struggling with this issue since day one of modern HD-video (on PC...).

Up to this point I have been counteracting the shift by making a master layer during color grading and lower the gamma for the upcoming h264 conversion.

I'm hoping to find an answer to this, but I see that it is still a big issue for some.

Yes, I have a NVIDIA card. I also have two hardware-calibrated monitors. I do not think the issue lies in NVIDIA.

Looking at my master file exported from Resolve (QT, DNxHD, 10bit) it looks just fine in VLC. Just as it looks in Resolve. However, the moment I put it into Media Encoder and choose h264, I can see, already in the preview window, that the gamma shift is in full swing. I do not even need to bother exporting.

AND, if I try using Handbrake instead, the result is actually the opposite! All blacks are pretty much crushed...  :S

I will follow this discussion with great interest!

All the best,

Johan

R Neil Haugen
Legend
November 20, 2016

My Nvidia cards ​always​ load with the controls for the card set to allow video players to choose the dynamic range, ​and​ with a dynamic range of 16-235 set as the 'preferred' one. I'm on the fifth OS setup for my video-post work, and just rebuilt my new station, it's been the same on Win10 as all previous versions. I've sat down at a few other computers for others, and they've had the same 'base' setup unless they'd modified it. So Nvidia's 'base' settings can play a role.

My work from PrPro needs to have those settings changed to the Nvidia settings for the card are in "control", and to a full dynamic range of 0-255. Then PrPro & VLC will 'see' the files the same. As will Resolve.

Resolve does it's own thing with color, or perhaps, it does whichever of about 50 options it's set to do. I know some colorists have found they needed to work out which way to set their computer and software settings so that PrPro, AE, Resolve, and their monitors both "computer" and B-cast (as a Flanders, say) "see" the same signal.

I'm not currently running any exterior 'boxes' to my second monitor, but ... PrPro and Resolve 'see' things the same. I do have an issue with SpeedGrade in "native" mode, where it shows things a bit dark ... grade a sequence, and then it's just a bit too bright. In Direct Link mode (and now, using Patrick Zadrobilek's little program from NTown productions to convert) SpeedGrade 'sees' things as does PrPro. Which makes no sense to me.

Ah well.

Neil

Everyone's mileage always varies ...
Participant
November 21, 2016

Yes, so it seems. When I have the NVIDIA set to full range, my DNxHD file looks fine, however, I did try to export a h264 with Media Encoder, and that file also looked crushed, rather than flat. Also a bit desaturated... So the preview in ME does NOT correspond with the look of the rendered file.

/Johan

Inspiring
November 10, 2016

Hi, I have been having a the same issue with the washed out colors with the H264. The solution with the NVIDIA control panel made indeed a huge difference. Now my exported files look as good as in PP, but when I upload them on YouTube however, they look bad again. So I upload a good-looking video, but somehow with the upload on YouTube the colors wash out. How is that possible? Has anyone here any experience with that?

R Neil Haugen
Legend
November 10, 2016

There have been several threads here of users having this issue. One user has posted a LUT that he created and makes available to use on export from PrPro that makes a not particularly nice-looking export, but after YouTube does its "thing" to the upload, it looks normal.

I've not tested that nor have any definitive knowledge of the final results, but others have said it was useful.

So ... perhaps search the forum for YouTube, saturation, exports, and see if you can find it. I've seen a thread with a post talking about this within the last week or two.

What this indicates about YouTube is they are using perhaps the old video-tape "legal broadcast" setting of signal levels of 16-235 instead of the full digital signal range of 0-255 for at least some areas/upload processes. There is no technical reason whatever for that old standard anymore, and many in the industry are calling for the elimination of its use.

Neil

Everyone's mileage always varies ...
Participant
October 4, 2016
Please!! help me!! I have the problem that exported in AE and red are changed to orange!!
Human skin looks like hepatitis!
I tried all the variants H264 (H264 even blue ray) offers nothing change !! Help!!!

Here a mask over the MTS to see the difference. It is not a question of the player! Both the H264 file as the MTS are inserted in AE: the window you are seeing is the AE !! Help me please!!!

R Neil Haugen
Legend
October 4, 2016

You want help, well, give information so we can try to help.

So you're dealing with originals from a Canon in .mts, and are viewing an mp4 output by PrPro in an older version of After Effects ... that's all I know. Isn't a lot, really.

What precise number-dot-number version of Premiere Pro were you using, what effects ... all effects ... were used, including but not limited to coloring or tonality work, what are the graphics/color-management settings in that After Effects, do the imports look the same when brought into PrPro as the original sequence before exporting, and of course ...

OS/CPU/RAM/GPU/vRAM.

With that information, we could have a very good chance at determining if there is a real problem with your PrPro (not very likely), or is some inadvertent setting in AE's color management is causing it to display different from PrPro (very possible), if there's a setting in your graphics that may be affecting this, and other possibilities.

By the way ... what does the PrPro export look like in VLC video player?

Neil

Everyone's mileage always varies ...
Participant
June 23, 2016

I just had some serious issues with this myself.

1 Hour 'till deadline, and i got this problem.

I haven't tried testing out actually what fixed my problem, but at my last export i tried enabling "maximum render quality". I also exported it directly from premiere, instead of going through encoder.

At least this fixed it for me :-)

Participant
May 5, 2016

I have a similar problem, in Premiere CC, Over exposed areas appear white however, when exported as H.264 or ProRes, the over exposed areas turn Magenta?

Any ideas what may be causing this?

R Neil Haugen
Legend
May 5, 2016

Yes, I do think I know what's happening ... but this is a very different issue than the original post concerned.

Go to your Lumetri Color workspace, and get the Lumetri scopes out. Particularly the RGB Parade, Wave, and YUV Vectorscope. I believe you'll find the 'magenta' areas have values well above the 100 nits top line of the scopes. PrPro does have some occasional blurps with some types of media with values up there ... and at times, when exporting that media to certain outputs.

I'm curious ... is this RAW or CinemaDNG media, perchance? Or shot in some log form? The first two can really get this, the last sometimes. If RAW or CinemaDNG there are master clip controls for some settings that might need adjusting, though I've not a lot of experience there and that some months ago. What you might try also is use the luma sliders of the Lumetri "Creative" tab ... the vertical sliders to the left of the three color wheels are Luma sliders ... particularly the right-side Highs control ... and back the tops of your trace in the scopes to within the 100 top line. (Often the "Basic" tab's exposure/contrast sliders are NOT allowed to move data outside the 1-99 range>)

Also ... if this is from one of the very wide DR-range cameras now available, you might need instead to set the sequence to High DR as shown here:

Neil

Everyone's mileage always varies ...