

- Home
- After Effects
- Discussions
- Re: automatize 3D-Movement along camera-cone?
- Re: automatize 3D-Movement along camera-cone?

Copy link to clipboard
Copied
Hi,
I am looking for a way to move objects in 3D-Space according to the camera-angle.
meaning all objects should constantly move back along the z-axis, but also move on x and y depending of there origin and the camera-angle of the camera I set.
For example if an object starts in the middle (x,y) of the comp, it would just move back in space on a straigt z-axis. If it is placed in the upper left corner it should also drift towards the upper left-corner while it moves back on z. and so on.
Like in the sketch.
Any ideas how to achive that with automatisation/expressions? (I don't want to keyframe each object individually because I need a lot of them)
Thanks!!
René


 1 Correct answer

This is pretty easy. You need a null attached to the point of interest of the camera. You can either set the camera at the default position or attach the null to the camera's point of interest with a simple expression created with the Pickwhip. Then you need a layer with the anchor point centered parented to the center null. Then you need to add an expression to the scale of the layer you want to move that ignores the scale of the parent. The last step is to add an expression to the center null
... 5
Replies
5
5
Replies
5

Copy link to clipboard
Copied
Assuming the camera is 100% static, it would be trivial by figuring out the 2D angle and distance between comp center and initial position and then multiply it with an abstract value. reserach some "targeting" expressions for examples. If the camera moves in your scene, then you're in for a hard time using complex vector math.
Mylenium

Copy link to clipboard
Copied
I'm not sure what you want to achive, but the visual outcome reads to me like linking the object scale to z-axis of the camera.
Copy link to clipboard
Copied
This is pretty easy. You need a null attached to the point of interest of the camera. You can either set the camera at the default position or attach the null to the camera's point of interest with a simple expression created with the Pickwhip. Then you need a layer with the anchor point centered parented to the center null. Then you need to add an expression to the scale of the layer you want to move that ignores the scale of the parent. The last step is to add an expression to the center null that keeps the null at an effective 100% scale. As the null moves away from the camera, it scales up which changes the relative position of the child (the circle). Without the expression that compensates for the scale, the circle layer will not appear to change size or position, but with the expression, the layer will remain at 100% scale no matter what the scale of the parent. A comp would look like this:
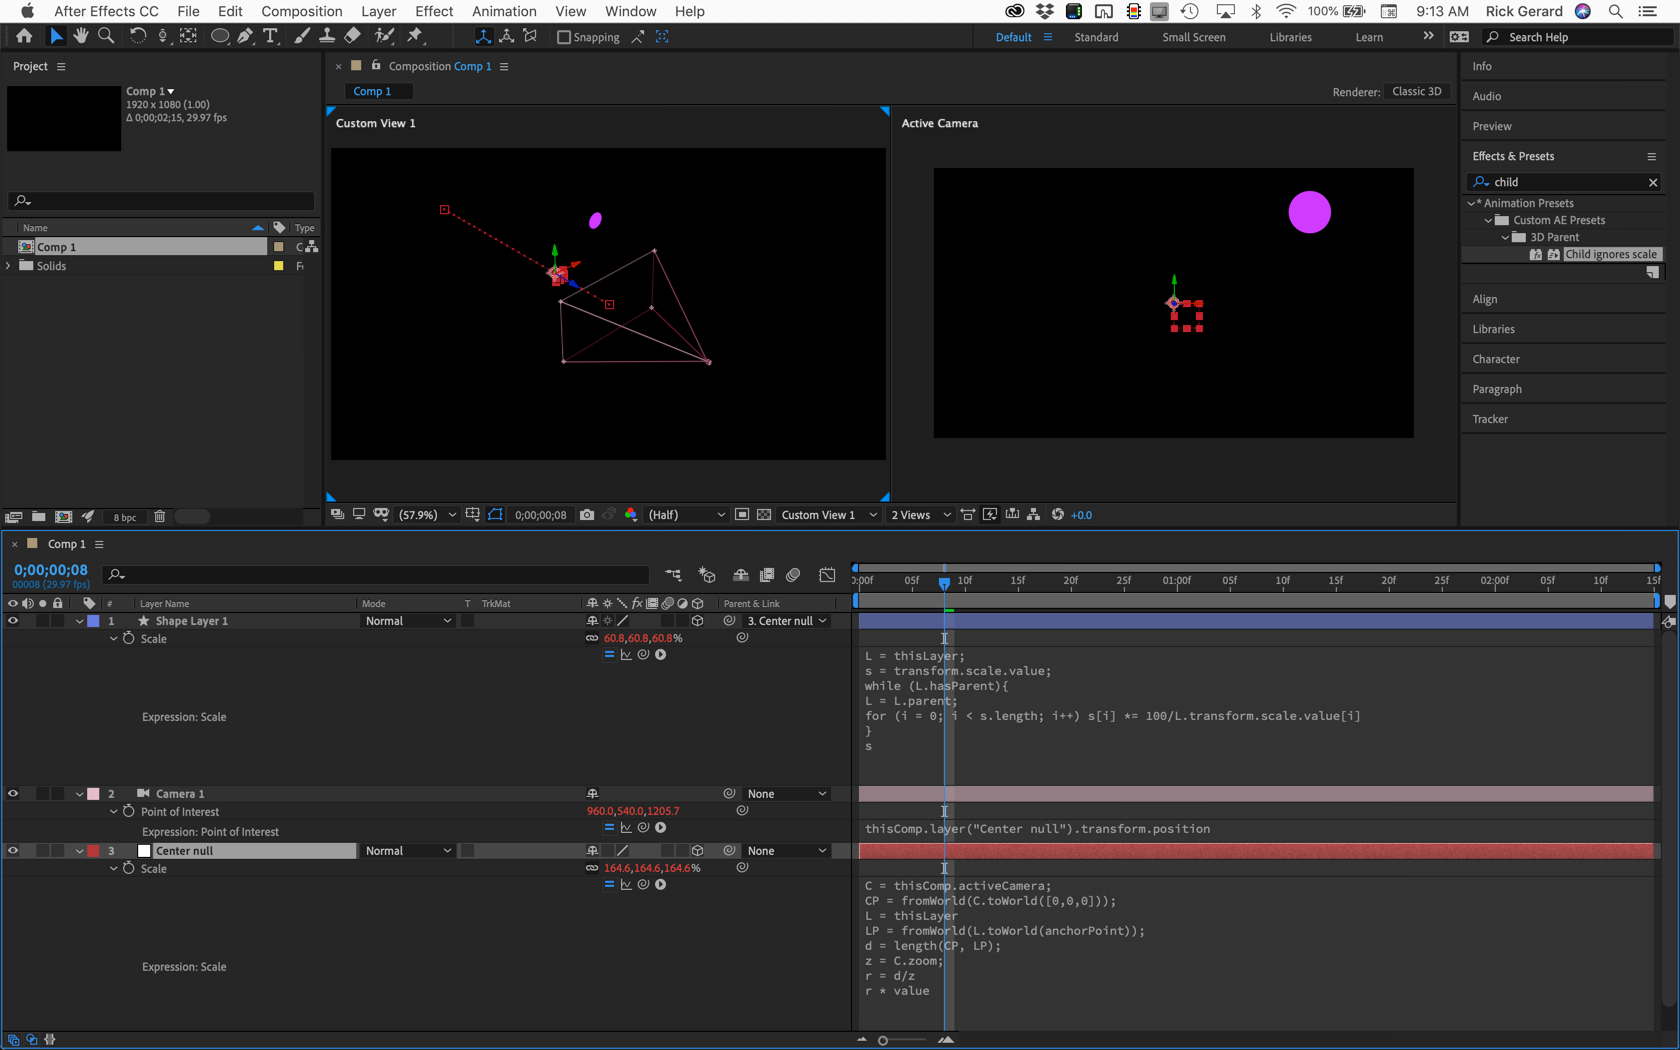
The expression to automatically scale the center null as it moves in relation to the camera looks like this:
C = thisComp.activeCamera;
CP = fromWorld(C.toWorld([0,0,0]));
L = thisLayer
LP = fromWorld(L.toWorld(anchorPoint));
d = length(CP, LP);
z = C.zoom;
r = d/z
r * value
The expression that ignores the scale of the parent layer looks like this:
L = thisLayer;
s = transform.scale.value;
while (L.hasParent){
L = L.parent;
for (i = 0; i < s.length; i++) s *= 100/L.transform.scale.value
}
s
I suggest that you save them both as Animation Presets. Both of these expressions are extremely handy in a lot of situations.
If you are not going to move the camera from its default position you don't need to attach the Point of Interest to the Center Null position. The screenshot gives you everything you need to recreate the project.
Now you can edit the camera, move it anywhere you want, even animate the zoom and you are free to animate the position of any layer parented to the center null by simply animating the position of the center null.
This is going to give you an odd unnatural perspective change but maybe that is what you want.
Copy link to clipboard
Copied
Hi Rick,
wow - that's really exactly doing, what I asked for 
But I admit, now that I see it, it is not really looking the way I had hoped for.
The idea was: when you make a lot of objects move backwards on z, in the very depth the all move towards the center. (Logically - laws of perspektiv). I tried made them move backwards slightly diagnally, so they would also fill the screen, even if they are very deep "in space". That actually looked nice. But by doing so matematically correct (like I thought and like you gave me a solution), it looses the effect of traveling into space. It looks like they just scale.
Mmh. Thanks anyway!!
(Or maybe can it be easily down, to do the same with your solution, just with a little bit different angle then the active camera?)
Copy link to clipboard
Copied
Perspective is controlled by camera position. Focal length defines the angle-of-view or the crop.
For normal parallax and perspective changes use a 50mm lens move the camera way back. If you want to scale down the set then you have to scale down the distances from the camera to maintain the same perspective. If you are worried about depth-of-field then you need to scale the aperture also.
Here's an example:
Let's say that your closest object is 540 pixels in diameter and it fills 1/2 of the frame when the camera is at its default position of -2666.6667 in z. Let's scale our world to 20% so we have some easier distances to work with. Multiply the camera's z value by .2 by simply double-clicking the z value, press the right arrow key, then add * .2. Now multiply the diameter of the closest object by .2 using the same technique or just set the scale to 20%.
Now that you have scaled everything you can start offsetting the other objects in your scene, then fly the camera through the scene. Just make the distances appropriate. For example, the moon is 1/3 the diameter of the earth, but it appears to be the same size as the sun because it is a lot closer. If you want to do an accurate solar system you need to start playing with ration and distances and sizes to get things to work out. Now when you fly your camera or animate your objects the perspective will be correct.
I don't have time to go through a complete explanation but maybe this project file will help: Dropbox - Orbits. aep
It's awfully simple but it shows how scale can be used to miniaturize the set into something that is usable.
(note: your browser may add a txt extension to the AEP file. If it does, just delete it)

Find more inspiration, events, and resources on the new Adobe Community
Explore Now
 AdChoices