


Copy link to clipboard
Copied
Hi all,
I have a clip of a window beam that I have keyed the black out of, but there are still subtle hints of it after the key and after adjusting levels and curves. I'm now trying to mask out the extra black portion of the clip I don't need, but for some reason when I draw the mask over the layer it doesn't mask out the bits I'm trying to get rid of. I'm not sure what I'm doing wrong. When I draw a mask on the bottom layer the mask works fine, but for some reason it doesn't work on the clip I've dropped on top of it.

Any ideas?


 1 Correct answer

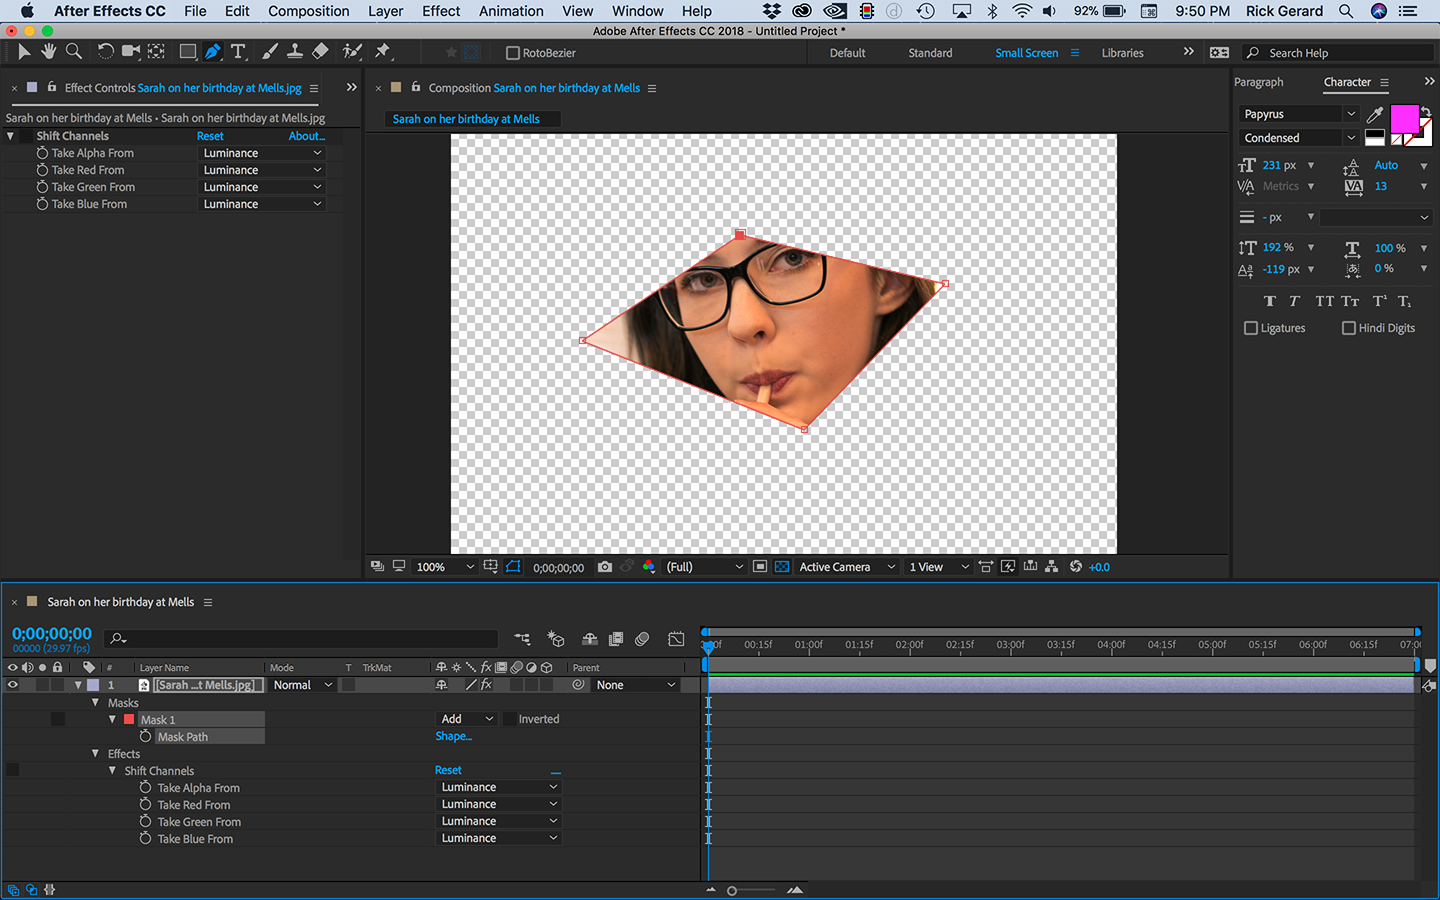
From what I can tell from your screenshot Shift Channels is applied to the layer with the mask and you have switched the Alpha to Luminance. In fact, you have switched all channels to luminance. This will make a semi-transparent black and white layer with really odd color to black and white conversion. Here is a screenshot showing all modified properties of this layer and as expected, the mask has no effect:

I am not sure what you are trying to accomplish with the Shift Channels effect but I've n
... 10
Replies
10
10
Replies
10

Copy link to clipboard
Copied
I don't really understand the issue. Could you please explain (with screenshots of your whole interface) what the issue is?
Copy link to clipboard
Copied
Thanks for the reply!
So Ive got this clip of a light beam coming through a window. I would like to keep the part of the light beam inside the red lines and
mask out the rest. I'm not sure why nothing is being masked out after I've drawn the mask around the clip, which is the top layer.

Copy link to clipboard
Copied
Update:
I can see now that the mask works in the Layer Window, but how do I get it to work in the comp window?
Copy link to clipboard
Copied
What happens if you turn off the eyeball on the layer beneath the masked layer?

Copy link to clipboard
Copied
I notice that the levels effect in your screenshot is set to alpha mode... are you sure you've not modified your alpha values with that. This would affect masks on the layer. Temporarily toggle of the effect (fx button) to check.
Copy link to clipboard
Copied
Hey guys, sorry for the delayed response.
Dave, if I turn the eyeball of the layer underneath the masked layer off the video of the room disappears.
Mike, if I turn off the fx button on the masked layer then what I'm trying to do does technically work, except the black in the masked clip that I removed comes back. If I can keep the mask working the way it is but also remove the black like I had done before then we are in business.
How might I go about doing that? Am I just doing it in the wrong order?
EDIT: It seems like anytime I add any kind of effect to the clip, the mask stops working properly. Is this a normal thing?
Copy link to clipboard
Copied
I have also tried adding the alpha channel effect to remove the black, pre composing the layer and then masking the new pre comp after reading another forum but that hasn't worked either.
Copy link to clipboard
Copied
From what I can tell from your screenshot Shift Channels is applied to the layer with the mask and you have switched the Alpha to Luminance. In fact, you have switched all channels to luminance. This will make a semi-transparent black and white layer with really odd color to black and white conversion. Here is a screenshot showing all modified properties of this layer and as expected, the mask has no effect:
I am not sure what you are trying to accomplish with the Shift Channels effect but I've never seen it used in that way. Adding curves is not going to do much. There is nothing in the screenshot that shows me a usefull technique for doing any kind of composite. To diagnose the problem I turn off the Effects using the switch just to the left of Shift Channels in the timeline layer and I'm getting the mask to work as expected.
Here's how I would troubleshoot any kind of problem.
- Select all layers and press the "u" key twice to find all modified properties of all layers
- Solo layers one at a time to see if they are behaving the way you want them to behave
- If you have a misbehaving layer then try turning off the effects applied to that layer one at a time to see where the problem is
- Make sure that none of your layers are set to guide layers
- If the layers are behaving properly when soloed then turn them all off and start on the bottom to build your composite when you find a layer that does not behave as expected check modified properties again (press uu) and see if you can figure out what's going on.
If all that fails then reveal the modified properties of the layer or layers that are giving you problems, press Shift + Ctrl/Cmnd + 3 to grab a screenshot and drag it from the desktop to the forum so we can see what you are dealing with. (Note: for Windows users, all you have to do is press PrintScreen and then click in the reply field and press Ctrl + v to paste a screenshot)
All I would do to create a light beam showing through the window is add a shape layer filled with a white to transparent gradient, blur it significantly, set the opacity to about 35% and set the blend mode to add or screen. It would take about a half a minute and look something like this:

I added a subtraction mask to the shape layer to get the light to pass behind Sarah's face. The white to transparent gradient fades the light across the scene. I could have filled the shape with a white and placed a black to white gradient layer above Shape Layer 1 to use as a luma matte for the shape layer also and sometimes that may be a better solution. I add lights to composites all the time and about 80% of the time it's just a blurred shape layer filled with a gradient and a blend mode.
Copy link to clipboard
Copied
Thank you for the detailed response Rick, I was able to get the exact look I was going for with the information you provided.

Copy link to clipboard
Copied
Copy the mask and paste it onto the other layer?

Find more inspiration, events, and resources on the new Adobe Community
Explore Now
 AdChoices