

- Home
- After Effects
- Discussions
- How do I scale a masked image smaller than the com...
- How do I scale a masked image smaller than the com...

Copy link to clipboard
Copied
Hi all,
Long time AE user here, but can't seem to figure this one out; hoping you guys can lend a hand and help me out 
I have a video clip of a sign in front of a building (The sign takes up about 25% of the frame).
I exported a still image of the sign and in Photoshop, made the sign say something else, then deleted everything around the sign so it's just an alpha channel. So now I have a PSD that's 1920x1080 with a single layer of the sign that only takes up 25% of the frame, so that I can composite it.
Then I imported the Photoshop file into AE along with the original footage.
Using Mocha AE, I tracked the footage of the sign, then in AE, made a Solid layer, pasted the tracking data onto it using corner pin, then Precomped the solid layer as 'leave all attributes'.
The solid layer follows the track perfect, so we are good there.
Inside the precomp, I add my photoshop layer (That has the replaced sign). In order for the new sign psd layer to composite properly over the sign footage, the 25% sign needs to fill 100% of the precomp (Since 75% of the sign PSD is an alpha channel). At this stage, watching the main comp, the replaced sign layer is being tracked, but it's much smaller and is not following it perfectly (Since inside the precomp, it hasn't been stretched to full screen.
I can do it roughly by adding another corner pin to the psd inside the precomp and stretch it up to the corners, but it's messy as I need to put the 4 corners WAY past the actual comp size. It doesn't do a perfect job and it takes a while to get it close to the right spot.
Is there anyway to stretch the psd layer (Not the 1920x1080 canvas size of the psd, but rather the exact size of the sign), so that it fits the precomp perfectly?
Thanks!


 1 Correct answer

For that shot, I would never go to Photoshop unless I needed the original background of the sign. Let's say that was the case. Here's the project what I would do.
- Pick a frame where the side of the apple box was as close as it gets to square to the camera.
- Export a frame as a PSD
- Draw a mask around the edge of the apple box
- Duplicate the layer using Ctrl/Cmnd + j to get a copy with just the cut out apple box
- Change to the selection tool (v) and transform the apple box to square it up to the frame usi
 36
Replies
36
36
Replies
36

Copy link to clipboard
Copied
Will I am glad all is sorted on your side.
Might workflow is slightly different.
We must chat some other time and I will share it with you.
In the video above I don't seem to understand why the entire table was splined if the tv screen was the only area which was to be replaced with footage. The TV screen was on the stand and it was not moving independently of the stand. So why not just track the tv itself.
Yup anyway. Each to his own I say
Copy link to clipboard
Copied
Copy link to clipboard
Copied
The CC Power Pin solution works perfectly on shots that change perspective because it squares everything up, keeps it the same size, and lets you do things like roto and motion blur simulation. You end up with a much easier composite than you would get with a simple corner pin. It's nearly impossible to quickly do roto or set up a track matte on a corner pinned layer. The Advanced Corner Pin workflow gives you an enlarged, stabilized rectangular copy of the footage to work with. It makes positioning, roto, matching lighting, light wrap, reflections, shadows and just about everything else easier to work with.
When I get the new tutorial finished I will try and remember to post it in this thread. The footage comes from a Terra 4K on a MoVI Pro with a very similar camera move. Multiple signs with shadows, reflections, and people walking past will be replaced.
I just remembered I had a comp from a class I taught a few months ago. The scene: a UPS truck drives past the camera. The task, cover up the UPS Logo. The time required for the task: 30 minutes. Here is the original shot followed by the composite which fades out at the end of the shot:
Here is a look at the start of the shot where a reflection gives problems. The CC Power Pin/Corner Pin original footage layer is set as a guide layer but turned on so you can see how the side of the trailer was squared up to make the composite easier to adjust. I tracked the entire side of the truck so we could put a new logo anywhere we wanted. The original footage is a guide layer so I have the option of using blend modes in the main comp.

As the truck moves down the road a shadow from powerlines presents another problem that needs to be solved. This time the guide layer is turned off so you just see the corrected replacement logo with just the shadow.
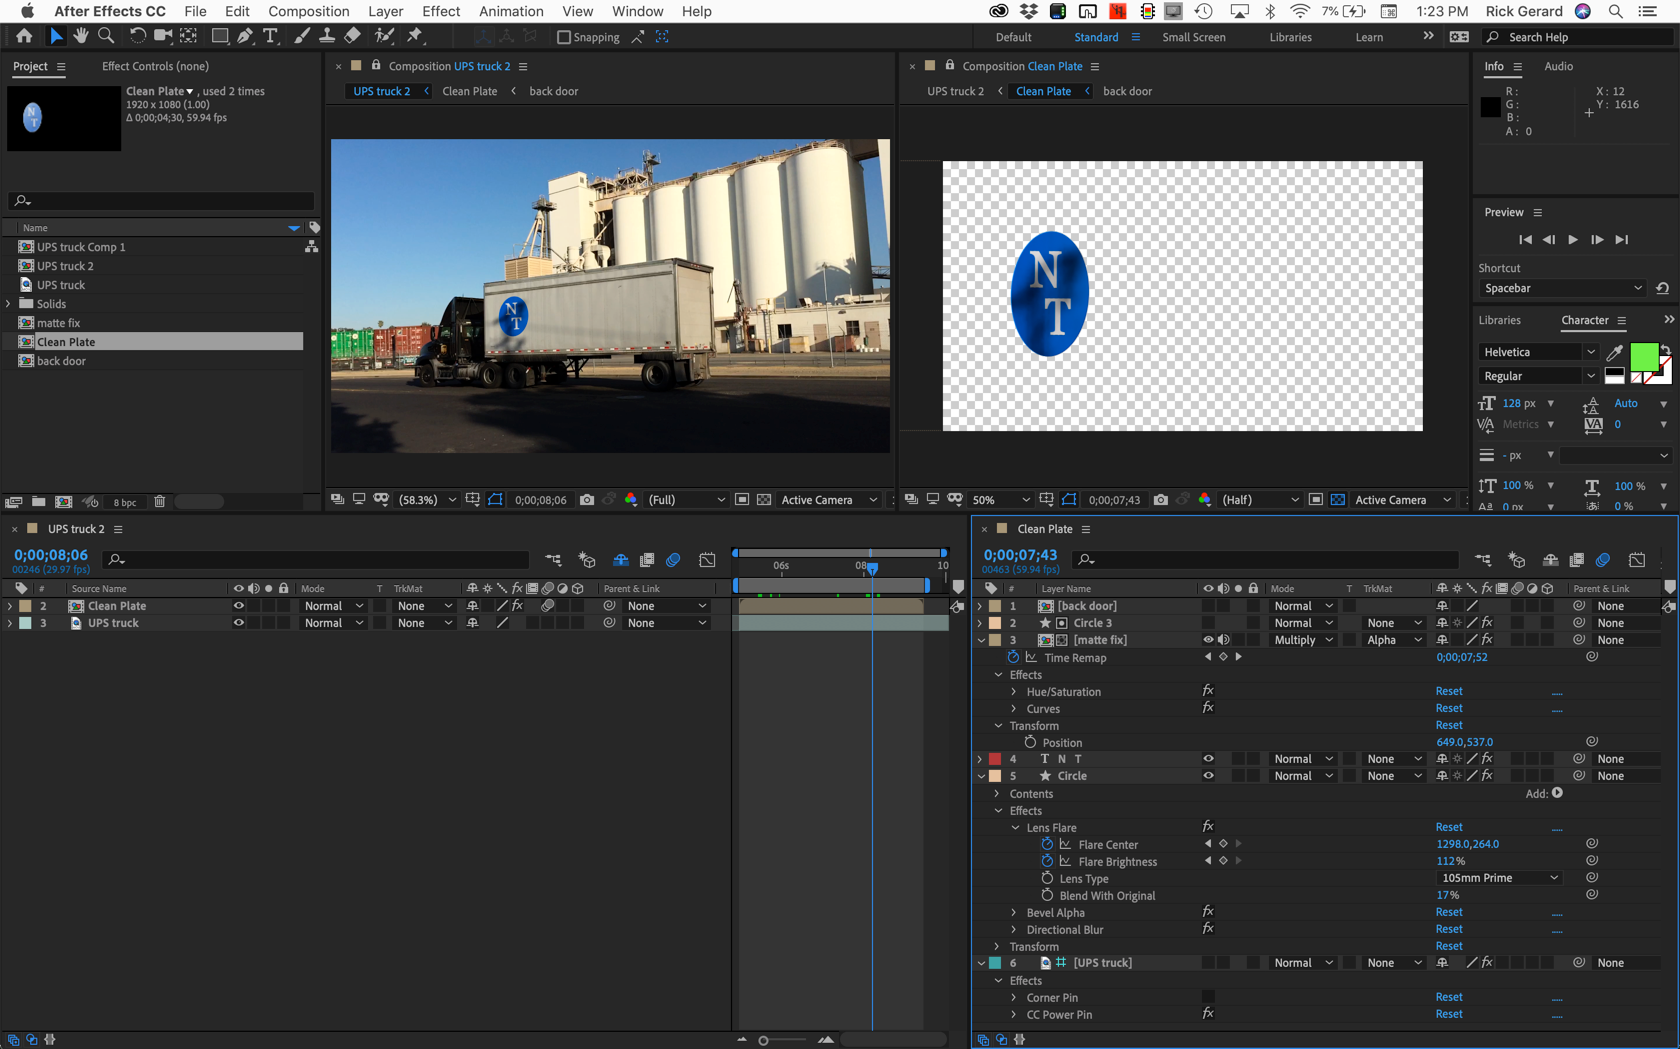
The composite of the reflection (lens flare) and shadow (a time remapped copy of the original footage color corrected, masked by the circle, applied using the multiply blend mode, retimes the shadow perfectly so the composite is seamless. This would have been nearly impossible to do with just Corner Pin tracking.
I hope this helps.
Copy link to clipboard
Copied
Thanks for sharing your workflow Rick
On the main comp, the precomp layer is a perfect track of the entire sign (In your case, the entire truck side), so within the precomp, my sign needs to be stretched/distorted to the full comp size. However, it's difficult to get the 4 sides to stretch and fill the full precomp). How can I do this better?
My issue isn't with the tracking. it's with the sign needing to be stretched to the full height and width of the precomp, but like shown above, the sign is a weird shape (Left side is taller than right side), so it makes it difficult to stretch to fill the comp. What would you do to complete this, is there a better way to complete this project?
In your precomp, the new logo is stretched tall (So that it composites perfectly on the main comp). How did you set it up so that it's stretched like that within the precomp at the right size? Did you stretch it? Or within your workflow, when you made the precomp, was it automatically added and stretched to the right side?
My workflow has been; I paste my corner pin tracking data to a new Solid layer, then precompose and leave the tracking data on the precomp (Leave all attributes), then inside the precomp, I add my painted sign layer, but as explained above, it's not full comp size, and it needs to be.
Thanks!
Copy link to clipboard
Copied
I think you are pasting the corner pin data to the wrong layer. If you apply corner pin to the new logo it will move it into the right shape to fit the boundaries of the original sign. My Circle and Text was scale was just estimated and adjusted so the new logo looked round when it was on the truck.
If the original sign you tracked was 11 X 20 inches and you want the new logo to be centered on the sign then start a new comp the same size as your original footage, add a solid or create a rectangle shape layer to use as a guide that is exactly in an 11 by 8 ratio. You could just double-click the Rectangle tool, reveal the modified properties by pressing UU, unlink the size, type 11 for X and 8 for Y, relink the size then enter the Y value for the comp (1080). This will give you a reference for the sign that is centered in the comp. Make the shape layer a guide layer, drop in your logo and position it properly, then nest Logo comp in the main comp and apply corner pin. If your Mocha Track is accurate and the frame precisely fits the sign you'll get the new logo in the main comp perfectly positioned over the sign.
Did you follow that? If that doesn't work then I don't understand your workflow and I need more details.
This is what your logo comp should look like:

Corner pin is the only effect applied to the Logo Comp. The shape layer is just a reference for the sign you are going to replace. The logo Comp is the same size as the original footage.
Copy link to clipboard
Copied
Hey Rick, thanks for the comment.
I think you are pasting the corner pin data to the wrong layer. If you apply corner pin to the new logo it will move it into the right shape to fit the boundaries of the original sign.
If I paste the corner pin data to the new logo layer, unfortunately, it will not move it to the right place. If I do that, it will shrink the new logo layer because it is smaller than the comp size to start off with. My understanding is the point of the precomp in my workflow is so that I can do whatever I want within the precomp and the main comp won't be changed. This way the tracking data applied to the precomp stays perfect. Within the precomp, as long as the logo is full screen, it will work. If it isn't full screen in the precomp, it'll end up being smaller than it should be on the main, making a bad composite. In your example, you mentioned you tracked the entire side of the UPS truck, but your logo is much smaller than it, and inside the precomp, it's also much smaller than the comp, which makes sense and will work. In mine, the area tracked is the entire sign that only fills up a bit of the full frame (So that's similar to yours), HOWEVER, the logo I'm using needs to be the full size of the precomp, in order to match the tracked data area. This is where yours is different, your logo doesn't need to match the size of the tracking data, it needs to be just a smaller size in the precomp and it'll work perfect.
In other words, the tracking data needs to be on a precomp AND within that precomp, the logo needs to be the full comp size in order for it to composite perfectly on the main comp. That was probably confusing, but it's so hard to explain, and I know I'm not making it easy by not sharing footage, but I can't, so I don't think we'll be able to get to a conclusion here haha.
Copy link to clipboard
Copied
I've pointed out several times, your workflow is incorrect. There is no bug, you are just not using the correct workflow.
You do not apply corner pin to the replacement logo unless the replacement logo is on a layer that has the same frame size as the tracked footage. If the replacement logo layer has transparency the frame size still needs to match the frame size of the original footage. If your original footage is 1920 X 1080, the logo layer must be 1920 X 1080. A shape layer always has the same frame size as the comp. The frame size of any layer changes when you scale the layer so Corner Pin tracking data should never be applied to a scaled layer.
Let me simplify this. This is the proper workflow to replace a sign using a simple corner pin track:
- Trim the layer to one frame before the sign enters the frame and one frame after the sign leaves the frame
- Open that trimmed shot in Mocha to perform corner pin tracking making sure the surface is sized properly to include everything you want to replace
- Create a replacement sign in a comp or using Photoshop or Illustrator using a canvas that is the same frame size as the original footage - do not distort any of the components of the sign
- Put the replacement sign above the footage
- Apply Corner Pin to the replacement sign in the main comp.
That's all there is to it. If your logo is in a pre-comp you do not apply corner pin to anything in the pre-comp. Corner pin is only applied in the main comp. There should be no layer in your logo comp that has any distortion applied to it. If this is a shot of your pre-comp then that is where the mistake is made.
The blue layer should be a rectangle the same height or same width as the original footage.
If you want to apply corner pin inside the nested comp then you have to group all of the undistorted layers in the pre-comp and apply corner pin to them all. You can do that with an adjustment layer on top of all of the undistorted layers in the pre-comp.
Copy link to clipboard
Copied
Hi Rick,
I'm sorry, but I haven't explained it well, so you are not understanding what I've attempted to explain. I am NOT applying corner pin data to the new logo layer, that was suggested by you in a previous reply:
As we both know at this point, this won't work because the corner pin data needs to be on the precomp, and not on the actual logo layer within the precomp.
As you've stated, my goal IS to do exactly the following, but my exported still frame to create my new logo is preventing my sign to be the full comp size, so I'm trying to find out a better way to make it the full comp size be scaling those four corners to comp size in the easiest way:
If your original footage is 1920 X 1080, the logo layer must be 1920 X 1080. A shape layer always has the same frame size as the comp. The frame size of any layer changes when you scale the layer so Corner Pin tracking data should never be applied to a scaled layer.
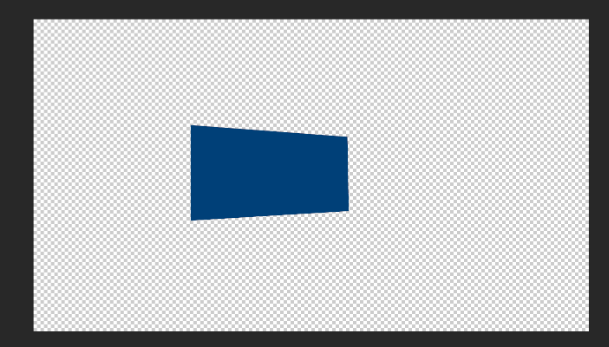
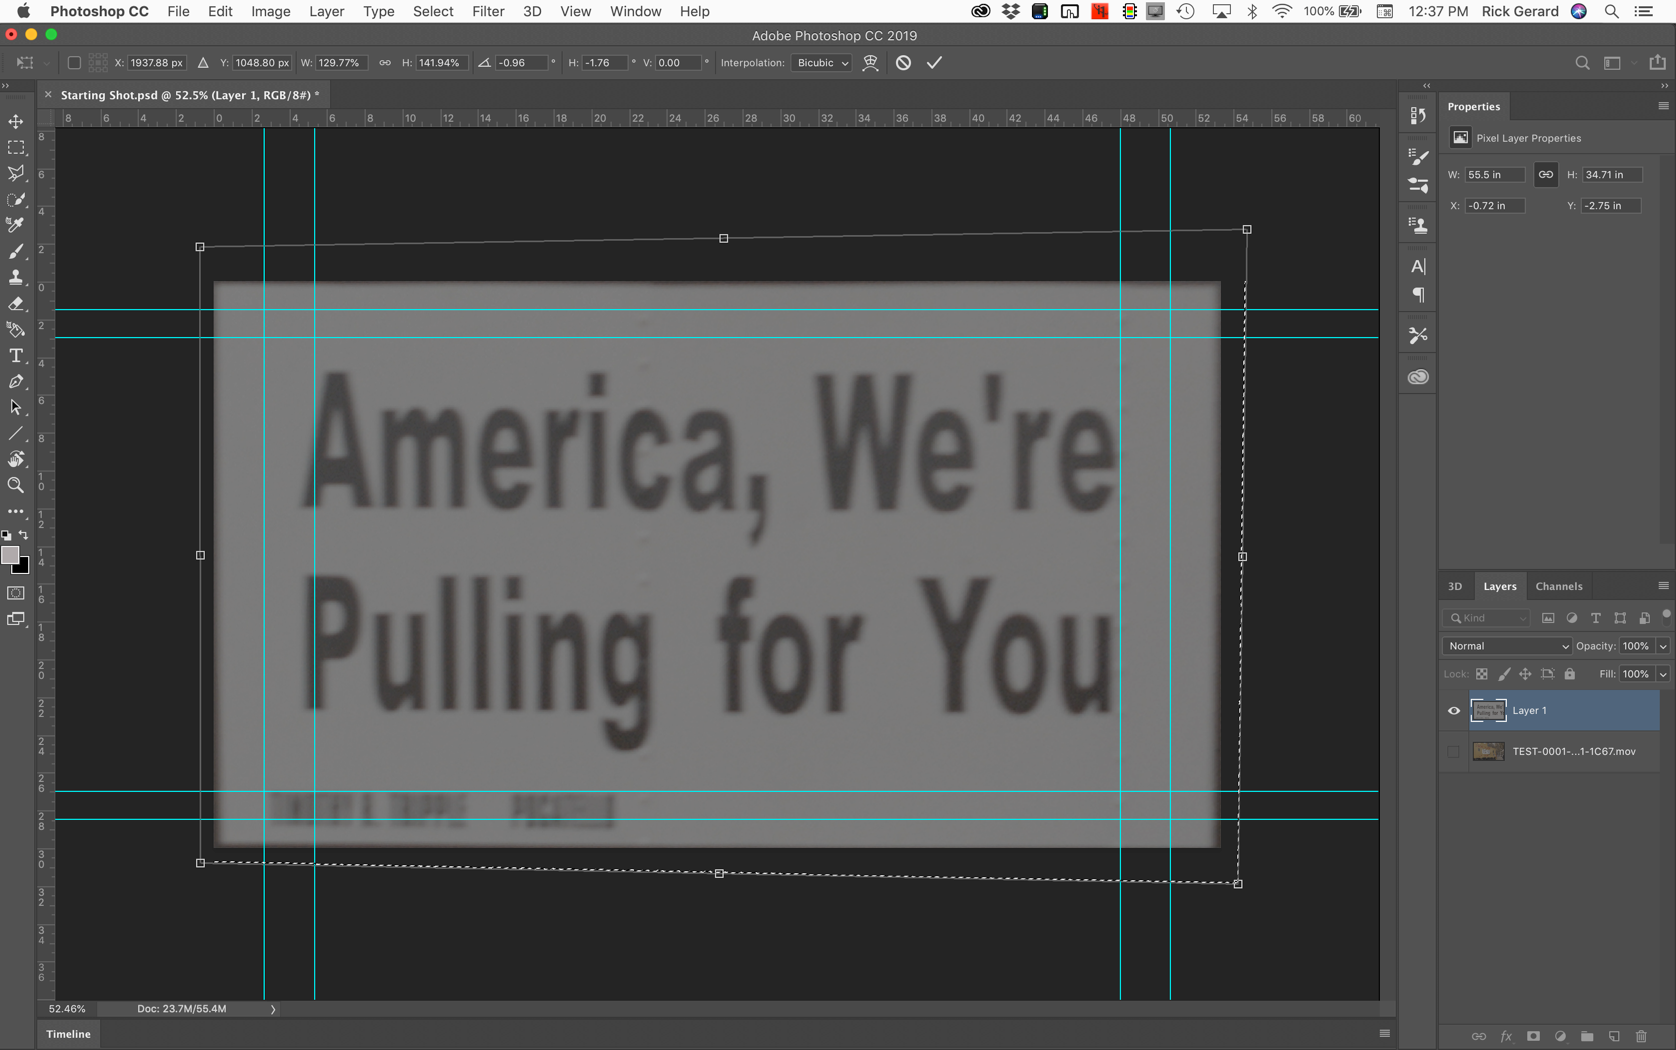
Regarding this image, which is the exact same size as the sign in my footage:

You are correct that the blue layer needs to be the same size as the comp, that has been what I've attempted to explain since my first post here. The problem is that because I'm exported a still frame from the original footage and changed it in Photoshop, at no point does it become full screen. The size of the sign in the footage is exactly the same as the above image, so when I exported a still frame and used it to recreate my own sign, I ended up with the exact same thing; a replaced sign that's the same as the sign in the original footage. So this is where the difficulty is. It never is the full screen, so it won't composite properly unless it is stretched to the full precomp size.
That is the part that has been confusing everyone. I needed to use a still frame export so maintain part of the original sign when making the new one, so therefore, at no point does the new sign become the full size of the screen because the original was used to make the new one, It is always like the above image. So when I completed the project a few days ago; within the precomp, I distorted the sign to stretch and distort to fill the precomp, then on the main comp everything is perfect and the tracking/composite works, but it's just a messy process to distort within the precomp.
Again, I'm not working with a brand new sign where I'm able to have it the full size of the precomp. If that were the case, this would be easy. I wasn't provided with a PSD where the sign is the full canvas size; instead I created my own using the footage because I needed elements from the original sign, so at no point does the sign become the full canvas size, unless I stretch it in Photoshop, or AE, which is what I did to complete the shot; I'm just looking to see if there's a better way to do this, while keeping in mind the still frame exported includes the size of the sign that is NOT the full comp size. (Same as above image) It's not a flat sign to camera, it has a perspective change, but again, in order to make the new sign, I had to use the original one, which is why the replaced sign never is the full precomp, unless I stretch it.
Copy link to clipboard
Copied
I'll say it again. Your workflow does not make any sense. You can work around it if you really want to spend a bunch of time fixing something that does not need fixing.
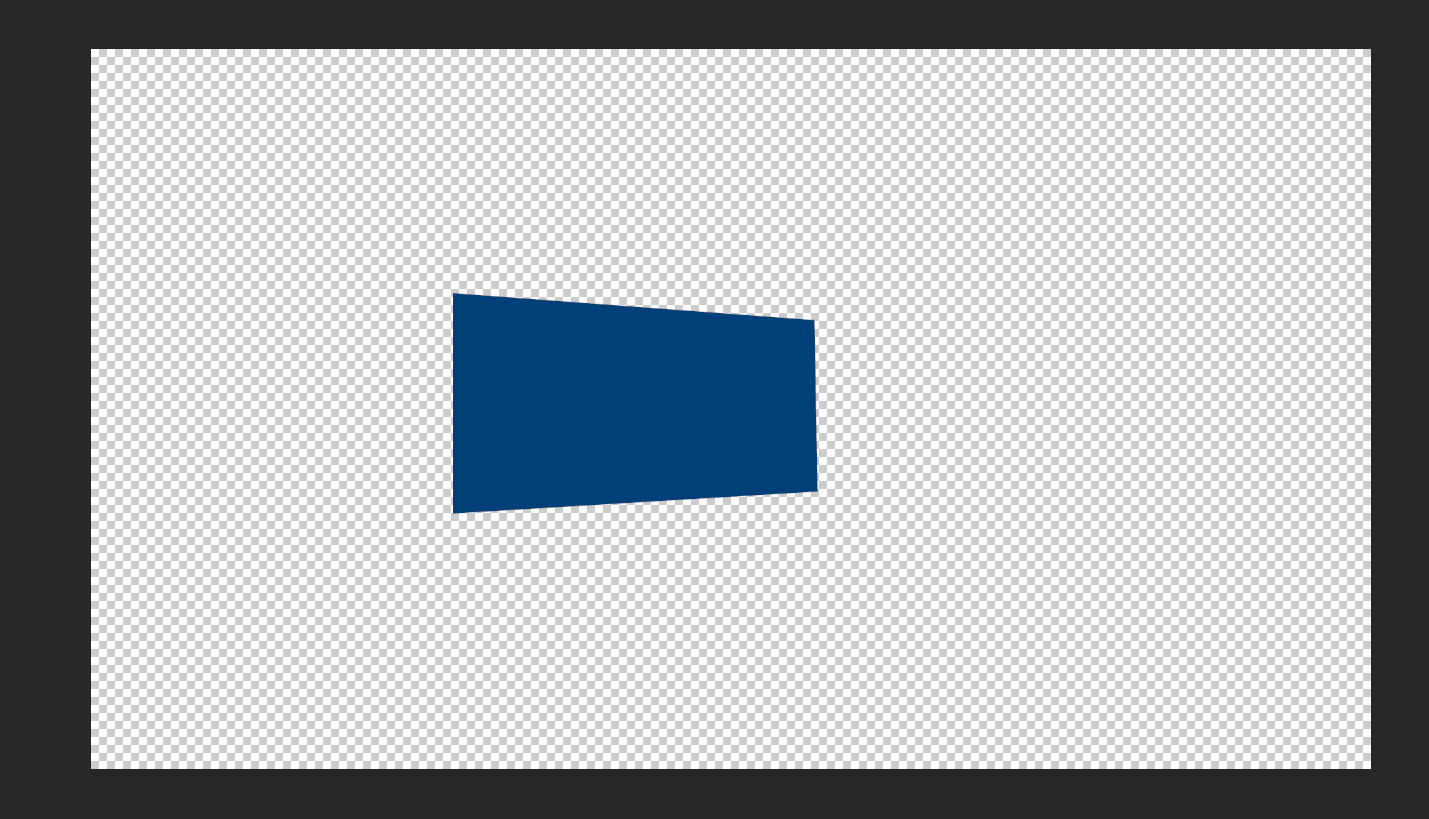
You need to take the original sign you fixed in Photoshop back into Photoshop and distort it so that it fills the frame. There are several ways to do that but the easiest is probably to make a selection of just the fixed sign and then hold down the Ctrl/Cmnd key and use the basic transform tool to make the fixed sign fill the frame. So this (Log footage from a tutorial I am working on):

Turns into this by using Ctrl/Cmnd + J to duplicate the selection:
And that selection gets stretched to this using the move tool (v) and the Ctrl/Cmnd key starting from the short side in a two step process from here to square up the sides:

To here to fill the frame:
Save the PSD, apply corner pin and you're done. Trying to do this in AE is inefficient, there is no automatic way to accomplish the task, and the quality of the composite will not improve.
If I had artwork that I just wanted to use to replace a sign entire sign I would just drop it in the timeline, use Fit to Frame from the Transform menu, pre-compose and apply corner pin tracking to the pre-comp. That would be easier than trying to distort an existing logo in Photoshop on a sign that was not square to the camera.
So I guess the short answer to your question is No, there is no automatic way to automatically distort an image that is not a rectangle parallel with the sides of the comp frame so that it fits the frame. You have to do it manually and Photoshop is the easiest tool to use.
Copy link to clipboard
Copied
That's what I was trying to figure out; how to stretch the file in AE, or in Photoshop. I tried AE and it was taking a while, but I eventually did it. In my reply #9, I was asking how to do that.
Your example is similar and what you've explained answers my question so thank you.
I just filmed a mockup to try and explain it better, but it looks like you've provided a better way in your recent post, so thank you.
here's a mock up I just filmed of the scene. It includes 1 clip of an applebox with some tape on it to resemble the sign I was working with. I exported a still frame of it and then used it to create a new sign. You'll see with my new sign within the photoshop file that the task I had to do was to have nothing in the bottom sections, and to move the bottom sections up to the top. (The Photoshop file consists of the original exported still frame as well as the replaced sign I made using the original.
https://drive.google.com/drive/folders/1rXL825zw9C5-hEulV2KH6LRtyeFHWLWU?usp=sharing
Your workflow would be to stretch in Photoshop for this as well?
Thank you
Copy link to clipboard
Copied
For that shot, I would never go to Photoshop unless I needed the original background of the sign. Let's say that was the case. Here's the project what I would do.
- Pick a frame where the side of the apple box was as close as it gets to square to the camera.
- Export a frame as a PSD
- Draw a mask around the edge of the apple box
- Duplicate the layer using Ctrl/Cmnd + j to get a copy with just the cut out apple box
- Change to the selection tool (v) and transform the apple box to square it up to the frame using the Ctrl/Cmnd key to move the corners
- Add the new sign elements in another layer
- Save the PSD, import it to AE and drop it in the timeline above the footage
- Select the footage layer in AE and choose Track In Mocha from the Animation Menu (or from the Effect Menu in the latest version)
- Draw a spline around the outside edge of the Apple Box and track
- Adjust the surface to include the same area that I used in Photoshop
- Check the track to make sure it was good by adding an image like the 8 X 8 grid to the surface
- Export the corner pin data, or copy or just apply directly from the Effect Control Panel to the PSD
All done, all through. Just for fun, I'll give it a try a little later today. It should take about 10 minutes.
Edit: Took me 7:44...
Here is the workflow.
If all I needed was to add a text layer with a blend mode I could have eliminated the photoshop file entirely.
Copy link to clipboard
Copied
Thank you Rick for recording and sharing that! I was doing everything correct, except for not scaling/distorting the sign on the Photoshop file itself before working in AE. It's much easier scaling it in Photoshop as you've shown
I've marked your reply as correct and appreciate all of your help!
Thank you!
Will
-
- 1
- 2

Find more inspiration, events, and resources on the new Adobe Community
Explore Now
 AdChoices