 Adobe Community
- Home
- After Effects
- Discussions
- Re: How do you redraw a mask, for every frame?
- Re: How do you redraw a mask, for every frame?

Copy link to clipboard
Copied
So instead of moving around all the points, is there a way to just delete the mask and generate a new keyframe with different points?


 1 Correct answer
There is no way that we know of to drawing a new mask for a frame. But you can reset it to a circle, or square, by right the mask and clicking reset to circle/square. This will delete all your points for that frame, and generate 4 new points into your selected shape.
 17
Replies
17
17
Replies
17
Copy link to clipboard
Copied
Just discovered reset to square/ellipse, kind of what i want. But would be better to be able to draw out a mask using the pen tool. Is that possible? Still looking.

Copy link to clipboard
Copied
When you are editing a mask the first vertex and the number of points are very important. You should not change the number of points.
It's actually quite easy to select multiple points, transform multiple points, select a single point and convert curves if you do you editing with the Pen tool selected and use the Alt/Option and Ctrl/Cmnd key as modifiers. Play around a little and watch what happens to the cursor as you press modifier keys. maybe this will help, I put it together a while ago to demonstrate mask editing in AE to a friend that could not seem to get the hang of it. It helped him a lot.
Copy link to clipboard
Copied
Thanks for the info, but it's not what i'm looking for. I just need to know if you can reset the points inside a mask using the pen tool. Reseting to ellipse does the trick, but using the pen tool to just draw out a new mask would be better.
Copy link to clipboard
Copied
What I'm trying to tell you is that if you draw a mask with the pen tool the fastest and easiest way to animate it is the way I suggested. Short answer: There is no reset for pen tool paths.
As I tried to point out you do not want to add any new points after you set the first keyframe, you do not want to change the first vertex. It's also almost impossible to get a decent animated mask if you make changes on every frame. If you are doing roto you want as few keyframes as you can get away with, You pick places where the action changes direction and then edit the position of the points, then pick halfway between those keyframes and make any adjustments you need.
What exactly are you trying to do? If it's roto then the easiest thing to do is create a separate mask for every part you are trying to mask. One mask for the arm, one for the shoulder, one for the head, then animate each of those masks one at a time.
if you are trying to create original artwork using the pen tool and do something like a hand-drawn cartoon then you still don't want to be creating a new path on each frame unless you want a jerky look because you'll never get it smooth. Cell animators don't even work that way when they draw each cell by hand. They draw the start and end position, then draw the middle position, then they start filling in the gaps using tracing paper and flipping through the drawings. When using a computer you use Onion skinning and AE does not have that feature built in.
Copy link to clipboard
Copied
I'm rotoing, and it's not a large animation project. It's a 1 minute video, and there are only a few frames here and there that needed to be rotoed and the parts that needed to be rotoed would change from a few point mask, to many.
I've already completed it, and at this point i just wanted to know how to do this one thing for future reference.
Using the reset sphere command made it easy, so no big deal. And if it's true what you say about the pen tool, then i guess those two options, ellipse and rectangle, are our only two options to resetting a mask.
Copy link to clipboard
Copied
In the future for Roto try this trick:
Another quick example put together for a friend. I have a lot more sophisticated ways of speeding up the Roto process. Most of them involve some kind of stabilization, a null and some simple expressions. I almost never mask directly on a layer but instead set up track mattes. If you have roto that only needs to be done for a few frames you can trim the layer. If you need more than one layer then you can pre-compose them all and just use the pre-comp as a track matte. I did one about a week ago that had about 20 layers, most of them not more than 20 or 30 frames, but some of the layers had four or five masks. I don't think I ever had fewer than 5 frames between a keyframe. Many of them only had 2 keyframes.
Hope this helps. Rotobrush is good for some things but for most of my roto work, you can't beat an animated mask.
Copy link to clipboard
Copied
There is no way that we know of to drawing a new mask for a frame. But you can reset it to a circle, or square, by right the mask and clicking reset to circle/square. This will delete all your points for that frame, and generate 4 new points into your selected shape.

Copy link to clipboard
Copied
Sounds like you need to 'remove' a mask - ie, you do not require it for the rest of the shot. I would prefer if you made the last viable keyframe a Hold Keyframe. Then, on the next frame, move the mask onto the pasteboard area of the Comp Panel - ie, outside the active Comp Panel. The draw a new mask for the continuing task at hand - and name it appropriately.
By analogy, use this same technique to introduce new masks into the scene; as delineated in the last sentence of the para above.
The rationale for this is to name your masks for their specific tasks - masks can and should be named appropriately, when you have multiple masks on a layer.
Copy link to clipboard
Copied
christopheru18772433 wrote
There is no way that we know of to drawing a new mask for a frame. But you can reset it to a circle, or square, by right the mask and clicking reset to circle/square. This will delete all your points for that frame, and generate 4 new points into your selected shape.
The problem with resetting a mask is that you can get unpredictable results because mask points move from one position to the next in a straight line. Your mask should have the same number of points for every frame. Setting a different position for every frame in an animated mask almost never necessary and not a good idea. You can't get smooth edges that way. It's way too much work.
If you need a mask to completely go away in one frame you set a keyframe, move forward one frame, double click to select all points on the mask and engage the transform tool, then just drag the mask off the layer. Simple as that. I do it all the time.
Another option is to animate mask opacity. Another option is to use a layer as a track matte. There are dozens of ways to efficiently animate mask paths without resorting to drawing a new mask on every frame.
Copy link to clipboard
Copied
Hey Rick, yes there are many ways to animating a mask but under the circumstances of my last project resetting was the most efficient way of rotoing out my footage. when i would reset my mask i would create two frames side by side, first frame being the old mask then the next being the new, and never encountered any unpredictable results. It worked really well.
Thanks for your input.
Copy link to clipboard
Copied
I just discovered a way, and it is simple. First you create a new mask, with your desired shape, and then set a keyframe for the mask path. You copy this key and paste it into your original animated mask. Both layers must be the same dimensions and that's it. Works like a charm. Hope this helps anyone who comes across this thread.

Copy link to clipboard
Copied
After Effects prior to release 8 used to let you keyframe the first mask and then draw a new completely different mask every frame.
You could actually to from a three point mask to a 100 point mask from frame to frame and it didn't care. It was a better way of handling it than the interpolation stunt they have going now. As a creator I liked having as much control as possible and in my opinion this limitation broke the rotoscoping tool.
Copy link to clipboard
Copied
Dang, shame they got rid of it. Oh well.
Copy link to clipboard
Copied
clarkp72169153 wrote
After Effects prior to release 8 used to let you keyframe the first mask and then draw a new completely different mask every frame.
You could actually to from a three point mask to a 100 point mask from frame to frame and it didn't care. It was a better way of handling it than the interpolation stunt they have going now. As a creator I liked having as much control as possible and in my opinion this limitation broke the rotoscoping tool.
This is incorrect. If you have 3 vertices (points) in a vector path at the first vertex and you add one in at the second keyframe you may bet some odd behavior because the points move in a straight line between keyframes by default, but if you delete a point it will delete the point in all previous keyframes. It has always been that way. Nothing is broken. No feature was removed. It has been that way since you could draw a mask in After Effects. I have been doing roto work in AE for 20 years and if this had changed I would know.
Commotion (only the old guys will remember this) one of the best manual rotoscoping apps ever developed, had the same behavior. Delete a point down the timeline and it's gone from the entire timeline. The same thing happens in BMD Fusion, Final Cut Pro, and every other program that I know of that allows you to animate masks.
The proper workflow is to use multiple simple masks when doing roto work. It will go faster, be more accurate, and interpolation between keyframes is a lot easier to control. Scott Squires, someone that really knows what he is doing when it comes to Roto work, has a couple of excellent tutorials on Roto. He is using Commotion, but the technique is exactly what you should be using if you are doing any hand roto work. Effects Corner: Rotoscoping -The Basics should be looked at by anyone doing roto work. Make sure you check out Rotoscoping - Part 1, and Rotoscoping - Part 2 to see how to set up and plan for roto work. You should also check out the other links in his post. Everything Scott wrote in December of 2005 is still viable.
There is and has been for a very long time, a Mask Interpolation panel that will help you fix problems when the straight line between keyframes behavior is giving you problems. This toolset is very useful when rotating a mask.
One more time. You never have been able to delete a point in a vector path without it deleting that point in the entire timeline.
Copy link to clipboard
Copied
You never have been able to delete a point in a vector path without it deleting that point in the entire timeline.
I think what clarkp72169153 refers to is the option to "preserve constant vertex count" which was something if I remember correctly not an option in old Ae versions and maybe it was by default?. when checked on (the default) you keep the vertext count if you delete points along the way. if you turn it off you can go from X number of vertices to Y number of vertices on the same path property.
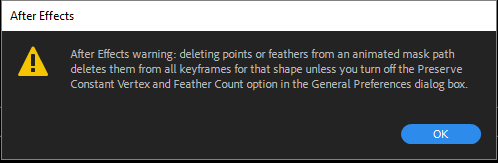
you also get a warning if you delete points along the road, that tell you that unless you turn it off, you will delete them all along the timeline:
I never turn it off, but you can: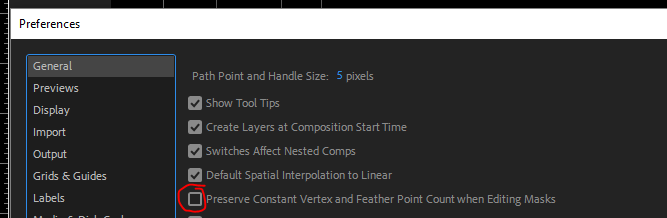
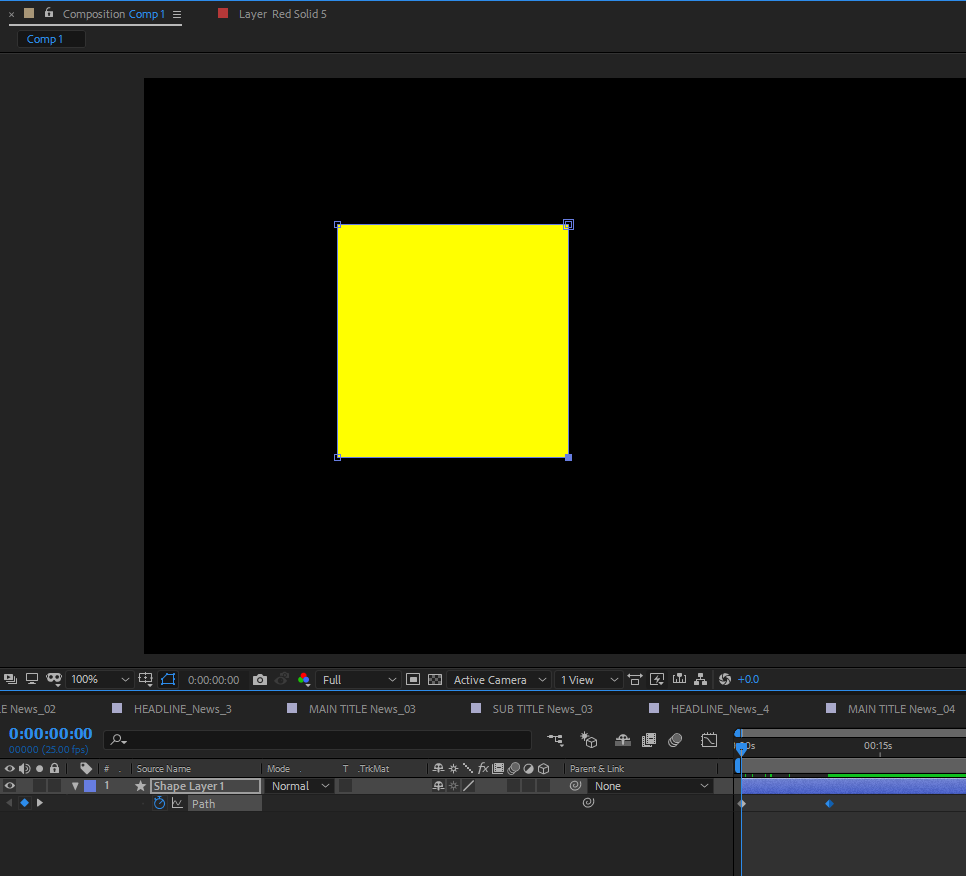
and go from this
to this
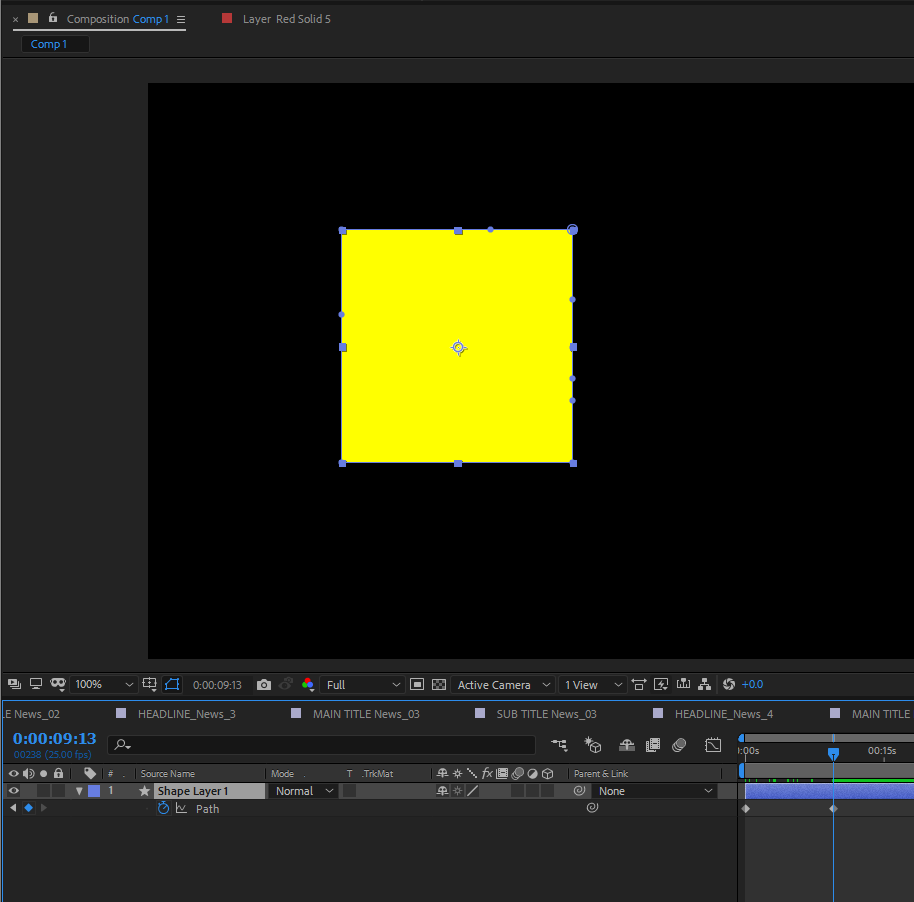
but at your own risk...
I personally do my roto in Mocha as much as I can. it can be very risky to roto anything but simple sahpes with Ae since there is no offseting of keyframes. if you realize along the way that some vertex was not in place, it's very problematic to change it. in Mocha you have the uber key. that's the major thing, but other things are how easily you can stablize a roto in Mocha as you roto. not having to do this process separatly in Ae it's a big bonus. I recommned this chain of threads about roto in mocha here: https://twitter.com/TeddyRockSteady/status/1128066715970154499
Copy link to clipboard
Copied
You get some very odd behaviors when you turn Preserve Points off. The points all rotate counterclockwise toward the First Vertex when you delete a point. If you delete the first vertex, the first point counterclockwise becomes the new first vertex. I can't think of a situation where deleting a point would be a useful feature. Try adding and deleting points from a simple box changing into a triangle and then back to a square with four points, then three, then four again. It doesn't work with Preserve Points on or off. I can't figure out how it would ever work mathematically.
My point is that if you use multiple simple paths to roto by hand the process is very predictable and pretty darn easy. If you have 60 points on a mask single mask cutting out an actor that is walking down a sidewalk it is going to be nearly impossible to animate the mask. Use multiple masks as I demonstrated in the short Simple Roto video I posted and the shot of the actor walking down the sidewalk becomes very manageable with 4 or 5 masks.
Mocha AE is also a pretty useful solution for Roto work because it can track surfaces very accurately, Mocha Pro is even more powerful, but the Actor walking down the sidewalk shot I described above would be easier in Mocha if you used multiple splines.

Copy link to clipboard
Copied
Yes its possible, draw the first mask double click the layer to get to the layer pannel. At the bottom of the layer pannel you will see a drop down menu with target set to none. Click on the drop down and set target to the mask that you want to target each time you draw a new mask. The dropdown menu is located next to where you toggle the alpha on and off.

 AdChoices