

- Home
- After Effects
- Discussions
- Re: How to copy keyframes and their values
- Re: How to copy keyframes and their values
How to copy keyframes and their values

Copy link to clipboard
Copied
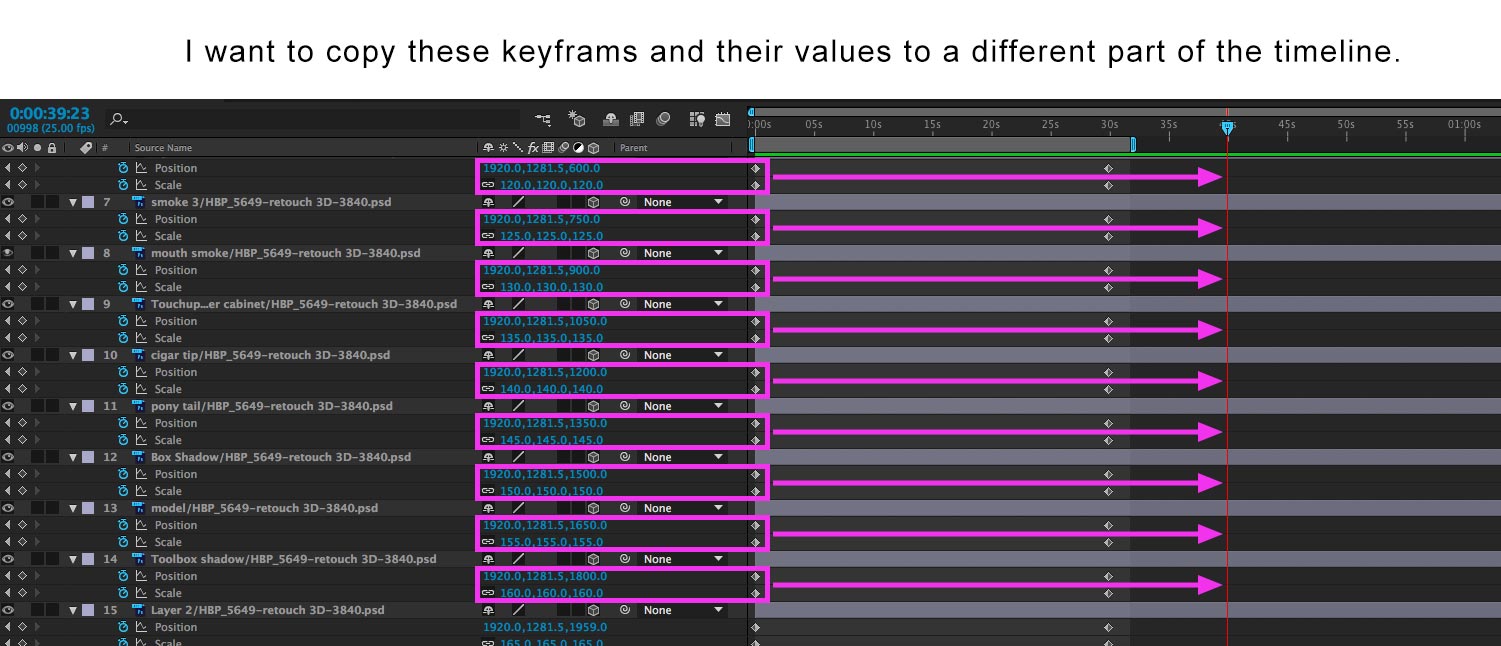
How do I copy a set of keyframs across several different layers to a new position? I am wanting to fly a camera through several layers of a photoshop file but I want to end up EXACTLY where I started. The only way I know to do this si to copy the keyframes that i started out with to the end. But I can not copy and paste my clicking in dragging across the keyframes without selecting the layers as well. So then when I paste, it also pastes the layers which I do not want.
Many thanks,
Houston


 7
Replies
7
7
Replies
7

Copy link to clipboard
Copied
If you copy a position keyframe and you have multiple layers selected, when you paste that keyframe to a new position every layer will get the same values.
If you have different values for a bunch of layers then you have to copy and paste one keyframe at a time. There is no other way.
If you think of AE's 3D space like a set and you work with it as you would a real set and actors then you probably would not move the set, you would move the camera. If you had actors on your set you may have them walk from place to place and do a simple camera move to frame things up. Unless you had a big crew and a really fancy set and a big budget you would not move the camera, move the set and move the actors. It would be very difficult to choreograph that kind of scene and it would take a long time to set up. Try and think of AE as if it were a real set and you'll be more efficient.
I don't know much about your project and it's impossible to tell what is going on on your set from the screenshot but from what I can see you are moving a bunch of layers around and some of them make up some kind of actor or character. Others, like the cabinet layer make up a set. I'm also guessing that the relationship between the set pieces doesn't change but the actor is moving around the set. If I am correct then I would not have animated the layers the way you have done. I would parent all of the pieces that make up the actor to a 3D null and move the null around the stage. If your actor needed to do something like raise the cigar and take a puff then you could still animate that action. I would then move the camera around the set to frame up the actor and the set pieces. Your project would be much more efficient. Only two or three sets of keyframes and a much easier task of making changes and moving the camera.
Copy link to clipboard
Copied
I would refer to this video that I am trying to duplicate. (See this video) If you notice he flies through some PS layers but ends up back where he stared. Since it takes time to space the layers and scale them once I fly around and am about 30 to 45 seconds into the time line, it would be nice to know where to end up again by just copying and pasting keyframes from all the starting layers than to try and realign them again. Yes, no would would notice if you were off a bit but I didn't realize I was asking such a difficult task.
I appreciate your in depth explanation. Hopefully after viewing some of the video you will understand. As you probably know now, I am also the one that posted about how to do the fly through in the first place on another thread. You were of great assistance there as well. 
Many thanks,
Houston

Copy link to clipboard
Copied
It sounds like you're looking to copy keyframes from multiple layers to multiple layers; however, AE only allows you to copy keyframes from one layer to multiple layers. Currently, you'll have to do this one layer at a time.

Copy link to clipboard
Copied
yep, AE can only do one layer at a time - but this great script will do what you want - Paste Multiple Keyframes 2 - aescripts + aeplugins - aescripts.com
I don't know how anyone could live without this script, and it is on sale right now for $7.50 (reg $10)
Copy link to clipboard
Copied
I think your workflow is a little wonky. The idea may be OK but the technique can be improved.
The s ample video has a bunch of scenes created from different photographs. I would make each scene a separate composition and edit them into the final movie in Premiere Pro. If you have an existing audio track I would put markers on the audio track to show me where the scenes or photos change.
For each scene I would add markers to the comp or a reference layer or null that show where the most important motion starts and stops.
I would then make all layers 3D, move the CTI to the point in time when the first action starts, press the Alt/Option key and the letter P to set initial position keyframes. Then I would hold down the shift key and press s, then Alt/Option + s to set the initial scale keyframes.
Position and scale keyframes would then be visible in the timeline. I would select all of the position and scale keyframes in the timeline by dragging a selection around them with the selection tool (v) and drag them to the marker that where I want the layers to return to the starting position and hold down the shift key as I approached that marker to snap the keyframes to the marker.
With the CTI still at the first marker and all of the layers selected I would then press Alt/Option + p again to set a new starting keyframe for position. I would then move down the timeline to the second marker where the layers would be separated and adjust the position and scale of each of the layers. Using two views would make this easier.
I would then select all of the keyframes at the second marker and use the keyframe assistant to covert the keyframes to hold keyframes.
Now I would move to the CTI to the third marker and press Alt/Option + s and Alt/Option + p to set new scale and position keyframes at the third marker then select all of the keyframes at the third marker by dragging with the selection tool and use the keyframe assistant to disable the hold keyframes at the third marker.
The last step would be to apply easy ease to the keyframes to smooth out the animation.
Since you already have your all of the keyframes set except the last one you could select all of the position and keyframes at the start of the animation (the first keyframes in the timeline) and drag them a few frames to the right, then use the keyboard shortcut Alt/Option + s and Alt/Option + p to set new keyframes at the starting position. You could then select the second set of keyframes and drag them right past the last keyframes to the end of your animation. If you have not set the third position and scale keyframes yet you could use the keyboard shortcuts to set them all at the same time when you want the move to start to revert to it's original position.
After doing that I would still attach a 3D null to the whole group to make it easier to move the whole scene around and then animate the camera.
Copy link to clipboard
Copied
Thanks to all you guys for your input to this greenhorn. With a lot of help from this forum and some persistence I think I finally got what I was wanting. Rick, I know for a fact that the video was made from PS layers and then spread out along the z plane. He very briefly explained what he did in a blog post or something, I am not sure where I read it. It is 5 years old now. Your alternate workflow is out of my pay grade on this one but I certainly appreciate you taking the time to explain it all to me.
Many thanks,
Houston
Copy link to clipboard
Copied
You misunderstood my explanation. His example makes no attempt to match real world camera moves. It's exactly the same technique I explained but he made no attempt to simulate a real camera move. You just distribute Photoshop layers, scale them to fill the frame, then animate the camera. He threw in revealing the trick of separating the layers.
My technique for moving around multiple keyframes and using keyboard shortcuts should be used all the time. It's a way more efficient way of working. Using that technique and two views you could move 10 layers in Z space, scale them all up then move them back to their original position and scale in about 2 minutes. Spend another 4 or 5 moving the camera around and you have a scene done. Without keyboard shortcuts and drawing selections and dragging the same task could easily take 30 minutes.
If you want to get advanced try working on something like an image of a field with a fence close to the camera, a tree in the middle, and a barn in the background. You want to move past the fence and the tree to the barn but fly over the field. In that case you cut out the field also, put it in front of a light, project the image to a solid rotated 90º in X and then fly through that scene. Same techniques with a twist. You can even throw in Free Form (a 3rd party plug-in) and put hills in the field.

 AdChoices