


Copy link to clipboard
Copied
Hello.
Question: there is a text and a mask for it, in the overlay mode Add, respectively, when the mask moves through the text, it becomes visible (http://prntscr.com/ntmdz4). This means that the mask does not change with the text (http://prntscr.com/ntmf77). How to make the mask increase with the addition of text?
The very idea of the project: the vertical bar moves in the text and the text. Then the line stops and then goes. There is another question to make sure that when you increase the mask on the text, the vertical bar itself
Thank.


 1 Correct answer

Here's what I would do.
- Create a text layer with everything centered and the paragraph style set to Centered. The baseline shift should be adjusted so that the line of text is centered over the Anchor Point.
- Search the Effects and Presets panel for "Typewriter" and apply it to the text layer.
- With the selection tool active (v) make sure the text layer is selected and press UU to see what has been added. You'll see a text animator has been added and under the Range Selector you will see two keyframe
 8
Replies
8
8
Replies
8

Copy link to clipboard
Copied
You can do it in several ways:
- The first one is animating the Mask Shape. Press "m" on your keyboard to access this parameter and create keyframes to animate it.
- Other one is to create the mask over a solid layer, not over the text. Put the solid layer over your text and use the track matte alpha for the text layer. Parent the solid layer with the animated bar and the mask will move it the same way the bar does.
Copy link to clipboard
Copied
And how to make the size of the mask change with the size of the text automatically?
Copy link to clipboard
Copied
I did as you suggested in the second method. Everything worked out.
But if I need to change the length of the text, the mask will remain unchanged in size. And also the vertical bar will stand in the wrong place. How to make the vertical bar get automatically at the desired distance from the text, and also so that the mask resizes automatically in accordance with the length of the text? Thx!
Copy link to clipboard
Copied
If you want an animated mask based on the size of the text box you have to combine a few tools. You use the expression method sourceRecAtTime to extract the width of the text box then apply those measurements to nulls attached to the points on your mask using the Create Nulls from paths. If the mask has 4 points (rectangle) then you can take the x and y position from this expression:
s = thisComp.layer("text");
x = s.sourceRectAtTime().width;
y = s.sourceRectAtTime().height;
[x,y]
and apply it to the current position of the nulls. Then as the number of characters changes, the expression, applied to the appropriate points by adding the value for x and y that the expression gives you based on the size of the text box to the current position of the nulls. The nulls are numbered from zero to the last number counter-clockwise starting from the first vertex. Assuming you have drawn a rectangular mask with 4 points, the first vertex in the top left corner and your text is left justified the first two points would not need expressions. Points 3 and 4 would need this expression.
s = thisComp.layer("text");
x = s.sourceRectAtTime().width;
y = s.sourceRectAtTime().height;
[value[0] + x, value[1]]
Assuming that you start with Null 0 and 2 in the same position and you have Null 1 and 3 in the same position as the text box increases in size the mask would also increase in size starting from the left side. You would end up with a comp that looked a lot like this:
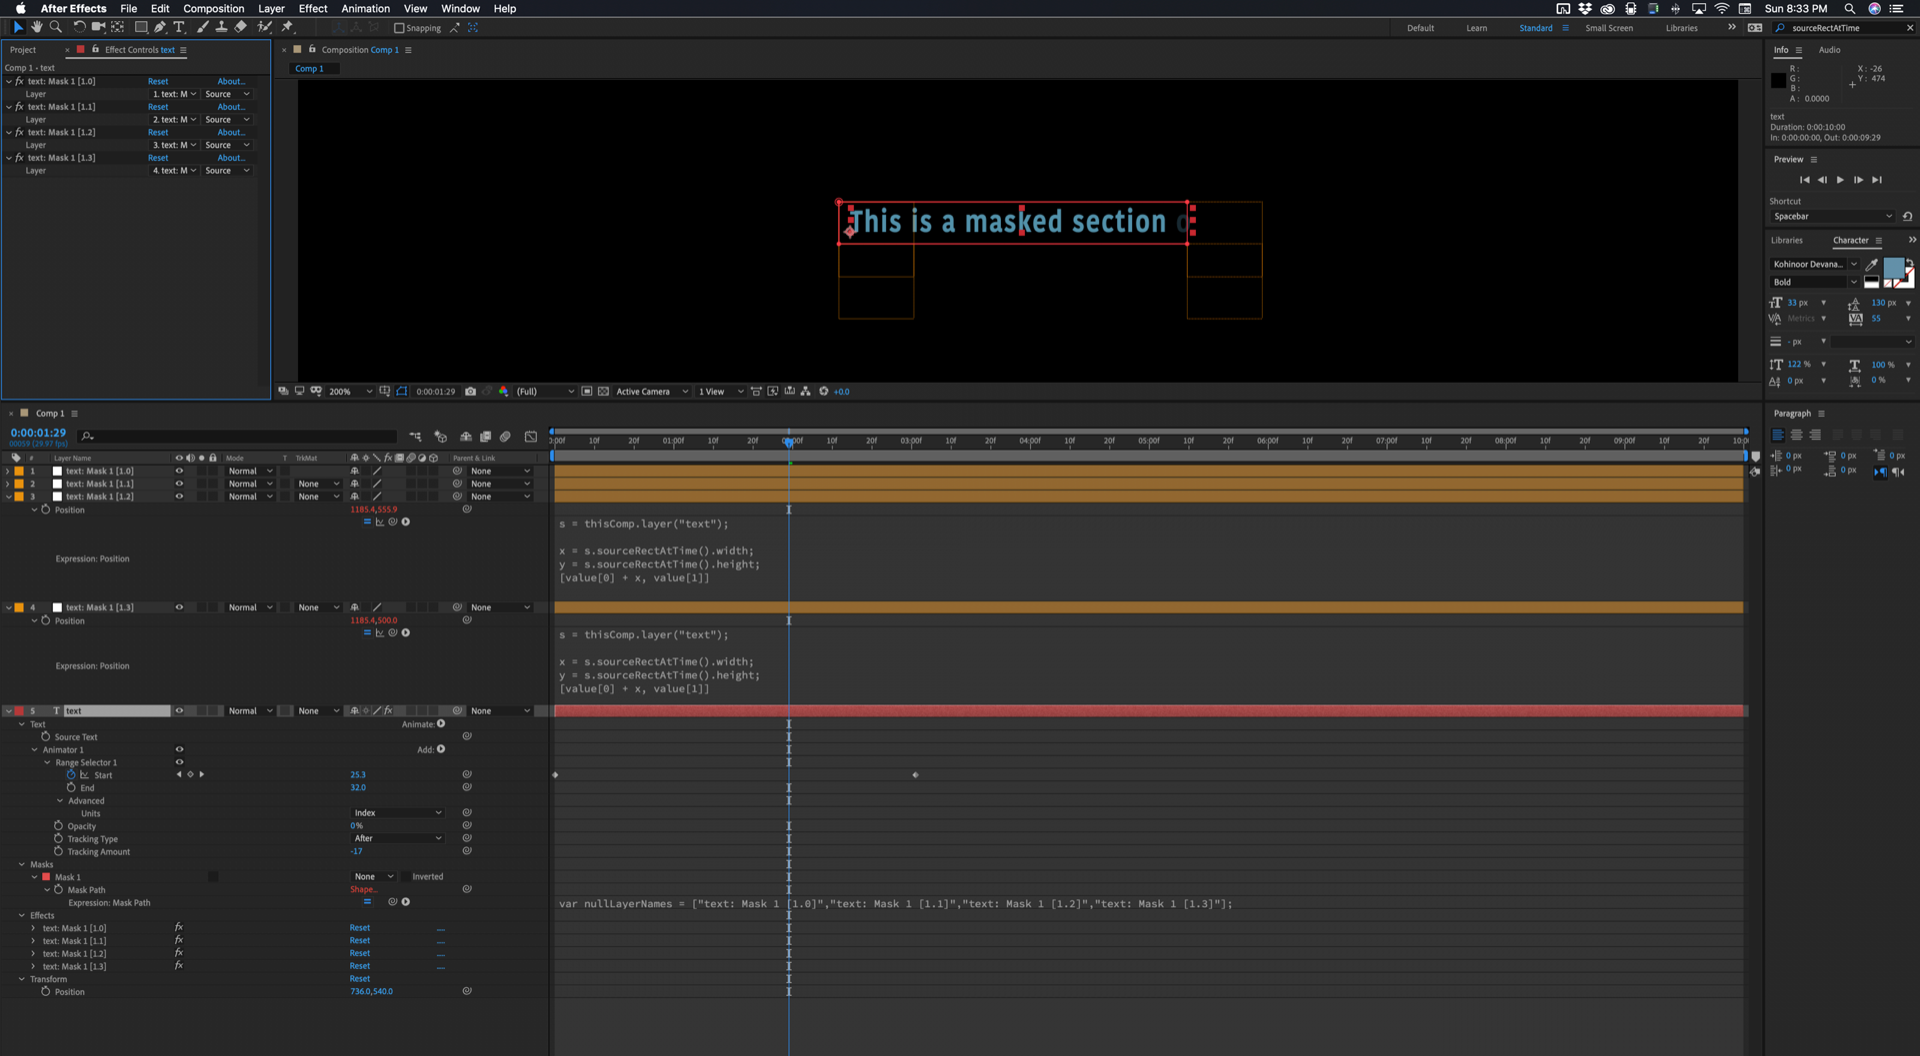
To make the text box expand as the letters were revealed I set tracking and opacity so that as each letter was revealed the tracking would return to normal and the letter would fade up.
This would e a lot easier if you just used sourceRectAtTime() to control the size of a shape layer that you could use as a track matte. If you wanted to actually reveal the text and create a stroke around the text box then simply putting two shape layers above the text layer, the one just above the text layer with a fill used as a track matte, and the other as a stroke only, then animate the size of the rectangle in both text boxes.
If all you want to do is reveal text or have it type on and put an expanding box around it it would take about 2 minutes to just animate the size of a shape layer to match the text. If you wanted to manually animate the mask and have the bar stick to one side of the mask then all you have to do is use the Create Nulls from Path script, pick Nulls Follow Path then parent a null on the right side to the edge of the mask.
If you want to create a MOGRT (motion graphics template) then you'll have to really complicate the expressions to add padding and either count the number of characters or use the tracking trick I used to get the text box to expand no matter how many letters are in the text box.
I did look at both of your examples and I'm not sure I understand exactly what you want to do. If all you are doing is writing on some text then a text animator can do that easily revealing each letter as it is typed on. You could even tie the x position of the colored bar at the end of the text to the range selector by adding the range selector value to the x position of the bar.
Please explain exactly what you are trying to accomplish. I could go on supplying you with solutions for another hour and still solve your problem because I don't clearly understand your design goal.
Copy link to clipboard
Copied
Please explain exactly what you are trying to accomplish. I could go on supplying you with solutions for another hour and still solve your problem because I don't clearly understand your design goal
Original animation -
If you change the text, make it larger or add letters, then the vertical bar flies and the mask for the text too. I want to make sure that the vertical bar passes the animation correctly depending on the length of the text.
If you add text, you get this -
Copy link to clipboard
Copied
And another question, how did you divide the mask into 4 points? (4 layers of yellow you have)
Copy link to clipboard
Copied
Here's what I would do.
- Create a text layer with everything centered and the paragraph style set to Centered. The baseline shift should be adjusted so that the line of text is centered over the Anchor Point.
- Search the Effects and Presets panel for "Typewriter" and apply it to the text layer.
- With the selection tool active (v) make sure the text layer is selected and press UU to see what has been added. You'll see a text animator has been added and under the Range Selector you will see two keyframes and an opacity setting. As you scrub through the timeline you'll see the letters appear one by one just like you would see with an animated mask but with a lot less work.
- Adjust the timing of the keyframes to get the timing you want for the animation
- Download this animation preset: Dropbox - Auto Cursor for typewriter.ffx
- Make sure no layers are selected and the text layer is at the top of the timeline then go to Menu>Animation>Apply Animation Preset and browse to the downloaded preset
- You'll end up with a comp that looks like this:
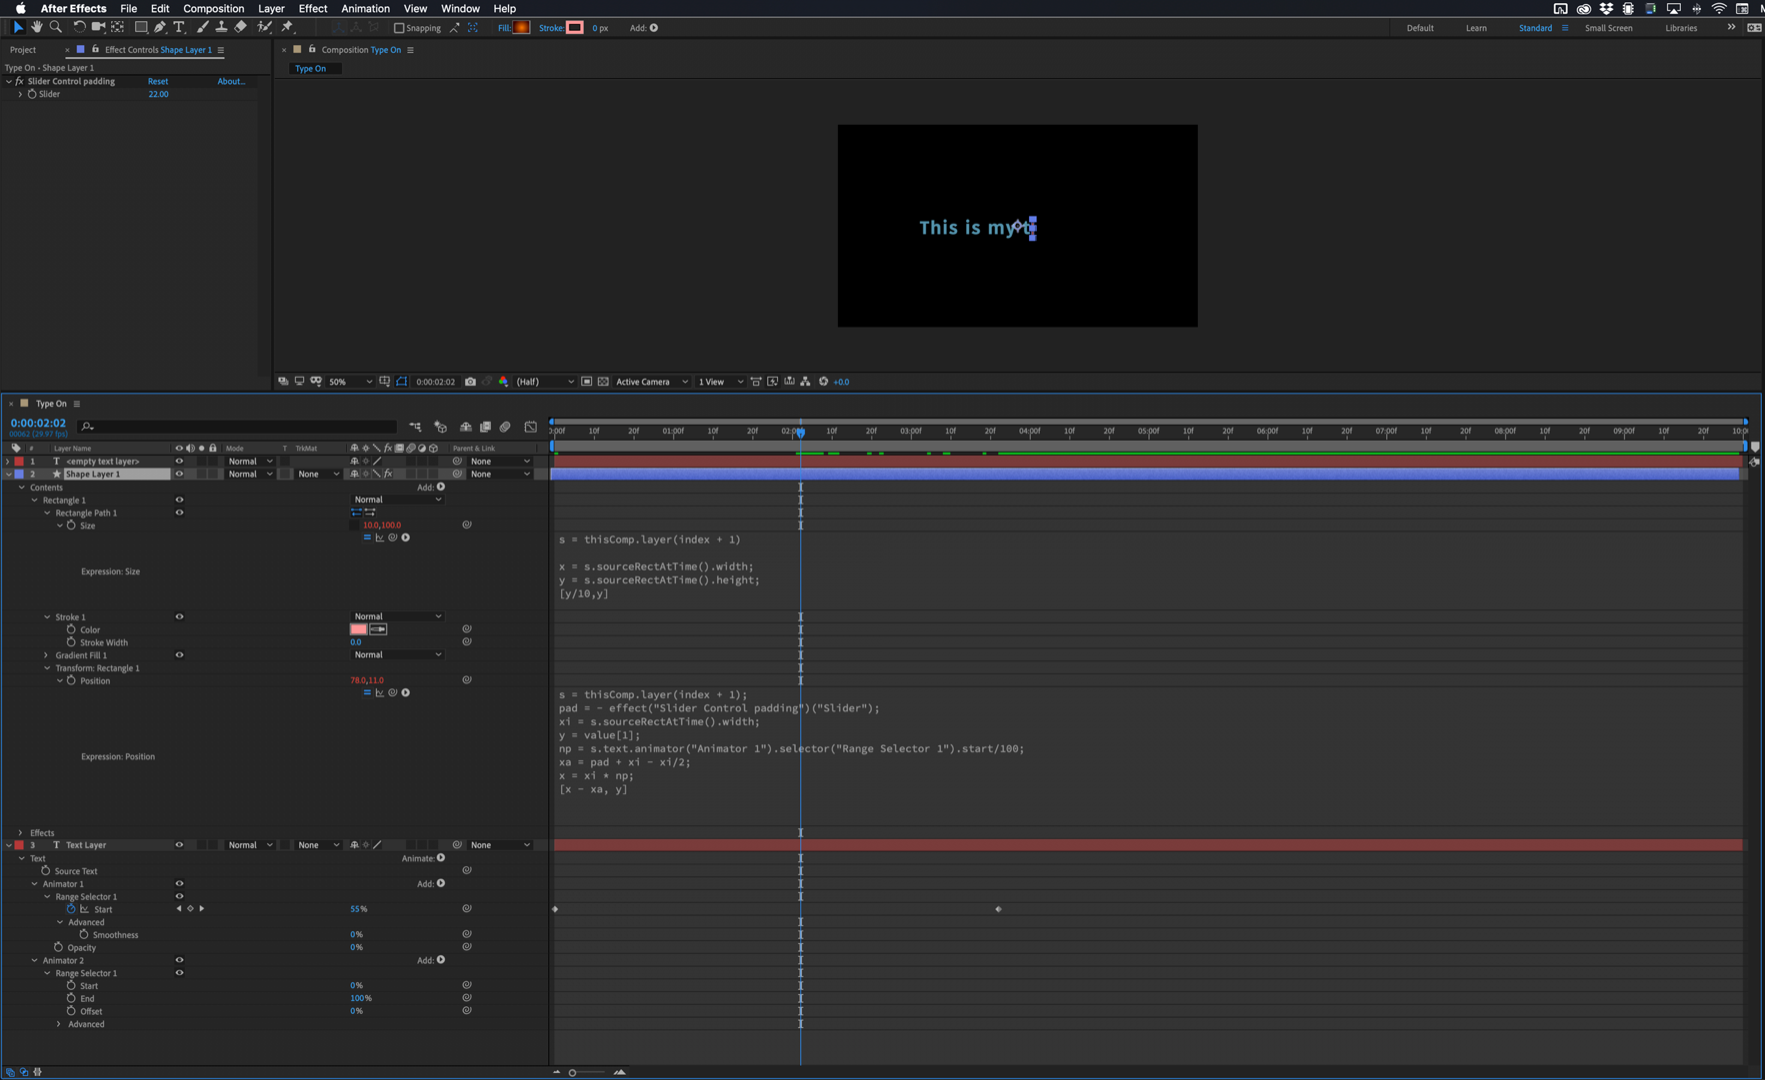
A shape layer has been added to the timeline. It is looking for a text layer below so that it knows what to do. There are three effects control sliders added to the layer that let you modify the padding for the cursor that has been created with a gradient filled rectangle and expressions that control the height of the rectangle and the Transform Rectangle 1> Position property.
Let me explain what the expressions do. The first expression applied to the size of Rectangle 1. This is what it looks like:
s = thisComp.layer(index + 1);
ha = effect("Cursor height")("Slider");
x = s.sourceRectAtTime().width;
y = s.sourceRectAtTime().height;
[y/10, y + ha]
The first line looks for a text layer that is one layer below the current layer and defines that variable as "s."
The second line, "ha" looks at the Cursor Height slider that is used to adjust the height of the rectangle.
The third and fourth line define the height (y) and width  of the text box formed by the text in the layer below using the sourceRectAtTime method.
The last line is the array that defines the height of the rectangle that makes up the cursor. The rectangle starts off the with the X and Y dimensions set to the height of the text rectangle so it is square, but the width, the x value is also divided by 10 so the cursor is 1/10 as wide as it is high no matter how high the source rectangle is.
That takes care of the size of the rectangle. The next expression is applied to the end point of the gradient fill. The start point default is zero which is in the center of the rectangle so this expression simply moves the End Point to the center of the bottom of the rectangle. It just uses the height of the rectangle divided by 2 to move the End Point down to the bottom. The center of the Rectangle 1 is zero and the other part of the array is the new Y value. You should be able to figure out what is going on here:
[0, content("Group 1").content("Rectangle Path 1").size[1]/2]
The last expression is a bit more complicated but it should be easy to understand. Here it is:
s = thisComp.layer(index + 1);
pad = - effect("Cursor Padding")("Slider");
posAdj = effect("Y Position")("Slider");
xi = s.sourceRectAtTime().width;
y = value[1];
np = s.text.animator("Animator 1").selector("Range Selector 1").start/100;
xa = pad + xi - xi/2;
x = xi * np;
[x - xa, y + posAdj]
Copy link to clipboard
Copied
perfectlines1 wrote
And another question, how did you divide the mask into 4 points? (4 layers of yellow you have)
The mask was created with the rectangle tool, and as I said, I used the new Create Nulls From Paths.jsx available under the Window menu to attach the four mask points to nulls. There is a lot of good information on how to use this new script panel in the user guide.

 AdChoices