


Copy link to clipboard
Copied
Hello all. I am new to working with after effects and trying to learn tracking effects. So I have an idea which may be ambitious. But I am trying to create a scene where as I rotate around this person, words pop up in 3d space. But they stay there as the camera continues to pan. What would really be ambitious is to do this and then at the end of the scene, back all the way out and see the person with all the words in the space in a wide shot. however it seems like the tracker is having issues tracking the orbiting shot. I'm hoping to get some advice and help with this concept. Thank you.
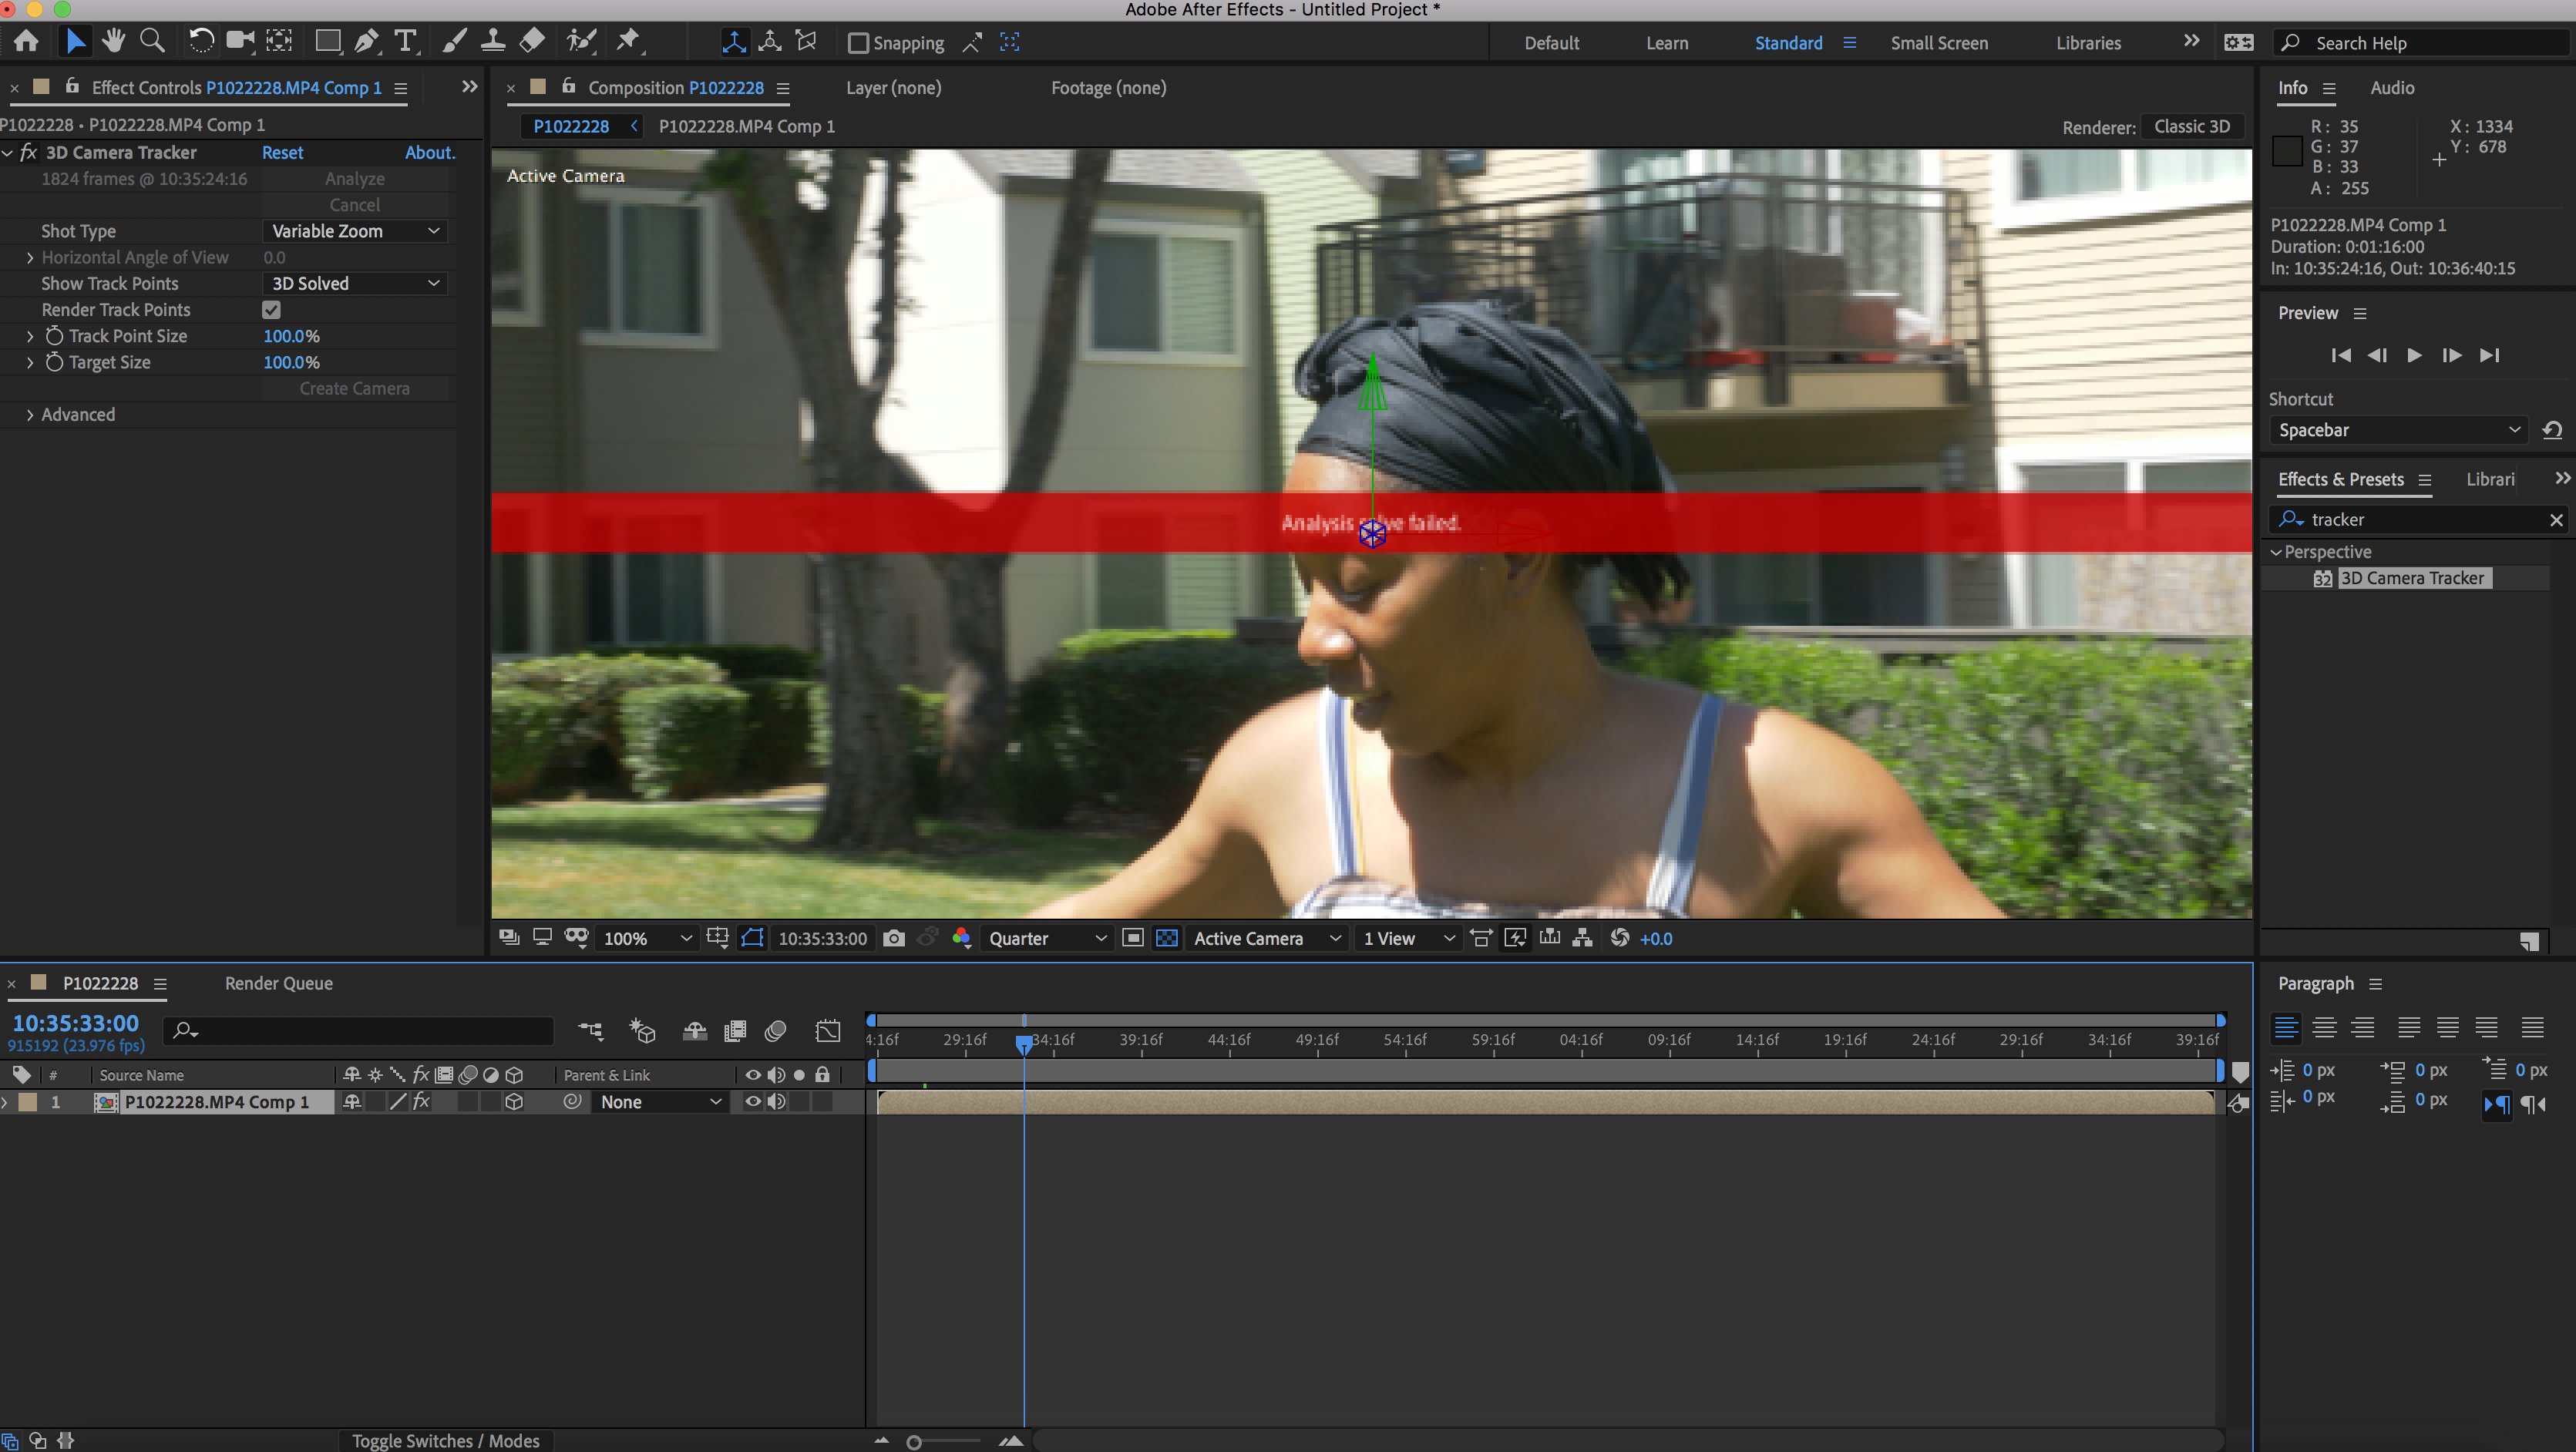
i attached a youtube clip which is serving as a test clip to practice the effect. and a screenshot of the error message I am running into.


 1 Correct answer

I do not usually spend this much time answering a post but your shot is such a good example I'm going to use it in the first draft of a tutorial I am working on for an advanced training series that I will be releasing soon.
Your first problem is that the shot is way too long. Even with some expensive 3rd party software, you are going to have to cut the shot up into sections and camera track each section individually. The camera moves continuously around the dancer and you want words to pop up lik
... 3
Replies
3
3
Replies
3

Copy link to clipboard
Copied
No dice. The camera is too close in, the surroundings don't consistently offer enough tracking features and the motion of the lady of course will massively throw off the tracker, too. this is beyond AE's 3D tracker. If at all it would require working in an advanced dedicated tracking tool like SynthEyes to place manual markers and reconstruct the 3D scene in full, but even there it may not be a walk in the park as you might need to mask out the dancing stuff so it's ignored by the actual tracking algorithms.
Mylenium
Copy link to clipboard
Copied
I do not usually spend this much time answering a post but your shot is such a good example I'm going to use it in the first draft of a tutorial I am working on for an advanced training series that I will be releasing soon.
Your first problem is that the shot is way too long. Even with some expensive 3rd party software, you are going to have to cut the shot up into sections and camera track each section individually. The camera moves continuously around the dancer and you want words to pop up like they were attached to some object or surface in the real world. Each word that pops up is only going to be in the frame for a few seconds so you need to break the shot up into small enough sections that you can track. Your shot is about a minute and fifteen seconds. That is an eternity in a video and any audience other than your closest family and friends are going to tune out after about eh first 20 seconds unless something happens in the frame that is incredibly engaging. For the final video, you may want to re-think the blocking and camera work to make the project much more interesting. If you are really stuck with a single shot that is over a minute long you are going to have to break it up. That will greatly improve the chance of getting a successful camera track for the smaller sections that you can then combine into a single long shot.
The first step is to trim the footage to just the frames you want to use in the final shot. This is important in every AE project. After Effects is a visual effect and compositing app. It's not a video editing app and every effect shot that you create should be limited to the frames that are needed for the final production. You'll edit the final movie in an NLE like Premiere Pro. Maybe I can explain better with screenshots.
After Trimming the shot in the Footage Pannel by double-clicking the footage in the Project Panel and setting in and out points create your master comp by using the file menu:
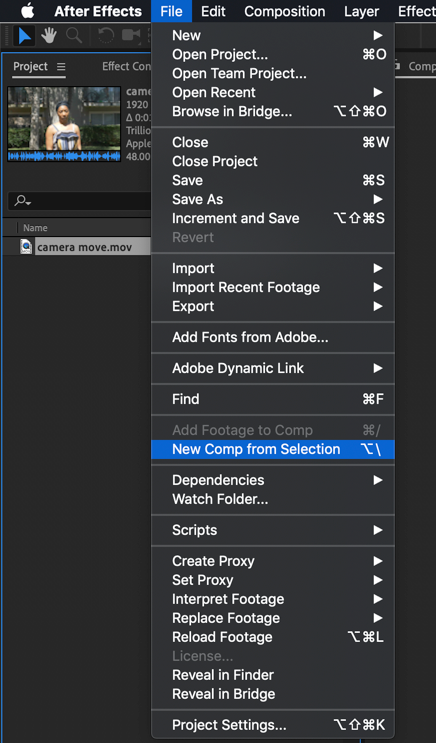
This will give you a composition that matches your video's specifications. I took the liberty of creating a Pro-Rez copy of your footage and I'm going to give the project a try for at least one shot and show you the steps. I'm doing something like this for an advanced After Effects training course using my own footage, but I'll substitute yours and show you the steps.
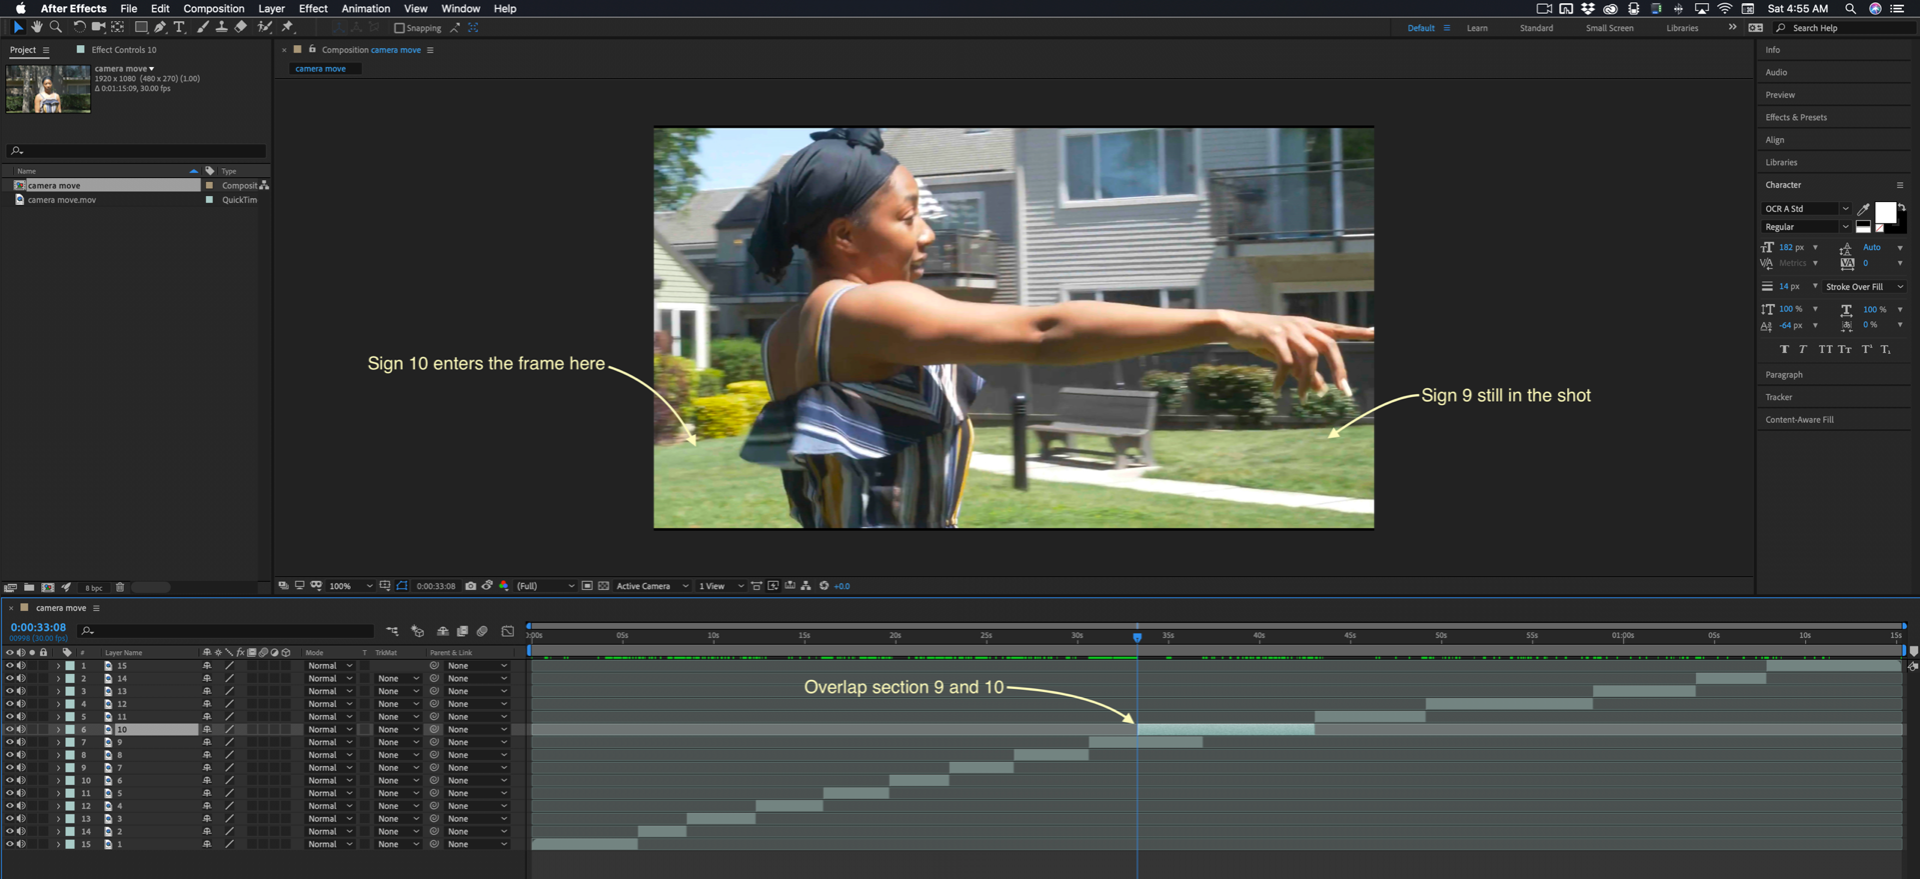
Now you have a comp that contains the final show without effects. The next step is to scrub through the video and decide where the first sign is going to pop up and then figure out where it will go out of frame. You split the layer at every in and out point for every sign you want to pop up in the video. If one sign is going to overlap another you have to create a separate cut. Some of the sections may overlap. You can use the Keyboard shortcut Shift + Ctrl/Cmnd + D to split the layers and then drag the in and out points as needed for the overlaps. You'll end up with a master comp that looks something like this:

If you want the sign in section 10 to pop up before section 9 ends so there are two signs in the final shot at the same time you have to overlap the in and out points like this:
When you have all of the sections edited you pre-compose each layer making sure that you select Move all attributes, Adjust duration and Open New Comp so you'll be ready to move on to motion tracking:

Always use the Track Motion workspace and for most shots, you want to select Advanced options in the motion tracker.

I got a successful camera track first time on section 10:
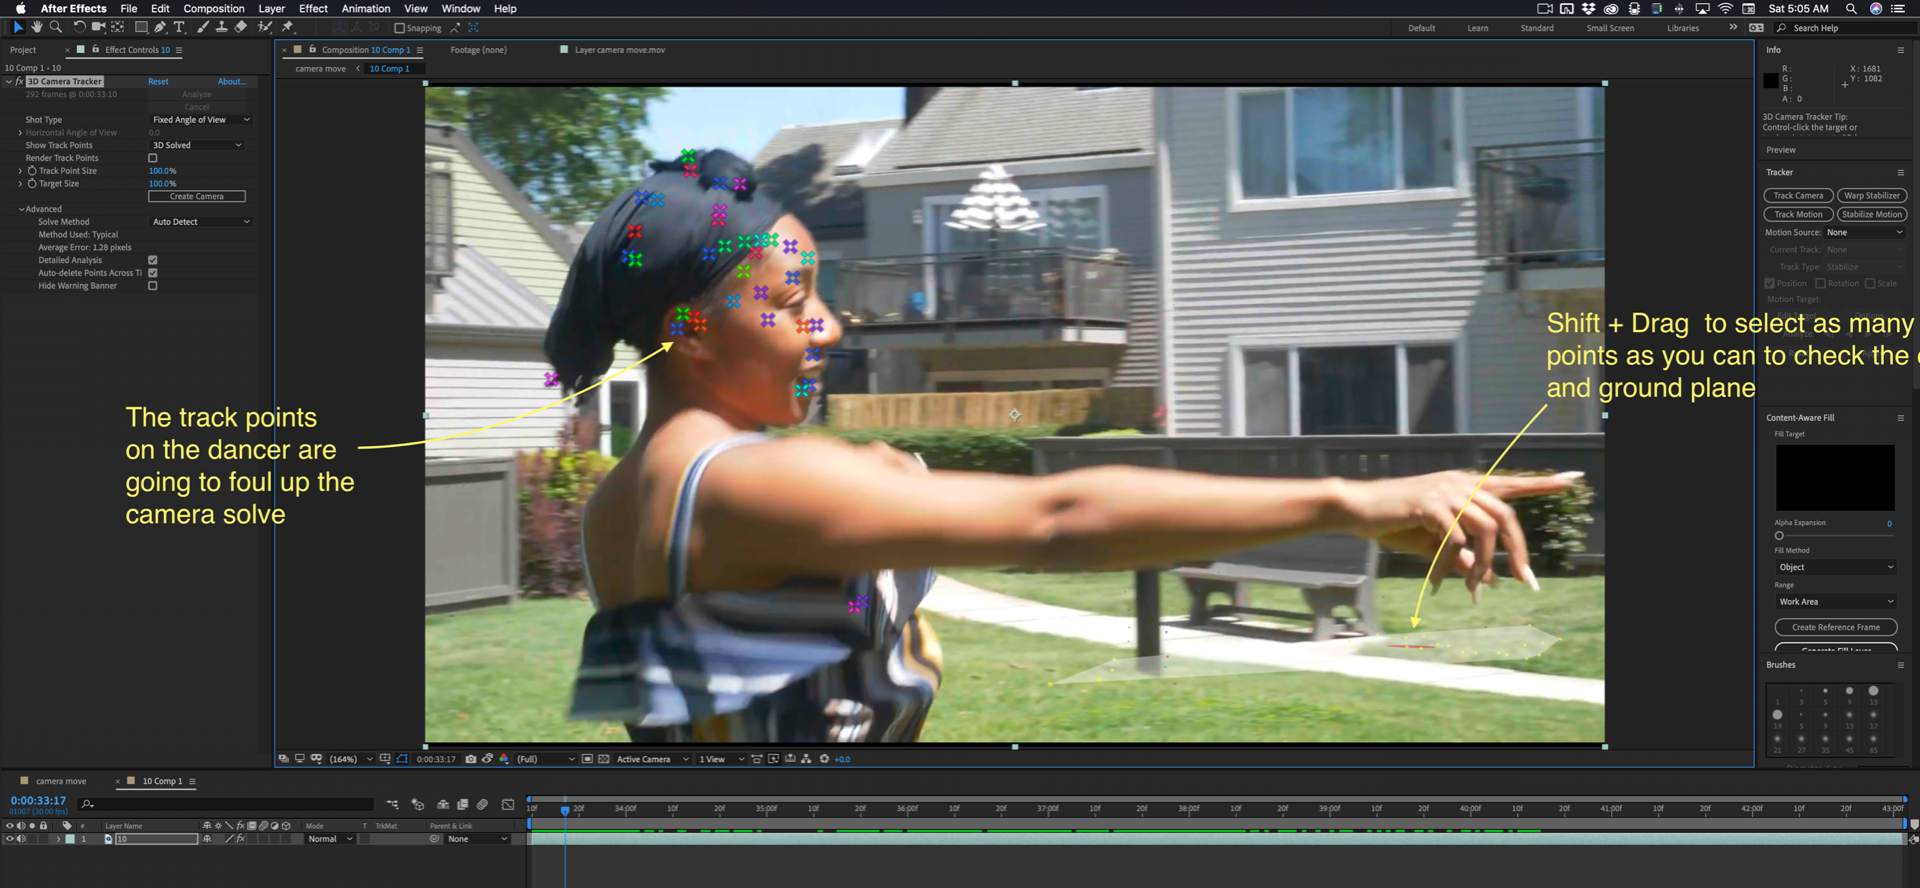
I found a point where I could shift select the tiny tracker points on the ground and get something that looked like a good origin and ground plane for the camera but there are a lot of track points on the dancer that has to be removed. If you have Auto Delete Points across time selected this is going to be easier but you have to go through the shot a few frames at a time and get rid of as many of the track points on the dancer as you can.

Select them by dragging around them then delete. The camera solve will restart after each set of track points is removed.
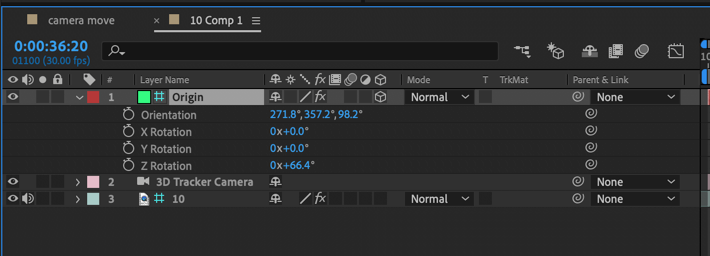
The next step is critical. You must establish an origin and ground plane, add a camera and a reference solid before you attempt to place your first sign. Sometimes it helps to increase the size of the track points, but the procedure is to select as many points as you need to select on the ground plane, then move the Target into position and size it up using the keyboard shortcut Alt/Option + drag so you can set an origin and ground plane.

When the target looks right, set the Ground Plane and Origin:

Then. immediately create a solid and a camera. Your comp will look like this:

The next step will help you place the sign and verify the accuracy of the camera track. Select the solid, press Shift + Ctrl + Y to open the solid properties and resize it. I need this reference solid to be big enough to cover more of the ground so I increased the size by 400%. Then I added the Grid effect and adjusted the width and color of the grid to let me check the track. I also adjusted the Z rotation to align the grid with the fence on the left so I could check the track against known geometry. The comp now looks like this and the track is good:

If you skip this step you will make it very difficult to accurately place your signs and end up with a believable track. The Track Solid 1 - Ground plane and origin is critical to the rest of the process. Pay attention to the next part. We don't want to end up with the Ground Plane solid in the final render, and we don't want the footage in the main comp, all we want is the camera and the camera. Set the Track 1 solid and the Footage layer to guide layers. This will keep them visible but keep them from rendering. The timeline will look like this:
The next step is to figure out where you want the sign to pop up. I want to use this post and replace it but there are no tracker points that give me a good target:

The solution is to create a new shape layer using the Rectangle tool and draw a rectangle that is about the same size and shape as the post. We're going to edit that layer. Select the Rectangle tool and drag a new shape around the post. Set the anchor point at the base of the post, then to make things easier later set the blend mode to something like Overlay. You'll get something like this:

Here comes the fun part. Make the shape layer 3D, name it Sign 10, and hold down the Shift key and parent the layer to the Origin layer. When you make it 3D it will probably disappear, when you hold down the shift key and parent it to the Origin layer it will be moved to the same position rotation and orientation. It's going to look a lot smaller, but we'll fix that.

The next step is to resize the rectangle using size, not scale and rotate it 90º in X and adjust the Y and Z rotation and drag it into position selecting only X and Y handles with Local Axis selected for the Move tool (v).

Sometimes it is easier to line things up with the Origin layer if you use the Ellipse tool to draw a mask around the geometry you want to attach the layer to. Now the comp looks like this:

undefinedCheck the placement of the Sign 10 layer, then you can either add a vector graphic or use the pen tool to draw a sign directly on the shape layer. If you are adding a vector graphic you use the shift + parent trick to move the 3D sign layer to the same position as the Sign 1 layer. The rectangle is deleted and the new sign looks something like this:
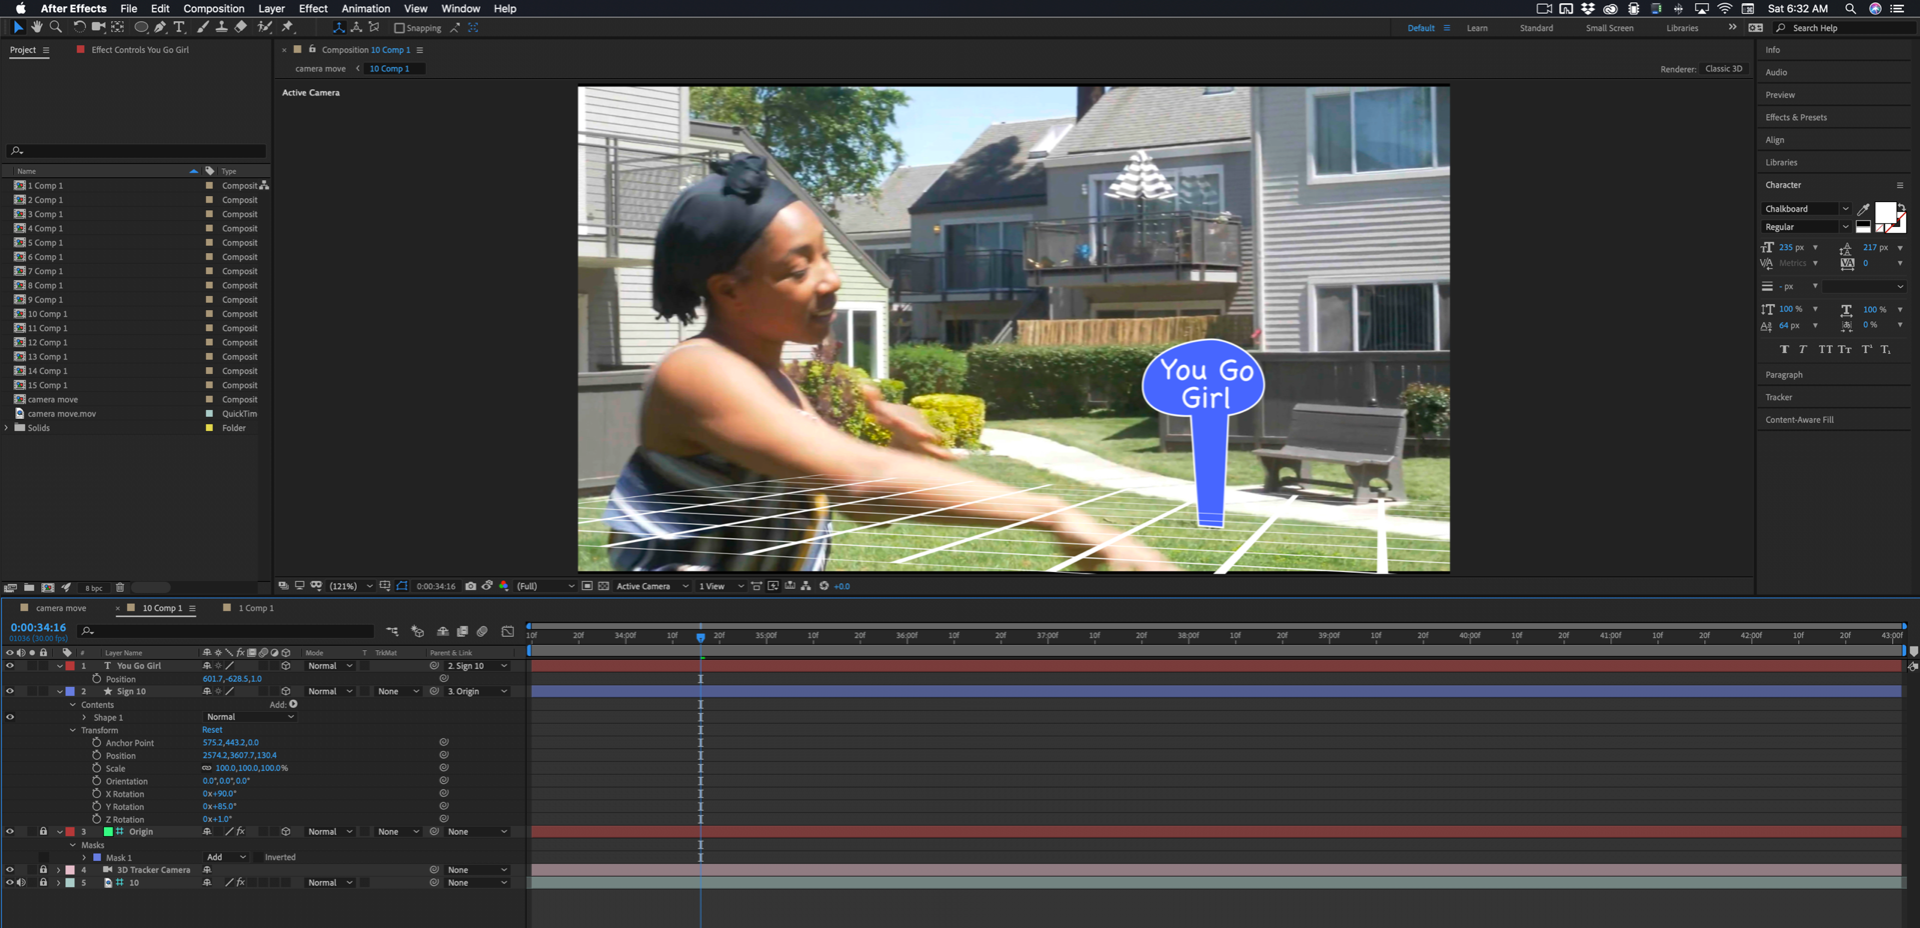
I have just drawn a simple shape with the pen tool, added a text layer, made it 3D, Shift + parent to the sign, then adjusted the position and rotation so that it is properly aligned and the Z position is 1 pixel in front of the sign layer. You should also notice that I have locked the footage, camera, and origin layers to prevent them from being accidentally moved.
Ok, sign 10 is complete. Just repeat the same procedure for all of the signs you want to include in the shot.
undefinedWhen you get back to the main comp because the Origin layer and the footage layer are guide layers you won't see any footage. You have to add the footage layer to the bottom of the comp, then duplicate the footage and put the duplicate on top and name it roto. You'll have to rotoscope the top layer to cut out the dancer so she passes in front of the signs as they move through the shot. The final comp will look like this:
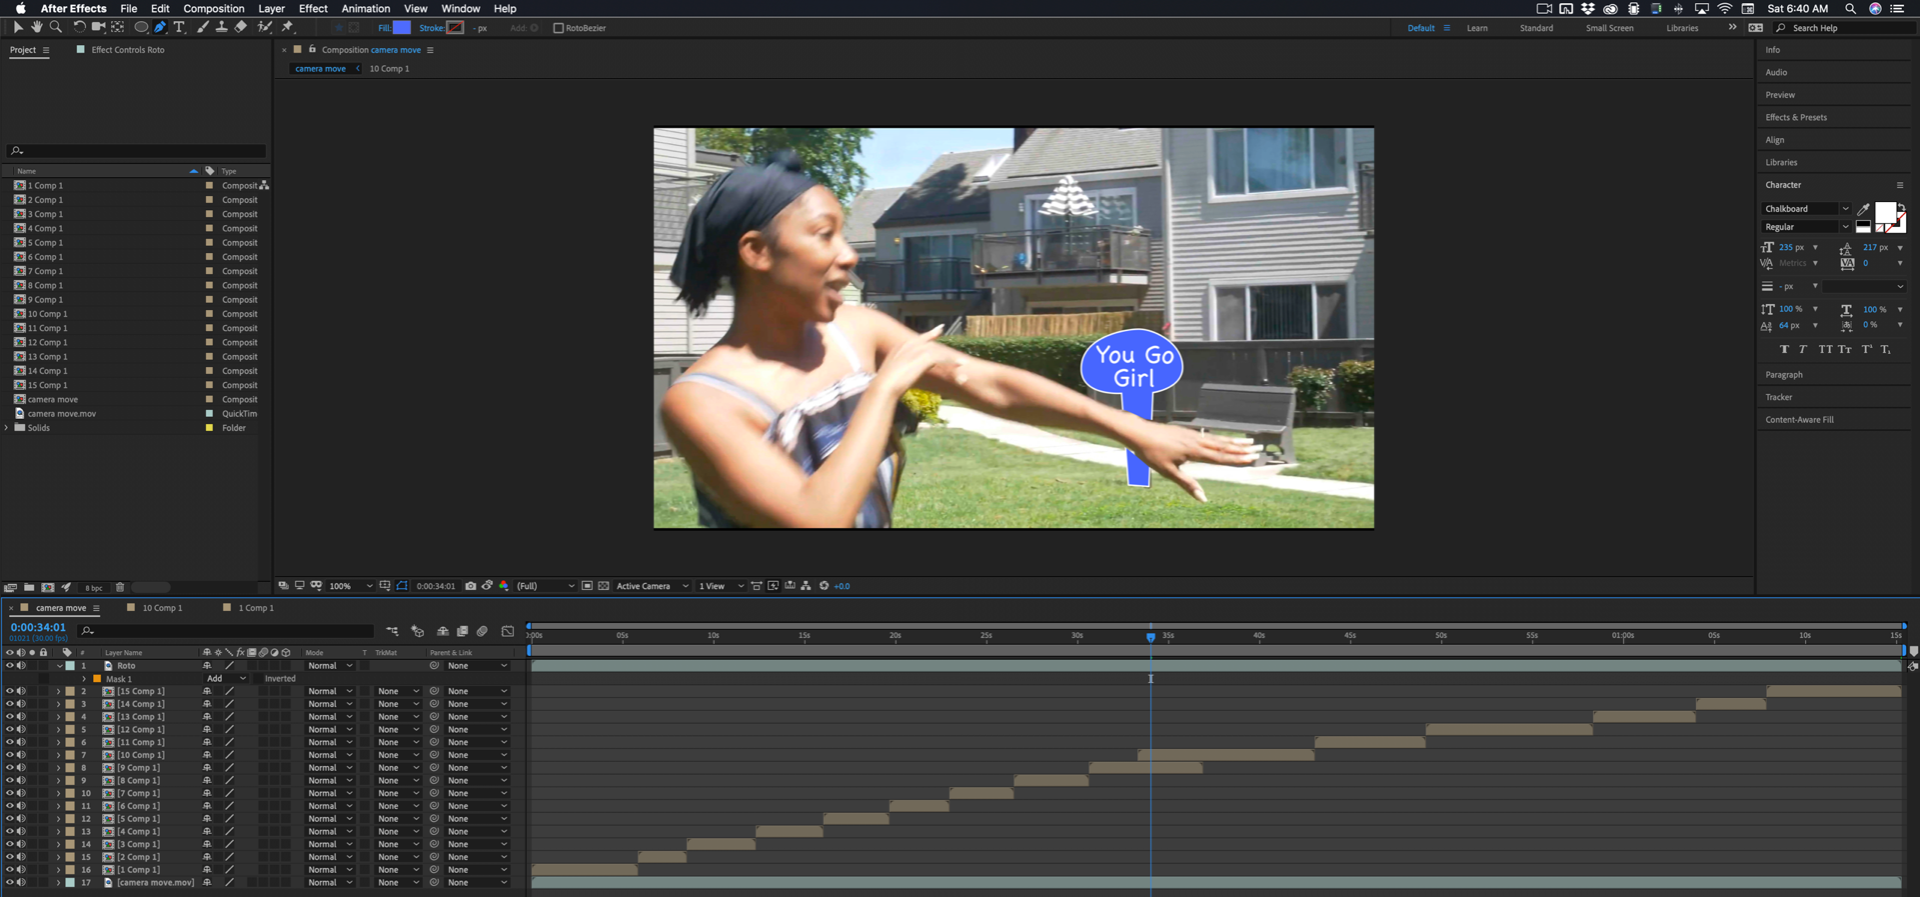
I started this post and working on this project about two and a half hours ago. About 40 minutes of that time was devoted to writing and editing screenshots so Sign 10 took about an hour and a half and I have a lot of experience. I also only drew one mask for demonstration purposes to show the roto. If you want to put 15 signs in the minute and fifteen shot you'll probably need about 30 to 40 hours.
This kind of work is tedious and time-consuming and the only thing you can do to speed it up is to carefully plan your shots, block your actors, skilfully execute the camera moves, and control the background so you can speed up the roto work. Your footage is not impossible to work with. There are solutions to almost every section of the shot, but if the shot was carefully planned and the final product pre-visualized you could save yourself a bunch of time.
Your footage is a good example of how to save a poorly planned motion tracking shot. It would be a good example to show to anyone planning this kind of shot.
Copy link to clipboard
Copied
Wow, thank you so much for taking all the time to help with this! Greatly appreciated! I will take some time to go over this and learn what you have taken the time to share. I'm sure this tutorial will be helpful to others also.
Just to kind of give you a better idea of my thoughts behind this shot, my idea is actually for a music video concept. The lady in the picture(my wife) is there taking the place of where the artist would be. So it wouldn't just be one continuous shot but cuts back in forth from this shot to others. My vision is when I would cut to this shot, lyrics from the song would pop up in the shot and would stay there in the space as the camera pans. And each time it cuts back the previous words would still be there. And then at the end of the song, I would back out and would (with the camera) and all the words and the artist could be seen as the video ends.
I mostly work in premier but I've been trying to learn AE more lately. I know this is probably an advanced idea but I want to learn if pointed in the right direction of how I could possibly pull this off. Thanks again!

Get ready! An upgraded Adobe Community experience is coming in January.
Learn more
 AdChoices